Page is loading ...

La Crosse Technology, Ltd. Page 1
WS-8120U-IT FAQS
The links below will work in most PDF viewers and link to the topic area by clicking
the link. We recommend Adobe Reader version 10 or greater available at:
http://get.adobe.com/reader
CONTENTS
WS-8120U-It FAQS ............................................................................................................ 1
Clock Factory Restart ............................................................................................................. 1
Outdoor Temperature Transmitter ............................................................................... 2
Compatible Outdoor Transmitters .................................................................................... 2
Fahrenheit/Celsius .............................................................................................................. 2
Dashes shown for Outdoor Temperature ........................................................................ 2
Inaccurate Outdoor Temperature Reading ..................................................................... 3
Intermittent Outdoor Temperature .................................................................................. 3
MIN/MAX Temperature readings ...................................................................................... 3
Sensor Stop Mode ............................................................................................................... 4
Outdoor Transmitter Fell and No Longer Works ............................................................ 4
Mounting/Positioning Outdoor Transmitter .................................................................... 4
Distance/Resistance/Interference .................................................................................... 5
Clock ........................................................................................................................................ 5
Power Requirements .......................................................................................................... 5
Does the Clock Have a Backlight? ................................................................................... 5
Manual Set Time ................................................................................................................. 6
Clock goes blank in low light ............................................................................................ 6
Inaccurate Indoor Temperature Reading........................................................................ 7
Clock Has Distorted Display .............................................................................................. 7
Clock Factory Restart
Note: If using Alkaline Rechargeable battery place solar panel under light
source for 6 hours with rechargeable battery in place to charge.
For best results please bring the outdoor sensor in the house and place 5 feet
from the display unit.
Remove the battery from clock. Place switch to Battery mode. Do not
attempt to remove batteries from solar sensor.
With the power source removed, press one of the buttons on the display at
least 20 times to clear all stored power. Please do this even if the display is
blank to remove any remaining power. Verify the display is blank.
Place the display face down on a clean cloth to prevent the solar panel from
providing power.

La Crosse Technology, Ltd. Page 2
It is important with most of our displays to remain without power for at least
15 minutes.
Note: Failure to allow a display to rest for 15 minutes can result in failure to
connect with the outdoor sensor or missing segment on the display. The
instruction manual describes a setup for a new unit that has not had time to
build up stored power.
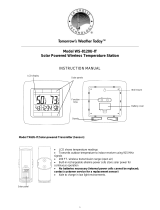
GENTLY PUSH the RESET button on the TX62U-IT sensor. All LCD segments
will light up briefly. The code number and the security code ('20' for
example) of the model will be displayed followed by the battery voltage will
be shown on the LCD then the current temperature.
Note: Voltage needs to be higher than 2.5V to maintain normal operation. If
the voltage is below 2.5V, place the TX62U-IT in a window in the full sun for
a day or two.
DISPLAY NEXT:
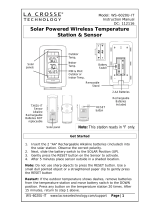
Note: Start with the Battery Switch in the Battery position.
*RECHARGEABLE ALKALINE BATTERY (charged by solar panel): Install
Alkaline Rechargeable battery. Move battery switch to the right.
Allow the sensor and display to remain 5 feet apart for 15 minutes to
establish a strong connection. Do not press buttons at this time. You should
see a reading on the outdoor temperature area in the first minute.
OR
*PLAIN ALKALINE BATTERY:
Please be sure you are using fresh batteries tested to a minimum of 1.48, on
a voltmeter that reads in numbers.
Install batteries into the display according to the diagram in the battery
compartment. Leave switch to the left.
Allow the sensor and display to remain 5 feet apart for 15 minutes to
establish a strong connection. Do not press buttons at this time. You should
see a reading on the outdoor temperature area in the first minute.
Outdoor Temperature Transmitter
Compatible Outdoor Transmitters
The TX62U-IT and the TX62UTH-IT sensors (915MHz) are compatible with this
station.
Fahrenheit/Celsius
This clock reads in Fahrenheit only.
Dashes shown for Outdoor Temperature
Dashes means the connection is lost between the clock and the outdoor
transmitter.
Distance/Resistance can cause loss of sensor signal. If possible avoid more than
1 wall, window, tree etc., between the display and the sensor. UV coated
windows may actually reflect the signal. Stucco walls will absorb the signal.

La Crosse Technology, Ltd. Page 3
If the sensor display is blank, place under a lamp for 24-hours to charge.
Voltage needs to be higher than 2.5V to maintain normal operation. If the
voltage is below 2.5V, place the TX62U-IT in a window in the full sun for a day
or two (or under a lamp). Complete a restart.
It may be helpful to orient the Display 90 degrees towards the sensor for better
reception.
Try repositioning the sensor or the display for better reception.
Inaccurate Outdoor Temperature Reading
The outdoor transmitter reads the environment. When mounted in the home it
will read inside temperature.
When the transmitter reads high during the day but not at night it is a
positioning
problem.
Side-by-side test: Bring the outdoor transmitter in the house and place it next
to the clock for 2 hours.
Compare indoor and outdoor temperature. The temperatures should be within 4
degrees to be within tolerance. See the section on accuracy
for details.
If the transmitter reads correctly when next to the clock then try a different
location outside.
Look for heat sources such as sunlight, door or window frames, or reflected
heat.
Intermittent Outdoor Temperature
RF (radio frequency) communication may come and go occasionally. This can be
normal in some environments (e.g. moister climates). If transmitter signal is
lost, please wait 2-4 hours for the signal to reconnect on its own.
Move the outdoor transmitter to a closer location.
Freezer test: Confirm the clock is reading the correct outdoor transmitter.
Place the transmitter in the freezer for an hour and watch the temperature drop
on the clock.
Indoor distance test: Please complete the restart
with transmitter and clock
5-10 feet apart and inside to establish a strong connection.
After 15 minutes if there is a reading in the outdoor temperature area, move the
transmitter to another room with one wall between the transmitter and the
clock. Observe to see if the Temperature remains on consistently for 1-hour.
If the temperature remains on while in the house then it is likely a
distance/resistance
issue. Move the transmitter to different locations outside to
find a location where the temperature reading will hold.
Distance/Resistance can cause loss of transmitter signal.
Voltage needs to be higher than 2.5V to maintain normal operation. If the
voltage is below 2.5V, place the TX62U-IT in a window in the full sun for a day
or two (or under a lamp).
MIN/MAX Temperature readings
This station will show the minimum and maximum temperatures from setup, until
you reset the min/max temperatures or remove the batteries from the station. If

La Crosse Technology, Ltd. Page 4
you wish a 24-hour min/max reading, reset the min/max temperatures at the same
time each day.
VIEW MIN/MAX READINGS:
Press and release the PLUS button to view outdoor MIN/MAX readings, then indoor
MIN/MAX readings then return to the normal display.
RESET MIN/MAX READINGS:
Press and hold the PLUS button for 5 seconds to reset both Indoor and Outdoor
MIN/MAX readings to current temperature.
Sensor Stop Mode
Place the sensor into Stop mode: Hold your hand over the solar panel for 10
seconds and gently key the reset. The sensor display will say STP then go blank.
Activate the sensor at any time by gently keying the reset button.
Outdoor Transmitter Fell and No Longer Works
First charge the sensor under a lamp for 24-hours. Then, try the restart with the
station. Often a sensor was just shocked and may reconnect with a proper
restart.
Mounting/Positioning Outdoor Transmitter
Mount outdoor temperature transmitters vertically and under a bit of an
overhang.
Protect the outdoor transmitter from standing rain or snow, and from the
overhead sun, which can cause it to read incorrectly. Generally, mounting under
an eave or deck rail works well.
Construct a small roof or box for the transmitter if you do not have an overhang.
Please be sure the box is vented.
The solar sensor charges best when mounted on the East side of the house so it
can receive
cool morning sun to stay charged.
Mount at least 6 feet in the air for a strong signal.
Outdoor transmitters are water resistant but not water proof.
Avoid more than one wall between the transmitter and the Clock.
Do not mount near electrical wires, transmitting antennas or other items that
will interfere
with the signal.
RF (radio frequency) signals do not travel well through moisture or dirt.
Place the outdoor transmitter and the Clock in the desired shaded locations, and
wait approximately 1-hour before permanently mounting the transmitter to
ensure that there is proper reception.
Do not mount the transmitter on a metal fence. This significantly reduces the
effective range.
Voltage needs to be higher than 2.5V to maintain normal operation. If the
voltage is below 2.5V, place the TX62U-IT in a window in the full sun for a day
or two (or under a lamp).

La Crosse Technology, Ltd. Page 5
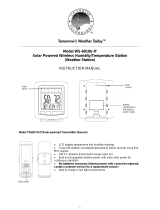
MOUNT
Choose a location for the transmitter that is within range
of the clock and under
an overhang for accuracy.
Install one mounting screw into a wall leaving approximately ½ inch (12.7mm)
extended.
Place the transmitter onto the screw, using the hanging hole on the backside.
Gently pull the transmitter down to lock the screw into place.
Note: Always ensure that the transmitter locks onto the screw before releasing.
Distance/Resistance/Interference
Distance:
The maximum transmitting range in open air is over 200-feet (61 meters)
between the outdoor transmitter and the clock.
Consider what is in the signal path between the clock and the transmitter.
Consider the distance the clock is located away from other electronic in the
home.
Resistance:
Obstacles such as walls, windows, stucco, concrete, and large metal objects can
reduce the range.
When considering the distance between the transmitter and the clock (200 feet
open air) cut that distance in half for each wall, window, tree, bush or other
obstruction in the signal path.
Closer is better.
Do not mount the transmitter on a metal fence. This significantly reduces the
effective range.
Interference:
Consider items in the signal path between the transmitter and the clock.
Sometime a simple relocation of the transmitter or the clock will correct the
interference issue.
Windows can reflect the radio signal.
Metal will absorb the RF (radio frequency) signal.
Stucco is held to the wall by a metal mesh.
Transmitting antennas (ham radio, emergency dispatch center, airports, military
base etc.)
Electrical wires (utilities, cable etc.)
Vegetation is full of moisture and reduces signal.
Dirt: Trying to receive a signal through a hill is difficult.
Clock
Power Requirements
1-AA alkaline or alkaline rechargeable battery powers the clock
Does the Clock Have a Backlight?
No, this clock does not have a backlight.

La Crosse Technology, Ltd. Page 6
Generally, an a/c power cord is required for products to have a backlight.
This clock does not use a/c power cord.
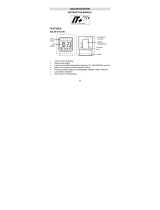
Manual Set Time
There are two function keys located on the reverse of the unit: SET and +
(PLUS). To begin hold the SET button until the display flashes. Press and release
the PLUS button to change a value. When you press and release the SET button
after each step, you will be moved to the next step.
1. HOUR: The Hour will flash. Use the PLUS button to set the Hour. Be sure to
set the Hour for AM or PM. Press and release the SET button once.
2. MINUTES: The Minutes will flash. Use the PLUS button to set the Minutes.
Press and release the SET Button once.
3. SOLAR MODE: SOL will show with either ON or OFF flashing. The Solar Mode is
used for saving the power consumption of the rechargeable battery (Default
setting ON).
4. Press the PLUS button to switch between ON or OFF. Press and release the SET
button once.
Note: If the solar mode setting is ON:
LCD will automatically turn OFF if the environment is too dark
LCD will automatically turn ON if the environment is bright enough;
the surrounding environment brightness is checked every 5 seconds
No information will be displayed when the LCD is OFF, but all the settings and
operations will remain, except for the temperature and humidity measurements.
If the solar mode setting is OFF:
LCD will remain ON constantly.
Solar Mode in the Program Menu is not related to the batteries.
Clock goes blank in low light
SOLAR MODE: The Solar Mode is used for saving power consumption of the
rechargeable battery (Default setting ON). The display will go blank in low light.
This is a setting in the program menu that can be turned OFF.
When the solar mode setting is ON:
• The surrounding environment brightness is checked every 5 seconds.
• LCD will automatically turn OFF if the environment is too dark.
• LCD will automatically turn ON if the environment is bright enough.
• No information will be displayed when the LCD is OFF, but all the settings and
operations will remain, except for the temperature and humidity measurements.
When the solar mode setting is OFF:
• LCD will remain ON constantly.
TURN OFF: scroll through your program menu until you see SOL ON. Press and
release the PLUS button to change that to OFF.

La Crosse Technology, Ltd. Page 7
Inaccurate Indoor Temperature Reading
Side-by-side test: Bring the outdoor transmitter in the house and place it next
to the clock for 2 hours.
Compare indoor and outdoor temperature. The temperature should be within 4
degrees to be within tolerance. See the section on accuracy
for details.
Look for heat sources such as sunlight, door or window frames, or reflected heat
of cold.
Clock Has Distorted Display
On a brand new clock, check for thin plastic films of printed scratch guard that
may be on the upper and lower screen of the clock. This thin piece of plastic has
printed numbers for store displays.
This film will be easy to peel off the LCD.
With all power removed the clock should be blank.
If numbers still appear, please check for scratch guard.
Check that the batteries are installed correctly.
This is generally a power related issue.
/