Pioneer VSX-329 Quick start guide

Category
AV receivers
Type
Quick start guide

This manual is also suitable for

VSX-824-
K
VSX-524-
K
VSX-329-K
AV Receiver
Receptor AV
Quick Start Guide
Guía de inicio rápido
ץഁΤߟࡿࠓ
VSX-824-
K
VSX-524-
K
VSX-329-K
AV Receiver
Receptor AV
Quick Start Guide
Guía de inicio rápido
ץഁΤߟࡿࠓ
What’s in the box / Contenido de la caja / є၇ϲৡޑ
Thank you for buying this Pioneer product. This Quick Start Guide includes instructions for basic connections and operations to allow simple use of the
receiver. For detailed descriptions of the receiver, see the “Operating Instructions” provided on the included CD-ROM ( ).
Muchas gracias por haber adquirido este producto de Pioneer. Esta Guía de inicio rápido incluye instrucciones para hacer las conexiones y operaciones
básicas que le permitirán hacer un uso sencillo del receptor. Para conocer una descripción detallada del receptor, consulte el “Manual de instrucciones”
suministrado con el CD-ROM ( ) incluido.
དᗃ்ᗋຶҐӒᎣ౱ࠣȄԫץഁΤߟࡿࠓϲ֥ஆҐഀጤІᐈձޠᇴ݃ȂѠР்߰ٻң௦ԞᏣȄԥᜱ௦ԞᏣޠၐಡᇴ݃Ȃ፝୥ᎨᓎߤDE.SPN
!
)
!!!
*
!
ޠ
ȶᐈձКьȷȄ
Remote Control
Mando a distancia
ሎ௢Ꮳ
Setup microphone
(not included for VSX-329)
Micrófono de configuración
(no incluido para VSX-329)
೪ۢബջॴȞϛєࢃWTY.43:࠯ဵңബջॴȟ
AAA size IEC R03 dry cell batteries x2
Pilas secas AAA, IEC R03 x 2
BBB0JFD!S14!ୂႬԲ!y3
AM loop antenna
Antena de cuadro de AM
BNᕘ࠯Љጤ
FM wire antenna
Antena de hilos de FM
GNጤ࠯Љጤ
These quick start guide
Esta guía de inicio rápido
ҐץഁΤߟࡿࠓ
Power cord
Cable de alimentación
Ⴌྜጤ
Safety Brochure
Folleto de Seguridad
ԋӓКь
CD-ROM (Operating instructions)
CD-ROM (Manual de instrucciones)
DE.SPN)ᐈձКь*
Safety Brochure
Folleto de seguridad
AV Receiver
Receptor AV
SPEAKER CAUTION Sheet
(English only)
Hoja de PRECAUCIONES ACERCA
DE LOS ALTAVOCES (solo en inglés)
ඵᖑᏣݨཏٲ໷ॳ Ȟ༊ऽᇮޏȟ
VSX-824
SLEEP
INPUT
MUTE
CTRL
BD
AUTO SURR ADV
DVD
iPod
TUN
GAME
SAT
CD
TV
HDMI
MHL
BT
NET
S.SEL ECO
STANDBY/ON
ENTER
CLR
SB CH
CH SEL
SP-A/B
Fav
RETURN
AUDIO P.
TOP
MENU
HOME
MENU
RECEIVER
RECEIVER SIGNAL SEL
SOURCE
TOOLS
MENU
SHIFT
BASS
BASS
TRE TRE
BAND PTY
VSX-824-K
VSX-524-K
VSX-329-
K
AV Receiver
Receptor AV
Quick Start Guide
Guía de inicio rápido
ץഁΤߟࡿࠓ
What’s in the box / Contenido de la caja / є၇ϲৡޑ
Thank you for buying this Pioneer product. This Quick Start Guide includes instructions for basic connections and operations to allow simple use of the
receiver. For detailed descriptions of the receiver, see the “Operating Instructions” provided on the included CD-ROM ( ).
Muchas gracias por haber adquirido este producto de Pioneer. Esta Guía de inicio rápido incluye instrucciones para hacer las conexiones y operaciones
básicas que le permitirán hacer un uso sencillo del receptor. Para conocer una descripción detallada del receptor, consulte el “Manual de instrucciones”
suministrado con el CD-ROM ( ) incluido.
དᗃ்ᗋຶҐӒᎣ౱ࠣȄԫץഁΤߟࡿࠓϲ֥ஆҐഀጤІᐈձޠᇴ݃ȂѠР்߰ٻң௦ԞᏣȄԥᜱ௦ԞᏣޠၐಡᇴ݃Ȃ፝୥ᎨᓎߤDE.SPN
!
)
!!!
*
!
ޠ
ȶᐈձКьȷȄ
Remote Control
Mando a distancia
ሎ௢
Setup microphone
(not included for VSX-329)
Micrófono de configuración
(no incluido para VSX-329)
೪ۢബջॴȞϛєࢃWTY.43:࠯ဵңബջॴȟ
AAA size IEC R03 dry cell batteries x2
Pilas secas AAA, IEC R03 x 2
BBB0JFD!S14!ୂႬԲ!y3
AM loop antenna
Antena de cuadro de AM
BNᕘ࠯Љጤ
FM wire antenna
Antena de hilos de FM
GNጤ࠯Љጤ
These quick start guide
Esta guía de inicio rápido
ҐץഁΤߟࡿ
Power cord
Cable de alimentación
Ⴌྜ
Safety Brochure
Folleto de Seguridad
ԋӓКь
CD-ROM (Operating instructions)
CD-ROM (Manual de instrucciones)
DE.SPN)ᐈձКь*
Safety Brochure
Folleto de seguridad
AV Receiver
Receptor AV
SPEAKER CAUTION Sheet
(English only)
Hoja de PRECAUCIONES ACERCA
DE LOS ALTAVOCES (solo en inglés)
ඵᖑᏣݨཏٲ໷ॳ Ȟ༊ऽᇮޏȟ
VSX-824
SLEEP
INPUT
MUTE
CTRL
BD
AUTOSURRADV
DVD
iPod
TUN
GAME
SAT
CD
TV
HDMI
MHL
BT
NET
S.SEL ECO
STANDBY/ON
ENTER
CLR
SB CH
CH SEL
SP-A/B
Fav
RETURN
AUDIO P.
TOP
MENU
HOME
MENU
RECEIVER
RECEIVERSIGNAL SEL
SOURCE
TOOLS
MENU
SHIFT
BASS
BASS
TRE TRE
BAND PTY
What’s in the box / Contenido de la caja / є၇ϲৡޑ
Thank you for buying this Pioneer product. This Quick Start Guide includes instructions for basic connections and operations to allow simple use of the
receiver. For detailed descriptions of the receiver, see the “Operating Instructions” provided on the included CD-ROM ( ).
Muchas gracias por haber adquirido este producto de Pioneer. Esta Guía de inicio rápido incluye instrucciones para hacer las conexiones y operaciones
básicas que le permitirán hacer un uso sencillo del receptor. Para conocer una descripción detallada del receptor, consulte el “Manual de instrucciones”
suministrado con el CD-ROM ( ) incluido.
དᗃ்ᗋຶҐӒᎣ౱ࠣȄԫץഁΤߟࡿࠓϲ֥ஆҐഀጤІᐈձޠᇴ݃ȂѠР்߰ٻң௦ԞᏣȄԥᜱ௦ԞᏣޠၐಡᇴ݃Ȃ፝୥ᎨᓎߤDE.SPN
!
)
!!!
*
!
ޠ
ȶᐈձКьȷȄ
Remote Control
Mando a distancia
ሎ௢Ꮳ
AAA size IEC R03 dry cell batteries x2
Pilas secas AAA, IEC R03 x 2
BBB0JFD!S14!ୂႬԲ!y3
AM loop antenna
Antena de cuadro de AM
BNᕘ࠯Љጤ
FM wire antenna
Antena de hilos de FM
GNጤ࠯Љጤ
These quick start guide
Esta guía de inicio rápido
ҐץഁΤߟࡿࠓ
Power cord
Cable de alimentación
Ⴌྜጤ
Safety Brochure
Folleto de Seguridad
ԋӓКь
CD-ROM (Operating instructions)
CD-ROM (Manual de instrucciones)
DE.SPN)ᐈձКь*
Safety Brochure
Folleto de seguridad
AV Receiver
Receptor AV
VSX-824
SLEEP
INPUT
MUTE
CTRL
BD
AUTO SURR ADV
DVD
iPod
TUN
GAME
SAT
CD
TV
HDMI
MHL
BT
NET
S.SEL ECO
STANDBY/ON
ENTER
CLR
SB CH
CH SEL
SP-A/B
Fav
RETURN
AUDIO P.
TOP
MENU
HOME
MENU
RECEIVER
RECEIVER SIGNAL SEL
SOURCE
TOOLS
MENU
SHIFT
BASS
BASS
TRE TRE
BAND PTY
2
Connecting up
Connecting the speakers
The receiver will work with just two stereo speakers (the front speakers in the diagram) but using
at least three speakers is recommended, and a complete setup is best for surround sound.
To achieve the best possible surround sound, install your speakers as shown below.
5.1 channel surround system:
After installing the speakers, connect them as shown below.
LINE LEVEL
INPUT
L
– Front Left
C
– Center
R
– Front Right
SL
– Surround Left
SR
– Surround Right
SW
– Subwoofer
Note
Please set the voltage to your regional
voltage before connecting. Refer to page
3 of the Operating Instructions for more
information.
Connecting the speaker cables
Make sure you connect the speaker on
the right to the right (
R
) terminal and the
speaker on the left to the left (
L
) terminal.
Also make sure the positive and negative
(
+/–
) terminals on the receiver match those
on the speakers.
CAUTION
Before making or changing
connections, switch off the power and
disconnect the power cord from the AC
outlet.
These speaker terminals carry
HAZARDOUS LIVE
voltage. To prevent
the risk of electric shock when
connecting or disconnecting the
speaker cables, disconnect the power
cord before touching any uninsulated
parts.
1
Twist exposed wire strands together.
2
Loosen terminal and insert exposed wire.
3
Tighten terminal.
12 3
10 mm
Connect the center and surround speaker
terminals of VSX-524/VSX-329 as shown below:
1
Twist exposed wire strands together.
2
Push open the tabs and insert exposed
wire.
3
Release the tabs.
12 3
10 mm
R
SL
L
SW
C
SR
Subwoofer
(
SW
)
Front Right (
R
)
Surround Right
(
SR
)
Surround Left
(
SL
)
Front Left (
L
)Center (
C
)
VSX-824
The type of center and surround speaker terminals for VSX-524/VSX-329 is different from this
diagram.
You can use speakers with a nominal impedance between 6
W
and 16
W
.
English
3
English
Español
፩ၭ
Connecting a TV and playback
components
Note
Refer to the operating instructions in the included CD-
ROM if you wish to connect a TV or playback component
in a method other than an HDMI connection.
Refer to the operating instructions in the included CD-
ROM for other device connections.
CAUTION
Handle the power cord by the plug part. Do not pull out
the plug by tugging the cord, and never touch the power
cord when your hands are wet, as this could cause a short
circuit or electric shock. Do not place the unit, a piece of
furniture, or other object on the power cord or pinch the
cord in any other way. Never make a knot in the cord or tie
it with other cables. The power cords should be routed so
that they are not likely to be stepped on. A damaged power
cord can cause a fire or give you an electric shock. Check
the power cord once in a while. If you find it damaged,
ask your nearest Pioneer authorized independent service
company for a replacement.
VENTILATION CAUTION
When installing this unit, make sure to leave space around the
unit for ventilation to improve heat radiation (at least 40 cm at
top, 20 cm at rear, and 20 cm at each side).
WARNING
Slots and openings in the cabinet are provided for ventilation
to ensure reliable operation of the product, and to protect it
from overheating. To prevent fire hazard, the openings should
never be blocked or covered with items (such as newspapers,
table-cloths, curtains) or by operating the equipment on thick
carpet or a bed.
D3-4-2-1-7b*_A1_En
Connecting up (continued)
Connecting antennas
21
AM loop antenna
FM wire antenna
VSX-824
Connecting to the network through
LAN interface
VSX-824 only
WAN
3
2
1
LAN
LAN cable (sold separately)
Router
Modem
Computer
Internet
HDMI IN
HDMI OUT
DIGITAL AUDIO OUT
OPTICAL
B
VIDEO IN
A
HDMI/DVI-compatible TV
VSX-824
VSX-524/VSX-329 only: Composite video cable (
A
)
connection is necessary in order to see the OSD of the
unit on the TV.
VSX-824 only: The OSD will only be output from the HDMI
OUT terminal.
If the TV does not support the HDMI Audio Return Channel
function, optical digital cable (
B
) connection is required to
listen to the TV sound over the receiver.
If the TV supports the HDMI Audio Return Channel
function, the sound of the TV is input to the receiver via the
HDMI terminal, so there is no need to connect an
optical
digital cable
(
B
). In this case, set
ARC
at
HDMI Setup
to
ON
l
“The HDMI Setup menu” on page 35 (VSX-524/VSX-
329), “HDMI Setup” on page 54 (VSX-824).
Please refer to the TV’s operation manual for directions on
connections and setup for the TV.
VSX-824
HDMI/DVI-compatible
Blu-ray Disc player, etc.
4
Initial Setup
Before you start
1
Put the batteries in the remote control.
The batteries included with the unit are to check initial
operations; they may not last over a long period. We
recommend using alkaline batteries that have a longer life.
2
Switch on the receiver and your TV.
BD DVD
INPUT SELECT
SOURCESLEEP
TV
CONTROL
CD
INPUT
RECEIVER
RECEIVER
SLEEP
CTRL
BD GAME HDMI
S.SEL ECO
STANDBY/ON
RECEIVER SIGNAL SEL
SOURCE
INPUT
3
Switch the TV input so that it connects to the
receiver.
4
Turn the subwoofer on and turn up the
volume.
CAUTION
Do not use or store batteries in direct sunlight or other
excessively hot place, such as inside a car or near a
heater. This can cause batteries to leak, overheat, explode
or catch fire. It can also reduce the life or performance of
batteries.
When inserting the batteries, make sure not to damage
the springs on the battery’s
*
terminals. This can cause
batteries to leak or overheat.
When disposing of used batteries, please comply with
governmental regulations or environmental public
institution’s rules that apply in your country/area.
Automatically setting up for surround sound (MCACC)
(VSX-824/VSX-524)
The Auto Multi-Channel ACoustic Calibration (MCACC) setup
uses the supplied setup microphone to measure and analyze
the test tone that is outputted by the speakers. This setup
enables automatic high precision measuring and settings;
utilizing it will create an optimum user listening environment.
Important
Measure in a quiet environment.
If you have a tripod, use it to place the microphone so
that it’s about ear level at your normal listening position.
Otherwise, place the microphone at ear level using a table
or a chair.
Accurate measurements may not be possible if there are
obstacles between the speakers and the listening position
(microphone).
When measuring, step away from the listening position,
and operate using the remote control from the external
side of all the speakers.
1
Connect the supplied setup microphone.
MCACC
SETUP
MIC
2
Press BD button on the remote control to
switch to BD entry.
3
Press RECEIVER CTRL (VSX-824),
RECEIVER
(VSX-
524/VSX-329) on the remote control, then
press the HOME MENU button.
The Home Menu appears on your TV.
4
Select ’Auto MCACC’ from the Home Menu,
then press ENTER.
Automatic measuring will start.
Home Menu
1
. Auto MCACC
2
. Manual SP Setup
3
. Input Assign
4. Auto Power Down
5. HDMI Setup
6. Network Standby
7. MHL Setup
8. OSD Setup
1
. Auto MCACC
Now Analyzing
Surround Analyzing
Speaker System
X.Over
Speaker Distance
Channel Level
Acoustic Cal EQ
Return
Measuring will take about 3 to 12 minutes.
5
Follow the instructions on-screen.
Automatic setting is complete when the Home Menu
screen appears.
If the power is cut off, the protection circuit that activates
when the naked wires of the cable cord is touching the
rear panel or when the naked
and
*
cords are touching
each other may be activated.
Twist back the cable cords of the speakers to the normal
position, and connect, making sure that the naked cable
cord cannot be seen from outside the terminal. Do the
same for the connections on the speaker side.
If
ERR
is displayed, check to make sure that the speakers
are connected correctly.
6
Make sure the setup microphone is
disconnected.
Tripod
Microphone
VSX-824
VSX-524/VSX-329 VSX-824
5
English
Español
፩ၭ
Basic playback
Multichannel playback
BD DVD
INPUT SELECT
SOURCESLEEP
TV
CONTROL
CD
INPUT
1
4
7
MIDNIGHT
CH
RECEIVER
TUNER
iPod/USB SAT/CBL
GAMETV
SIGNAL SEL
Acous.EQ
PHASE
S.RETRIEVER
ENTER
ADV SURR
AUTO/
DIRECT
VOL
+
10
2
5
8
SPEAKERS
DIMMER
LEV
LEV
SB CH
DISP
CLR
3
6
9
0
ENTER
CH
CH
CH SELECT
MUTE
RETURN
AUDIO
PARAMETER
TOOLS
VOLUME
BAND
MENU
HOME
MENU
iPod CTRL
PTY
TRE
BASS
TOP
MENU
RECEIVER
T
U
N
E
T
U
N
E
P
R
E
S
E
T
P
R
E
S
E
T
RECEIVER
ALC/
STANDARD
STEREO
SLEEP
MUTE
CTRL
BD
AUTO SURR ADV
DVD
USB
TUNER
ADPT
iPod
TUN
GAME
CBL ROKU
SAT
CD
TV
CH LEVEL
HDMI
MHL
BT
NET
S.SEL ECO
STANDBY/ON
ENTER
CLR
SB CH
CH SEL
SP-A/B
Fav
RETURN
BAND
POP UP SUB TITLE DISP
DIMMER STATUS
AUDIO
PRESET TUNE
PTY
AUDIO P.
TOP
MENU
HOME
MENU
RECEIVER
LISTENING MODE
RECEIVER SIGNAL SEL
SOURCE
TOOLS
MENU
SHIFT
BASS
BASS
TRE TRE
INPUT
CH
VOL
2
3
5
1
Switch on the playback component.
E.g. Turn the Blu-ray Disc player connected to the
HDMI BD IN
terminal on.
2
Switch the input of the receiver.
E.g. Press
BD
to select the
BD
input.
3
Press AUTO (VSX-824), AUTO/DIRECT (VSX-
524/VSX-329) to select ’AUTO SURROUND’.
Also press
SURR
(VSX-824),
ALC/STANDARD
(VSX-524/
VSX-329) or
ADV
(VSX-824),
ADV SURR
(VSX-524/VSX-329)
for multichannel playback. Select your preferred listening
mode.
4
Start the playback component’s playback.
E.g. Start playback of the Blu-ray Disc player.
5
Use VOLUME +/– to adjust the volume level.
If no sound comes out of the center speaker or surround
speaker, change the listening mode by pressing
SURR
(VSX-824),
ALC/STANDARD
(VSX-524/VSX-329) or
ADV
(VSX-824),
ADV SURR
(VSX-524/VSX-329).
E.g. Repeatedly press
ADV
(VSX-824),
ADV SURR
(VSX-
524/VSX-329) to select [
EXT.STEREO
].
If there is no sound from the subwoofer
Cause:
The front speaker is set to
LARGE
.
(During 2ch audio input, the low frequency sound is
output not from the subwoofer but the front speaker)
How to x:
If you want the sound to come from the subwoofer, please
change the speaker setup.
(There are 2 following methods)
Method 1:
Change the front speaker to
SMALL
.
The low frequency sound will be output not from the front
speaker but the subwoofer.
We recommend not changing this if the low frequency
function of the front speaker is high.
Method 2:
Change the subwoofer to
PLUS
.
The low frequency sound will output from both the front
speaker and the subwoofer.
This may lead to excessive low frequency sound.
If that happens, we suggest you do not change the setting
or change to Method 1.
l
Speaker Setting” on page 32 (VSX-524/VSX-329),
“Speaker Setting” on page 50 (VSX-824).
Note
If not using the remote control to operate:
– When operating the receiver, press
RECEIVER CTRL
(VSX-824),
RECEIVER
(VSX-524/VSX-329) and then operate.
– When operating devices such as
NETWORK
(VSX-
824 only),
TUNER
, and
iPod
, press the various function
button (
NET
(VSX-824 only),
TUNER
,
iPod USB
(VSX-824),
iPod/USB
(VSX-524/VSX-329), etc.) before operating.
In order to listen to the audio from the source component
that is connected to this receiver using a coaxial or an
optical cable, choose the
C1
(coaxial) or
O1
(optical) input.
(Press
SIGNAL SEL
.)
VSX-524/VSX-329 VSX-824
6
Basic playback (continued)
Listening to the radio
1
Press TUNER to select the tuner.
If necessary, press
BAND
to change the band (FM or AM).
2
Press TUNE +/– (VSX-824), TUNE
/
(VSX-
524/VSX-329) to tune to a station.
Press and hold
TUNE +/–
(VSX-824),
TUNE
/
(VSX-
524/VSX-329) for about a second. The receiver will start
searching for the next station.
If you’re listening to an FM station but the reception
is weak, press
BAND
to select FM MONO and set the
receiver to the mono reception mode.
Saving station presets
If you often listen to a particular radio station, it’s convenient to
have the receiver store the frequency for easy recall whenever
you want to listen to that station.
1
Press TOOLS while receiving a signal from the
station you want to store.
The preset number is blinking.
2
Press PRESET +/– (VSX-824), PRESET
/l
(VSX-524/VSX-329) to select the station preset
you want, then press ENTER.
The preset number stop blinking and the receiver stores
the station.
Listening to station presets
You will need to have some presets stored to do this.
Press PRESET +/– (VSX-824), PRESET
/l
(VSX-524/VSX-329) to select the station preset
you want.
Playing an iPod
About one minute is required between turning the power
on and completion of startup.
1
Connect your iPod.
2
Press iPod USB (VSX-824), iPod/USB (VSX-524/
VSX-329) to select the iPod/USB input.
When the display shows the names of folders and files,
you’re ready to play music from the iPod.
3
Use
/
to select a category, then press
ENTER to browse that category.
• To return to the previous level any time, press
RETURN
.
4
Use
/
to browse the selected category (e.g.,
albums).
• Use
/l
to move to previous/next levels.
5
Continue browsing until you arrive at what
you want to play, then press
to start
playback.
USB cable that
comes with the iPod
iPod/iPhone
Listening to Internet radio stations
VSX-824 only
About one minute is required between turning the power
on and completion of startup.
Important
When using a broadband Internet connection, a contract
with an Internet service provider is required. For more
details, contact your nearest Internet service provider.
To listen to Internet radio stations, you must have high-
speed broadband Internet access. With a 56 K or ISDN
modem, you may not enjoy the full benefits of Internet
radio.
Access to content provided by third parties requires a
high speed internet connection and may also require
account registration and a paid subscription. Third
party content services may be changed, suspended,
interrupted, or discontinued at any time without notice,
and Pioneer disclaims any liability in connection with such
occurrences. Pioneer does not represent or warrant that
content services will continue to be provided or available
for a particular period of time, and any such warranty,
express or implied, is disclaimed.
1
Press NET repeatedly to select the NETRADIO
input.
It may take several seconds for this receiver to access the
network.
2
Use
/
to select the Internet radio station to
play back, and then press ENTER.
7
English
Español
፩ၭ
Basic playback (continued)
To enjoy the many functions of the
unit to the fullest extent
Load the CD-ROM into your computer and download the
Operating Instructions (PDF) from the menu screen to
read.
Functions
Playing a USB device
l
page 25 (VSX-524/VSX-329), page 28 (VSX-824)
Bluetooth ADAPTER for Wireless Enjoyment of Music
l
page 31 (VSX-824 only)
Playback with NETWORK features
l
page 39 (VSX-824 only)
Setting the Audio options
l
page 30 (VSX-524/VSX-329), page 37 (VSX-824)
Using the Home Menu
l
page 32 (VSX-524/VSX-329), page 50 (VSX-824)
Troubleshooting
l
page 36 (VSX-524/VSX-329), page 56 (VSX-824)
Note
VSX-824 only: This unit supports AirPlay. For details,
see page 39 of the operating instructions and the Apple
website (http://www.apple.com).
VSX-824 only: This unit’s software can be updated
(page 44 of the operating instructions). With Mac OS, it
can be updated using Safari (page 45 of the operating
instructions).
© 2014 PIONEER HOME ELECTRONICS CORPORATION.
All rights reserved.
2
Conexiones
Conexión de los altavoces
El receptor puede funcionar con sólo dos altavoces estéreo (los altavoces frontales en el diagrama),
pero se recomienda utilizar al menos tres altavoces, o una configuración completa para obtener el
mejor sonido envolvente.
Para obtener el mejor sonido envolvente posible, instale los altavoces como se indica a continuación.
Sistema de sonido envolvente de 5.1 canales:
Después de instalar los altavoces, conéctelos tal como se indica a continuación.
LINE LEVEL
INPUT
L
– Delantero izquierdo
C
– Central
R
– Delantero derecho
SL
– Envolvente izquierdo
SR
– Envolvente derecho
SW
– Subwoofer
Nota
Antes de conectarlos, ajuste el voltaje a
su voltaje regional. Para una información
detallada, consulte la página 3 de las
Instrucciones de Funcionamiento.
Conexión de los cables de
altavoces
Asegúrese de conectar el altavoz derecho al
terminal derecho (
R
), y el altavoz izquierdo al
terminal izquierdo (
L
). Asegúrese también de
que los terminales positivo y negativo (
+/–
)
del receptor coincidan con los terminales de
los altavoces.
PRECAUCIÓN
Antes de hacer o cambiar las
conexiones, desconecte la alimentación
y desenchufe el cable de alimentación
de la toma de CA.
Estos terminales de los altavoces llevan
VOLTAJE VIVO PELIGROSO
. Para
evitar el riesgo de descargas eléctricas
al conectar o desconectar los cables
de altavoz, desenchufe el cable de
alimentación antes de tocar las partes
de los cables que no están aisladas.
1
Trence los hilos expuestos del cable.
2
Aoje el terminal e inserte el hilo expuesto.
3
Apriete el terminal.
12 3
10 mm
Conecte los terminales del altavoz central y del
altavoz de sonido envolvente del VSX-524/VSX-
329 según se indica a continuación:
1
Trence los hilos expuestos del cable.
2
Empuje para abrir las pestañas e
introduzca los hilos expuestos del cable.
3
Suelte las pestañas.
12 3
10 mm
R
SL
L
SW
C
SR
Subwoofer
(
SW
)
Delantero
derecho (
R
)
Envolvente
derecho (
SR
)
Envolvente
izquierdo (
SL
)
Delantero
izquierdo (
L
)
Central (
C
)
VSX-824
El tipo de terminales de altavoz central y de sonido envolvente para VSX-524/VSX-329 es distinto
de este diagrama.
Puede utilizar los altavoces con una impedancia nominal de entre 6
W
y 16
W
.
Español
3
English
Español
፩ၭ
Conexión de componentes de
reproducción y de un TV
Nota
Consulte las instrucciones operativas en el CD-ROM
adjunto si desea conectar un televisor o componente de
reproducción mediante un método distinto de la conexión
HDMI.
Consulte las instrucciones operativas en el CD-ROM
adjunto respecto a las conexiones de otros dispositivos.
PRECAUCIÓN
Sujete el cable de alimentación por la parte del enchufe.
No desconecte la clavija tirando del cable; nunca toque
el cable de alimentación con las manos mojadas, ya que
esto puede causar cortocircuitos o descargas eléctricas.
No coloque el equipo, un mueble ni ningún objeto
encima del cable de alimentación. No dañe el cable de
alimentación. No anude el cable ni lo ate a otros cables.
Los cables de alimentación deben ser tendidos de manera
tal que la probabilidad de que alguien los pise sea mínima.
Un cable de alimentación dañado puede causar incendios
y descargas eléctricas. Revise el cable de alimentación
cada cierto tiempo. Si encuentra que está dañado, pida un
cable de recambio al representante autorizado de Pioneer
más cercano.
PRECAUCIÓN PARA LA VENTILACIÓN
Cuando instale este aparato, asegúrese de dejar
espacio en torno al mismo para la ventilación con el fin
de mejorar la disipación de calor (por lo menos 40 cm
encima, 20 cm detrás, y 20 cm en cada lado).
ADVERTENCIA
Las ranuras y aberturas de la caja del aparato sirven
para su ventilación para poder asegurar un
funcionamiento fiable del aparato y para protegerlo
contra sobrecalentamiento. Para evitar el peligro de
incendio, las aberturas nunca deberán taparse ni
cubrirse con nada (como por ejemplo, periódicos,
manteles, cortinas) ni ponerse en funcionamiento el
aparato sobre una alfombra gruesas o una cama.
D3-4-2-1-7b*_A1_Es
Conexiones (continuación)
Conexión de antenas
21
Antena de cuadro de AM
Antena de hilo de FM
VSX-824
Conexión a la red mediante la
interfaz LAN
VSX-824 solamente
WAN
3
2
1
LAN
Cable LAN
(vendido por separado)
Enrutador
Módem
Ordenador
Internet
HDMI IN
HDMI OUT
DIGITAL AUDIO OUT
OPTICAL
B
VIDEO IN
A
Televisor compatible con HDMI/DVI
VSX-824
VSX-524/VSX-329 solamente: La conexión de cable de vídeo compuesto
(
A
) es necesaria para ver la pantalla OSD de la unidad en el televisor.
VSX-824 solamente: La pantalla OSD sólo se transmite desde el
terminal HDMI OUT.
Si el televisor no soporta la función HDMI Audio Return Channel
(Canal de retorno de audio HDMI), se precisa una conexión de cable
digital óptico (
B
) para escuchar el sonido del televisor a través del
receptor.
Si el televisor soporta la soporta la función HDMI Audio Return
Channel (Canal de retorno de audio HDMI), el sonido del televisor
llega al receptor a través del terminal HDMI, por lo que no hay
necesidad de conectar un cable digital óptico (
B
). En este caso,
ajuste
ARC
en el
HDMI Setup
(Configuración de HDMI) a
ON
l
“El menú HDMI Setup” en la página 35 (VSX-524/VSX-329), “HDMI
Setup” en la página 54 (VSX-824).
Para obtener instrucciones sobre las conexiones y configuración del
televisor, consulte el manual de funcionamiento del mismo.
VSX-824
Reproductor de Blu-ray Disc
compatible con HDMI/DVI etc.
4
Initial Setup
Antes de comenzar
1
Ponga las pilas en el mando a distancia.
Las pilas suministradas con este equipo le permitirán
comprobar las operaciones iniciales, pero no durarán
mucho tiempo. Le recomendamos el empleo de pilas
alcalinas porque tienen una vida útil de servicio más larga.
2
Encienda el receptor y el televisor.
BD DVD
INPUT SELECT
SOURCESLEEP
TV
CONTROL
CD
INPUT
RECEIVER
RECEIVER
SLEEP
CTRL
BD GAME HDMI
S.SEL ECO
STANDBY/ON
RECEIVER SIGNAL SEL
SOURCE
INPUT
3
Cambie la entrada de TV para que se conecte
con el receptor.
4
Active el subwoofer y suba el volumen.
PRECAUCIÓN
No use ni guarde pilas en lugares expuestos a la luz
solar directa o en lugares con un calor excesivo, como el
interior de un coche o cerca de un calefactor. Esto puede
ocasionar fugas en las pilas, que se sobrecalienten,
exploten o se incendien. También puede reducir su
duración o rendimiento.
Cuando introduzca las pilas, asegúrese de no causar
daños en los muelles de los terminales
*
de las pilas.
Podría provocar que las baterías experimenten alguna
fuga o que se calienten en exceso.
Al desechar pilas gastadas, deberá cumplir las
regulaciones gubernamentales o las normas de las
instituciones medioambientales públicas que se apliquen
en su país/área.
Conguración automática para sonido envolvente (MCACC)
(VSX-824/VSX-524)
La configuración de calibración acústica automática
multicanal (MCACC) utiliza el micrófono incluido de
configuración para medir y analizar el tono de prueba emitido
por los altavoces. Esta configuración permite una medición
y ajuste automáticos de alta precisión, al aplicarla creará un
entorno de escucha óptimo para el usuario.
Importante
Realice la medición en un entorno silencioso.
Si tiene un trípode, utilícelo para situar el micrófono de
modo tal que quede a nivel del oído en la posición de
audición normal. En caso contrario, sitúe el micrófono a
nivel del oído utilizando una mesa o silla.
Es posible que no consiga una medición precisa si hay
obstáculos entre los altavoces y la posición de escucha
(micrófono).
Durante la medición, apártese de la posición de escucha y
opere el dispositivo mediante el control remoto y desde el
lado exterior de todos los altavoces.
1
Conecte el micrófono de conguración
incluido en el equipo.
MCACC
SETUP
MIC
2
Para cambiar a la entrada BD, pulse el botón
BD del mando a distancia.
3
Pulse RECEIVER CTRL (VSX-824),
RECEIVER
(VSX-524/VSX-329) en el mando a distancia; a
continuación, pulse el botón de HOME MENU.
Aparece Home Menu en su televisor.
4
Seleccione ‘Auto MCACC’ desde el Home Menu
y luego pulse ENTER.
Se iniciará la medición automática.
Home Menu
1
. Auto MCACC
2
. Manual SP Setup
3
. Input Assign
4. Auto Power Down
5. HDMI Setup
6. Network Standby
7. MHL Setup
8. OSD Setup
1
. Auto MCACC
Now Analyzing
Surround Analyzing
Speaker System
X.Over
Speaker Distance
Channel Level
Acoustic Cal EQ
Return
La medición precisa entre 3 y 12 minutos.
5
Siga las instrucciones que aparecen en
pantalla.
La configuración automática se ha completado cuando
aparece la pantalla Home Menu.
Si se interrumpe el suministro eléctrico, es posible
que se active el circuito de protección que entra en
funcionamiento cuando los cables desprotegidos tocan el
panel posterior o cuando los cables
y
*
se tocan entre
sí.
Tuerza de nuevo los cables de altavoz hasta que recuperen
su forma normal y conéctelos, asegurándose de que el
cable desprotegido no resulta visible desde el exterior del
terminal. Haga lo propio para las conexiones en el lado del
altavoz.
Si se muestra
ERR
, asegúrese de que los altavoces están
conectados correctamente.
6
Asegúrese de que el micrófono de
conguración esté desconectado.
Trípode
Micrófono
VSX-824
VSX-524/VSX-329 VSX-824
5
English
Español
፩ၭ
Reproducción básica
Reproducción multicanal
BD DVD
INPUT SELECT
SOURCESLEEP
TV
CONTROL
CD
INPUT
1
4
7
MIDNIGHT
CH
RECEIVER
TUNER
iPod/USB SAT/CBL
GAMETV
SIGNAL SEL
Acous.EQ
PHASE
S.RETRIEVER
ENTER
ADV SURR
AUTO/
DIRECT
VOL
+
10
2
5
8
SPEAKERS
DIMMER
LEV
LEV
SB CH
DISP
CLR
3
6
9
0
ENTER
CH
CH
CH SELECT
MUTE
RETURN
AUDIO
PARAMETER
TOOLS
VOLUME
BAND
MENU
HOME
MENU
iPod CTRL
PTY
TRE
BASS
TOP
MENU
RECEIVER
T
U
N
E
T
U
N
E
P
R
E
S
E
T
P
R
E
S
E
T
RECEIVER
ALC/
STANDARD
STEREO
SLEEP
MUTE
CTRL
BD
AUTO SURR ADV
DVD
USB
TUNER
ADPT
iPod
TUN
GAME
CBL ROKU
SAT
CD
TV
CH LEVEL
HDMI
MHL
BT
NET
S.SEL ECO
STANDBY/ON
ENTER
CLR
SB CH
CH SEL
SP-A/B
Fav
RETURN
BAND
POP UP SUB TITLE DISP
DIMMER STATUS
AUDIO
PRESET TUNE
PTY
AUDIO P.
TOP
MENU
HOME
MENU
RECEIVER
LISTENING MODE
RECEIVER SIGNAL SEL
SOURCE
TOOLS
MENU
SHIFT
BASS
BASS
TRE TRE
INPUT
CH
VOL
2
3
5
1
Active el componente de reproducción.
Por ejemplo, active el reproductor de Blu-ray conectado al
terminal
HDMI BD IN
.
2
Active la entrada del receptor.
Por ejemplo, pulse
BD
para seleccionar la entrada
BD
.
3
Pulse AUTO (VSX-824), AUTO/DIRECT
(VSX-524/VSX-329) para seleccionar
’AUTO SURROUND’.
Pulse también
SURR
(VSX-824),
ALC/STANDARD
(VSX-
524/VSX-329) o
ADV
(VSX-824),
ADV SURR
(VSX-524/VSX-
329) para una reproducción multicanal. Seleccione su
modo de escucha preferido.
4
Inicie la reproducción del componente de
reproducción.
Por ejemplo, inicie la reproducción del reproductor de
discos Blu-ray.
5
Use VOLUME +/– para ajustar el nivel del
volumen.
Si no escucha ningún sonido por el altavoz central o el
altavoz de sonido envolvente, cambie el modo de escucha
pulsando
SURR
(VSX-824),
ALC/STANDARD
(VSX-524/
VSX-329) o
ADV
(VSX-824),
ADV SURR
(VSX-524/VSX-329).
Por ejemplo, pulse repetidamente
ADV
(VSX-824),
ADV SURR
(VSX-524/VSX-329) para seleccionar
[
EXT.STEREO
].
Si no se escucha ningún sonido por el altavoz de
subgraves
Causa:
El altavoz frontal está ajustado a
LARGE
.
(Durante la entrada de audio de 2 canales, el sonido de
baja frecuencia no se escucha por el altavoz de subgraves,
sino por el altavoz frontal)
Cómo resolverlo:
Si desea que el sonido provenga del altavoz de subgraves,
cambie la configuración de los altavoces.
(Puede utilizar los dos métodos que se indican a
continuación)
Método 1:
Cambie el altavoz frontal a
SMALL
.
El sonido de baja frecuencia no se escuchará por el
altavoz frontal, sino por el altavoz de subgraves.
Si la función de baja frecuencia del altavoz frontal es alta,
se recomienda no cambiar esto.
Método 2:
Cambie el altavoz de subgraves a
PLUS
.
El sonido de baja frecuencia se escuchará por el altavoz
frontal y por el altavoz de subgraves.
Esto puede provocar un sonido de baja frecuencia
excesivo.
En tal caso, recomendamos que no modifique el ajuste o
que cambie al Método 1.
l
Ajuste de altavoz” en la página 32 (VSX-524/VSX-329),
Ajuste de altavoz” en la página 50 (VSX-824).
Nota
Si no utiliza el mando a distancia:
– Cuando desee utilizar el receptor, antes deberá pulsar
RECEIVER CTRL
(VSX-824),
RECEIVER
(VSX-524/VSX-329).
– Cuando desee utilizar dispositivos tales como
NETWORK
(VSX-824 solamente),
TUNER
, e
iPod
, antes deberá pulsar
el botón correspondiente (
NET
(VSX-824 solamente),
TUNER
,
iPod USB
(VSX-824),
iPod/USB
(VSX-524/VSX-
329), etc.).
Con objeto de escuchar el audio del componente fuente
que está conectado a este receptor mediante un cable
coaxial u óptico, elija la entrada
C1
(coaxial) u
O1
(óptica).
(Pulse
SIGNAL SEL
.)
VSX-524/VSX-329 VSX-824
6
Reproducción básica (continuación)
Escucha de la radio
1
Pulse TUNER para seleccionar el sintonizador.
Si es preciso, pulse
BAND
para cambiar la banda (FM o
AM).
2
Para sintonizar una emisora, pulse TUNE +/–
(VSX-824), TUNE
/
(VSX-524/VSX-329).
Pulse y mantenga presionado durante cerca de un
segundo
TUNE +/–
(VSX-824),
TUNE
/
(VSX-524/VSX-
329). El receptor empezará a buscar la siguiente emisora.
Si está escuchando una estación FM pero la recepción es
débil, pulse
BAND
para seleccionar FM MONO y ajuste el
modo de recepción del receptor a mono.
Presintonización de emisoras
Si escucha una emisora de radio en particular a menudo,
puede ser conveniente almacenar la frecuencia de la emisora
en el receptor para luego recuperarla fácilmente cada vez que
desee escuchar dicha emisora.
1
Pulse TOOLS mientras recibe la señal de la
emisora que desee guardar.
El número presintonizado está parpadeando.
2
Pulse PRESET +/– (VSX-824), PRESET
/l
(VSX-524/VSX-329) para seleccionar la emisora
presintonizada que desea; a continuación,
pulse ENTER.
El número presintonizado deja de parpadear y el receptor
guarda la emisora.
Audición de emisoras preajustadas
Para poder utilizar esta función, primero deberá presintonizar
algunas emisoras.
Pulse PRESET +/– (VSX-824), PRESET
/l
(VSX-524/VSX-329) para seleccionar la emisora
presintonizada que desea.
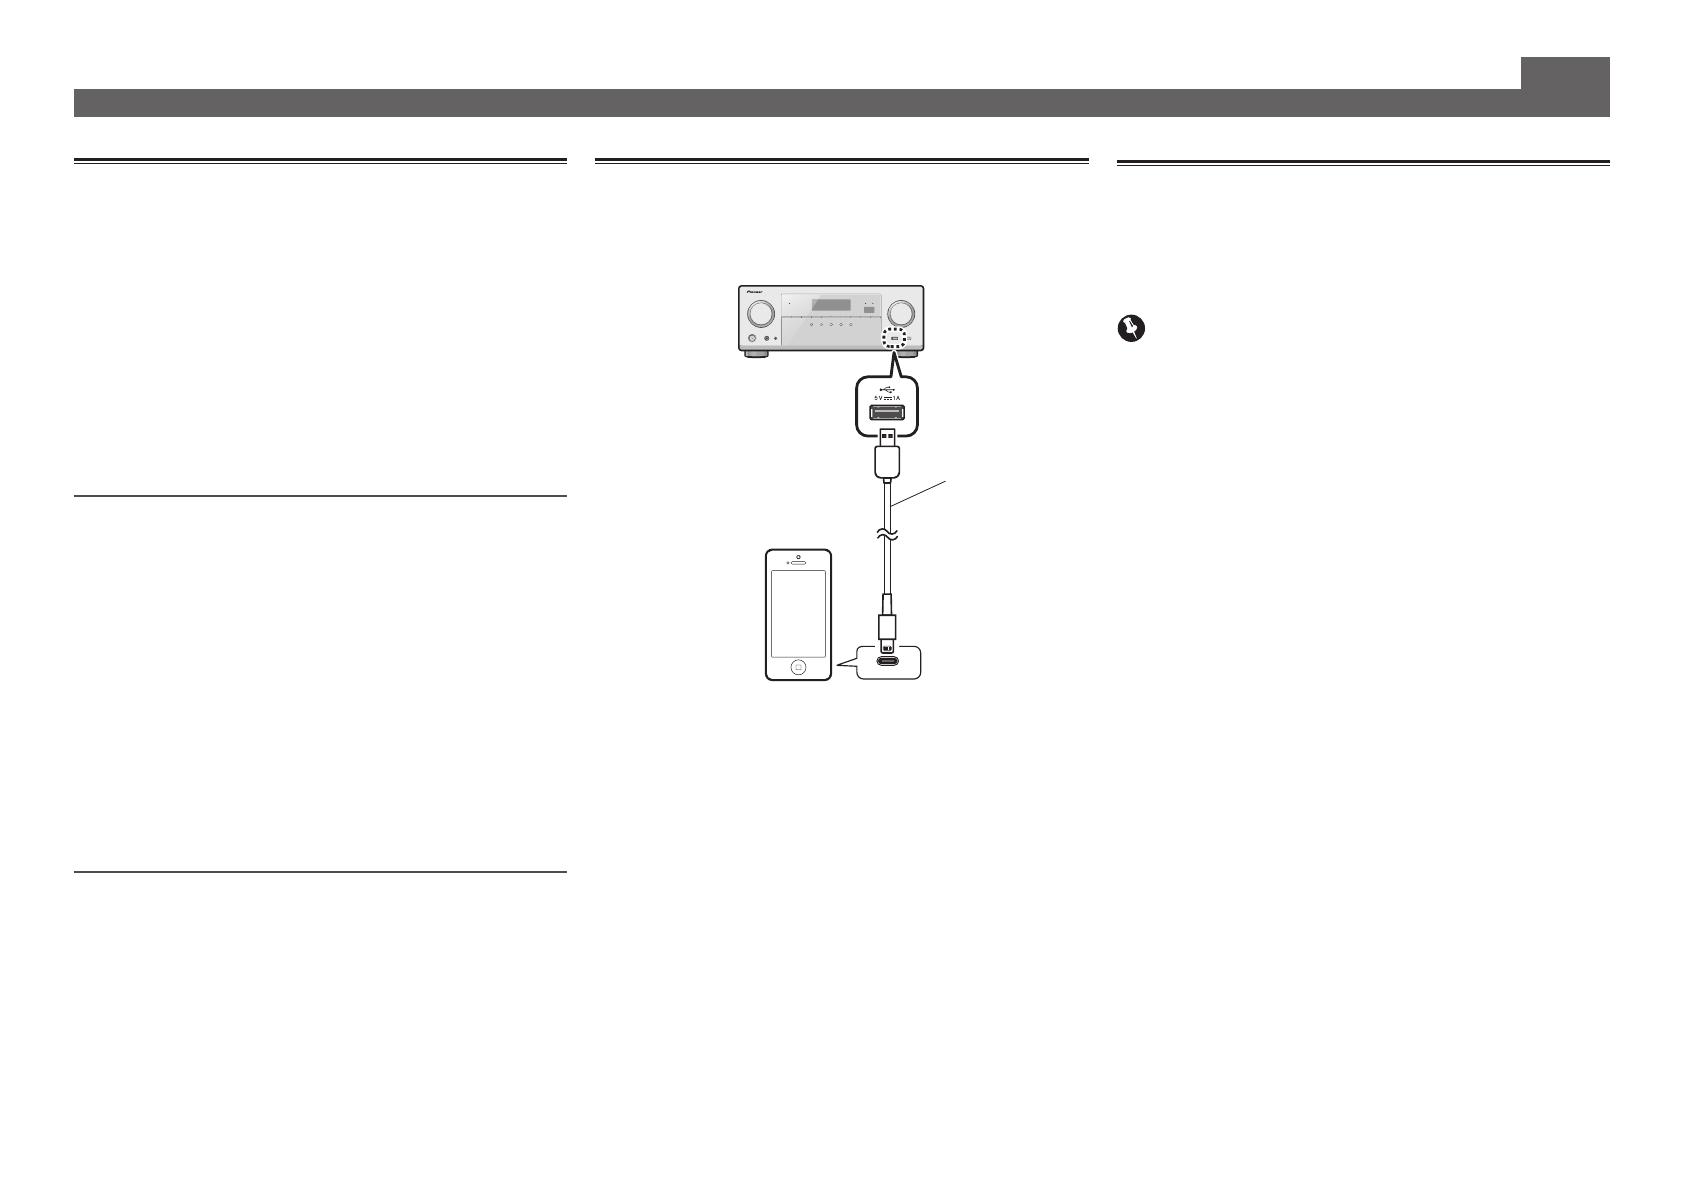
Reproducción de un iPod
Es necesario esperar aproximadamente un minuto desde
que se conecta la alimentación hasta que finaliza el inicio.
1
Conecte el iPod.
2
Pulse iPod USB (VSX-824), iPod/USB (VSX-
524/VSX-329) para seleccionar la entrada de
iPod/USB.
Cuando aparecen en pantalla los nombres de carpetas y
archivos, está preparado para reproducir música desde el
iPod.
3
Utilice
/
para seleccionar una categoría y,
a continuación, pulse ENTER para navegar en
esa categoría.
• Para volver al nivel anterior en cualquier momento, pulse
RETURN
.
4
Utilice
/
para examinar la categoría
seleccionada (p. ej., álbumes).
• Utilice
/l
para pasar a los niveles anteriores/
siguientes.
5
Siga buscando hasta que encuentre lo que
quiere reproducir. A continuación, pulse
para iniciar la reproducción.
Cable USB proporcionado
con el iPod
iPod/iPhone
Recepción de emisoras de radio de
Internet
VSX-824 solamente
Es necesario esperar aproximadamente un minuto desde
que se conecta la alimentación hasta que finaliza el inicio.
Importante
Cuando utilice una conexión de Internet de banda ancha,
es necesario un contrato con un proveedor de servicios de
Internet. Para conocer más detalles, póngase en contacto
con su proveedor de servicios de Internet más cercano.
Para escuchar emisoras de radio de Internet tendrá que
tener acceso a Internet de banda ancha de alta velocidad.
Con un modem de 56 K o ISDN tal vez no pueda disfrutar
de todos los beneficios de la radio de Internet.
Acceso a los contenidos proporcionados por terceros
requiere una conexion de Internet de alta velocidad y
tambien puede ser requerido una cuenta registrada y
una suscripcion de pago. Los servicios de contenidos
ofrecidos por terceros podrian modificarse, suspenderse
o interrumpirse en cualquier momento y sin previo
aviso. Pioneer se exime de cualquier responsabilidad en
relacion con tales acontecimientos. Pioneer no representa
o garantiza que este servicio de contenidos se siga
suministrando o este disponible por un determinado
periodo de tiempo, y toda garantia expresa o implicita,
sera rechazada.
1
Pulse NET varias veces para seleccionar la
entrada NETRADIO.
Este receptor puede tardar varios segundos en tener
acceso a la red.
2
Utilice
/
para seleccionar la emisora de
radio por Internet que desee escuchar y luego
pulse ENTER.
7
English
Español
፩ၭ
Reproducción básica (continuación)
Para disfrutar al máximo las muchas
funciones de la unidad
Introduzca el CD-ROM en su ordenador y descargue las
Instrucciones de Funcionamiento (PDF) de la pantalla de
menú para leerlas.
Funciones
Reproducción de un aparato USB
l
página 25 (VSX-524/VSX-329), página 28 (VSX-824)
ADAPTADOR Bluetooth para el disfrute inalámbrico de
la música
l
página 31 (VSX-824 solamente)
Reproducción con funciones MULTIMEDIA
l
página 39 (VSX-824 solamente)
Ajuste de las opciones de Audio
l
página 30 (VSX-524/VSX-329), página 37 (VSX-824)
Uso de Home Menu
l
página 32 (VSX-524/VSX-329), página 50 (VSX-824)
Solución de problemas
l
página 36 (VSX-524/VSX-329), página 56 (VSX-824)
Nota
VSX-824 solamente: Esta unidad es compatible con
AirPlay. Para una información detallada, consulte la
página 39 del Manual de Instrucciones y la página web de
Apple (http://www.apple.com).
VSX-824 solamente: El software de esta unidad se
puede actualizar (consulte la página 44 del Manual de
Instrucciones). Con Mac OS, se puede actualizar mediante
Safari (consulte la página 45 del Manual de Instrucciones).
© 2014 PIONEER HOME ELECTRONICS CORPORATION.
Todos los derechos reservados.
2
連接設備
連接揚聲器
本接需兩體聲就可 中的揚聲), 議至使三部
聲器並加上完整的設定 以建立最佳環繞音效組合
為能獲得最佳的環繞音效 請按照下圖方式安裝所有揚聲器
5.1 聲道環繞系統
在安裝揚聲器後 請按照下圖方式連接
LINE LEVEL
INPUT
L
左前置
C
中置
R
右前置
SL
左環繞
SR
右環繞
SW
重低音
附註
電壓為您
電壓 需詳資訊 參閱作手
的第 3
連接揚聲器連接線
請確實將右置
R
揚聲器接至右側端子
L
器接
+/–
聲器上相符的端子
注意
在接線或更動接線前 請關閉電源並將
電源線插頭從 AC 電源插座上拔掉
這些揚聲器端子均帶有
危險電壓
為避
或脫
任何絕緣之前
先將電源線插頭拔離
1
將裸露的導線捲繞在一起。
2
鬆開端子,插入裸露的導線。
3
旋緊端子。
12 3
10 mm
如下圖所示 連接 VSX-524/VSX-329
中置及環繞揚聲器端子
1
將裸露的導線捲繞在一起。
2
推開端子,插入裸露的導線。
3
鬆開端子。
12 3
10 mm
R
SL
L
SW
C
SR
重低音
(
SW
)
右前置
R
右環繞
(
SR
)
左環繞
(
SL
)
左前置
L
中置
C
VSX-824
VSX-524/VSX-329 的中置與環繞揚聲器端子類型與此
圖中的不同。
您可使用額定阻抗介於 6
W
16
W
的揚聲器
中文
3
English
Español
፩ၭ
連接電視機及播放設備
附註
若您想要以非 HDMI 連線的方式連接電視或播放設備
參閱所附 CD-ROM 中的操作手冊
裝置線的 CD-ROM 中的
作手冊
注意
手拿電源線時請握住插頭部分 切勿拖著線將插頭拔出
且不可在您手濕時觸摸電線 因為這樣會造成短路或受到
電擊 請勿將本機 家具或其他物體放在電源線上
是以任何其他方式擠壓到電線 絕不可將電線打結或與其
他連接線纏繞在一起 電源線在佈線上不可有會被腳踩到
的情 電源引起讓您
一段查一源線 有受
最近的先鋒授權服務公司尋求更換
೾ॴݨཏٲ໷
ԋ၇ҐᐡਣȂ፝ጃۢӶҐᐡѳڻႲ੽٘஋ޠޫ໣пւ೾
ॴȞദഌĵıġŤŮȃन८ijıġŤŮȃІڎ୐ijıġŤŮпαȟȄ
ឍ֚
ᐡ෧αڏԥϟᖂራІ໡πңܼ೾ॴȂпጃߴҐ౱ࠣϟҔ
ளᐈձٯ٪ЦႇዦȄ࣐ᗘռЭدȂ፝Ͻஈ༭໡πܗңޑ
ࠣȞԄൣિȃ਺ҁȃᛩᄎȟ஡ڐ᙮ᇑȂη፝ϽӶࠕ෨ܗ
טαᐈձҐᐡȄ
D3-4-2-1-7b*_A1_Zhtw
連接設備(續)
連接天線
21
AM 環型天線
FM 線型天線
VSX-824
透過LAN介面連線至網路
僅適用於 VSX-824
WAN
3
2
1
LAN
LAN 連接線 另售
路由器
數據機
電腦
網際網路
HDMI IN
HDMI OUT
DIGITAL AUDIO OUT
OPTICAL
B
VIDEO IN
A
HDMI/DVI 相容電視機
VSX-824
VSX-524/VSX-329
A
連接 才能在電視上查看本機的 OSD
僅適用於 VSX-824
OSD 只會從 HDMI OUT 端子輸出
若電視不支援 HDMI 音訊返回通道功能 則需要有光纖數
位連接線
B
連接才能聆聽接收器上的電視音效
HDMI
HDMI
B
)。
HDMI
ARC
ON
l
35 HDMI
VSX-524/
VSX-329
54 頁的
HDMI 設定 VSX-824
如需電視連線及設定的說明 請參閱電視的操作手冊
VSX-824
HDMI/DVI 相容
Blu-ray Disc 播放機等
4
初始設定
使用前
1
在遙控器中裝入電池。
本機內附的電池可用於檢查初始操作 電池電量可能不夠
長時間使用 建議使用壽命較長的鹼性電池
2
打開接收器及電視機。
BD DVD
INPUT SELECT
SOURCESLEEP
TV
CONTROL
CD
INPUT
RECEIVER
RECEIVER
SLEEP
CTRL
BD GAME HDMI
S.SEL ECO
STANDBY/ON
RECEIVER SIGNAL SEL
SOURCE
INPUT
3
切換電視輸入以便連接至接收器。
4
開啟重低音揚聲器並調高音量。
注意
切勿在受到陽光直射或車內 加熱設備附近等極熱的場所
中使用或存放電池 這樣會導致電池滲漏 過熱 爆炸
或起火 而且會降低電池的使用壽命或效能
入電
*
子上
否則會導致電池漏液或過熱
處理廢棄電池時 請遵守政府條例或適用於貴國地區的
環境公共指令規則
環繞音效的自動設定MCACC
VSX-824/VSX-524
MCACC 功能是利用隨附的
來測分析揚聲輸出測試
的測設定 將能最佳使用
聽環境
重要
請在安靜的環境中測量
若有 用它置麥 其調
聆聽的耳 或者 子或
克風置於耳朵的高度
若揚聲器與聆聽位置 麥克風 之間有阻礙物 會無法
精準地測量
測量 聆聽 所有外側使
器操作
1
連接隨附的設定麥克風。
MCACC
SETUP
MIC
2
下遙控器上的
BD
鍵以切換為
BD
項目。
3
按下遙控器上的 RECEIVER CTRLVSX-824
RECEIVER
VSX-524/VSX-329,然後按
HOME MENU 鍵。
電視上會出現 Home Menu
4
Home Menu 中選取「Auto MCACC,然後
按下 ENTER
此時會開始自動測量
Home Menu
1
. Auto MCACC
2
. Manual SP Setup
3
. Input Assign
4. Auto Power Down
5. HDMI Setup
6. Network Standby
7. MHL Setup
8. OSD Setup
1
. Auto MCACC
Now Analyzing
Surround Analyzing
Speaker System
X.Over
Speaker Distance
Channel Level
Acoustic Cal EQ
Return
測量需花費 3 12 分鐘
5
遵循螢幕上指示。
出現 Home Menu 畫面時 代表自動設定已完成
若電源遭切斷 連接線的裸線接觸後面板 或是裸露的
*
線相互觸碰 可能會啟動保護電路
請將揚聲器連接線捲繞回正常位置 然後再連接 確定
無法從端子外側看見裸露的連接線 對揚聲器端的連線進
行相同處理
若顯示
ERR
請檢查確認揚聲器已正確連接
6
確定設定麥克風已經脫離。
三腳架
麥克風
VSX-824
VSX-524/VSX-329 VSX-824
5
English
Español
፩ၭ
基本播放功能
多聲道播放
BD DVD
INPUT SELECT
SOURCESLEEP
TV
CONTROL
CD
INPUT
1
4
7
MIDNIGHT
CH
RECEIVER
TUNER
iPod/USB SAT/CBL
GAMETV
SIGNAL SEL
Acous.EQ
PHASE
S.RETRIEVER
ENTER
ADV SURR
AUTO/
DIRECT
VOL
+
10
2
5
8
SPEAKERS
DIMMER
LEV
LEV
SB CH
DISP
CLR
3
6
9
0
ENTER
CH
CH
CH SELECT
MUTE
RETURN
AUDIO
PARAMETER
TOOLS
VOLUME
BAND
MENU
HOME
MENU
iPod CTRL
PTY
TRE
BASS
TOP
MENU
RECEIVER
T
U
N
E
T
U
N
E
P
R
E
S
E
T
P
R
E
S
E
T
RECEIVER
ALC/
STANDARD
STEREO
SLEEP
MUTE
CTRL
BD
AUTO SURR ADV
DVD
USB
TUNER
ADPT
iPod
TUN
GAME
CBL ROKU
SAT
CD
TV
CH LEVEL
HDMI
MHL
BT
NET
S.SEL ECO
STANDBY/ON
ENTER
CLR
SB CH
CH SEL
SP-A/B
Fav
RETURN
BAND
POP UP SUB TITLE DISP
DIMMER STATUS
AUDIO
PRESET TUNE
PTY
AUDIO P.
TOP
MENU
HOME
MENU
RECEIVER
LISTENING MODE
RECEIVER SIGNAL SEL
SOURCE
TOOLS
MENU
SHIFT
BASS
BASS
TRE TRE
INPUT
CH
VOL
2
3
5
1
開啟播放設備。
例如 開啟連接至
HDMI BD IN
端子的 Blu-ray Disc 播放
2
切換接收器的輸入。
例如 按下
BD
選擇
BD
輸入
3
按下 AUTO (VSX-824)AUTO/DIRECT (VSX-
524/VSX-329) 以選擇「AUTO SURROUND
此外 按下
SURR
VSX-824)、
ALC/STANDARD
VSX-524/VSX-329
ADV
VSX-824)、
ADV SURR
VSX-524/VSX-329 可進行多聲道播放 選擇您喜好
的聆聽模式
4
開始播放設備的播放內容。
例如 開始播放 Blu-ray Disc 播放機
5
使用 VOLUME +/– 可調整音量。
SURR
VSX-824)、
ALC/STANDARD
VSX-524/VSX-329
ADV
VSX-824)、
ADV SURR
VSX-524/VSX-329
更聆聽模式
例如重複按
ADV
VSX-824)、
ADV SURR
VSX-524/
VSX-329 選擇 [
EXT.STEREO
]
若重低音揚聲器沒有聲音
原因:
前置揚聲器設為
LARGE
2 聲道音訊輸入期間 不會從重低音揚聲器輸出低頻
率的聲音 而會由前置揚聲器輸出
修正方式:
若您要從重低音揚聲器中輸出聲音 請變更揚聲器設定
有下列 2 種方式
方式 1
將前置揚聲器變更為
SMALL
低頻率的聲音將不會從前置揚聲器輸出 而會由重低音揚
聲器輸出
若前置揚聲器的低頻功能過高 建議不要變更此設定
方式 2
將重低音揚聲器變更為
PLUS
低頻率的聲音將從前置揚聲器與重低音揚聲器輸出
這可能會造成低頻率的聲音過大
若發生此現象 建議不要變更設定 或將設定變更為方
1
l
32
揚聲器設定
VSX-524/VSX-329)、
50
揚聲器設定
VSX-824)。
附註
若不使用遙控器操作
在操作接收器時請按下
RECEIVER CTRL
VSX-824)、
RECEIVER
VSX-524/VSX-329), 然後再操作
操作
NETWORK
僅適用於 VSX-824)、
TUNER
iPod
等裝置時 請在操作前按下各種功能鍵
NET
僅適
用於 VSX-824)、
TUNER
iPod USB
VSX-824)、
iPod/USB
VSX-524/VSX-329 )。
若要聽使同軸接線纖連線連本接器來
裝置的音選擇
C1
同軸
O1
光纖輸入
SIGNAL SEL
。)
VSX-524/VSX-329 VSX-824
6
基本播放功能(續)
收聽收音機
1
按下 TUNER 以選取調諧器。調諧器。
如有必要 按下
BAND
按鍵切換波段 FM AM)。
2
按下 TUNE +/– (VSX-824)TUNE
/
(VSX-524/VSX-329) 以調頻至電台。
按住
TUNE +/–
VSX-824)、
TUNE
/
VSX-524/
VSX-329 約一秒鐘 接收器將開始搜尋下一個電台
若您正在收聽 FM 電台但收訊強度微弱 請按下
BAND
FM MONO 並將接收器設為單聲道接收模式
儲存預設電台
定收個電 便的方讓接器將
儲存起來 日後隨時想聽節目時就可叫出來收聽
1
在收到想要儲存電台的訊號時,按下 TOOLS
預設數字會閃爍
2
按下 PRESET +/ (VSX-824)PRESET
/l
(VSX-524/VSX-329) 選擇台,
後按下 ENTER
在按 數字止閃 收器
收聽預設電台
您必須已儲存一些電台才可進行此項操作
按下 PRESET +/ (VSX-824)PRESET
/l
(VSX-524/VSX-329) 選擇您要的預設電台。
播放iPod
開啟電源至完成啟動需要約一分鐘的時間
1
連接 iPod
2
按下 iPod USB (VSX-824)iPod/USB
(VSX-524/VSX-329) 以選擇 iPod/USB 輸入。
當顯示幕上顯示資料夾及檔案的名稱時 即表示您已可從
iPod 播放音樂
3
使用
/
選取一個類別,然後按下 ENTER
瀏覽該類別。
任何時候要返回上一層時 請按
RETURN
4
使用
/
可瀏覽所選類別(例如專輯)
使用
/l
以移至上一層下一層
5
覽,容,
按下
開始播放。
iPod 隨附的
USB 連接線
iPod/iPhone
收聽網際網路廣播電台
僅適用於 VSX-824
開啟電源至完成啟動需要約一分鐘的時間
重要
使用寬頻網際網路連線時 需與網際網路服務業者簽訂使
用合 細資 您當際網
要收聽網際網路廣播電台 您必須可以進入高速寬頻網際
網路 使 56 K ISDN 數據 能無
體驗到網際網路廣播的優點
存取由第三方提供之內容需要高速網際網路連線 並可能
需要註冊帳號及付費訂閱 第三方內容服務可能會在不經
通知的情況下隨時變更 暫停 中斷或中止 而先鋒對
此相關情況概不負責 先鋒不聲明亦不保證可在特定期間
持續提供內容服務 且對於此類擔保 無論明示或默示
皆不予負責
1
重複按下 NET 以選擇 NETRADIO 輸入。
本接收器需要數秒鐘的時間才能進入網路
2
使用
/
選擇要播放的網際網路廣播電台,然
後按 ENTER
7
English
Español
፩ၭ
基本播放功能(續)
若要以最大限度享受本機的眾多功能
CD-ROM 載入的電腦,選單下載作手冊(PDF
以便閱讀。
功能
播放 USB 裝置
l
25 VSX-524/VSX-329)、 28 VSX-824
享受無線音樂的
Bluetooth
®
ADAPTER
l
31 僅適用於 VSX-824
利用網路功能播放
l
39 僅適用於 VSX-824
設定音訊選項
l
30 VSX-524/VSX-329)、 37 VSX-824
使用 Home Menu
l
32 VSX-524/VSX-329)、 50 VSX-824
疑難排解
36 VSX-524/VSX-329)、 56 VSX-824
附註
VSX-824 本機 AirPlay
請參閱操手冊 39 頁以及 Apple 網站
http://www.
apple.com)。
VSX-824 本機更新
44 )。 使 Mac OS
Safari
手冊第 45
進行更新
© 2014 PIONEER HOME ELECTRONICS CORPORATION
版權所有
<5707-00000-900-1S>
© 2014 PIONEER HOME ELECTRONICS CORPORATION.
All rights reserved.
Printed in Vietnam
PIONEER HOME ELECTRONICS CORPORATION
1-1, Shin-ogura, Saiwai-ku, Kawasaki-shi, Kanagawa 212-0031, Japan
PIONEER ELECTRONICS (USA) INC.
P. O. BOX 1540, Long Beach, California 90801-1540, U.S.A. TEL: (800) 421-1404
PIONEER ELECTRONICS OF CANADA, INC.
340 Ferrier Street, Unit 2, Markham, Ontario L3R 2Z5, Canada TEL: 1-877-283-5901, 905-479-4411
PIONEER EUROPE NV
Haven 1087, Keetberglaan 1, B-9120 Melsele, Belgium TEL: 03/570.05.11
PIONEER ELECTRONICS ASIACENTRE PTE. LTD.
253 Alexandra Road, #04-01, Singapore 159936 TEL: 65-6472-7555
PIONEER ELECTRONICS AUSTRALIA PTY. LTD.
5 Arco Lane, Heatherton, Victoria, 3202, Australia, TEL: (03) 9586-6300
PIONEER ELECTRONICS DE MEXICO S.A. DE C.V.
Blvd.Manuel Avila Camacho 138 10 piso Col.Lomas de Chapultepec, Mexico, D.F. 11000 TEL: 55-9178-4270
K002_B3_En
ӒᎣ޷ӌԥ४ϵѨ
  • Page 1 1
  • Page 2 2
  • Page 3 3
  • Page 4 4
  • Page 5 5
  • Page 6 6
  • Page 7 7
  • Page 8 8
  • Page 9 9
  • Page 10 10
  • Page 11 11
  • Page 12 12
  • Page 13 13
  • Page 14 14
  • Page 15 15
  • Page 16 16
  • Page 17 17
  • Page 18 18
  • Page 19 19
  • Page 20 20

Pioneer VSX-329 Quick start guide

Category
AV receivers
Type
Quick start guide
This manual is also suitable for

Ask a question and I''ll find the answer in the document

Finding information in a document is now easier with AI

in other languages