GroupSTATION
Vaddio GroupSTATION - Document Number 342-0671 Rev B Page 4 of 40
Overview
The Vaddio GroupSTATION is a complete media
collaboration appliance for small and medium
meeting spaces. GroupSTATION incorporates all
the audio & video functions required for group
collaboration in a sturdy and robust form-factor.
This multipurpose appliance is used for local
presentations, PC-based Unified Communications,
and VoIP conferencing. The GroupSTATION
system consists of a table-based MicDock and a
camera/sound bar.
The MicDock functions as the microphone, user interface, and PC interface dock. Four (4) cardioid microphone
elements, each with its own AEC (acoustic echo canceller) circuit, provide a 360° pickup pattern for all
participants. Vaddio’s microphone technology ensures that pristine, crystal clear audio is maintained for both local
and far-end participants with hands-free, automatic operation. A capacitive-touch user interface on the MicDock
provides for dialing, volume and mute along with video controls for zoom, PIP, and a 2-input source selection for
complete operator control during a conference. The MicDock features interfaces for a PC, laptop or tablet, HDMI
or VGA inputs to locally extend the PC to the room monitor and a USB 2.0 UVC and UAC compliant connection.
Once the laptop is docked, media functions are extended from the PC for room operations.
The GroupSTATION wall unit includes a pair of 2-way loudspeakers with a HD camera in the center. Like the
ZoomSHOT™ camera, the GroupSTATION camera has an auto-focus, 19X motorized zoom lens and is directly
wired into the main processor in the camera/speaker unit. ZoomSHOT can be manually positioned for pan and tilt.
The GroupSTATION also includes an HDMI output for the room LCD monitor extending the PC or laptop’s screen
when docked. A supplied single Cat-6 SSTP shielded cable (25-feet) connects the GroupSTATION with the
MicDock carrying power, video, audio, and network making installation a pure breeze. A Premium Wall Mount
with integrated cable tray and a 4x4 PC Interface Cable are both sold separately as accessory options.
Intended Use:
Before operating the device, please read the entire manual thoroughly. The system was designed, built and
tested for use indoors, and with the provided power supply and cabling. The use of a power supply other than the
one provided or outdoor operation has not been tested and could damage the device and/or create a potentially
unsafe operating condition.
Important Safeguards:
Read and understand all instructions before using. Do not operate any device if it has been dropped or damaged.
In this case, a Vaddio technician must examine the product before operating. To reduce the risk of electric shock,
do not immerse in water or other liquids and avoid extremely humid conditions. Do not connect Power over
Ethernet (PoE) cables directly to the RJ-45 ports on the device as damage may result.
Installation Requirements
Please use qualified personnel for installation of the GroupSTATION systems. It is critical that the IT
professionals that install and maintain the network at the place of installation be involved with the provision of the
network for the GroupSTATION IP, VoIP and PC connectivity.
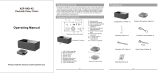
Images:
GroupSTATION Components;
Camera/Sound bar (top) and
MicDock (right) controller, dialer
and PC Interface for the system
Use only the power supply provided with the system. Use of an unauthorized power supply will void all warranties.
The GroupSTATION Cable: The type of LINK cable between the GroupSTATION MicDock and the Camera/Sound Bar is critical
for proper operation. The LINK cable is Cat-6 SSTP (26awg stranded, individually shielded pairs with overall shield, gold
contacts and metal shielded RJ-45. This exact attributes of the cable are required for the high speed data traffic between the
two GroupSTATION devices. A 25’ (7.62m) cable is provided. A 50’ (15.24m), which is the maximum distance between the Dock
and the Camera/Sound Bar, is available as an accessory.