Page is loading ...

Electric Adjustable Height
Standing Desk
Assembly Instructions
www.ergoelements.com
t 415.671.6392

www.ergoelements.com (415) 671-6392 Electric Adjustable Frame-r5 pg 2
Before You Begin
1. Lay the top intended for use
upside-down at on the oor.
2. Lay out all components that were
inside your product package and
check them against the Parts &
Tools List to ensure your product
came with all necessary items. If
there are missing components,
please call Ergo Elements
immediately to have them
shipped to you.
3. Make sure you have ample
workspace in all directions
in a clutter-free and well-lit
environment in advance before
beginning assembly to prevent
any unforeseen collisions and
space restrictions.
Parts & Tools List
2.5mm Hex Allen Tool (1 ea)
5mm Hex Allen Tool (1 ea)
Support Beam (2 ea)
Bracket (2 ea)
Foot Margin (2 ea)
Foot Pad (4 ea)
Lifting System Legs (2 ea)
M8*10 Screws (12 ea)
M6*25 Screws (8 ea)
Gasket 6 Washers (8 ea)
Drive Shaft (1 ea)
Power Supply Control Box
(1 ea with 2 mounting screws)
Controller (1 ea & 2 screws)

www.ergoelements.com (415) 671-6392 Electric Adjustable Frame-r5 pg 3
Assembly Overview
Please review the illustration prior to
assembly to familiarize yourself with
the location of each component.

www.ergoelements.com (415) 671-6392 Electric Adjustable Frame-r5 pg 4
Assembly Instructions
Support Beams
1. Lay the top intended for use
upside-down at on the oor.
2. Using the 5mm Hex Allen Tool
partially unscrew and loosen the
screws that are built into the
3-piece Support Beams just
enough to be able to pull apart
the two end components of each
Support Beam.
3. Then, line up the Support Beam
on your intended top parallel
to each other with their two
side-protruding hole aps
pointing towards each other and
making contact with your top as
pictured. Center them along the
long length of your top as
pictured.
4. Next, pull apart and lengthen
both support beams to your
desired length for your intended
top. Please note that the wider
the base spans beneath your
top, the more stable your desk
will be. If you’re planning to use
an Ergo Elements Brand Top,
the screw holes on the base
will line up with the pre-drilled
threaded holes on the Ergo
Elements Top.
5. Then tighten the screws back to
lock the adjusted length.

www.ergoelements.com (415) 671-6392 Electric Adjustable Frame-r5 pg 5
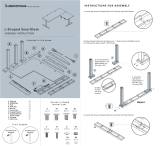
6. While the two Support Beams
lay parallel to each other, place
the two Bracket pieces
against the parallel Support
Beam ends as pictured, so the
ends line up to the two middle
holes of each Bracket piece.
7. Attach each of the two legs of
the Lifting System to where
each of the two Support Beams
meet a Bracket so the
screw holes line up as pictured.
Use the 5mm Hex Allen Tool
to tighten M8*10 Screws into
the six holes on each side.

www.ergoelements.com (415) 671-6392 Electric Adjustable Frame-r5 pg 6
Lifting System Legs
1. Line-up the center of a Foot
Margin onto the end part of
each of the Lifting System Legs
so the bolt holes line up and
attach using the 5mm Hex Allen
Tool to tighten the M6 * 25
Screws and Gasket 6
Washers into the four holes
as pictured.
2. Also be sure to screw-in a Foot
Pad to each underside end of
each Foot Margin.
3. Adjust height of each Foot Pad
to level assembly.

www.ergoelements.com (415) 671-6392 Electric Adjustable Frame-r5 pg 7
Drive Shaft
1. Now it’s time to install the two-
piece Drive Shaft . Partially
loosen each screw in the Drive
Shaft just enough that the outer
shell can move independently of
the inner shaft of the two-piece
Drive Shaft. Partially extend out
the inner shaft end and insert it
about ½ inch into the vacant
gearbox port of one of the Lifting
System Legs .
2. Next, extend out the outer shell
of the Drive Shaft in the
opposite direction and slide it
over the opposing gearbox shaft
about 1 inch until the nearest
outer shell screw completely sits
over this shaft. Then, use the
2.5mm Hex Allen Tool to
tighten all the bolts of the Drive
Shaft to lock it’s position.

www.ergoelements.com (415) 671-6392 Electric Adjustable Frame-r5 pg 8
Electrical Connection
1. Connect the cable extending from
one of the Lifting System Gear
Boxes and the cable from the
Controller into the Power Supply
Control Box in their respective
ports as pictured. Then, plug in the
Power Supply Control box into a wall
outlet.
2. To calibrate the Control Box , push
and hold both the up and down keys
simultaneously for 15 seconds until a
‘BEEP’ sounds. Once you hear a
‘BEEP’, press and hold the down key
until the desk lowers to the lowest
height and three ‘BEEPS’ are heard
to nish the calibration. Calibration
will ensure proper performance of
the whole Lifting System.
3. If ever there is a need to reset the
system, perform calibration again.
4. The Controller has 4 memory banks
where height settings can be stored.
To store a height setting, adjust the
desk to your desired height. Then
press and hold the ‘M’ key for 3
seconds. The Memory Controller
display will ash. Next, press the
numbered key for the memory bank
where you wish to store the setting
in. Your height is now stored in this
numbered memory bank.
5. To set desk height to your stored
setting, press the numbered memory
bank key where your setting is
stored and the desk will move to the
stored height.

www.ergoelements.com (415) 671-6392 Electric Adjustable Frame-r5 pg 9
Desktop
1. Proceed to install your desktop.
If you are installing an Ergo
Elements Top, please refer to
it’s accompanying instruction
manual.
2. If desired, you can also mount
the Power Box and Controller
onto the underside of your
tabletop with the included
mounting screws. If installing an
Ergo Elements Top, please refer
to the Ergo Elements Top
Assembly Manual for Controller
and Control Box placement.
Your
Electric Adjustable Table is now
completely assembled and ready for
action.
/