Page is loading ...

TDP-244/ TDP-245/ TDP-245 Plus/ TDP-247/
TDP-345 Series
USER’S
MANUAL
DIRECT THERMAL BAR CODE PRINTER

i
COPYRIGHT DECLARATION .....................................................................................................1
COMPLIANCES.......................................................................................................................1
1. Introduction ...............................................................................................................5
2. Getting Started ..........................................................................................................5
2.1 Unpacking and Inspection.....................................................................................5
2.2 Equipment Checklist .............................................................................................5
2.3 Printer Parts..........................................................................................................7
2.3.1 Front View .....................................................................................................7
2.3.2 Rear View ......................................................................................................7
3 Setup...........................................................................................................................8
3.1 Setting Up the Printer ...........................................................................................8
3.2 Loading Label Stock .............................................................................................9
3.3 Peel-Off Installation Assembly (Option) .............................................................. 11
3.4 Loading Label for Peel-off Mode (Option) ........................................................... 14
3.5 External Label Roll Mount Installation (Option) ................................................... 16
3.6 Cutter Module Installation (Option) ..................................................................... 17
3.7 Loading Label in Cutter Mode ............................................................................. 20
3.8 Diagnostic Tool ................................................................................................... 21
3.8.1 Start the Diagnostic Tool .............................................................................. 21
3.8.2 Printer Function (Calibrate sensor, Ethernet setup, RTC setup………) ........ 22
3.9 Setting Ethernet by Diagnostic Utility (Option) .................................................... 23
3.9.1 Using USB interface to setup Ethernet interface .......................................... 23
3.9.2 Using RS-232 interface to setup Ethernet interface ..................................... 24
3.9.3 Using Ethernet interface to setup Ethernet interface .................................... 25
3.10. Install Memory Card ......................................................................................... 27
4. Power on Utilities .................................................................................................... 29
4.1 Gap/Black Mark Sensor Calibration .................................................................... 29
4.2 Gap/Black Mark Calibration, Self-test, Dump Mode ............................................ 30
4.3 Printer Initialization ............................................................................................. 35
4.4 Set Black Mark Sensor as Media Sensor and Calibrate the Black Mark Sensor.. 36
4.5 Set Gap Sensor as Media Sensor and Calibrate the Gap Sensor ....................... 36
4.6 Skip AUTO.BAS.................................................................................................. 36
5. Maintenance ............................................................................................................ 37
5.1 Cleaning ............................................................................................................. 37
6. Troubleshooting ...................................................................................................... 39
Contents

ii
LED Status................................................................................................... 39
Print Quality ................................................................................................. 40
7. LED and Button Operation ..................................................................................... 41
7.1 LED .................................................................................................................... 41
7.2 Button Operation................................................................................................. 41
Revise History ............................................................................................................. 45

1
Copyright Declaration
Information in this subject to change without notice and does not represent a
commitment on the part of TSC Auto ID Technology Co., Ltd.. No part of this manual
may be reproduced or transmitted in any form by any means, for any purpose other than
the purchaser’s personal use, without the expressed written permission of T TSC Auto
ID Technology Co., Ltd..
Compliances
CE Class B:
EN55022: 1998+A1: 2000+A2: 2003
EN55024: 1998+A1: 2001+A2: 2003 IEC 61000-4 Series
EN61000-3-2: 2006 & EN61000-3-3: 1995+A1: 2001
FCC Part 15, Class B
UL, CUL
C-Tick:
CFR 47, Part 15/CISPR 22 3
rd
Edition: 1997, Class B
ANSI C63.4: 2003
Canadian ICES-003
TÜ V/Safety: EN60950: 2000
Wichtige Sicherheits-Hinweise
1. Bitte essen Sie diese Hinweis sorgfältig durch.
2. Heben Sie diese Anleitung fűr den späteren Gebrauch auf.
3. Vor jedem Reinigen ist das Gerät vom Stromentz zu trennen. Verwenden Sie
keine Flüssig-oder Aerosolreiniger. Am besten eignet sich ein angefeuchtetes
Tuch zur Reinigung.
4. Die Netzanschluß-Steckdose soll nahe dem Gerät angebracht und leicht
zugänglich sein.
5. Das Gerät ist vor Feuchtigkeit zu schűtzen.
6. Bei der Aufstellung des Gerätes ist auf sicheren Stand zu achten. Ein Kippen oder
Fallen könnte Beschädigungen hervorrufen.
7. Beachten Sie beim Anschluß ans Stromnetz die Anschlußwerte.
8. Dieses Gerät kann bis zu einer Außentemperatur von maximal 40℃ betrieben
werden.

2
CAUTION
1. HAZARDOUS MOVING PARTS IN CUTTER MODULE. KEEP FINGER AND OTHER BODY
PARTS AWAY.
B 급기기
(가정용 정보통신기기)
이 기기는 가정용으로 전자파 적합등록을 한 기기로서
주거지역에서는 물론 모든 지역에서 사용할 수 있습니다.
Important safety instructions:
1. Read all of these instructions and keep them for later use.
2. Follow all warnings and instructions on the product.
3. Disconnect the power plug from the AC outlet before cleaning or if fault happened. Do not use liquid or
aerosol cleaners. Using a damp cloth is suitable for cleaning.
4. The mains socket shall be installed near the equipment and easily accessible.
5. The unit must be protected against moisture.
6. Ensure the stability when installing the device, Tipping or dropping could cause damage.
7. Make sure to follow the correct power rating and power type indicated on marking label provided by
manufacture.
8. Please refer to user manual for maximum operation ambient temperature.
重要安全說明:
1. 閱讀所有這些說明,並保留以備未來使用。
2. 按照產品上的所有警告和說明進行操作。
3. 在清潔前或發生故障時,拔除電源插頭與交流電源插座的連接。
不要使用液體或噴霧清潔劑。建議使用濕布清潔。
4. 電源插座應安裝在設備附近及方便使用處。
5. 本機器必須防止潮濕。
6. 確保安裝設備時的穩定性,翻倒或跌落可能會導致設備損壞。

3
7. 確保按照製造商提供的標籤上標明之正確的額定功率和電源類型進行設定。
8. 請參考使用手冊以確認環境溫度的最大值。
型號差異表
型號
解析度
打印速度
額定
TDP-245 Plus 系列
203 dpi
2, 3, 4, 5, 6, 7 ips
24Vdc, 3.75A
TDP-244 系列
2, 3, 4 ips
24Vdc, 2.5A
TDP-343 Plus 系列
300 dpi
2, 3, 4, 5 ips
24Vdc, 3.75A

4
設備名稱 Equipment name:熱感式/熱轉式條碼印表機,
主型號(型式) Type designation (Type):TDP-247 系列
單元Unit
限用物質及其化學符號
鉛Lead
(Pb)
汞Mercury
(Hg)
鎘Cadmium
(Cd)
六價鉻
Hexavalent
chromium
(Cr
+6
)
多溴聯苯
Polybrominated
biphenyls
(PBB)
多溴二苯醚
Polybrominated
diphenyl ethers
(PBDE)
內外塑膠件
○
○
○
○
○
○
內外鐵件
-
○
○
○
○
○
滾輪
○
○
○
○
○
○
電路板
-
○
○
○
○
○
晶片電阻
-
○
○
○
○
○
積層陶瓷表
面黏著電容
○
○
○
○
○
○
集成電路-IC
-
○
○
○
○
○
電源供應器
○
○
○
○
○
○
印字頭
○
○
○
○
○
○
馬達
-
○
○
○
○
○
插座
-
○
○
○
○
○
線材
-
○
○
○
○
○
備考1.〝超出0.1 wt %〞及〝超出0.01 wt %〞係指限用物質之百分比含量超出百分比含量基準值。
備考2.〝○〞係指該項限用物質之百分比含量未超出百分比含量基準值。
備考3.〝-〞係指該項限用物質為排除項目。
Restricted substances and its chemical symbols
Note 1:“Exceeding 0.1 wt %” and “exceeding 0.01 wt %” indicate that the percentage content of the restricted substance exceeds the
reference percentage value of presence condition.
Note 2:“○” indicates that the percentage content of the restricted substance does not exceed the percentage of reference value of presence.
Note 3:The “−” indicates that the restricted substance corresponds to the exemption.

5
1. Introduction
Thank you for purchasing the TSC TDP-245/245 Plus/247/345 Series Direct Thermal
Bar Code Printer. Although it is a compact desktop printer, it is reliable and with superior
throughput performance.
This printer provides direct thermal printing at user selectable speed of: 2.0, 3.0, 4.0, 5.0,
6.0 or 7.0 inches per second. It accepts roll feed, die-cut, and fan-fold labels for direct
thermal printing. All common bar codes formats are available. Fonts and bar codes can
be printed in 4 directions, 8 different alphanumeric bitmap fonts and a build-in true type
font capability. You will enjoy high throughput for printing labels with this printer.
2. Getting Started
2.1 Unpacking and Inspection
This printer has been specially packaged to withstand damage during shipping. Please
carefully inspect the packaging and printer upon receiving the bar code printer. Please
retain the packaging materials in cover you need to reship the printer.
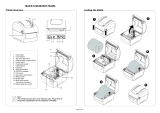
2.2 Equipment Checklist
Printer
BarTender UltraLite CD disk
Quick start guide
USB port cable
External universal switching power supply
Power Cord
Label Spindle
Fixing tab x2
1.5” core adapter x2
If any parts are missing, please contact the Customer Service Department of your
purchased reseller or distributor.

6
Dealer option
Peel off module assembly.
Regular cutter (Guillotine cutter)
Full cut: Media thickness: 0.06~ 0.19mm
Media type: receipt and label liner w/o glue
Partial cut: Media thickness: 0.06~0.12mm
Media type: receipt and label liner w/o glue
Note: Except for the linerless cutter, all regular/heavy duty/care label cutters DO
NOT cut on media with glue.
Main board integrated with internal Ethernet
Internal Ethernet print server module
User option
KP-200
KU-007 plus
External Ethernet print server
External wireless (802.11b/g) print server
External roll mount, media OD. 214 mm (8.4”) with 3” core label spindle
Contact CCD contact scanner
Long range linear image bar code scanner

7
2.3 Printer Parts
2.3.1 Front View
2.3.2 Rear View
Note: The interface picture here is for reference only. Please refer to the product specification for
the interfaces availability.
1
2
3
4
5
6
1. USB Interface
2. Centronics Interface
3. RS-232C DB-9 Interface
4. Power Jack
5. Power Switch
6. Rear Label Guide
Top Cover Open Lever
LED Indicator
Feed Button
Top Cover
Clear Window
Backing Paper Opening
Label Opening
Front Panel

8
3 Setup
3.1 Setting Up the Printer
1. Place the printer on a flat, secure surface.
2. Make sure the power switch is off.
3. Connect the printer to the computer with the Centronics or USB cable.
4 Plug the DC power cord into the power jack at the rear of the printer, and then
plug the AC power cord into a properly grounded receptacle.
Note: When plug power code into the rear of printer please make sure the printer power switch is
off.
Power Cord
Power Switch
Power Supply
Plug
USB
RS-232C
Centronics
Power Jack

9
3.2 Loading Label Stock
1. Insert a 1” label spindle into a paper roll (If your paper core is 1 inch, remove the 1.5
inch core adapter from the fixing tab).
2. Open the printer’s top cover by releasing the green top cover open levers located
on both sides of the printer and lifting the top cover.
3. Place a roll of paper into internal paper roll mount.
4. Feed the paper, printing side face up, through the label guides and place the label
over the platen.
5. Adjust the black center-biased label guides in or out by turning adjustment knob so
they are slightly touch the edges of the label backing.
Label Roll
1” Label Spindle
Label Roll Mount
Platen
1.5” Core Adapter
Adjustment Knob
Fixing Tab
Label Guide
Printing Side Face up


11
3.3 Peel-Off Installation Assembly (Option)
1. Open the top cover.
2. Unscrew the 6 screws in the lower inner cover.
3. Upside down the printer.
4. Unscrew the 2 screws at the lower inner cover
5. Remove the screw at memory card cover.
Remove the
screw
Remove the
screw
Screw
Screws
Screws

12
6. Hold the lower cover and lift up the top cover opening levers to separate the lower
inner cover from the lower cover.
7. Thread the harness red connector through the cable hole at the front side of lower
inner cover. Plug the red peel off module harness connector at the location JP17
(TDP-245) / JP19 (TDP-245 Plus/TDP-247/TDP-345) on the main board. Place
lower inner cover to the lower cover. Install the peel-off module to the lower inner
cover slot.
8. Gently push peel-off panel to lock to the lower inner cover.
9. Reassemble parts in reverse procedures after installing the module.
Lower inner
cover
Lower cover
Peel-off module
assembly
Install one side first
and install another
side

13

14
3.4 Loading Label for Peel-off Mode (Option)
1. Open the peel-off module by pulling it out.
2. Thread the label, printing side facing up, through the label guides and place it on top
of the platen.
3. Thread the label through the liner opening, which is beneath the roller.
4. Adjust the black center-biased label guides by turning adjustment knob to fit the
edge of the label backing.
5. Push the peel-off panel back to the printer.
6. Close the top cover.
Note:
Please refer to videos on TSC YouTube or driver CD.
Peel-off Panel
Peel-off Roller
Roller
Adjustment Knob
Peel-off panel

15

16
3.5 External Label Roll Mount Installation (Option)
1. Attach an external label roll mount on the bottom of the printer.
2. Install a roll of label on the external label roll mount.
3. Feed the label to the external label feed opening through the rear label guide.
4. Open the printer top cover by pulling the top cover open levers.
5. Thread the label, printing side face up, through the label guide and place it on top the
platen.
6. Adjust the label guides by turning adjustment knob to fit the edge of the label
backing.
7. Close the printer top cover.
External Label
Roll Mount
Label
External Label
Feed Opening
Rear Label Guide

17
3.6 Cutter Module Installation (Option)
1. Pull the top cover open levers to open the top cover.
2. Remove the front panel from the lower cover.
3. Remove 6 screws on the lower inner cover.
4. Upside down the printer.
5. Remove two screws at the hinge
6. Remove the screw that fixes the memory card cover.
Screws
Screws
Screw
/