Page is loading ...

Epiphan LUMiO 12x
UserGuide
May 10, 2016
UG110-04

Terms and conditions
This document, the Epiphan web site, and the information contained therein, including but not limited to the
text, videos and images as well as Epiphan System Inc.’s trademarks, trade names and logos are the property
of Epiphan Systems Inc. and its affiliates and licensors, and are protected from unauthorized copying and
dissemination by Canadian copyright law, United States copyright law, trademark law, international
conventions and other intellectual property laws.
Epiphan, Epiphan Video, Epiphan Systems, Epiphan Systems Inc., and Epiphan logos are trademarks or
registered trademarks of Epiphan Systems Inc., in certain countries. All Epiphan product names and logos are
trademarks or registered trademarks of Epiphan. All other company and product names and logos may be
trademarks or registered trademarks of their respective owners in certain countries.
Copyright © 2016 Epiphan Systems Inc. All Rights Reserved.
THE SOFTWARE LICENSE AND LIMITED WARRANTY FOR THE ACCOMPANYING PRODUCT ARE SET FORTH IN
THE INFORMATION PACKET OR PRODUCT INSTALLATION SOFTWARE PACKAGE THAT SHIPPED WITH THE
PRODUCT AND ARE INCORPORATED HEREIN BY REFERENCE. IF YOU ARE UNABLE TO LOCATE THE SOFTWARE
LICENSES OR LIMITED WARRANTY, CONTACT YOUR EPIPHAN REPRESENTATIVE FOR A COPY.
PRODUCT DESCRIPTIONS AND SPECIFICATIONS REGARDING THE PRODUCTS IN THIS MANUAL ARE SUBJECT
TO CHANGE WITHOUT NOTICE. EPIPHAN PERIODICALLY ADDS OR UPDATES THE INFORMATION AND
DOCUMENTS ON ITS WEB SITE WITHOUT NOTICE. ALL STATEMENTS, INFORMATION AND
RECOMMENDATIONS ARE BELIEVED TO BE ACCURATE AT TIME OF WRITING BUT ARE PRESENTED WITHOUT
WARRANTY OF ANY KIND, EXPRESS OR IMPLIED. USERS MUST TAKE FULL RESPONSIBILITY FOR THEIR
APPLICATION OF ANY PRODUCTS.
LIMITATION OF LIABILITY
UNDER NO CIRCUMSTANCES SHALL EPIPHAN BE LIABLE FOR ANY INCIDENTAL, SPECIAL, CONSEQUENTIAL,
EXEMPLARY OR OTHER INDIRECT DAMAGES THAT RESULT FROM THE USE OF, OR THE INABILITY TO USE,
THIS PRODUCT OR THE INFORMATION CONTAINED IN THIS DOCUMENT OR PROVIDED ON EPIPHAN’S WEB
SITE, EVEN IF EPIPHAN HAS BEEN ADVISED OF THE POSSIBILITY OF SUCH DAMAGES. IN NO EVENT SHALL
EPIPHAN’S TOTAL LIABILITY TO YOU FOR ALL DAMAGES, LOSSES, AND CAUSES OF ACTION RESULTING FROM
YOUR USE OF THIS PRODUCT, WHETHER IN CONTRACT, TORT (INCLUDING, BUT NOT LIMITED TO,
NEGLIGENCE) OR OTHERWISE, EXCEED THE AMOUNTS YOU PAID TO EPIPHAN DURING THE MOST RECENT
THREE-MONTH PERIOD IN CONNECTION WITH AMOUNTS WHICH YOU PAID FOR USING THIS PRODUCT.
INFORMATION AND DOCUMENTS, INCLUDING PRODUCT SPECIFICATIONS, PROVIDED IN THIS DOCUMENT
OR THE EPIPHAN WEB SITE ARE PROVIDED “AS IS”. SPECIFICALLY, BUT NOT WITHOUT LIMITATION, EPIPHAN
DOES NOT WARRANT THAT: (i) THE INFORMATION IS CORRECT, ACCURATE, RELIABLE OR COMPLETE; (ii) THE
FUNCTIONS CONTAINED ON THE EPIPHAN WEB SITE WILL BE UNINTERRUPTED OR ERROR-FREE; (iii) DEFECTS
WILL BE CORRECTED, OR (iv) THIS WEB SITE OR THE SERVER(S) THAT MAKES IT AVAILABLE ARE FREE OF
VIRUSES OR OTHER HARMFUL COMPONENTS. EPIPHAN SPECIFICALLY DISCLAIMS ALL REPRESENTATIONS,
WARRANTIES, AND CONDITIONS, EITHER EXPRESS, IMPLIED, STATUTORY, BY USAGE OF TRADE OR
OTHERWISE INCLUDING BUT NOT LIMITED TO ANY IMPLIED WARRANTIES OF MERCHANTABILITY, NON-
INFRINGEMENT, TITLE, SATISFACTORY QUALITY OR FITNESS FOR A PARTICULAR PURPOSE.
For additional terms and conditions, please refer to additional sections in this document.

Thank you for choosing Epiphan!
At Epiphan Video (“Epiphan”), product function and quality are our top priority. We make every effort to make
sure that our products exceed your expectations.
Product feedback
Your feedback is important! We regularly contact our customers to ensure our products meet your
performance and reliability requirements. We strive to continually enhance our products to accommodate
your needs. Please let us know how you think we can improve our products by emailing your suggestions to
info@epiphan.com.
Specifications
Go to the LUMiO 12x product page on the Epiphan website to get the most recent product specifications and
additional information about LUMiO 12x.
Warranty
All Epiphan Systems products are provided with a 100% return to depot warranty for one year from the date
of purchase.
Technical support
Epiphan’s products are backed by our professional support team. If you are having issues with your product,
please gather details about your system and contact our team by:
l Emailing support@epiphan.com
l Live chat via the link on our support site http://www.epiphan.com/support/
l Phone toll free at 1-877-599-6581 or call +1-613-599-6581
Be sure to include as much information about your problem as possible. Including:
l Problem description
l Details of the video or audio source (type, connection, resolution, refresh rate, etc.)
l Product serial number
l Product firmware version (if applicable, from web admin interface)
Copyright © 2016 Epiphan Systems Inc. All Rights Reserved.

4
Table of contents
Table of contents 4
Getting started 6
Quickstart 7
What is LUMiO 12x? 10
What's in the box? 11
Front, back and bottom views 13
Technical specifications 16
LUMiO 12x setup 18
Positioning and connecting your LUMiO 12x 19
Setting up your remote control 20
Operation 21
The remote control 22
Setting up your remote control 24
Understanding the remote control buttons 25
Operation basics 28
Controlling pan, tilt and zoom settings 29
Setting and applying presets 30
Clearing presets 31
Setting video output resolution and frame rate 32
The OSD menu 33
Accessing the OSD menu 34
Navigating the OSD menu 35
Understanding OSD menu settings 36
RS-232 serial port communication 40
VISCAprotocol command list 41
PELCO-D protocol command list 56
PELCO-P protocol command list 58
Support 60
Customer support 61

5
Software and documentation license 62

LUMiO 12x User Guide Getting started
Getting started
Welcome and thank you for buying Epiphan Video’s LUMiO 12x!
This user guide contains all the information necessary to successfully set up and operate your LUMiO 12x PTZ
camera.
This guide helps you get started by providing identification and descriptions of your LUMiO 12x's physical
features and included hardware following by a detailed breakdown of your LUMiO 12x's technical
specifications. A quickstart guide is also included for those who prefer a less detailed approach.
This introductory section of the guide includes the following topics:
l Quickstart
l What is LUMiO 12x?
l What's in the box?
l Front, back and bottom views
l Technical specifications
In the rest of the guide, you'll learn how to position and connect your LUMiO 12x, set and operate your
remote control and configure your LUMiO 12x using additional methods.
Let’s get started!
About this guide
Warnings are depicted as follows.
This is a warning.
Tips and Notes are depicted as follows.
This is a tip.
Throughout this guide there are situations where more than one solution will complete a task. In those cases
the guide describes the simplest or most common variation first.
6

LUMiO 12x User Guide Quickstart
Quickstart
This sections helps you get started with your LUMiO 12x. You'll learn how to position/connect your LUMiO
12x and set up and operate your remote control.
Before you begin, ensure you have the following:
l Your LUMiO 12x camera
l Your remote control (included with purchase)
l DC12V power supply (included with purchase)
l DVI-I, 3G-SDI, and/or HDMI™ cables and adapters, depending on what kind of video format you'd like
your LUMiO 12x to output (not included with purchase).
l A capture appliance, such as Epiphan Pearl or AV.io SDI.
Optionally:
l Screws and mounting panels (if mounting your LUMiO 12x to a wall or ceiling – not included with
purchase).
Positioning and connecting your LUMiO 12x (direct connection)
Positioning and connecting your LUMiO 12x is a simple process that involves physically placing your LUMiO
12x for the best view and connecting the required output cables to transfer video output to your capture
appliance.
To position and connect your LUMiO 12x:
1. Place your LUMiO 12x in the desired location (i.e. on a flat surface, a tripod or mounted to a wall).
2. Connect your power supply cable from an electrical outlet to the back of your LUMiO 12x.
3. Connect your video output cable (i.e. 3G-SDI, DVI-I) from the back of your LUMiO 12x to your capture
appliance.
7

LUMiO 12x User Guide Quickstart
Next you'll learn how to use the remote control to operate your LUMiO 12x.
Setting up your remote control
Your remote control allows you to control your LUMiO 12x movements and settings but requires a bit of
initial configuration before it's ready for use.
To set up your remote control:
1. Ensure your LUMiO 12x is connected to the power supply and that the
rear indicator light is a solid red (see Front, back and bottom views for
exact location of indicator lights).
2. Point the remote control at your LUMiO 12x and press the POWER
button; your LUMiO 12x powers on and performs a quick 15 second self-
configuration (the front indicator light on your LUMiO 12x turns a solid
blue when self-configuration is complete – see The remote control for a
detailed button layout).
3. Point the remote control at your LUMiO 12x and press and hold the SET1
button for about 4 seconds until the front indicator light on your LUMiO
12x flashes purple; your LUMiO 12x is now ready to pair to your remote
control.
4. Keep your remote control pointed at your LUMiO 12x and press the
CAM1 button; your LUMiO 12x is now fully paired to the remote control.
Now you'll learn how to issue basic control commands to your LUMiO 12x using
the remote control.
Controlling your LUMiO 12x with the remote control
Your remote control allows you to issue basic control commands, such as pan, tilt and zoom adjustments to
your LUMiO 12x along with more advanced setting customizations.
8

LUMiO 12x User Guide Quickstart
To control your LUMiO 12x with the remote control:
1. Ensure that your LUMiO 12x is powered on (the front indicator light should be solid blue – see Front,
back and bottom views for exact location of indicator lights).
2. Press the CAM 1 button you mapped to your LUMiO 12x in Setting up your remote control.
3. Point the remote control at your LUMiO 12x and press the +/- buttons to control the focus (manual
focus must be enabled) and zoom settings, and press the arrow buttons to control the pan and tilt
settings.
Your LUMiO 12x is now all set up and ready to capture video content!
What's next?
Now that you've set up your LUMiO 12x, configured your remote control and learned how to control your
LUMiO 12x, you can learn more about additional operation and configuration options. You can look at topics
such as:
l Front, back and bottom views to learn about the visual features of your LUMiO 12x, including all ports
and connectors.
l The remote control for a detailed guide on all buttons on the remote control, how to set presets and
how control your LUMiO 12x.
l The OSD menu for instruction on how to change settings on your LUMiO 12x using the on screen
display (OSD) menu.
l RS-232 serial port communication for an overview of how to operate your LUMiO 12x using VISCA,
PELCO-P and PELCO-D serial port communication protocols.
Refer to the table of contents for a complete list of the topics covered.
9

LUMiO 12x User Guide What is LUMiO 12x?
What is LUMiO 12x?
LUMiO 12x is a portable and versatile HD pan-tilt-zoom (PTZ) camera that can be placed comfortably on a flat
surface, secured on a wall, ceiling or mounted on a tripod. LUMiO 12x captures crystal-clear HD video at 60
fps and outputs in DVI-I, HDMI and 3G-SDI video formats.
LUMiO 12x captures the finest of details with its 12x optical zoom capability and offers true video capture
flexibility with its 72.5° wide angle view and 6.3° zoom angle view.
The included remote control syncs with up to 4 different LUMiO 12x cameras and allows you to operate the
pan/tilt movements and zoom/focus setting adjustments of your LUMiO 12x from a distance. You can save
up to 128 unique pan, tilt and zoom settings to specific presets on your remote control and apply each preset
to your LUMiO 12x with the press of a button.
Connect up to 4 LUMiO 12x cameras to a capture appliance, such as Epiphan's all-in-one live production
mixer, Pearl, to create custom, multi-camera layouts and switch between layouts while streaming and
recording for a dynamic, engaging and high-definition video capture experience!
10

LUMiO 12x User Guide What's in the box?
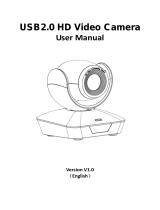
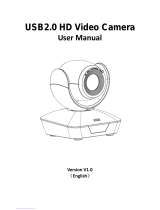
What's in the box?
Within the box you'll find the following items:
1. Your LUMiO 12x video camera
2. One infrared (IR) remote control (requires 2 AAA batteries sold separately)
3. One power supply cable (the exact cable you receive depends on your region)
4. One DC12V power adapter
5. VISCA RS-232 cable
6. Lens cap
7. Adhesive rubber mounting pad
Table 1 Description of included purchase contents (for identification only, color and appearance of individual items may
vary).
Name Image Description
LUMiO 12x video
camera
Your LUMiO 12x pan-tilt-zoom camera.
Infrared (IR)
remote control
A remote controller to operate your LUMiO 12x
manually from a distance (powered by 2 AAA
batteries – sold separately).
Power cable (power
cable may differ
depending on
region)
Connects to an electrical outlet to supply power to
your DC12V power supply.
DVI-to-HDMI
adapter
An adapter that is used to convert between DVI
signals and HDMI signals.
11

LUMiO 12x User Guide What's in the box?
Name Image Description
DC12V power
supply
Connects to your power cable to convert electrical
energy and supply power to your LUMiO 12x.
VISCA RS-232 cable
Connects your computer to your LUMiO 12x to
allow issuing commands via serial port.
Lens cap
Rubber cap that covers and protects your LUMiO
12x's lens when not in use.
Adhesive rubber
mounting pad
Sticks over the mounting holes on the bottom of
your LUMiO 12x and is designed to spread the
pressure of securely fastened alignment pins and/or
screws.
12

LUMiO 12x User Guide Front, back and bottom views
Front, back and bottom views
In the front, your LUMiO 12x has its camera lens, the camera base, the IR receiver panel and the power
indicator light. The rear panel features a series of output ports and a power input port, and the bottom of
your LUMiO 12x has a dial switch and a few mounting installation holes. See below for a complete list of
LUMiO 12x's physical features.
Table 2 LUMiO 12x front view descriptions
Label Name Description
1 Camera lens Captures video content.
2 Camera base Supports and balances the weight of the camera.
3 Indicator light
Displays a colored light to indicate the status of your LUMiO 12x and
its response to commands from the remote control.
Blue light (solid): LUMiO 12x is powered on.
Red light (flashing continuously): LUMiO 12x is receiving commands
from the remote control.
Purple light (one quick flash): A setting or mode is changed via the
remote control.
4 IR receiver panel Receives signals from the remote control.
13

LUMiO 12x User Guide Front, back and bottom views
Table 3 LUMiO 12x back view descriptions
Label Name Description
5
VISCA IN/OUT (RS-232)
ports
RS-232 serial port connections. Allows issuing of RS-232 commands
using VISCA/PELCO-D/PELCO-P protocols.
6 CVBS output port Not supported.
7 3G-SDI output port
Outputs SDI video signals from LUMiO 12x (3G-SDI cable not
included with purchase).
8
DVI-I (HDMI) output port
Outputs DVI-I video signals (and HDMI with adapter) from LUMiO 12x
(cable/adapter not included with purchase).
9 12V DC power input port Connects to the power supply to provide power to your LUMiO 12x.
10 Power indicator light
Displays a red light to indicate your LUMiO 12x is plugged in and
receiving power.
14

LUMiO 12x User Guide Front, back and bottom views
Table 4 LUMiO 12x bottom view descriptions
Label Name Description
11 Rubber pads (x4)
Lightly adheres to most flat surfaces to ensure your LUMiO 12x stays
in place.
12 DIP switch Unused.
13 Tripod mount hole Tripod mounting connection point (accepts a 1/4"-20 UNC bolt).
14 Additional mount holes Connection points for tripod alignment pins.
15

LUMiO 12x User Guide Technical specifications
Technical specifications
Technical specifications for LUMiO 12x are included in the table below.
Model TLC-300-S Series
Sensor 1/2.3-inch high-quality 12MP HD CMOS sensor
Output ports DVI-I (HDMI™), 3G-SDI
Output resolutions 720p, 1080p, 720i, 1080i
Output frame rates 25, 29.97, 50, 59.94
Optical zoom 12x
Digital zoom 2x
View angle 6.3° (zoom) and 72.5° (wide)
Pan rotation angle -170° to +170°
Tilt rotation angle -35° to +90°
Pan rotation speed 0° to 120° per second
Tilt rotation speed 0° to 80° per second
Number of presets 128
Control port RS-232 and RS-485
Signal-to-noise ratio
(SNR)
>50 dB
Focal length
3.92 mm (zoom) to 47.32 mm (wide);
35 mm equivalent focal length: 22.3 mm (zoom) to 269.7
mm (wide)
Minimum lux 0.01 lux
White balance Auto/Manual
Focus Auto/Manual
Iris Auto/Manual
16

LUMiO 12x User Guide Technical specifications
Electronic shutter Auto/Manual
Back light
compensation (BLC)
Auto/Manual
Input voltage DC 12V
Dimensions (height x
width x depth)
173 mm × 220 mm × 117 mm (6.8 in. × 8.66 in. × 4.6 in.)
Net weight 1.25 kg
Country of origin China
17

LUMiO 12x User Guide LUMiO 12x setup
LUMiO 12x setup
Your LUMiO 12x comes fully assembled and is ready to connect to your capture appliance right out of the
box.
Setup involves preparing your new LUMiO 12x to transmit video signals, which includes physical positioning
and connecting the power supply/video output cables to your capture appliance. The remote control also
requires some initial configuration to pair to your LUMiO 12x.
Before setting up your LUMiO 12x, make sure you have the following:
l Your LUMiO 12x camera
l The remote control
l DC12V power supply (included with purchase)
l DVI-I, 3G-SDI, and/or HDMI cables and adapters, depending on what kind of video format you'd like
your LUMiO 12x to output (not included with purchase).
l A capture appliance, such as Epiphan Pearl or AV.io SDI.
Optionally:
l Screws and mounting panels (if mounting your LUMiO 12x to a wall or ceiling – not included with
purchase).
Topics in this section include:
l Positioning and connecting your LUMiO 12x
l Setting up your remote control
18

LUMiO 12x User Guide Positioning and connecting your LUMiO 12x
Positioning and connecting your LUMiO 12x
Positioning and connecting your LUMiO 12x is a simple process that involves physically placing your LUMiO
12x for the best view and connecting the required output cables to transfer video output to your capture
appliance.
To position and connect your LUMiO 12x
1. Place your LUMiO 12x in the desired location (i.e. on a flat surface, a tripod or mounted to a wall).
2. Connect your power supply cable from an electrical outlet to the back of your LUMiO 12x.
3. Connect your video output cable (i.e. 3G-SDI, DVI-I, HDMI) from the back of your LUMiO 12x to your
capture appliance.
19

LUMiO 12x User Guide Setting up your remote control
Setting up your remote control
Your remote control requires a bit of initial configuration before it can be used to control your LUMiO 12x.
To set up your remote control:
1. Ensure your LUMiO 12x is connected to the power supply and that the
rear indicator light is a solid red (see Front, back and bottom views for
exact location of indicator lights).
2. Point the remote control at your LUMiO 12x and press the POWER
button; your LUMiO 12x powers on and performs a quick 15 second self-
configuration (the front indicator light on your LUMiO 12x turns a solid
blue when self-configuration is complete – see The remote control for a
detailed button layout).
3. Point the remote control at your LUMiO 12x and press and hold the SET1
button for about 4 seconds until the front indicator light on your LUMiO
12x flashes purple; your LUMiO 12x is now ready to pair to your remote
control.
4. Keep your remote control pointed at your LUMiO 12x and press the
CAM1 button; your LUMiO 12x is now fully paired to the remote control.
20
/