Page is loading ...

P/N: 501012500
Quick Start Guide
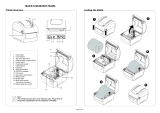
Package Content
After removing the printer out of its box, verify that the following items are included:
• LB-1000 Label Printer
• Quick Start Guide (this document)
• Power Cord
•
# #
• USB Communication cable
• (x2) Ribbon Spindle
• Ribbon Paper Core
• Label Spindle
*These items may be different depending on the product configuration.
Printer Overview
Note:
The interface picture here is for reference only. Please refer to the product specification for the interfaces availability.
LED
Indicator
Power
Switch
Feed
Button
Top Cover
Open Tab
Power Jack Socket
RS-232C Interface (Optional)
Centronics
Interface (Optional)
USB Interface
Ethernet Interface
(Optional)
SD Card Socket
(Optional)

P/N: 501012500
Printer Overview
Button Functions
LB-1000 Label Printer has one Feed Button and one colored LED to indicate its status.
(1) Feed labels (
)
When the printer is ready, press the button to feed one label to the beginning of next label.
(2) Pause the printing job
When the printer is printing, press the “FEED (
)” button to pause a print job. When the printer is paused the LED will be green
blinking. Press the button again to continue the printing job.
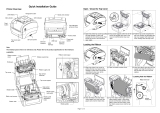
Ribbon and Media Loading Path
Ribbon Rewind
Spindle
Printer Top Cover
Fixing
Tab
Ribbon Rewind
Hub
Thermal Head
Release Button
P
aper Roll
Mount
Print Head
Ribbon Supply
Spindle
Ribbon Supply
Hub
Platten
Roller
Gap
Sensor
Media
Guide
Black Sensor Mark
Media
Bar
Status
LED
Feed Button
Ribbon
Ribbon
rewind
hub
Print head
Paper core
Media
Media bar
Gap sensor
Platen roller
Black mark sensor
Media guide

P/N: 501012500
Loading the Ribbon
(1) Open the printer top cover by
press
ing the
top cover open tabs located on each sid
e of
the printer.
(2)
Insert the
paper core to the
ribbon rewind
spindle.
(3)
Insert the left side of ribbon rewind spindle to
the ribbon rewind hub first then insert the
right side of ribbon rewind spindle to the hole
at the right side of ribbon mechanism.
(4)
Push the print head release button to open
the print head mechanism.
(5) Insert the ribbon to the ribbon spindle.
(6)
Insert the left side of ribbon supply spindle to
the ribbon supply hub first then insert the
right side of ribbon supply sp
indle to the hole
at the right side of ribbon mechanism.
(7
)
Pull the ribbon through the print head
and
then stick the ribbon onto the ribbon re
wind
paper core.
Keep the ribbon flat and without
wrinkles.
(8
)
Turn the ribbon rewind
hub
until the
ribbon
plastic leader is thoroughly wound and the
black section of the ribbon covers the print
head.
(9
) Close the print head
mechanism
by both
hands and make sure the latches
are
engaged securely.
Loading the Media
(1)
Open the printe
r top co
ver by p
ress
ing the
top cover open tabs located on each side
of
the printer.
(2)
Insert the media supply spindle into the paper
roll and use two fixing tabs to fix the paper roll
onto the center of the spindle.
(3) Place the
paper
roll
onto the paper roll
mount. (If your paper width is 4 inch,
you
can remove the fixing tabs from the
supply
spindle.)
(4)
Push the print head release button to open
the print head mechanism.
(5)
Feed
the paper, printing side face up, through
the media bar, media senso
r and place the
label leading edge onto the platen roller. Move
the media guides to fit the label width.
(6)
Close the print head mechanism
by both
hands and make sure the latches
are
engaged securely.
(7)
Use “
Diagnostic Tool
” to s
et the media sensor typ
e and calibrate the selected sensor.
(Start the “Diagnostic tool”
Select the “Printer
Configuration” tab Click the “Calibrate Sensor” button ) Please refer to the diagnostic utility quick start guide for more information.
Note: Please calibrate the gap/black mark sensor when changing the media.
In case of changing the ribbon, the calibration process is not
necessary.

P/N: 501012500
Diagnostic Tool
Bematech’s Diagnostic Tool Utility is an integrated tool incorporating features that enable you to explore a printer’s settings/status;
change a printer’s settings; download graphics, fonts and firmware; create a printer bitmap font; and send additional commands to a
printer. With the aid of this powerful tool, you can review printer status and settings in an instant, which make it much easier to
troubleshoot problems and other issues.
Start the Diagnostic
Tool
:
(1) Double click on the Diagnostic tool icon to start the software.
(2) There are four features (Printer Configuration, File Manager, Bitmap Font Manager, Command Tool) included in the Diagnostic
utility.
(2) The detail functions in the Printer Function Group are listed as below.
Function
Description
Calibrate Sensor
Calibrate the sensor specified i
n the Pri
nter Setup group media
sensor field
Ethernet Setup
Setup the IP address, subnet mask, gateway for the on board Ethernet
RTC Time
Synchronize printer Real Time Clock with PC
Print Test Page
Print a test page
Reset Printer
Reboot printer
Factory Default
Initialize the printer and restore the settings to factory default.
Dump Text
To activate the printer dump mode.
!"
Ignore AUTO.BAS
Ignore the downloaded AUTO.BAS program
Configuration Page
Print printer configuration
# $
Password Setup
Set the password to protect the settings
* For more information and features about this printer, please refer to the User’s Manual.
The User
’s Manual can be
downloaded at Bematech website: www.bematech.com
* Specifications, accessories, parts and programs are subject to change without notice.
Features tab
Printer functions
Interface
Printer Status
Printer setup
/