Brother RJ-3050 User guide

Category
POS/mobile printers
Type
User guide

This manual is also suitable for

Brother RJ-3050Ai is a portable printer designed for on-the-go printing of receipts, labels, and other documents. It features a rechargeable Li-ion battery, allowing for cordless operation, and can connect to devices via USB, Bluetooth, or Wi-Fi. The printer is compatible with RD Rolls and can print on 3" (76.2 mm) receipt paper. It also has a built-in cutter for easy separation of prints. With its compact size and versatile connectivity options, the Brother RJ-3050Ai is a convenient solution for mobile printing needs.

Brother RJ-3050Ai is a portable printer designed for on-the-go printing of receipts, labels, and other documents. It features a rechargeable Li-ion battery, allowing for cordless operation, and can connect to devices via USB, Bluetooth, or Wi-Fi. The printer is compatible with RD Rolls and can print on 3" (76.2 mm) receipt paper. It also has a built-in cutter for easy separation of prints. With its compact size and versatile connectivity options, the Brother RJ-3050Ai is a convenient solution for mobile printing needs.

Check that the package contains the following before using the printer.
Installing the Rechargeable Li-ion Battery
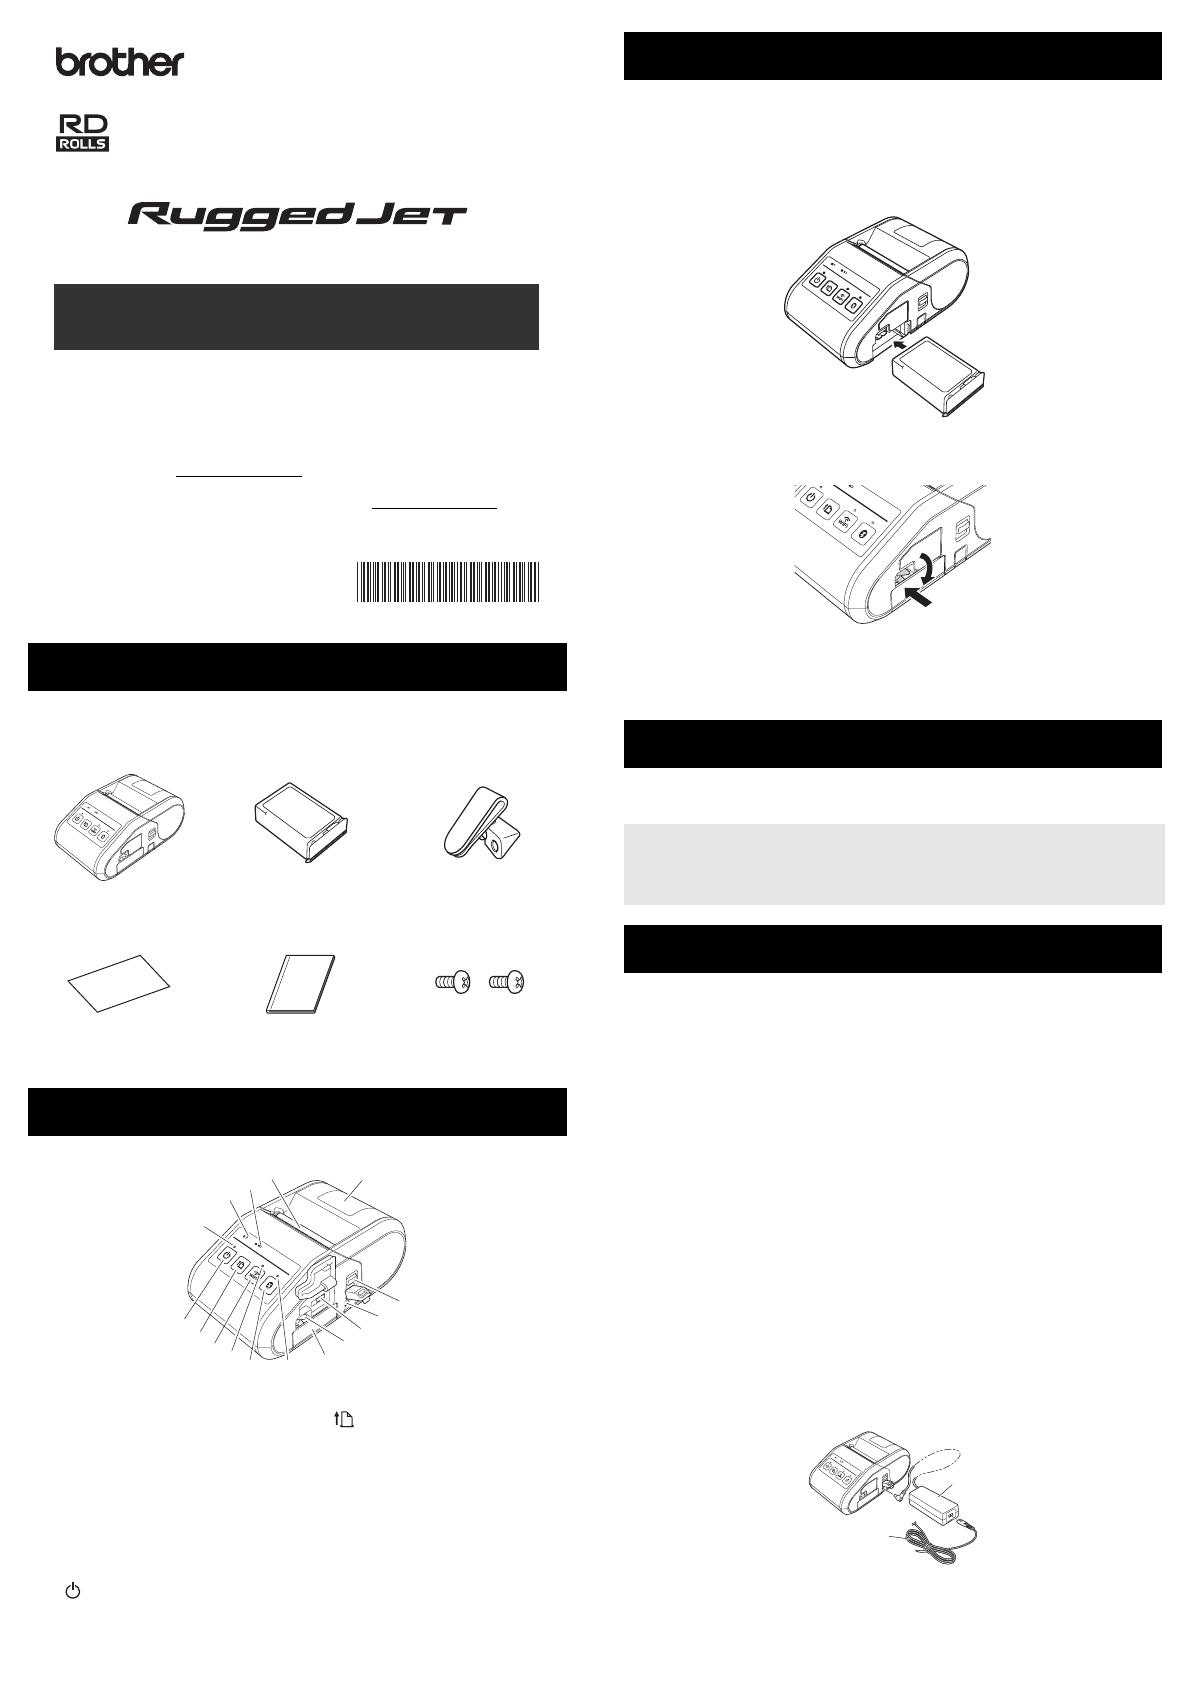
1. Make sure that the battery latch is lifted up, and then insert the battery
into the battery compartment with the battery cover attached to the
battery. Make sure that the terminal end of the battery is facing inward.
2. With the battery inserted and while pushing the battery lightly into the
cavity, lower the battery latch until it clicks locking the battery in place.
Removing the Rechargeable Li-ion Battery
While pushing the battery lightly, lift the battery latch to unlock the battery, and
then remove the battery.
On: Press and hold the Power button until the POWER indicator is lit in green.
Off: Press and hold the Power button until the STATUS indicator is lit in red.
1. Make sure that the rechargeable Li-ion battery is installed in the printer.
2. Use the AC adapter and AC power cord to connect the printer to an AC
power outlet (see Connecting to an AC Power Outlet (Optional)), or use
the car adapter to connect the printer to a DC power outlet (see
Connecting to a DC Power Outlet (Optional)).
3. The battery indicator light is orange when the battery is charging.
When the rechargeable Li-ion battery is fully charged, the battery
indicator light turns off. Disconnect the AC adapter or car adapter from
the DC connector.
For details, see the Online User’s Guide.
Connecting to an AC Power Outlet (Optional)
Connect the printer to a nearby AC power outlet to charge the rechargeable
battery.
1. Connect the AC adapter to the printer.
2. Connect the AC power cord to the AC adapter.
3. Connect the AC power cord to a nearby AC power outlet (100 -
240 VAC, 50 - 60 Hz).
Unpacking the RJ-3050/3050Ai
Printer Rechargeable Li-ion
Battery
Belt clip
User’s Guide Product Safety Guide Phillips screw
General Description
1 Battery compartment
2 Battery latch
3 Mini-USB port
4 DC connector
5 Cover open lever
6 RD Roll compartment cover
7 Paper outlet
8 Battery indicator
9STATUS indicator
10 POWER indicator
11 (Power) button
(To turn the printer on/off)
12 (Feed) button
(To feed the paper or print the
printer settings)
13 Wi-Fi button
14 Wi-Fi indicator
15 Bluetooth button
(To communicate with your
Bluetooth-equipped
computer/adapter or your
network access point/router)
16 Bluetooth indicator
English
Español
Thank you for purchasing the Brother RuggedJet RJ-3050/3050Ai mobile printer.
Read the included User’s Guide and Product Safety Guide, before using the
printer. For detailed operation instructions, see the Online User's Guide (Brother
Solutions Center at support.brother.com
). We suggest that you keep these
documents in a handy place for future reference. To download the latest
manuals, please visit the Brother Solutions Center (support.brother.com
),
where you can also download the latest drivers and utilities for your printer, read
FAQs and troubleshooting tips or learn about special printing solutions.
Printed in China
D00HXL001
RJ-3050/3050Ai
User’s Guide
1
2
3
4
5
6
7
8
9
11
12
13
15
10
16
14
Using the Rechargeable Li-ion Battery
Turning the Printer On or Off
NOTE
Do NOT remove the battery or power to turn off the printer until the
STATUS indicator goes off .
Recharging the Li-ion Battery
1 AC adapter
2 AC power cord
1
2
Connecting to a DC Power Outlet (Optional)
Connect the printer to your vehicle’s 12 V DC power outlet (cigarette lighter,
etc.) to charge the rechargeable battery.
1. Connect the car adapter to the vehicle’s 12 V DC power outlet.
2. Connect the car adapter to the printer.
1. Install the printer driver and software downloaded from the web page.
(See Installing the Drivers section.)
2. Make sure that the printer is powered using a charged battery.
3. Insert the RD Roll.
4. Press and hold the (Power) button to turn the printer on. The POWER
indicator should be green.
5. Connect the printer to a computer or handheld device using either a
USB cable, Bluetooth, or Wi-Fi.
6. Print receipts.
For details, see the Online User’s Guide.
1. Push and hold the cover open lever to open the RD Roll compartment
cover.
2. Open the roll guides by lifting up the roll guide adjustment lever (1) and
pulling the roll guide outwards.
Insert an RD Roll into the RD Roll compartment with the roll feeding
from the bottom as shown.
3. While lifting up the roll guide adjustment lever (1), push in both roll
guides (2) to the roll width. Make sure that RD Roll is positioned straight
in the RD Roll compartment.
4. Close the RD Roll compartment by pressing down on the center of the
cover until it latches.
1. Push the cover open lever, and then open the RD Roll compartment
cover.
2. While pushing the roll release lever, tilt the roll guide slightly, and then
remove the roll. The roll can be removed without changing the position
of the roll guide.
Do not forcefully tilt the roll guide too far. Otherwise, the roll guide could
break.
1 Car adapter
NOTE
A battery charger (option) and cradle (option) can also be used for
charging.
Printing Receipts
Inserting the RD Roll
1 Cover open lever
1 Roll guide adjustment lever
2 Roll guide
1
1
2
1
Removing the RD Roll
1 Roll release lever
1
12
When using the printer outside the office, you can attach the included belt clip
to the printer and secure the belt clip to your belt.
1. Secure the Phillips-head screws to the rear of the printer as shown.
2. Attach the clip to your belt.
Please install the printer driver and P-touch Editor, software before using the
printer.
1. Visit our website (install.brother) and download the installer for the
software and documents.
2. Double-click the downloaded .exe file and follow the on-screen
instructions to proceed with the installation. In the dialog box for
selecting which items to install, select the necessary software.
Bluetooth Connection
1. Press and hold the (Power) button to turn the printer on, and then
press the Bluetooth button.
2. Use your Bluetooth management software to discover the printer.
Bluetooth communication is now available.
Wi-Fi Connection
1. Press and hold the (Power) button to turn the printer on, and then
press the Wi-Fi button. Wi-Fi communication is now available.
For details, see the Online User’s Guide.
Example: G = Indicator is blinking in green
Attaching the Belt Clip
1Belt clip
2 Phillips screw
IMPORTANT
Make sure that the belt clip is attached securely to the printer. There
is a risk of injury if the belt clip is not attached securely and the printer
falls.
Make sure that the belt clip is attached securely to the wearer's belt.
There is a risk of injury if the belt clip is not attached securely and the
printer falls.
Installing the Drivers
Wireless Network Connections
IMPORTANT
In order for the printer and your Bluetooth-equipped computer or adapter
to communicate, you must first pair the printer with the computer or
handheld device using the Bluetooth management software.
IMPORTANT
In order for the printer and your network access point or router to
communicate, you must first install the printer driver and Printer Setting
Tool.
2
1
LED Indicators
= Indicator is lit
G = Green
O = Orange
R = Red
B = Blue
= Indicator is blinking
=
Indicator blinks 1 or 2 times in each color, then
turns off
= Indicator is lit or blinking in any color or pattern
(off) = Indicator is off
POWER STATUS
(Wi-Fi)
(Bluetooth)
Description
G
Power on
O
Roll cover open
G
Receiving data
Transferring data
G
R
Error
Print error
Feed error
Cover open error
Communication error
Image processing error
Database search error
No template error
Access point search error
Access point
connection error
Security error
R R
(off) (off)
Error
Battery error
Mass storage error
R R B B
System error
B
(Once every
3 seconds)
Wireless on, not
connected
B
Wireless on, connected
B
(Once every
second)
Now setting WPS
B
Bluetooth on
B
(Once every
second)
Pairing with Bluetooth
B
(Once every
2 seconds)
Connecting to an Apple
device (iPad, iPhone, or
iPod touch)
O
(off)
B B
Now resetting
O
(off)
B B
Formatting complete
(When [Print Data after
being Printed] is set to
[Erase])
O
Now cooling
G G
(off) (off) In mass storage mode
G G
(off)
B
Processing file in mass
storage mode
G R
(off) (off) Initializing
Maintenance of the printer may be carried out as required. However, some
environments may require that maintenance must be done more frequently
(e.g. in dusty conditions).
Print Head Maintenance
Use a cotton swab to wipe the print head.
Roller Maintenance
Use a piece of cellophane tape or a lint-free cloth to remove dirt from the
roller. After cleaning the roller, make sure that no lint or other material remains
on the roller.
Paper Outlet Maintenance
If the paper outlet becomes dirty, press and hold the (Power) button to turn
the printer off and clean the paper outlet with a cloth slightly moistened with
isopropyl alcohol.
You can use the (Feed) button to print a report that lists the following
printer settings:
Program version
Printer usage history
Missing dot test pattern
Printer setting information
List of transferred data
Network setting information
1. Make sure that a roll of 3" (76.2 mm) receipt paper has been loaded and
the RD Roll compartment cover is closed.
2. Turn on the printer.
3. Press and hold the (Feed) button until the POWER indicator starts
blinking in green. The settings will print.
For details, see the Online User’s Guide.
Brother Global Web Site: www.brother.com
Brother Developer Center: www.brother.com/product/dev
For Frequently Asked Questions (FAQs), Product Support and Technical
Questions, and Driver Updates and Utilities:
support.brother.com
(Battery)
Description
O
(Once every second)
Battery needs recharging
O
(Twice every 4 seconds)
Rechargeable battery power: low
O
(Once every 4 seconds)
Rechargeable battery power: half
O
Charging
(off)
Rechargeable battery power: full
Charging complete
Maintaining the Printer
1 Print head
2 Roller
3 Paper outlet
1
Printing the Printer Set-up
Information
NOTE
You can use the Printer Setting Tool to set in advance which items will
be printed.
The node name appears in the Printer Settings. The default node
name is “BRWxxxxxxxxxxxx”. (“xxxxxxxxxxxx” is based on your
printer’s MAC Address / Ethernet Address.)
NOTE
To print the Printer Set-up Information, we recommend to use 3" (76.2
mm) receipt paper.
This operation can also be performed using the Printer Setting Tool.
Internet Addresses
  • Page 1 1
  • Page 2 2
  • Page 3 3
  • Page 4 4

Brother RJ-3050 User guide

Category
POS/mobile printers
Type
User guide
This manual is also suitable for

Brother RJ-3050Ai is a portable printer designed for on-the-go printing of receipts, labels, and other documents. It features a rechargeable Li-ion battery, allowing for cordless operation, and can connect to devices via USB, Bluetooth, or Wi-Fi. The printer is compatible with RD Rolls and can print on 3" (76.2 mm) receipt paper. It also has a built-in cutter for easy separation of prints. With its compact size and versatile connectivity options, the Brother RJ-3050Ai is a convenient solution for mobile printing needs.

Ask a question and I''ll find the answer in the document

Finding information in a document is now easier with AI