Page is loading ...

NYC-CRV-C
SURFACE
Page 1 of 2
Beghelli U.S.A., 3810 Executive Way, Miramar, Florida, Tel: (954) 442-6600
07/ 07/ 22
INSTALLATION INSTRUCTIONS
IMPORTANT SAFEGUARDS
Read & Follow All Safety Instructions
When using electrical equipment, basic safety precautions should always be followed including:
1. Disconnect power before performing work on electrical equipment.
2. Do not use outdoors.
3. Do not mount near gas or electric heaters.
4. Do not let power cords touch hot surface.
5. Equipment should be mounted in locations and at heights where it will not be subjected to tampering.
6. The use of accessory equipment not recommended by Beghelli Inc., may cause an unsafe condition, and will void
the unit’s warranty.
7. Do not use this equipment for other than its intended purpose.
8. Servicing of this equipment should be performed by a qualied service personnel.
9. Allow battery to charge for 24 hours before rst use.
10. DO NOT install in unstable, loose or breakable surfaces.
11. DO NOT let objects impact or exert force on the surface of the xture.
SAVE THESE INSTRUCTIONS!
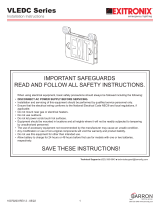
WIRING DIAGRAM (SEE FIG. 1)
1. Connect the white wire to neutral.
2. If using 120V, connect the black wire to the hot lead.
3. If using 277V, connect the orange wire to the hot lead.
4. Cap the unused lead.
Surface Ceiling Mount Surface Wall Mount
FIG.1
FIG.2 FIG.3

NYC-CRV-C
SURFACE
Page 2 of 2
Beghelli U.S.A., 3810 Executive Way, Miramar, Florida, Tel: (954) 442-6600
07/ 07/ 22
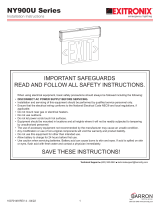
CEILING MOUNT (see Fig. 4)
1. Knockout side center hole, insert plastic washer and
assemble canopy using M4*8mm screws.
2. Remove trim plate in order to connect battery.
3. Feed AC supply wires through the center hole.
4. Assemble the back of the trim plate using M3*15 mm screws.
5. Attach crossbar to junction box with the longer part of the
crossbar laying ontop of the J-Box.
6. Route the proper wires from the housing to the J-Box through
the mounting hole and connect inside J-Box. (see Fig. 1)
7. Push excess wire into J-Box before tightening the screws
that connect the canopy to the crossbar so that the canopy
is securely fastened and tight against the wall.
8. Connect the light bar connector, attach panel module to trim
plate and adjust the position of the lamp heads as needed.
9. Determine the direction of the chevrons as needed.
J-Box (not provided)
Crossbar
Screws (M4*8)
Canopy
GroundSafety Cable
Battery Connector
Screws (M3*15)
Light Bar Connector
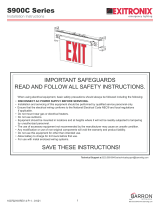
WALL MOUNT (see Fig. 5)
1. Knockout side center hole, insert plastic washer and
assemble canopy using M4*8mm screws.
2. Remove trim plate inorder to connect battery.
3. Feed AC supply wires through the center hole.
4. Assemble the back of the trim plate using M3*15 mm screws.
5. Attach crossbar to junction box with the longer part of the
crossbar laying ontop of the J-Box.
6. Route the proper wires from the housing to the J-Box through
the mounting hole and connect inside J-Box. (see Fig. 1)
7. Push excess wire into J-Box before tightening the screws
that connect the canopy to the crossbar.
8. Connect the light bar connector, attach panel module to trim
plate and adjust the position of the lamp heads as needed.
9. Determine the direction of the chevrons as needed.
J-Box (not provided)
Crossbar Canopy Safety Cable Ground
Screws (M4*8)
Battery Connector
Screws (M3*15)
Light Bar Connector
CONNECTING REMOTE HEADS (see Fig. 6)
1. Using 1pc battery, no remote capability.
2. Using 2pcs battery with remote capability.
3. Connect remote heads extension wire to remote wire, yellow
is positive(+), purple is negative(-). connect wires using wire
nuts.
4. Remote capability: 3.6V 3W remote capabilities.
Lamp Head Connector Remote Head Connector
SURFACE MOUNT NOTICE: MUST WEAR GLOVES
FIG. 6
FIG. 4
FIG. 5
/