Andersen Drip Leg Replacement Service Instructions
- Type
- Service Instructions
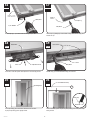
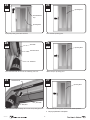
Andersen Drip Leg Replacement is a crucial component for your E-Series Gliding Patio Doors, designed to prevent water damage and enhance the overall performance of your door system. Crafted with precision, this replacement drip leg ensures a secure fit and optimal functionality. Replacing the drip leg is a simple process that can be completed using commonly found tools and materials. By following the detailed instructions provided in the manual, you can effortlessly restore the efficiency of your patio door, ensuring years of smooth operation and protection against water infiltration.
Andersen Drip Leg Replacement is a crucial component for your E-Series Gliding Patio Doors, designed to prevent water damage and enhance the overall performance of your door system. Crafted with precision, this replacement drip leg ensures a secure fit and optimal functionality. Replacing the drip leg is a simple process that can be completed using commonly found tools and materials. By following the detailed instructions provided in the manual, you can effortlessly restore the efficiency of your patio door, ensuring years of smooth operation and protection against water infiltration.


-
 1
1
-
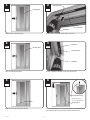 2
2
-
 3
3
-
 4
4
-
 5
5
-
 6
6


Andersen Drip Leg Replacement Service Instructions
- Type
- Service Instructions
Andersen Drip Leg Replacement is a crucial component for your E-Series Gliding Patio Doors, designed to prevent water damage and enhance the overall performance of your door system. Crafted with precision, this replacement drip leg ensures a secure fit and optimal functionality. Replacing the drip leg is a simple process that can be completed using commonly found tools and materials. By following the detailed instructions provided in the manual, you can effortlessly restore the efficiency of your patio door, ensuring years of smooth operation and protection against water infiltration.
Ask a question and I''ll find the answer in the document
Finding information in a document is now easier with AI
Related papers
-
Andersen Auxiliary Foot Lock Replacement Service Instructions
-
-
-
-
-
-
-
-
-
Other documents
-
 Silver Line Building Products 60758GBG00 Installation guide
-
JELD-WEN THDJW155900281 Operating instructions
-
-
-
JELD-WEN LOWOLJW220100733 User manual
-
-
-
JELD-WEN LOWOLJW155900011 Installation guide
-
True GDT Series Technical & Service Manual
-
 American Craftsman 50/70 PATIO DOOR 6/0 SCREEN Operating instructions

