Page is loading ...

Important Information
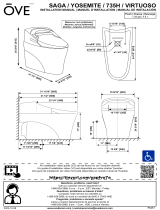
NOTE: This product is designed for installation with the electrical and water supplies located through
either the wall or the floor.
Grounding Instructions
•
This product should be grounded. In the event of an electrical short circuit, grounding reduces the
risk of electric shock by providing an escape wire for the electric current. This product is equipped
with a cord having a grounding wire with a grounding plug. The plug must be plugged into an
outlet that is properly installed and grounded.
WARNING: Risk of electric shock. Improper use of the grounding plug can result in a risk of
electric shock.
•
If repair or replacement of the cord or plug is necessary, do not connect the grounding wire to either
flat blade terminal. The wire with insulation having an outer surface that is green with or without
yellow stripes is the grounding wire.
•
Check with a qualified electrician or service personnel if the grounding instructions are not
completely understood, or if in doubt as to whether the product is properly grounded.
•
This product is factory equipped with a specific electric cord and plug to permit connection to a
proper electric circuit. Make sure that the product is connected to an outlet having the same
configuration as the plug. No adapter should be used with this product. Do not modify the plug
provided — if it will not fit the outlet, have the proper outlet installed by a qualified electrician. If
the product must be reconnected for use on a different type of electric circuit, the connection should
be made by qualified service personnel.
Tools and Materials
Before You Begin
WARNING: Risk of electric shock. Disconnect power before servicing.
WARNING: Risk of electrical shock. Connect only to a properly-grounded, grounding-type
receptacle which is protected by a Ground-Fault Circuit-Interrupter (GFCI). Do not remove the
grounding pin or use a grounding adapter.
CAUTION: Risk of hazardous gases. If a new toilet is not installed immediately, temporarily place
a rag in the floor flange opening.
NOTICE: The Canadian Electric Code requires receptacles installed in bathrooms to be located at least
39-3/8″ (1 M) from a bath or shower if practical, but in no case less than 19-11/16″ (500 mm). If the
installation is in Canada, install this unit in accordance with the Canadian Electrical Code, Part 1.
Masking
Tape
Pencil or Felt
Tip Marker
Assorted
Screwdrivers
Supply Stop
5/16" T-Bolts and Wax Seal
Drill and 1/4" bit
Caulk Gun
Caulk
Rags
Silicone Grease
or Soap
1221754-2-B 2 Kohler Co.

Before You Begin (cont.)
Observe all local plumbing and building codes.
Carefully inspect the new toilet for damage.
There is a wiring schematic on the inside of the junction box cover.
Consult the Homeowners Guide for user directions.
Consult the Homeowners Guide for troubleshooting instructions.
Kohler Co. 3 1221754-2-B

1. Prepare the Site
WARNING: Risk of electrical shock. Connect only to a properly-grounded, grounding-type
receptacle which is protected by a Ground-Fault Circuit-Interrupter (GFCI). Do not remove the
grounding pin or use a grounding adapter.
CAUTION: Risk of hazardous gases. If the new toilet is not installed immediately, temporarily
place a rag in the closet flange.
NOTE: If the rough-in distance is less than 12″ (305 mm) the seat may strike the wall when it is opened.
Confirm the rough-in is 12″ (305 mm) before installing the toilet.
Turn off the water supply.
Remove the old toilet.
Remove the wax residue from the flange.
NOTE: T-bolts are not included.
Install two 5/16″ diameter T-bolts into the floor flange.
Mark the centerlines for the outlet on the floor.
Install the electrical supply at the location shown.
Install the water supply at the location shown.
6"
(152 mm)
12"
(305 mm)
2-3/4" (70 mm)
Supply Stop
Floor Flange
T-Bolt
Scrape off the old
wax seal.
Centerline
Centerline
1221754-2-B 4 Kohler Co.

2. Install the Tank
CAUTION: Risk of property damage. Do not rock or lift the tank after placement. The seal created
by the wax ring may be broken, resulting in leaking.
CAUTION: Risk of product damage. Do not push down on any part of the tank assembly other than the
cylinder. Damage may occur.
Position the wax ring in the putty ring located on the tank.
Remove the outlet gasket.
Align the tank over the floor flange and T-bolts.
Lower the tank onto the floor flange with the slots in the base of the tank aligned with the T-bolts.
Carefully align the tank on the centerline.
CAUTION: Risk of product damage. Only apply downward pressure to the tank cylinder. Do not press
on the tank components other than the cylinder, or damage may occur.
Press down evenly on the rim of the cylinder to set the wax ring.
Reinstall the outlet gasket.
Position the loose end of the refill tube in the outlet gasket.
Press here on cylinder.
Refill Tube
Floor Flange
Tank
T-Bolts
Centerlines
Wax Ring
Outlet Gasket
Kohler Co. 5 1221754-2-B

3. Secure the Tank
CAUTION: Risk of product damage. Do not overtighten the mounting nuts. Do not cut or shorten the
T-bolts.
Install a washer on each T-bolt.
Thread a nut onto each T-bolt.
Hand tighten the nuts.
Wrench tighten the nuts one quarter turn past hand tight.
Connect the water supply hose to the open port on the elbow.
Connect the water supply hose to the water supply stop.
Confirm the cap on the elbow is tight.
Open the water supply stop.
T-Bolt
Washer
Nut
Base of
Tank Assembly
Connect to the
supply stop.
Flexible Hose
Capped
Port
Water Supply
Hose
1221754-2-B 6 Kohler Co.

4. Check the Waterline
CAUTION: Risk of property damage. Before use, open the inlet valve using the valve adjustment
screw to avoid overflow.
NOTE: The waterline is marked inside the tank by a notch and a label.
Turn the valve adjustment screw counterclockwise to open the motorized valve.
Allow the tank to fill. Check the water level in the tank.
To adjust the water level, use a flat-blade screwdriver to carefully turn the adjustment rod on the
inlet valve. Turning the rod counterclockwise will lower and clockwise will raise the water level.
If further adjustment is required, remove several inches of water from the tank and allow it to refill.
Confirm the water level is correct. Repeat until the correct water level is reached.
Turn off the water supply.
Valve Adjustment
Waterline
Adjustment
Waterline
Flexible Hose
Notch
Kohler Co. 7 1221754-2-B

5. Install the Collar
CAUTION: Risk of product damage. Confirm the wires and water supply hose will not interfere with the
vitreous shell as it is lowered into place. The vitreous shell may cause damage to the wires or hose.
NOTE: It may be necessary to disconnect the water supply hose and tape it to the floor with the wires to
keep it clear of the vitreous while it is lowered into place.
Place the pump wiring harness, level switch wire, refill tube, electrical plug, and bidet wiring plug
on the floor at the location of the rear access opening and tape them on the centerline so they will
not interfere with the vitreous shell.
Apply silicone grease or soap to the inside bottom edges of the collar where it will contact the outlet
gasket.
Install the collar onto the outlet gasket. Push the collar down firmly.
Clip the spray shield into place over the fill valve.
Refill Tube
Tape
Level Switch
Wire
Electrical Plug
Pump Wiring
Harness
Bidet Wiring
Harness
Spray Shield
Collar
Tank
Flexible
Hose
Apply silicone grease
or soap to the inside.
1221754-2-B 8 Kohler Co.

6. Install the Vitreous Shell
WARNING: Risk of personal injury. The vitreous shell weighs 105 lbs (36 kg). Use proper lifting
technique when handling the vitreous shell. Lift and position the vitreous shell with a partner.
CAUTION: Risk of product damage. Do not set the shell down hard. Gently lift and move the shell if it
is not placed correctly. If handled carelessly, the shell may chip or break.
With assistance, carefully pick up the vitreous shell and slowly lower it over the tank.
Remove the cap from the capped elbow port.
Connect the bidet hose to the elbow.
Make sure the trapway in the vitreous shell seats fully in the outlet gasket. If the vitreous shell does
not sit evenly on the floor, the trapway may not be properly seated.
Adjust the vitreous shell as needed until the trapway is properly seated.
Reconnect the water supply hose to the water supply if it was disconnected.
Connect the Wires
CAUTION: Risk of personal injury. Make sure the plug (if plug-in connection is used) and
receptacle are dry. If any moisture is present, allow the area to dry before plugging the unit in.
Remove the tape from the floor wires and toilet.
Connect the level switch and refill tube.
Connect the bidet wiring harness and pump wiring harness.
Vitreous
Tank
Collar
Bidet
Wiring Harness
Pump
Wiring Harness
Level Switch
Refill Tube
Kohler Co. 9 1221754-2-B

7. Install the Remote Control
Determine the desired location of the remote control docking station.
Position the docking station in the desired location and mark the location of the screw holes.
Remove the docking station.
Drill 1/4″ holes at each of the screw locations.
Install anchors in each of the holes.
Remove the backing on the two-sided tape.
Attach the docking station to the wall using the two supplied screws.
Install the screw hole covers.
Install the batteries in the remote control (consult the Homeowners Guide for instructions if
needed).
Place the remote control on the docking station.
38" (965 mm) - 66" (1676 mm)
36"
(914 mm)
Docking Station
Remote Control
Screw
Double-Sided Tape
Anchor
Docking Station
Cover
1221754-2-B 10 Kohler Co.

8. Check Operation
NOTE: The flushing mechanism works best if it is quickly tapped, not held down for an extended period
of time.
Flush the toilet and check for proper operation by pushing the manual flush actuator.
Refer to the troubleshooting table if the toilet does not function properly.
9. Secure the Vitreous Shell
CAUTION: Risk of product damage. Do not overtighten the screws when tightening. The vitreous shell
may chip or break if the screws are overtightened.
Insert a screw through each grommet.
Insert a screw in each of the holes on the side of the vitreous shell and tighten securely. Do not
overtighten.
Install a cap over each screw. The caps should be flush with the exterior of the shell.
Push to
flush.
Cap
Screw
Grommet
Kohler Co. 11 1221754-2-B

10. Complete the Installation
IMPORTANT! Do not caulk the access cover to the floor.
Cut a recess in the access cover using a utility knife at the spot marked on the access cover.
Place the access cover over the opening in the back of the toilet.
Caulk around the base of toilet. Do not caulk the area where the access cover meets the floor.
Confirm correct seat operation using the seat functions outlined in the Homeowners Guide.
Toilet Back
Access Cover
Caulk the
base of the
toilet
.
Do not caulk base of
access cover.
Cut with a
utility knife
.
1221754-2-B 12 Kohler Co.
/