Page is loading ...

PAGE 2
TABLE OF CONTENT
TABLE DES MATIÈRES
TABLA DE CONTENIDOS
TABLE OF CONTENT ........................................2
SAFETY INFORMATION ....................................3
POWER OUTLET ................................................4
PART LIST ..........................................................5
TOOLS REQUIRED (not supplied) ...................5
INSTALLATION ...................................................7
BATTERY USAGE SAFETY GUIDELINES ......11
BATTERIES INSTALLATION ............................11
FIRST TIME USE GUIDELINES .......................13
REMOTE CONTROL PAIRING .........................14
SIDE KEYPAD CONTROLS DESCRIPTION ....15
LIGHT INDICATOR PANEL DESCRIPTION .....16
REMOTE CONTROL DESCRIPTION ...............17
AUDIO SIGNALS ..............................................20
FEATURES .......................................................21
INTELLIGENT FEATURES ...............................23
CLEANING THE FILTER ..................................25
LONG TERM STORAGE ..................................26
BATTERY MAINTENANCE ..............................26
SPECIFICATION SHEET ..................................27
INSTALLATION PICTURE ................................28
MAINTENANCE AND CARE ............................29
LIMITED PRODUCT WARRANTY ....................29
TABLE DES MATIÈRES .....................................2
INFORMATION SUR LA SÉCURITÉ ..................3
PRISE DE COURANT .........................................4
LISTE DES PIÈCES ............................................5
OUTILS REQUIS (non fournis)..........................5
INSTALLATION ...................................................7
CONSIGNES DE SÉCURITÉ POUR
L’UTILISATION DE LA BATTERIE .................. 11
INSTALLATION DES PILES ............................ 11
DIRECTIVES D’UTILISATION POUR LA
PREMIÈRE FOIS .............................................13
COUPLAGE À DISTANCE ..............................14
DESCRIPTION DES COMMANDES DU
CLAVIER LATÉRAL .........................................15
DESCRIPTION DU PANNEAU INDICATEUR
LUMINEUX ........................................................16
DESCRIPTION DE LA TÉLÉCOMMANDE .....17
SIGNAUX AUDIO .............................................20
CARACTÉRISTIQUES ......................................21
FONCTIONS INTELLIGENTES .......................23
NETTOYAGE DU FILTRE .................................25
ENTREPOSAGE À LONG TERME ..................26
ENTRETIEN DES BATTERIES .........................26
FEUILLE DE SPÉCIFICATIONS .......................27
IMAGE DE MONTAGE ......................................28
ENTRETIEN ET MAINTENANCE .....................30
GARANTIE LIMITÉE DU PRODUIT .................30
TABLA DE CONTENIDOS ..................................2
INFORMACIÓN DE SEGURIDAD ......................3
TOMA DE CORRIENTE ......................................4
LISTA DE PIEZAS ...............................................5
HERRAMIENTAS NECESARIAS (no incluido) ..
.............................................................................5
INSTALACIÓN ....................................................7
PAUTAS DE SEGURIDAD PARA EL USO DE
LA BATERÍA ....................................................11
INSTALACIÓN DE BATERÍAS .........................11
PAUTAS PARA EL USO POR PRIMERA VEZ .13
EMPAREJAMIENTO DEL MANDO A
DISTANCIA .......................................................14
DESCRIPCIÓN DE LOS CONTROLES DEL
TECLADO LATERAL ........................................15
DESCRIPCIÓN DEL PANEL INDICADOR DE
LUZ ....................................................................16
DESCRIPCIÓN DEL MANDO A DISTANCIA ...17
SEÑALES DE AUDIO .......................................20
CARACTERÍSTICAS ........................................21
CARACTERÍSTICAS INTELIGENTES .............23
LIMPIEZA DEL FILTRO ....................................25
ALMACENAMIENTO PROLONGADO .............26
MANTENIMIENTO DE BATERÍAS ...................26
HOJA DE ESPECIFICACIONES ......................27
IMAGEN DE INSTALACIÓN .............................28
MANTENIMIENTO Y CUIDADO .......................31
GARANTÍA LIMITADA DEL PRODUCTO ........31

PAGE 3
CAUTION
1. Do not disassemble toilet by yourself.
2. Ensure that there is proper air ow in the room to avoid humidity buildups.
3. Ensure that the product is set more than 0.6 meter away from the bathtub.
4. Ensure electric power is AC 120V.
5. Ensure the electrical socket can bare a load of 1800W power (or else it can cause re or electrical shock).
6. Ensure the electrical source is well grounded.
7. Do not put any water or detergent on the product or its electrical plug.
8. Do not touch the electrical plug with a wet hand (or else it can cause re or electric shock).
9. Do not use the product if it has these following problems, and if the problem occur, turn o the electricity and water shut-o valve
immediately:
• Water leaking from the pipe or the main body.
• Crack or breakage
• Abnormal sound or smell of the product
• Smoke coming out from the product
SAFETY INFORMATION
INFORMATION SUR LA SÉCURITÉ
INFORMACIÓN DE SEGURIDAD
AVERTISSEMENT
1. Ne démontez pas vous-même les toilettes.
2. Veillez à ce que l’air circule correctement dans la pièce an d’éviter l’accumulation d’humidité.
3. S’assurer que le produit est placé à plus de 0,6 mètre de la baignoire.
4. S’assurer que l’alimentation électrique est de 120 V CA.
5. S’assurer que la prise électrique peut supporter une charge de 1800W (sinon elle peut provoquer un incendie ou un choc électrique).
6. S’assurer que la source électrique est bien mise à la terre.
7. Ne pas mettre d’eau ou de détergent sur le produit ou sa che électrique.
8. Ne touchez pas la che électrique avec une main mouillée (sinon elle pourrait provoquer un incendie ou un choc électrique).
9. N’utilisez pas le produit s’il présente les problèmes suivants, et si le problème survient, fermez immédiatement le robinet d’arrêt d’électricité
et d’eau :
• De l’eau s’échappe de la conduite ou du corps principal.
• Fissures ou bris.
• Son ou odeur anormaux du produit.
• Fumée s’échappant du produit.
PRECAUCIÓN
1. No desmonte el inodoro usted solo.
2. Asegúrese de que haya un ujo de aire adecuado en la habitación para evitar la acumulación de humedad.
3. Asegúrese de que el producto esté colocado a más de 0,6 metros de distancia de la bañera.
4. Asegúrese de que la energía eléctrica sea de 120V CA.
5. Asegúrese de que la toma de corriente puede soportar una carga de 1800W de potencia (o bien puede provocar un incendio o una
descarga eléctrica).
6. Asegúrese de que la fuente eléctrica esté bien conectada a tierra.
7. No ponga agua o detergente en el producto o en su enchufe eléctrico.
8. No toque el enchufe eléctrico con las manos mojadas (de lo contrario, podría provocar un incendio o una descarga eléctrica).
9. No utilice el producto si tiene los siguientes problemas, y si el problema ocurre, apague la electricidad y la válvula de corte de agua
inmediatamente:
• Hay fugas de agua en la tubería o en el cuerpo principal.
• Grieta o rotura.
• Sonido u olor anormal del producto.
• Humo que sale del producto.

PAGE 4
CAUTION
10. Keep any ame or ammable products away from the toilet.
11. Do not step on the toilet seat, the seat cover, the ceramic body, or put anything heavy on the product. Otherwise, the product may
break and may cause injury or the product may break and may cause indoor ooding.
12. Do not put your nger or anything else into the outlet of the drying blower.
13. Do not touch or cover the drying blower outlet with clothes, or it may lead to burn injury or electric shock.
14. Do not tightly bend or press the exible supply hose, or it may lead to water leakage or it may decrease the water pressure.
15. Always clean the product with soft cleaning products.
16. Do not use any harsh detergents to clean the product.
17. Do not throw anything other than toilet paper into the toilet or it may lead to blockage and indoor ooding.
18. Do not ush objects like a comb, toothbrush or other sanitary product.
SAFETY INFORMATION
INFORMATION SUR LA SÉCURITÉ
INFORMACIÓN DE SEGURIDAD
AVERTISSEMENT
10. Gardez toute amme ou tout produit inammable loin de la toilette.
11. Ne marchez pas sur le siège de toilette, la housse de siège, le corps en céramique et ne mettez rien de lourd sur le produit. Dans le
cas contraire, le produit risque de se briser et de causer des blessures ou de se briser et de provoquer des inondations intérieures.
12. Ne mettez pas votre doigt ou quoi que ce soit d’autre dans la sortie du ventilateur de séchage.
13. Ne touchez pas ou ne couvrez pas la sortie du ventilateur de séchage avec des vêtements, car cela pourrait provoquer des brûlures
ou un choc électrique.
14. Ne pliez ou n’appuyez pas trop fort sur le exible d’alimentation, cela pourrait entraîner des fuites d’eau ou réduire la pression de
l’eau.
15. Nettoyez toujours le produit avec des produits nettoyants doux.
16. N’utilisez pas de détergents agressifs pour nettoyer le produit.
17. Ne jetez rien d’autre que du papier hygiénique dans les toilettes, car cela pourrait les obstruer et provoquer des inondations intérieures.
18. Ne rincez pas des objets comme un peigne, une brosse à dents ou tout autre produit sanitaire.
POWER OUTLET - GFCI
PRISE DE COURANT - DDFT
TOMA DE CORRIENTE - GFCI
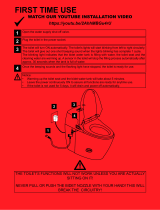
POWER OUTLET REQUIREMENT
This product must be plugged into a working GFCI power outlet to avoid potential damages on the electronic
component during electrical surges. The power outlet must have a dedicated minimum 1800W capacity for the
smart toilet.
TEST
RESET
GFCI
SPÉCIFICATION DE LA PRISE DE COURANT
Ce produit doit être branché dans une prise de courant DDFT fonctionnelle an d’éviter d’endommager le composant
électronique lors de surtensions électriques. La prise de courant doit avoir une capacité minimale de 1800 W pour
la toilette intelligente.
REQUISITOS DE LA TOMA DE CORRIENTE
Este producto debe conectarse a una toma de corriente GFCI en funcionamiento para evitar posibles daños en
el componente electrónico durante las sobretensiones eléctricas. La toma de corriente debe tener una capacidad
mínima dedicada de 1800W para el inodoro inteligente.
PRECAUCIÓN
10. Mantenga cualquier llama o producto inamable lejos del inodoro.
11. No pise el asiento del inodoro, la tapa del asiento, el cuerpo de cerámica ni ponga nada pesado sobre el producto. De lo contrario,
el producto podría romperse y podría causar lesiones o podría romperse y causar inundaciones en interiores.
12. No introduzca el dedo o cualquier otra cosa en la salida del secador.
13. No toque ni cubra la salida del ventilador de secado con ropa, ya que podría provocar quemaduras o descargas eléctricas.
14. No doble ni presione rmemente la manguera de suministro exible, ya que podría provocar fugas de agua o disminuir la presión
del agua.
15. Limpie siempre el producto con productos de limpieza suaves.
16. No utilice detergentes fuertes para limpiar el producto.
17. No arroje nada más que papel higiénico al inodoro, ya que puede provocar obstrucciones e inundaciones en el interior de la vivienda.
18. No lave objetos como un peine, cepillo de dientes u otro producto sanitario.

PAGE 5
PART LIST
LISTE DES PIÈCES
LISTA DE PIEZAS
TOOLS REQUIRED (not supplied)
OUTILS REQUIS (non fournis)
HERRAMIENTAS NECESARIAS (no incluido)
A
B
C
J
I
H
G
L
K
D
E
F
M
Clockwise - Lower ow
Anti-cloclwise - Higher ow

PAGE 10
INSTALLATION
INSTALLATION
INSTALACIÓN
4
4.1
4.2
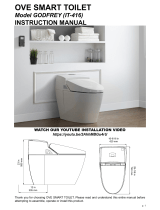
4.1- Connect the water inlet tting to the water supply.
4.2- Connect the toilet’s water inlet with the supplied water supply hose.
4.3- Apply silicone around the base of the toilet.Wait for 24h for it to dry.
4.1- Raccorder le robinet d’arrêt à la conduite d’eau existante.
4.2- Raccorder le tuyau d’alimentation à la vanne d’arrêt.
4.3- Appliquez du silicone tout autour de la base de la toilette. Laissez sécher pendant 24h.
4.1- Conectar la válvula de cierre a la tubería de suministro de agua existente.
4.2- Conectar la manguera de alimentación a la válvula de cierre.
4.3- Aplique silicona alrededor de la base del inodoro. Espere 24h para que se seque.
4.3
24h

PAGE 11
BATTERY USAGE SAFETY GUIDELINES
CONSIGNES DE SÉCURITÉ POUR L’UTILISATION DE LA BATTERIE
PAUTAS DE SEGURIDAD PARA EL USO DE LA BATERÍA
• Always purchase the correct size and grade of battery most suitable for the intended use.
• Clean the battery contacts and also those of the device prior to battery installation.
• Remove batteries from equipment which is not to be used for an extended period of time.
• Remove batteries if consumed or if product is to be left unused for a long time.
• Do not mix old and new batteries.
• Do not mix alkaline, standard (carbon-zinc), or rechargeable (ni-cad, ni-mh, etc) batteries.
• Do not dispose of old batteries in the trash! Please dispose of your used batteries at your local collection center.
• Achetez toujours la taille et la qualité de batterie qui conviennent le mieux à l’utilisation prévue.
• Nettoyez les contacts des piles ainsi que ceux de l’appareil avant l’installation des piles.
• Retirez les piles de l’équipement qui ne doit pas être utilisé pendant une période prolongée.
• Retirez les piles si vous les consommez ou si vous laissez le produit inutilisé pendant une longue période.
• Ne mélangez pas des piles neuves et des piles usagées.
• Ne pas mélanger des piles alcalines, standard (carbone-zinc) ou rechargeables (ni-cad, ni-mh, etc).
• Ne jetez pas les piles usagées à la poubelle ! Veuillez vous débarrasser de vos piles usagées auprès de votre centre de collecte local.
• Siempre compre el tamaño y grado correcto de la batería más adecuada para el uso previsto.
• Limpie los contactos de la batería y también los del dispositivo antes de la instalación de la batería.
• Retire las baterías de los equipos que no se vayan a utilizar durante un período de tiempo prolongado.
• Retire las pilas si se consumen o si el producto no se va a utilizar durante mucho tiempo.
• No mezcle baterías viejas y nuevas.
• No mezcle pilas alcalinas, estándar (carbono-zinc) o recargables (ni-cad, ni-mh, etc).
• No tire las pilas usadas a la basura! Deseche las pilas usadas en su centro de recogida local.
BATTERIES INSTALLATION
INSTALLATION DES PILES
INSTALACIÓN DE BATERÍAS
5
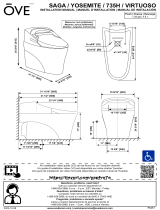
5- Load the remote with two AAA batteries. The battery compartment is located at the bottom back of the remote and is opened by rmly sliding
the cover downward.
5- Charger la télécommande à l’aide de deux piles de type ‘AAA’. Le compartiment à piles est situé au bas de l’arrière de la télécommande et
s’ouvre en faisant glisser fermement le couvercle vers le bas.
5- Cargue el mando a distancia con dos pilas AAA. El compartimento de la batería está situado en la parte posterior inferior del mando a
distancia y se abre deslizando rmemente la tapa hacia abajo.
2x 1.5V AAA Battery
(NOT INLCUDED)
2x 1.5V AAA Batterie
(NON ENCORE)
2x 1.5V AAA Batería
(NO INCLUYE)

PAGE 15
SIDE KEYPAD CONTROLS DESCRIPTION
DESCRIPTION DES COMMANDES DU CLAVIER LATÉRAL
DESCRIPCIÓN DE LOS CONTROLES DEL TECLADO LATERAL
9
POWER/ECO:
Press 1 time, it will turn the toilet ON.
Press 2 times, it will activate the ECO MODE.
Press 3 times, it will turn the toilet OFF.
MARCHE/ÉCO:
Appuyer 1 fois, la toilette se met en marche.
Appuyer 2 fois, la fonction MODE ÉCO s’active.
Appuyer 3 fois, la toilette s’arrête.
ENCENDIDO/ECO:
Presione 1 vez, se encenderá el inodoro.
Presione 2 veces, se activará ENERGÍA ECO.
Presione 3 veces, se apagará el inodoro.
STOP:
Pressing this button will stop any ongoing function.
ARRÊT:
Appuyer sur ce bouton et toutes fonctions s’arrêteront.
PARAR:
Al presionar este botón se parará cualquier función en curso.
BIDET/MOVE:
Pressing this button will initiate the Back-&-Forth Bidet Cleaning function. Press it again to change to the Static Bidet Cleaning function. After 20
seconds of use, the Air Drying function will start automatically.
*The Bidet refers the 4 water jets function of the nozzle.
BIDET/RÉGLAGE:
Appuyer sur ce bouton et la fonction Nettoyage par bidet statique s’activera. Appuyer une seconde fois an s’activer la fonction du nettoyage va-
et-vient.
*Lavage par Bidet réfère à un nettoyage avec la buse à 4 jets.
BIDET/MOVERSE:
Al presionar este botón se iniciará la función de limpieza estática de bidet. Presiónelo nuevamente para cambiar a la función de vaivén de limpieza
de bidet.
*El Bidet se reere a la función de 4 chorros de agua de la boquilla.
SPRAY/MOVE:
Pressing this button will initiate the Back-&-Forth Spray Cleaning function. Press it again to change to the Static Spray Cleaning function. After 20
seconds of use, the Air Drying function will start automatically.
*The SPRAY refers the 1 water jet function of the nozzle.
JET/RÉGLAGE:
Appuyer sur ce bouton et la fonction Nettoyage par jet statique s’activera. Appuyer une seconde fois et la fonctionnettoyage va-et-vient s’activera.
* Lavage par Jet réfère à un nettoyage avec la buse à 1 jet.
CHORRO/MOVERSE:
Al presionar este botón se iniciará la función de limpieza estática por chorro. Presiónelo nuevamente para cambiar a la función de limpieza por
chorro al vaivén.
*El CHORRO se reere a la función de 1 chorro de agua de la boquilla.

PAGE 16
LIGHT INDICATOR PANEL DESCRIPTION
DESCRIPTION DU PANNEAU INDICATEUR LUMINEUX
DESCRIPCIÓN DEL PANEL INDICADOR DE LUZ
10
POWER INDICATOR:
The light will turn RED when the toilet is powered ON.
The light will turn o when the toilet is powered OFF.
INDICATEUR DE LA MISE EN MARCHE:
Lors de la mise en marche, la lumière devient rouge.
La lumière s’éteint lorsqu’on procède à la mise en Arrêt de la toilette.
INDICADOR DE ENCENDIDO:
La luz se volverá de color ROJO cuando el inodoro está encendido [ON].
La luz se apagará cuando el inodoro está apagado [OFF].
ECO MODE INDICATOR:
The light will turn YELLOW when the ECO MODE is active.
The light will turn o when the ECO MODE is not active.
INDICATEUR DU MODE ÉCO:
La lumière devient jaune lorsqu’on active le mode ECO.
La lumière s’éteint lorsque le MODE ECO n’est pas actif.
INDICADOR DE ENERGÍA ECO:
La luz se volverá de color AMARILLO cuando ENERGÍA ECO está activa.
La luz se apagará cuando ENERGÍA ECO no está activa.
WATER TEMP INDICATOR:
Below are the dierent colors the light takes depending on the current setting:
LIGHT OFF = Room temp / GREEN = Low / ORANGE = Medium / RED = High
INDICATEUR TEMP EAU:
Ci-dessous nous avons les diérentes couleurs dépendamment des fonctions activées:
LIGHT OFF = température ambiante / VERT = Faible / ORANGE = Moyen / ROUGE = Élevé
INDICADOR TEMP AGUA:
A continuación se encuentran los diferentes colores de luces dependiendo de los ajustes actuales:
LUZ APAGADA = Temperatura ambiente / VERDE = Baja / NARANJA = Media / ROJA = Alta
SEAT TEMP INDICATOR:
Below are the dierent colors the light takes depending on the current setting:
LIGHT OFF = Room temp / GREEN = Low / ORANGE = Medium / RED = High
INDICATEUR TEMP SIÈGE:
Ci-dessous nous avons les diérentes couleurs dépendamment des fonctions activées:
LIGHT OFF = température ambiante / VERT = Faible / ORANGE = Moyen / ROUGE = Élevé
INDICADOR DE TEMP ASIENTO:
A continuación se encuentran los diferentes colores de luces dependiendo de los ajustes actuales:
LUZ APAGADA = Temperatura ambiente / VERDE = Baja / NARANJA = Media / ROJA = Alta
SEAT SENSOR INDICATOR:
The light will turn GREEN when the Seat Sensor is active.
The light will turn o when the Seat Sensor is not active.
INDICATEUR CAPTEUR SIÈGE :
La lumière devient verte lorsque le Capteur siège est activé.
La lumière s’éteint lorsque le Capteur Siège n’est pas actif.
INDICADOR DE SENSOR ASIENTO:
La luz se volverá VERDE cuando el Sensor asiento está activo.
La luz se apagará cuando el Sensor asiento no está activo.

PAGE 17
REMOTE CONTROL DESCRIPTION
DESCRIPTION DE LA TÉLÉCOMMANDE
DESCRIPCIÓN DEL MANDO A DISTANCIA
11
AIR PUMP:
Pressing this button initiate the air pumps which will boost the water pressure even more than the maximum attainable setting by
the WATER PRESSURE UP button.
POMPE À AIR:
En appuyant sur ce bouton, vous déclenchez les pompes à air qui augmenteront la pression de l’eau encore plus que le réglage
maximum par la PRESSION D’EAU HAUT. button.
BOMBA DE AIRE:
Pulsando este botón se inician las bombas de aire que elevarán la presión del agua aún más que el valor máximo alcanzable
mediante el botón WATER PRESSURE UP.
LADY BIDET/MOVE:
Pressing this button will initiate the Static Lady Bidet Cleaning function. Press it again to change to the Back-&-Forth Lady Bidet
Cleaning function.
*The LADY BIDET refers the 4 water jets function of the nozzle.
BIDET DAME /RÉGLAGE:
Pressing this button will initiate the Static Lady Bidet Cleaning function. En appuyant à nouveau sur ce bouton, la fonction Nettoyage
Va-et-Vient par Bidet s’active.
Le BIDET DAME renvoie à la fonction 4 jets d’eau de la buse.
BIDÉ SEÑORA/MOVERSE:
Pulsando este botón se iniciará la función de limpieza de la señora estática bidet.
Presiónelo nuevamente para volver a cambiar la función de limpieza por bidet al vaivén.
LADY BIDET hace referencia a la función de 4 chorros de agua de la boquilla.
DRYING:
Pressing this button will initiate the warm air drying.
SÉCHAGE:
Appuyer sur ce bouton déclenche le séchage à l’air chaud.
SECAR:
Pulsando este botón se inicia el secado al aire caliente.
WATER PRESSURE INDICATOR:
1 light ON = minimum pressure.
5 lights ON = maximum pressure.
INDICATEUR DE PRESSION D’EAU :
1 voyant allumé = pression minimale.
5 voyants allumés = pression maximale.
INDICADOR DE PRESIÓN DE AGUA:
1 luz encendida = presión mínima.
5 luces ON = presión máxima
REAR BIDET/MOVE:
Pressing this button will initiate the Static Rear Bidet Cleaning function. Press it again to change to the Back-&-Forth Rear Bidet
Cleaning function.
*The REAR BIDET refers the 1 water jet function of the nozzle.
RÉGLAGE BIDET DAME:
En appuyant sur ce bouton, la fonction de nettoyage statique du bidet Lady Bidet est activée. En appuyant à nouveau sur ce bouton,
la fonction Nettoyage Va-et-Vient par Bidet s’active.
Le LADY BIDET renvoie à la fonction 1 jets d’eau de la buse.
BIDÉ POSTERIOR/ MOVERSE:
Pulsando este botón se iniciará la función de limpieza estática del bidé trasero. Presiónelo nuevamente para cambiar a la función
de limpieza por chorro al vaivén.
El BIDET TRASERO hace referencia a la función 1 chorro de agua de la tobera.

PAGE 18
REMOTE CONTROL DESCRIPTION
DESCRIPTION DE LA TÉLÉCOMMANDE
DESCRIPCIÓN DEL MANDO A DISTANCIA
12
WATER PRESSURE UP:
Pressing this button during the Static or the Back-&-Forth Bidet cleaning will increase the water jet pressure.
5 settings: 5 increments from low to high.
PRESSION DE L’EAU EN HAUSSE:
Appuyer sur ce bouton pendant le nettoyage Statique ou Back-&-Forth Bidet augmente la pression du jet d’eau.
5 réglages: 5 incréments de faible à élevé.
PRESIÓN AGUA ALTA:
Presionando este botón durante la limpieza del Bidé estático o de fondo y norte aumentará la presión del chorro de agua.
5 ajustes: 5 incrementos de bajo a alto.
WATER PRESSURE DOWN:
Pressing this button during the Static or the Back-&-Forth Bidet cleaning will decrease the water jet pressure.
5 settings: 5 increments from high to low.
PRESSION DE L’EAU EN BAISSE:
Appuyez sur ce bouton pendant le nettoyage Statique ou Back-&-Forth Bidet pour diminuer la pression du jet d’eau.
5 réglages: 5 incréments d’élevé à faible.
PRESIÓN AGUA BAJA:
Presionando este botón durante la limpieza estática o del bidé de fondo y norte disminuirá la presión del chorro de agua.
5 ajustes: 5 incrementos de alto a bajo.
NOZZLE FORWARD:
Pressing this button during the Static Bidet cleaning will move the nozzle forward.
5 settings: 5 increments from back to front.
BUSE VERS L’AVANT:
En appuyant sur ce bouton durant le nettoyage Statique par JET ou BIDET la buse se déplacera vers l’avant.
5 réglages: 5 incréments de l’arrière à l’avant.
BOQUILLA ADELANTE:
Al presionar este botón durante el chorro estático o de limpieza por bidé la boquilla se moverá hacia adelante.
5 ajustes: 5 incrementos de atrás hacia adelante.
NOZZLE BACKWARD:
Pressing this button during the Static Bidet cleaning will move the nozzle backward.
5 settings: 5 increments from front to back.
BUSE VERS L’ARRIÈRE:
En appuyant sur ce bouton durant le nettoyage Statique par JET ou BIDET la buse se déplacera vers l’arrière.
5réglages: 5 incréments de l’avant à l’arrière.
BOQUILLA ATRÁS:
Al presionar este botón durante el chorro estático o la limpieza por bidé la boquilla se moverá hacia atrás.
5 ajustes: 5 incrementos de adelante hacia atrás.
WATER TEMPERATURE BUTTON & INDICATOR
Pressing this button will cycle through the 4 possible temperatures settings for the Bidet cleaning water jets.
LIGHT OFF = Room temp / GREEN = Low / ORANGE = Medium / RED = High
TOUCHE ET INDICATEUR DE TEMPÉRATURE DE L’EAU
En appuyant sur ce bouton, vous obtenez 4 réglages de températures possible pour le nettoyage bidet par jets d’eau.
LIGHT OFF = température ambiante / VERT = Faible / ORANGE = Moyen / ROUGE = Élevé
BOTÓN E INDICADOR DE TEMPERATURA DEL AGUA
Al presionar este botón el inodoro pasará por ciclos a través de los 4 ajustes de temperatura posibles para chorro/chorros de agua
de limpieza de bidé.
LUZ APAGADA = Temperatura ambiente / VERDE = Baja / NARANJA = Media / ROJA = Alta

PAGE 19
FLUSH:
Pressing this button will ush the toilet.
CHASSE D’EAU:
En appuyant sur ce bouton la chasse d’eau s’active.
DESCARGA:
Al presionar este botón se descargará el inodoro.
STOP:
Pressing this button will stop any ongoing function.
ARRÊT:
En appuyant sur ce bouton toutes les fonctions s’arrêteront.
PARAR:
Al presionar este botón se parará cualquier función en curso.
AIR TEMPERATURE BUTTON & INDICATOR:
Pressing this button will cycle through the 4 possible temperatures settings for the air drying function.
LIGHT OFF = Room temp / GREEN = Low / ORANGE = Medium / RED = High
BOUTON ET INDICATEUR DE TEMPÉRATURE DE L’AIR :
En appuyant sur ce bouton, vous obtenez 4 réglages de températures possible pour la fonction SÉCHAGE.
LIGHT OFF = température ambiante / VERT = Faible / ORANGE = Moyen / ROUGE = Élevé
BOTÓN E INDICADOR DE TEMPERATURA DEL AIRE:
Al presionar este botón el inodoro pasará por ciclos a través de los 4 ajustes de temperatura posibles para la función de secado
por aire.
LUZ APAGADA = Temperatura ambiente / VERDE = Baja / NARANJA = Media / ROJA = Alta
SEAT TEMPERATURE BUTTON & INDICATOR:
Pressing on this button will cycle through the 4 possible temperatures settings for the seat heating.
LIGHT OFF = Room temp / GREEN = Low / ORANGE = Medium / RED = High
BOUTON ET INDICATEUR DE TEMPÉRATURE DU SIÈGE :
En appuyant sur ce bouton, vous obtenez 4 réglages de températures possible pour le chauage du siège.
LIGHT OFF = température ambiante / VERT = Faible / ORANGE = Moyen / ROUGE = Élevé
BOTÓN E INDICADOR DE TEMPERATURA DEL ASIENTO:
El inodoro pasará por ciclos a través de los 4 ajustes de temperatura posibles para el calentamiento de asiento.
LUZ APAGADA = Temperatura ambiente / VERDE = Baja / NARANJA = Media / ROJA = Alta
LIGHT:
Pressing this button will turn the toilet bowl’s light ON / OFF.
LUMIÈRE:
En appuyant sur ce bouton la lumière de la cuve de la toilette s’allumera ou s’éteindra.
LUZ:
Al presionar este botón se encenderá la luz de la taza del inodoro [ON / OFF].
ECO MODE
Pressing this button will turn the ECO function ON / OFF.
MODE ECO
En appuyant sur cette touche, vous activez / désactivez la fonction ECO.
MODO ECO
Al pulsar este botón, la función ECO se activará / desactivará.
REMOTE CONTROL DESCRIPTION
DESCRIPTION DE LA TÉLÉCOMMANDE
DESCRIPCIÓN DEL MANDO A DISTANCIA
13

PAGE 20
AUDIO SIGNALS
SIGNAUX AUDIO
SEÑALES DE AUDIO
14
BEEPING SOUNDS DIRECTIONS
1X BEEP = The toilet will give out one beeping sound every time it successfully receives a command from the Remote Control.
2x BEEP = The toilet will give out two beeping sounds every time it has successfully received a command, but cannot execute it. The toilet
might not be able to execute a given commant because the function is currently unavailable, or because a given function has reached its
maximum or minimum setting. For example, if the Seat Sensor is not active and the user presses the REAR BIDET/MOVE button, the toilet
will beep two times because the bidet function cannot be active if the seat sensor is not active.
BIPS SONORES DIRECTIONS
1X BIP = La toilette émet un bip sonore à chaque fois qu’elle reçoit une commande de la télécommande.
2x BEEP = La toilette émet deux bips sonores à chaque fois qu’elle a reçu une commande avec succès, mais ne peut l’exécuter. La toilette
peut ne pas être en mesure d’exécuter une commande donnée parce que la fonction est actuellement indisponible, ou parce qu’une fonction
donnée a atteint son réglage maximum ou minimum. Par exemple, si le capteur de siège n’est pas actif et que l’utilisateur appuie sur la touche
REAR BIDET/MOVE, les toilettes émettent deux bips car la fonction bidet ne peut pas être active si le capteur de siège n’est pas actif.
PITIDOS SONOROS DIRECCIONES
1X BIP = El inodoro emitirá un sonido de bip cada vez que reciba con éxito un comando del control remoto.
2x BEEP = El inodoro emitirá dos pitidos cada vez que haya recibido una orden con éxito, pero no puede ejecutarla. El inodoro puede no ser
capaz de ejecutar un comando dado porque la función no está disponible actualmente, o porque una función dada ha alcanzado su ajuste
máximo o mínimo. Por ejemplo, si el sensor de asiento no está activo y el usuario pulsa el botón REAR Bidet/MOVE, el inodoro emitirá dos
pitidos porque la función bidet no puede estar activa si el sensor de asiento no está activo.

PAGE 22
FEATURES
CARACTÉRISTIQUES
CARACTERÍSTICAS
16
FLUSHING
Press FLUSHING button before using intelligent toilet will clean the bowl with water automatically.
CHASSE D’EAU
Appuyez sur le bouton CHASSE D’EAU avant utilisation et la chasse d’eau nettoyera automatiquement la cuve.
DESCARGA
Al presionar el botón DESCARGA antes de usar el inodoro inteligente se limpiará la taza automáticamente con agua.
LIGHT
Pressing the LIGHT button on the remote control board will turn ON the toilet’s light, pressing the button again will turn it OFF.
ECLAIRAGE
Appuyez sur le bouton LUMIÈRE et la lumière de la toilette s’alluemera. Appuyez une seconde fois, la lumière s’éteindra
automatiquement.
LUZ
Al presionar el botón LUZ en el control remoto se encenderá [ON] la luz del inodoro; al presionar el botón nuevamente, se apagará
[OFF].
STOP
Pressing the stop button at any time will automatically stop any functions.
ARRÊT
Appuyez sur le bouton ARRÊT an de mettre n à toutes les fonctions.
PARAR
Al presionar el botón PARAR en cualquier momento se parará automáticamente cualquier función.
The toilet will keep spraying for 3-4 seconds after you stand up, so be sure to press the STOP button before standing up from the
toilet seat, during the cleaning process.
Si vous vous levez durant la séance de nettoyage, les buses ne s’arrêteront qu’après 3-4 secondes! Pesez sur le bouton ARRÊT
avant de vous lever.
El inodoro seguirá rociando durante 3-4 segundos después de que usted se levante del asiento del inodoro, durante el proceso de
limpieza.
If you press the DRYING key while the toilet is ushing, you will need to wait about 2 seconds before the air starts to ow out of the
dryer.
Après avoir pesé sur le bouton SÉCHAGE, la chasse d’eau s’active avant que la toilette intelligente initie la session de séchage.
Cela prend environ 2 secondes.
Si usted presiona la tecla de SECADO mientras se está descargando el inodoro, tendrá que esperar cerca de 2 segundos antes de
que el aire caliente empiece a salir del secador.
AIR DRYING
This function will only work if the user is sitting on the toilet. Press the DRYING button for air drying. The air will dry the user. Press
the button again and the air nozzle will move back & forth to insure driest result. You can use this key stoke to get the best drying
eect.
SÉCHAGE À AIR CHAUD
Cette fonction se met en marche uniquement lorsque l’usager est assis. Appuyez sur le bouton SÉCHAGE et la séance séchage à
air chaud débutera. Appuyer une seconde fois, et la buse séchage se déplacera de l’avant vers larrière pour un meilleur séchage.
SECADO POR AIRE
Esta función operará únicamente si el usuario está sentado sobre el inodoro. Presione el botón SECADO para secado por aire. El
aire secará al usuario. Presione el botón nuevamente y la boquilla de aire moverá en vaivén para garantizar el mejor resultado de
secado. Usted puede utilizar esta función para lograr un mejor efecto de secado.

PAGE 26
LONG TERM STORAGE
ENTREPOSAGE À LONG TERME
ALMACENAMIENTO PROLONGADO
20
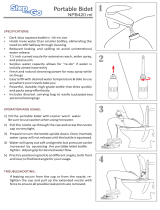
NOTICE: When leaving for a long time without using this toilet, ensure to drain all the water from the toilet.
20.1- Close shut-o valve.
20.2- Unfasten and remove the water drain bolt.
20.3- After draining all of the water, tightly screw the water drain plug back into place.
20.4- Make sure to drain all water from the toilet, including the water in the tank for the bidet/spray cleaning, also any water left in the seals or
grooves, dry with towel.
AVIS : Lorsque vous partez pour une longue période sans utiliser ces toilettes, assurez-vous de vidanger toute l’eau des toilettes.
20.1- Fermer le robinet d’arrêt.
20.2- Dévissez et enlevez le boulon de drainage.
20.3- Après avoir vidé toute l’eau, revissez fermement le bouchon de vidange d’eau en place.
20.4- Finalement, tirez la chasse d’eau 1 ou 2 fois an de retirer le maximum d’eau, puis éponger l’excédent avec une serviette. Assurez-vous
qu’il ne reste pas excédent d’eau.
AVISO: Cuando salga por un largo período de tiempo sin usar este inodoro, asegúrese de drenar toda el agua del inodoro.
20.1- Cerrar la válvula de cierre.
20.2- Aoje y retire el perno de drenaje de agua.
20.3- Después de drenar toda el agua, enroscar el tapón de drenaje de agua en su sitio.
20.4- No olvide drenar todo el agua del inodoro, incluyendo el agua en tanque para bidet/limpieza por chorro, y también cualquier agua que
haya quedado en los sellos o ranuras, seque con una toalla.
21
BATTERY MAINTENANCE
ENTRETIEN DES BATTERIES
MANTENIMIENTO DE BATERÍAS
21
NOTICE: To ensure that the ushing function works in the event of an electricity shortage, replace the battery once a year. Take
out the battery when not using the toilet for a long time.
21.1- Open the window-shade.
21.2- Open the battery cover.
21.3- Take out the battery and replace them.
21.4- Close the battery cover and window-shade.
AVIS : Pour s’assurer que la fonction de rinçage fonctionne en cas de panne d’électricité, remplacez la pile une fois par an. Retirez
la pile lorsque vous n’utilisez pas la toilette pendant une longue période.
21.1- Ouvrir le couvercle.
21.2- Ouvrir le couvercle de la batterie.
21.3- Retirer la batterie et remplacer la par une nouvelle.
21.4- Fermer le couvercle de la batterie.
AVISO: Para asegurarse de que la función de descarga funciona en caso de falta de electricidad, sustituya la batería una vez al
año. Retire la batería cuando no vaya a usar el inodoro durante mucho tiempo.
21.1- Abra rejilla-ventana.
21.2- Abra la tapa de la batería.
21.3- Saque la batería y reemplácela.
21.4- Cierre la tapa de la batería y la rejilla ventana.

PAGE 27
SPECIFICATION SHEET
FEUILLE DE SPÉCIFICATIONS
GARANTÍA LIMITADA DEL PRODUCTO
Item Content
Electric Load AC 120V / 1300W / 60HZ
Electric Cord 1.5 m insulated power cord
Cleaning System
Rear Bidet (1 jet) Adjustable pressure
Lady Bidet (4 jets) Adjustable pressure
Water Temp 4 Levels
Heater Capacity AC 120V / 1200W / 60HZ
Bidet Tank Capacity 1 L
Overheating Safety
Temperature safety reset protector integrated. Toilet will shutdown if temp. is out of
specs.
Anti-Reux Anti-Reux check valve integrated in the shut-o valve.
Drying System
Drying Air Temp 4 Levels
Air Speed 1 Level
Heater Capacity AC 120V / 250W / 60HZ
Overheating Safety Temperature Fuse
Heating Seat
Seat Temp 4 Levels
Heater Capacity AC 120V / 45W / 60HZ
Overheating Safety By design
Deodorization System
Deodorizer Eliminates odors through an odor ghting catalyzer.
Limitations
Water Supply Pressure Lowest water pressure is 207 kPa (30psi), highest water pressure is 552 kPa (80psi)
Water Supply Temp 15-35 C
Ambiant Temp 15-40 C

PAGE 28
INSTALLATION PICTURE
IMAGE DE MONTAGE
IMAGEN DE INSTALACIÓN

PAGE 29
MAINTENANCE AND CARE
For general cleaning, use mild, nonabrasive soap and warm water. Do not use abrasive cleaners (such cleaners contain sand or silica that
will scratch the ceramic nish). Common bowl cleaners may be used on the ceramic surface. Do not use “in-tank” bowl cleaners because they
contain corrosive chemicals that attack the tank’s components.
LIMITED PRODUCT WARRANTY
Warranty Period (from date of sale to rst retail purchaser): 1 year on electric and electronic components, 5 years on ttings, 20 years on
ceramic components.
Limited Warranty: THE DISTRIBUTOR warrants to the original retail purchaser that within a reasonable time after notication from purchaser,
THE DISTRIBUTOR will repair or replace the Product, or any part or component of the covered Product, distributed by THE DISTRIBUTOR
which is proven to the satisfaction of THE DISTRIBUTOR to be defective in workmanship or materials, and which has failed during normal
use and within the warranty period. This Limited Warranty does not apply to Products that have been damaged, or which fail, as a result of
causes other than manufacturing defects (such as but not limited to improper installation including damage to nishes; lack of or improper care
or maintenance; exposure to elements including corrosive products, environments or external water damage; external causes or impact such
as electrical surges, re or impurities in the water supply, alteration; abuse or misuse). The warranty commences on the rst date a Product is
purchased by the customer. This warranty applies exclusively to products purchased and used in the country of sale.
Warranty Claim Procedure: To make a claim please email or call THE DISTRIBUTOR to trouble-shoot the issue and start the claim process.
Products may be inspected or evaluated by THE DISTRIBUTOR and any Product, part or component found to meet the above warranty criteria
will be repaired or replaced at THE DISTRIBUTOR’s option. Replacement or repaired parts will be shipped at no cost to customer via ground
freight to USA and CANADA destinations only. Any expedited methods of shipments are customer’s expense.
DISCLAIMER AND EXCLUSION OF WARRANTIES: This warranty is meant to be a complete and exclusive statement of the terms of
all limited warranties oered by THE DISTRIBUTOR.
To the fullest extent permitted by law, other than the express warranty set forth in this instrument there are NO WARRANTIES,
EXPRESS OR IMPLIED, INCLUDING ANY IMPLIED WARRANTIES OF MERCHANTABILITY OR FITNESS FOR A PARTICULAR PURPOSE
EXTENDED BY THE DISTRIBUTOR. Some states do not allow the exclusion of, or limitations to the duration of, implied warranties
so the above limitation may not apply to you.
This warranty gives you specic legal rights. You may also have rights, which may vary under applicable state or national legislation, which
cannot be disclaimed or modied by the above Disclaimer. Except as permitted, the Disclaimer is not intended to waive, modify, release or limit
the applicability of preemptive state or national legislation inconsistent with the terms of this Limited Warranty and Disclaimer. However, to the
extent permitted by law, no implied warranties of merchantability or tness are intended or extended hereunder. Notwithstanding the Disclaimer
if any implied warranty is imposed by operation of law, to the extent permitted, the duration of such implied warranties is limited to the shorter
of the term of the express warranty or the applicable statute of limitations.
The Products listed above are intended to be installed and used for personal, consumer residential use. Use of Products for any other purpose
such as commercial purposes voids this warranty. The Limited Warranty is applicable only to the Products listed herein, and no warranty is
extended to products not distributed by THE DISTRIBUTOR. The warranty is applicable only to the rst retail purchaser.
Transferability: This warranty is not transferrable.
LIMITATION AND EXCLUSION OF REMEDIES AND DAMAGES: THE DISTRIBUTOR’s sole responsibility under this Limited Warranty
shall be to evaluate, inspect, repair and/or replace, at its option, any defective Product, part or component. In certain instances THE
DISTRIBUTOR reserves the right to provide refurbished parts. Purchaser agrees that this is the sole and exclusive remedy under
this Limited Warranty. THE DISTRIBUTOR will not be responsible for any incidental, consequential, special or indirect damages,
including loss of use as a result of any manufacturing defect in a Product. THE DISTRIBUTOR will not be responsible for labor, or
any other fees associated with the removal or installation of the warranted Product, parts and/or components. Some states do not
allow the exclusion or limitation of incidental or consequential damages, so this limitation may not apply to you.
Product modication: THE DISTRIBUTOR reserves the right to change, modify or improve the Products without obligation to incorporate such
changes in Products previously sold or installed.
Authority and Modication: The retail seller is not the agent of THE DISTRIBUTOR and is not authorized to vary or modify the terms of the
Limited Warranty. In addition, the retail seller cannot bind THE DISTRIBUTOR or make any representations or promises about the Product
that are binding on THE DISTRIBUTOR.
Questions, problems, need help?
Call our customer service department at
1-866-839-2888, 9 a.m. - 5 p.m., EST, Monday - Friday
Questions, problèmes ou besoin d’aide?
Contactez notre service à la clientèle au
1-866-839-2888, du lundi au vendredi de 9h00 à 17h00 HNE.
Preguntas, problemas o necesita ayuda?
Llame a nuestro departamento de servicio al cliente al
1-866-839-2888, 9 am. – 5 pm., HDE, Lunes a Viernes.
www.ovedecors.com | [email protected]
/