Brady BBP12 User manual

Category
Label printers
Type
User manual

Brady BBP12 is a versatile thermal transfer printer that offers both thermal transfer and direct thermal printing at user-selectable speeds of 2.0, 3.0, or 4.0 ips. It accepts roll feed, die-cut, and fanfold labels for both thermal transfer and direct thermal printing. Brady BBP12 features high throughput for printing labels, supporting all common barcode formats, and can print fonts and barcodes in 4 directions. It also has 8 different alphanumeric bitmap fonts and built-in TrueType font capability.

Brady BBP12 is a versatile thermal transfer printer that offers both thermal transfer and direct thermal printing at user-selectable speeds of 2.0, 3.0, or 4.0 ips. It accepts roll feed, die-cut, and fanfold labels for both thermal transfer and direct thermal printing. Brady BBP12 features high throughput for printing labels, supporting all common barcode formats, and can print fonts and barcodes in 4 directions. It also has 8 different alphanumeric bitmap fonts and built-in TrueType font capability.

BBP12
ThermalTransferPrinter
UserGuide
BPP12 User Manual
iii
Contents
CHAPTER1 Introduction ........................................................................................................................................ 5
ProductIntroduction ................................................................................................................................................ 5
Compliance ............................................................................................................................................................ 5
CHAPTER 2 Operations Overview .......................................................................................................................... 6
Unpacking and Inspection ...................................................................................................................................... 6
Printer Overview ..................................................................................................................................................... 7
CHAPTER 3 Setup ................................................................................................................................................. 10
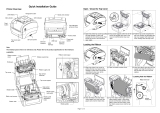
SettingUpthePrinter .............................................................................................................................................. 10
Open/ClosetheTopCover ...................................................................................................................................... 11
LoadingtheRibbon ................................................................................................................................................ 12
LoadingtheMedia .................................................................................................................................................. 15
DiagnosticTool ...................................................................................................................................................... 20
InstallSDMemoryCard .......................................................................................................................................... 21
CHAPTER 4 LEDandButtonFunctions ................................................................................................................. 26
LEDIndicator ......................................................................................................................................................... 26
RegularButtonFunction ........................................................................................................................................ 26
PoweronUtilities .................................................................................................................................................... 27
CHAPTER 5 LCD Menu Function ......................................................................................................................... 35
Enter the Menu ..................................................................................................................................................... 35
Main Menu Overview ........................................................................................................................................... 36
TSPL2 .................................................................................................................................................................. 37
ZPL2 ..................................................................................................................................................................... 39
Sensor .................................................................................................................................................................. 42
Interface ............................................................................................................................................................... 43
File Manager ........................................................................................................................................................ 46
Diagnostics ........................................................................................................................................................... 47
Advanced ............................................................................................................................................................. 51
Service ................................................................................................................................................................. 52
CHAPTER 6 Troubleshooting ............................................................................................................................... 53
LEDStatus............................................................................................................................................................. 53
PrintQuality ........................................................................................................................................................... 54
CHAPTER 7 Maintenance ..................................................................................................................................... 55
BPP12 User Manual
iii
Copyright
Thismanualiscopyrightedwithallrightsreserved.Noportionofthismanualmaybecopiedorreproducedby
anymeanswithoutthepriorconsentofBradyWorldwide,Inc.
Whileeveryprecautionhasbeentakeninpreparationofthisdocument,Bradyassumesnoliabilitytoanypartyf
oranylossordamagecausedbyerrorsoromissionsorbystatementsresultingfromnegligence,accident,oran
yothercause.Bradyfurtherassumesnoliabilityarisingoutoftheapplicationoruseofanyproductorsystemdes
cribed,herein;noranyliabilityforincidentalorconsequentialdamagesarisingfromtheuseofthisdocument.Br
adydisclaimsallwarrantiesofmerchantabilityorfitnessforaparticularpurpose.
Bradyreservestherighttomakechangeswithoutfurthernoticetoanyproductorsystemhereintoimproverelia
bility,function,ordesign.
Reproductionofthismaterial,inpartorwhole,isstrictlyprohibitedwithoutthewrittenpermissionofBradyWo
rldwide,Inc..Formoreinformation,contact:BradyWorldwide,Inc.Signmark® Division,2221W.Camden
Road,Milwaukee,WI53209.
Disclaimer
Everyefforthasbeenmadetomakethisguideasaccurateandcompleteaspossible.BradyWorldwide,Inc.isn
otresponsibleforinaccuraciesandomissionsoccurringduringtheuseofthisguide.
ThismanualisproprietarytoBradyWorldwide,Inc.andmayberevisedfromtimetotimewithoutnotice.BradyW
orldwide,Inc.disclaimsanyunderstandingtoprovideyouwithrevisions,ifany.
Allbrandorproductnamesreferencedinthismanualaretrademarksorregisteredtrademarksoftheirrespectiv
ecompaniesororganizations.
©2015Brady
Worldwide,Inc.Allrightsreserved.www.bradycorp.
com
Edition05/15
IdentificationSolutionsDivision
POBox2131
Milwaukee,WI53201U.S.A.
Phone:1-800-537-8791Fax:1-800-292-2289
iv
BPP12UserManual
Revision History
Date
Content
BPP12UserManual
5
CHAPTER1 Introduction
ProductIntroduction
ThankyouforpurchasingtheBRADYBBP12seriesbarcodeprinter.Althoughtheprinteriss
mall,itdeliversreliable,superiorperformance.
Thisprinterprovidesboththermaltransferanddirectthermalprintingatuser-
selectablespeedsof2.0, 3.0 or 4.0ips.Itacceptsrollfeed,die-cut,andfan-
foldlabelsforboththermaltransferanddirectthermalprinting.Allcommonbarcodesformatsarea
vailable.Fontsandbarcodescanbeprintedin4directions,8differentalphanumericbitmapfontsa
ndbuilt-intruetypefontcapability.Youwillenjoyhighthroughputforprintinglabelswiththisprinter.
Compliance
FCC ClassB,
CE Class B,
C-Tick Class B,
UL, cUL,
V/safety,
CCC,
EAC,
NOM
Note:
Continuousprintingwillcauseprintermotoroverheat.Printerwillstopprintingautomat
icallyabout10~15minutesuntilmotoriscooleddown.Donotturnoffpowerwhenprinter
pausesorthedatatransferedtoprinterbufferwillbelost.
Note:
Themaximumprintingratioperdotlineis15%forthisprinter.Toprintthefullwebblacklin
e,themaximumblacklineheightislimitedto40dots,whichis
3.3
mmfor300dpiresolutionprinter.
BPP12UserManual
6
CHAPTER 2 Operations Overview
UnpackingandInspection
Thisprinterhasbeenspeciallypackagedtowithstanddamageduringshipping.Pleasecareful
lyinspectthepackagingandprinteruponreceivingthebarcodeprinter.Retainthepackagingm
aterialsincaseyouneedtoreshiptheprinter.
UnpackingthePrinter
Thefollowingitemsareincludedinthecarton:
(1) Printer unit
(1) Product CD, including drivers
(1) Quick installationguide
(1) Power cord
(1) Auto switchingpower supply
(1) USB interface cable
(1)Adapter (for narrow continuous sleeves)
Ifanypartsaremissing,pleasecontactcustomerservice.
BPP12UserManual
7
PrinterOverview
Front View
1. LCD display
2. Menu button
3. Feed button
4. LED indicator
5. Navigation button
6. Ribbon access cover
7. Top cover open lever
8. SD card socket
1
7
8
5
6
3
2
BPP12UserManual
8
Interior View
1. Ribbon rewind hub
2. Ribbon rewind gear
3. Gap sensor (receiver)
4. Media holder
5. Media holder lock switch
6. Gap sensor (transmitter)
7. Printhead
8. Ribbon supply hub
9. Top cover support
10. Media guide adjustment knob
11. Media guide
12. Black mark sensor
13. Platen roller
2
3
1
11
7
8
9
10
12
13
6
5
4
BPP12UserManual
9
Rear View
1. Ethernet interface
2. USB interface
3. USB host interface
4. Serial/COM interface
5. Power jack socket
6. Power switch
7. Fan-fold paper entrance chute
6
7
1
5
4
2
3
BPP12UserManual
10
CHAPTER 3 Setup
SettingupthePrinter
1.
Placetheprinteronaflat,securesurface.
2.
Makesurethepowerswitchisoff.
3.
ConnecttheprintertothecomputerwiththeprovidedUSBcable.
4.
PlugthepowercordintotheACpowercordsocketattherearoftheprinter,andthenplugthepo
wercordintoaproperlygroundedpoweroutlet.
Note:
Please switch OFF printer power switch prior to plug in the power cord to printer power
jack.
Power Supply
Plug
Power
Switch
USB interface
Serial/COMInterfac
e
USB host interface
Ethernet RJ-45
interface
BPP12UserManual
11
Open/ClosetheTopCover
1.
Opentheprintertopcoverbypullingthegrey
tabslocatedoneachsidetowardthefrontoftheprinter,thenliftthetopcovertothemaximumo
penangle.
2.
Atopcoversupportattherearoftheprinterwillengagewithlowerinnercovertoholdtheprintert
opcoveropen.
3.
Holdthetopcoverandpressthetopcoversupporttodisengagethetopcoversupportwithlo
werinnercover.Gentlyclosethetopcover.
BPP12UserManual
12
LoadingtheRibbon
1.
Openthetopcoverontheprinterbypullingthegreenopenleverslocatedoneachsideofthepri
nterandliftingthetopcovertothemaximumopenangle.
2.
Opentheribbonaccesscover.
Note:Innormalprintmode,theribbonaccesscovercanbeopenedwhileopeningthet
opcover.Theribbonaccesscovercanbeclosedwhilethetopcoverisopenorclosed.
3.
Inserttherightsideoftheribbonrightontothesupplyhub.Alignthenotchesontheleftsideand
mountontothespokes.
BPP12UserManual
13
4.
Inserttherightsideofthepapercoreontotherewindhub.Alignthenotchesontheleftsideand
mountontothespokes.
5.
Attachtheribbonleaderontotheribbonrewindpapercore.
6.
Turntheribbonrewindgearuntiltheplasticribbonleaderisthoroughlywoundandtheblack
sectionoftheribboncoverstheprinthead.
BPP12UserManual
14
7.
Closetheribbonaccesscoverandthetopcover.
RibbonLoadingPath
BPP12UserManual
15
LoadingtheMedia
LoadingMedia
1.
Opentheprintertopcoverbypullingthegreytabs,locatedoneachside,towardthefrontofthep
rinter,thenliftthetopcovertothemaximumopenangle.
2.
Separateandholdopenthemediaholders.
3.
Placetherollbetweentheholdersandclosethemontothecore.
4.
SetthemediaholderlockswitchtoLock(down)toholdthelabelrollfirmly.
BPP12UserManual
16
5.
Optional:Ifusingeitheranexternalmediaholderorfoldedlabels,feedthemediathrou
ghtherearexternallabelentrancechute.
6.
Placethe paper,printsidefaceup,throughthemediasensor.
7.
Placethelabelleadingedgeontotheplatenroller.
8.
Movethemediaguidestofitthelabelwidthbyturningtheguideadjusterknob.
9.
Disengagethetopcoversupportandclosethetopcovergently.
10.
UsetheDiagnosticToolor LCD menu
tosetthemediasensortypeandcalibratetheselectedsensor(seethediagnosticutilityquicks
tartguideformoreinformation):
a.
StartDiagnostictool.
BPP12UserManual
17
b.
Select sensor onCalibrationtab.
c.
ClickCalibratebutton.
Note:Pleasecalibratethegap/blackmarksensorwhenchangingmedia.
Loading Path for Roll Labels
BPP12UserManual
18
External Label Roll Mount Installation (Option)
1.
Attachanexternal paperrollmountonthebottomoftheprinter.
2.
Insertalabelspindleintoapaperrollandinstallitontheexternalpaperrollmount.
3.
Openthetopcoverandseparatethemediaholderstofitthemediawidth.
4.
Pressdownthemediaholderlockswitchtofixthemediaholder.
5.
Feedthemediathroughtherearexternallabelentrancechute:
a.
Placethe paper,printsidefaceup,throughthemediasensor.
b.
Placethelabelleadingedgeontotheplatenroller.
BPP12UserManual
19
6.
Movethemediaguidestofitthelabelwidthbyturningtheguideadjusterknob.
7.
Disengagethetopcoversupportandclosethetopcovergently.
8.
UsetheDiagnosticTool or LCD
menutosetthemediasensortypeandcalibratetheselectedsensor
.
a.
StartDiagnostictool.
b.
Select sensor onCalibrationtab.
c.
ClickCalibratebutton.
BPP12UserManual
20
DiagnosticTool
TheDiagnosticUtilityisatoolboxthatletsusersexploretheprinter'ssettingsandstatus;changepri
ntersettings;downloadgraphics,fonts,andfirmware;createprinterbitmapfonts;andtosendadditi
onalcommandstotheprinter.Usingthisconvenienttool,youcanexploretheprinterstatusandsetti
ngsandtroubleshoottheprinter.
Start the Diagnostic Tool
1.
Tostartthesoftware,doubleclicktheDiagnostictoolicon.
Note:ThediagnostictoolislocatedatD:\DiagTool.
2.
Select the PC interface connected with bar code printer.
Default setting is USB interface. No further setting is required.
If RS-232 port is selected, further setup is required to select the serial port, baud rate, parity
check, data bits, stop bit and flow control.
If Ethernet is selected, need to select the bar code printer.
  • Page 1 1
  • Page 2 2
  • Page 3 3
  • Page 4 4
  • Page 5 5
  • Page 6 6
  • Page 7 7
  • Page 8 8
  • Page 9 9
  • Page 10 10
  • Page 11 11
  • Page 12 12
  • Page 13 13
  • Page 14 14
  • Page 15 15
  • Page 16 16
  • Page 17 17
  • Page 18 18
  • Page 19 19
  • Page 20 20
  • Page 21 21
  • Page 22 22
  • Page 23 23
  • Page 24 24
  • Page 25 25
  • Page 26 26
  • Page 27 27
  • Page 28 28
  • Page 29 29
  • Page 30 30
  • Page 31 31
  • Page 32 32
  • Page 33 33
  • Page 34 34
  • Page 35 35
  • Page 36 36
  • Page 37 37
  • Page 38 38
  • Page 39 39
  • Page 40 40
  • Page 41 41
  • Page 42 42
  • Page 43 43
  • Page 44 44
  • Page 45 45
  • Page 46 46
  • Page 47 47
  • Page 48 48
  • Page 49 49
  • Page 50 50
  • Page 51 51
  • Page 52 52
  • Page 53 53
  • Page 54 54
  • Page 55 55
  • Page 56 56
  • Page 57 57
  • Page 58 58

Brady BBP12 User manual

Category
Label printers
Type
User manual

Brady BBP12 is a versatile thermal transfer printer that offers both thermal transfer and direct thermal printing at user-selectable speeds of 2.0, 3.0, or 4.0 ips. It accepts roll feed, die-cut, and fanfold labels for both thermal transfer and direct thermal printing. Brady BBP12 features high throughput for printing labels, supporting all common barcode formats, and can print fonts and barcodes in 4 directions. It also has 8 different alphanumeric bitmap fonts and built-in TrueType font capability.

Ask a question and I''ll find the answer in the document

Finding information in a document is now easier with AI