Page is loading ...

Page 1
Eclipse
®
Upgrade
Guide
Part Number: PUB-00047 Rev A
Date: 07 Jan 2021
User
Guide

Eclipse | Upgrade Guide
Page 2
Document Reference
Clear-Com Eclipse HX Upgrade Guide
Product number: PUB-00047 Revision: A
Legal Disclaimers
Copyright © 2021 HME Clear-Com Ltd.
All rights reserved.
Clear-Com and the Clear-Com logo are trademarks or registered trademarks of HM
Electronics, Inc.
The software described in this document is furnished under a license agreement and
may be used only in accordance with the terms of the agreement.
The product described in this document is distributed under licenses restricting its use,
copying, distribution, and decompilation/reverse engineering. No part of this document
may be reproduced in any form by any means without prior written authorization of
Clear-Com, an HME Company.
Clear-Com Offices are located in California, USA; Cambridge, UK; Dubai, UAE;
Montreal, Canada; and Beijing, China. Specific addresses and contact information can
be found on Clear-Com’s corporate website:
www.clearcom.com
Clear-Com Contacts
Americas and Asia-Pacific Headquarters
California, United States
Tel: +1 510 337 6600
Email: CustomerServicesUS@clearcom.com
Europe, Middle East, and Africa Headquarters
Cambridge, United Kingdom
Tel: +44 1223 815000
Email: CustomerServicesEMEA@clearcom.com
China Office
Beijing Representative Office
Beijing, P.R.China
Tel: +8610 65811360/65815577

Eclipse | Upgrade Guide
Page 3
Contents
1 Important Safety Instructions ............................................ 7
Safety symbols .......................................................................................... 8
Mains power cord ....................................................................................... 8
2 Introduction ..................................................................... 10
2.1 Planning the upgrade to Eclipse HX ...................................................... 10
3 Quick reference: Upgrading to Eclipse HX v12.1 ............... 20
3.1 Upgrading from 5.2.5 ......................................................................... 20
3.2 Upgrading from 7.0 ........................................................................... 23
3.3 Upgrading from 7.1 ........................................................................... 26
3.4 Upgrading from 7.5 ........................................................................... 29
3.5 Upgrading from 7.6 ........................................................................... 32
3.6 Upgrading from 8.0 ........................................................................... 35
3.7 Upgrading from 8.5 ........................................................................... 38
3.8 Upgrading from 8.5.1 ......................................................................... 41
3.9 Upgrading from 8.5.2 ......................................................................... 44
3.10 Upgrading from 8.7 ....................................................................... 47
3.11 Upgrading from 8.8 ....................................................................... 51
3.12 Upgrading from 9.0 ....................................................................... 54
3.13 Upgrading from 9.1 ....................................................................... 57
3.14 Upgrading from 10.0 ..................................................................... 60
3.15 Upgrading from 11.0 ..................................................................... 63
3.16 Upgrading from 11.1 ..................................................................... 66
3.17 Upgrading from 12.0 ..................................................................... 69
4 Upgrading to Eclipse HX v12.1.......................................... 73
4.1 Backing up your ECS v5.2.5 configurations ........................................... 73
4.2 Backing up your EHX 7.x/8.x/9.x/10.x/11.x/12.x configurations .............. 73
4.3 Installing EHX and Dynam-EC Clients ................................................... 73
4.4 Importing your configurations into EHX ................................................ 74
4.5 Updating Dynam-EC .......................................................................... 75

Eclipse | Upgrade Guide
Page 4
5 Upgrading the CPU cards .................................................. 76
5.1 Changing the CPU card PROM (only applicable if upgrading from v5) ........ 76
5.2 Changing the CPU card RAM (only applicable if upgrading from v5).......... 77
5.3 Changing the CPU card DIP switches .................................................... 79
5.4 Upgrading the CPU card secondary bootloader and application code ......... 79
5.5 Setting the matrix type ...................................................................... 97
5.6 Checking the CPU card application code version .................................... 99
5.7 Upgrading CPU Card U53 CPLD............................................................ 99
5.8 Upgrading CPU Card U1 CPLD ........................................................... 101
5.9 Upgrading the CPU card U53 CPLD code with Xilinx tools ...................... 103
5.10 Upgrading the CPU card U1 CPLD code with Xilinx tools .................... 105
5.11 Downloading a test configuration to the CPU card using EHX ............ 108
5.12 Forcing the CPU card to the factory default IP address ..................... 108
6 Upgrading the Eclipse HX-PiCo ....................................... 110
6.1 Changing the Eclipse HX-PiCo PROM .................................................. 110
6.2 Changing the Eclipse HX-PiCo RAM .................................................... 113
6.3 Changing the Eclipse HX-PiCo DIP switches ......................................... 114
6.4 Upgrading the Eclipse HX-PiCo Secondary Bootloader and Application .... 114
6.5 Upgrading the Eclipse HX-PiCo MVX code............................................ 130
6.6 Checking the Eclipse HX-PiCo app code and MVX code versions ............. 138
6.7 Upgrading the Eclipse HX-PiCo CPLD and FPGA code with Xilinx tools ..... 139
6.8 Download a test configuration into the Eclipse HX-PiCo using EHX ......... 142
6.9 Forcing the Eclipse HX-PiCo to the factory default IP address ................ 143
7 Upgrading the MVX-A16 card ......................................... 145
7.1 Identifying MK I and MK II MVX-A16 cards ......................................... 145
7.2 Upgrading the MVX-A16 MK I or MK II boot and/or app code ................ 145
7.3 Checking the MVX-A16 MK I or MK II boot and application code version . 152
7.4 Upgrading the MVX-A16 MK I or MK II card FPGA with Xilinx tools ......... 153
8 Upgrading E-FIB cards.................................................... 163
8.1 Upgrading E-FIB card FPGA with Xilinx tools ....................................... 163
9 Upgrading E-QUE cards .................................................. 166

Eclipse | Upgrade Guide
Page 5
9.1 Identifying MK1 and MK2 E-QUE cards ............................................... 166
9.2 Upgrading the E-QUE card (MK1 and MK2) via EHX .............................. 167
9.3 Upgrading the E-QUE card (MK1) via serial cable and third-party TFTP tools168
9.4 Upgrading the E-QUE card (MK2) via serial cable and third-party TFTP tools173
9.5 Upgrading the E-QUE card (MK1 and MK2) FPGA with Xilinx tools .......... 180
9.6 Upgrading the E-QUE card (MK1) boot ROM ........................................ 182
9.7 Upgrading the E-QUE card (MK2) boot ROM ........................................ 183
10 Upgrading IVC-32 and LMC-64 cards .............................. 190
10.1 Identifying MK1 and MK2 IVC-32 / LMC-64 cards ............................ 190
11 Upgrading E-MADI64 cards ............................................ 192
11.1 Identifying MK1 and MK2 E-MADI64 cards ...................................... 192
11.2 Upgrading the E-MADI64 boot code ............................................... 194
11.3 Upgrading the E-MADI64 application, DSP and FPGA code using EHX . 197
11.4 Upgrading the E-MADI64 FPGA using the Xilinx tool set .................... 200
12 Upgrading E-DANTE64-HX cards ..................................... 204
13 Upgrading E-IPA-HX cards ............................................. 207
14 Upgrading panels ........................................................... 210
14.1 Upgrading panels using EHX ......................................................... 210
14.2 Upgrading V-Series Iris panels by USB ........................................... 213
14.3 Upgrading panel application code manually .................................... 214
14.4 Manually upgrading V-Series panels .............................................. 226
15 Upgrading the TEL-14 module ........................................ 233
15.1 Upgrading the TEL-14 hardware .................................................... 233
15.2 Upgrading the TEL-14 firmware ..................................................... 235
16 Upgrading the AES-6 module .......................................... 239
16.1 Upgrading AES-6 FPGA ................................................................ 241
17 Upgrading FreeSpeak II™ wireless systems ................... 246
17.1 Upgrading FreeSpeak II Beltpacks and transceivers centrally using EHX246
17.2 Upgrading FreeSpeak II beltpacks and non-IP transceivers via USB ... 249
17.3 Upgrading the FS II IP Transceiver firmware ................................... 251

Eclipse | Upgrade Guide
Page 6
18 Upgrading FreeSpeak Edge ............................................. 253
18.1 Upgrading FreeSpeak Edge transceivers ......................................... 253
18.2 Upgrading FreeSpeak Edge beltpacks ............................................. 254
Appendix A: CPU card layout .............................................. 256
Appendix B: CPU card DIP switches ................................... 257
Appendix C: PiCo card layout ............................................. 259
Appendix D: Eclipse HX-PiCo CPU DIP switches ................. 260
Appendix E: Hitachi Renesas Flash Development Tool ....... 262
Appendix F: TFTPUtil .......................................................... 270
Appendix G: Tera Term ...................................................... 273
Appendix H: Flash Magic .................................................... 275
Appendix I: i-Station converter cable wiring and rear panel
layouts 279
Appendix J: Xilinx tools ...................................................... 281
Appendix K: Clear-Com
®
End User Software License ........... 282

Eclipse | Upgrade Guide
Page 7
1 Important Safety Instructions
1) Read these instructions.
2) Keep these instructions.
3) Heed all warnings.
4) Follow all instructions.
5) Do not use this apparatus near water.
6) Clean only with dry cloth.
7) Do not block any ventilation openings. Install in accordance with the
manufacturer’s instructions.
8) Do not install near any heat sources such as radiators, heat registers, stoves,
or other apparatus (including amplifiers) that produce heat.
9) Do not defeat the safety purpose of the polarized or grounding-type plug. A
polarized plug has two blades and a third grounding prong. The wide blade or
the third prong are provided for your safety. If the provided plug does not fit
into your outlet, consult an electrician for replacement of the obsolete outlet.
10) Protect the power cord from being walked on or pinched particularly at plugs,
convenience receptacles, and the point where they exit from the apparatus.
11) Only use attachments/accessories specified by the manufacturer.
12) Use only with the cart, stand, tripod, bracket, or table specified by the
manufacturer, or sold with the apparatus. When a cart is used, use caution
when moving the cart/apparatus combination to avoid injury from tip-over.
13) Unplug this apparatus during lightning storms or when unused for long periods
of time.
14) Refer all servicing to qualified service personnel. Servicing is required when
the apparatus has been damaged in any way, such as power-cord supply or
plug is damaged, liquid has been spilled or objects have fallen into the
apparatus, the apparatus has been exposed to rain or moisture, does not
operate normally, or has been dropped.
15) Warning: To reduce the risk of fire or electric shock, do not expose this
product to rain or moisture.

Eclipse | Upgrade Guide
Page 8
Safety symbols
Familiarize yourself with the safety symbols in Figure 1 below. These symbols are displayed on
the apparatus and warn you of the potential danger of electric shock if the system is
used improperly. They also refer you to important operating and maintenance
instructions in the product user manual.
Figure 1-1: Safety symbols
Mains power cord
Eclipse HX matrices are powered by an internal power supply. The cord to connect the
internal power supply to the mains supply must conform to the following:
• The mains power cord shall have an IEC C13 connector at one end and a
mains power plug at the other end.
• An IEC C13 plug has three pins, the center pin carrying the earth / ground.
The other two pins carry neutral and live circuits.
• The conductors of the mains cords shall have adequate cross-sectional area for
rated current consumption of the equipment.

Eclipse | Upgrade Guide
Page 9
• The mains plug that connects to the mains supply must be approved for use in
the country where the equipment is to be used.
• The mains power cord must be an IEC mains power cord complying with
standard IEC60320; IEC320/C13.
• Mains power cords used in the U.S. must also comply with standard UL817.

Eclipse | Upgrade Guide
Page 10
2 Introduction
This guide describes how to upgrade from ECS v5.2.5 to Eclipse HX v12.1, a
software release for the Clear-Com Eclipse HX™ digital matrix system (standalone or
networked). This guide additionally identifies the simpler upgrade from
v7.x/v8.x/v9.x/v10.x/11.x/12.x to v12.1.
The system components covered by the guide include (but are not limited to):
• Matrices (Eclipse HX-PiCo, Eclipse HX-Delta, Eclipse HX-Median and Eclipse
HX-Omega)
• Interface cards (E-IPA, E-FIB, E-QUE, MVX-A16, E-MADI64, LMC-64, and
others)
• Interface modules (AES-6, TEL-14 and others)
• User panels (V-series and i-Station panels)
Important note:
Eclipse HX upgrades must be performed by a technically qualified engineer.
2.1 Planning the upgrade to Eclipse HX
Before you start upgrading your Eclipse (ECS v5.2.5 or EHX
v7x/v8.x/v9.x/10.x/11.x/12.x) system components to Eclipse HX v12.1 ensure that
you have:
• Sufficient spare (replacement) cards, interfaces or panels for the upgrade.
• Scheduled enough time to complete the upgrade, or if required, roll back the
upgrade to the version that was running before the upgrade.
• A suitable backup system is in place to maintain service, if your intercom
system is part of a mission critical or sensitive application.
You should also be aware that:
• The order in which you carry out the upgrade is important. The chapters of
this guide are laid out in the order that your system components should be
upgraded.
Tip: For a quick reference to the upgrade procedures you require, and the
order in which they should be carried out, see chapter 3 Quick reference:
Upgrading to Eclipse HX.
• If you are upgrading V-Series panels, you may have to upgrade each V-
Series panel individually by connecting it directly to a PC.

Eclipse | Upgrade Guide
Page 11
• Upgrading the matrices in a networked (linked) system should take place at
the same time, because the data sent between networked matrices can
change.
When upgrading networked (linked) matrices, Clear-Com recommends that you:
• Remove one CPU card from each matrix, put it in a safe place, then upgrade
the other CPU card and the rest of the system upgrade.
• Upgrade the remaining CPU cards in the matrices only when the upgrade has
been completed and tested across the full system. Leaving the remaining CPU
cards until last gives you the capability of quickly rolling back to the previously
running version, if any mission critical issues are encountered. NOTE – When
the second card is upgraded retrospectively as described it needs to be placed
in the frame without the other CPU card in place. This is because CPU cards
only exchange data as a master/slave pair when both cards are already
running the same firmware. Once both cards are upgraded insert both cards
and re-download the frame configuration.
• Great care must be taken when opening the lid of the Eclipse HX-PiCo matrix
to upgrade components. This may invalidate UL status.
Remove power from the device first, to avoid working with the
system while it is live. Observe all electrical shock hazard
warning and precautions for handling electrostatic sensitive
devices
2.1.1 Client / Server installations
When upgrading Client / Server installations from ECS v5.2.5 or EHX
v7.x/v8.x/v9.x/v10.x/v11.x/12.x to Eclipse HX v12.1, you must:
• Use the EHX v12.1 Server Installer only on the PC that is to be the EHX
Server. The EHX v12.1 server installer will automatically update your IIS and
configure it to work with Eclipse HX v12.1.
• Use the standard combined EHX/Dynam-EC 12.1 Client Installer on all the
Client PCs. The Server PC can also act as a client.
You should check that you have the appropriate IIS and .Net Windows components
installed prior to installing the EHX Server. Please refer to the Initial Setup section of
the Client/Server chapter in the EHX User Guide for a complete list of the components
required for each version of Windows.
Note: Installing an EHX Server is an advanced workflow - please contact Clear-Com
Support for advice before attempting to install an EHX Server.

Eclipse | Upgrade Guide
Page 12
Before upgrading your EHX Server installation, Clear-Com strongly recommends that
you export any existing projects (using File->Export from an EHX Client) and backup
your users list (using the Export command in the User Management screen). It is
recommended that you uninstall your existing EHX Server before installing the newer
version.
2.1.2 Roll back strategy
You should not encounter any mission critical issues when upgrading to Eclipse HX
v12.1. However, if you decide to roll back the system to the previously running
version, then you must:
• Allow adequate time for the roll back operation.
• Roll back all system components to the same baseline version.
Temporary roll back strategy
If you want to roll back to the previously running version for a temporary period only,
before making another attempt to upgrade to Eclipse HX v12.1, then you may
implement the following temporary roll back strategy:
1) Leave all cards and panels at Eclipse HX v12.1
2) Roll back the matrix CPU card to run at the previously running version.
3) Re-install the previous running version of ECS/EHX and import your old
configurations.
Caution:
The above strategy is a temporary solution only. Eclipse HX v12.1 configurations will
not import or work with a CPU card at ECS v5.2.5 or EHX
v7.x/v8.x/v9.x/v10.x/v11.x/12.x. If you want to run the previously running system
software for an extended period, Clear-Com recommends rolling back all system
components to the same baseline version.
2.1.3 Supplied Upgrade Media
Different upgrade media are supplied to the customer, according to the type of Eclipse
HX product that has been purchased:
Product
Firmware Documentation
USB
System
Drivers
USB
Documentation
USB
Matrix
-
-

Eclipse | Upgrade Guide
Page 13
ECS / EHX /
Dynam-EC
-
-
Upgrade kit
-
Table 2-1: Supplied USBs
System Drivers Upgrade Media
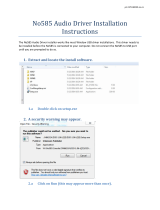
The System Drivers upgrade media contains the latest firmware for your Eclipse HX
devices, including Boot PROM and FPGA / CPLD code files for Eclipse HX matrices,
interface cards, interface modules and supported panels (i-Station and V-Series
panels). You must upgrade to the latest firmware when upgrading to Eclipse HX v12.1.
The System Drivers USB also includes the third party software that may be used
during upgrades.
Firmware USB
The Firmware USB contains:
• The EHX configuration software, which is used to manage and configure your
Eclipse HX devices.
• Dynam-EC, which provides fast, intuitive audio routing control for your Eclipse
HX system.
• A full set of Eclipse HX documentation, including release notes and user
guides.
• The application code files for your Eclipse HX matrices.
The Firmware USB also includes the third party software that may be used during
upgrades.
You must upgrade to the latest application code files when upgrading to Eclipse HX
v12.1. You require both sets of upgrade media to complete a full upgrade to Eclipse
HX v12.1.
Tip: You can find user documentation, brochures and summary information for all
Clear-Com’s products (including the Eclipse and Eclipse HX systems), on the Clear-
Com website at: http://www.clearcom.com/support/user-manuals.
A number of upgrade procedures, require the use of a TFTP Server. One is supplied on
the USB, but you can use any compatible TFTP Server.

Eclipse | Upgrade Guide
Page 14
2.1.4 Fitting the Eclipse HX door panel
To enable you to change the branding of Eclipse Median and Eclipse Omega matrices
that have been upgraded to Eclipse HX, Clear-Com provides an Eclipse HX door panel
kit.
The figures that illustrate the procedure below feature an Eclipse Median matrix.
However, the procedure is also applicable to Eclipse Omega matrices.
Tip: For more information about fitting the Eclipse HX door panel to your upgraded
Eclipse Median and Eclipse Omega matrices, see the Eclipse Matrix Door
Replacement Instructions, included with your kit.
To replace the Eclipse branded door with the Eclipse HX door:
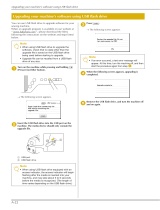
1) Remove the two screws securing the Eclipse door (and hinge) unit to the
Eclipse matrix. Retain the screws.
Figure 2-1: Screws securing the Eclipse door (and hinge)
unit
1

Eclipse | Upgrade Guide
Page 15
2) Remove the four screws securing the hinge to the existing door unit. Retain
the screws.
Figure 2-2: Removing the screws securing the hinge to
the Eclipse door
3) Use the four screws retained in Step 2 to secure the hinge to the new Eclipse
HX door unit.
Figure 2-3: Securing the hinge to the Eclipse HX door
4) Use alcohol to clean the latch-mount surface (located to the bottom right on
the inside of the Eclipse HX door).
2
3

Eclipse | Upgrade Guide
Page 16
Figure 2-4: Latch-mount surface, inside the Eclipse HX
door
5) To attach the Eclipse HX door to the matrix, secure the hinge to the matrix
using the two screws retained from Step 1.
Figure 2-5: Attaching the Eclipse HX door to the matrix
4
Latch-mount
surface
5

Eclipse | Upgrade Guide
Page 17
6) Open the door. Insert the latch (a separate item from the door unit) into the
latch receptacle on the chassis.
The latch receptacle is located to the bottom left of the area enclosed by the
door.
Note:
Leave the white plastic protector on the latch when you insert the latch into the receptacle.

Eclipse | Upgrade Guide
Page 18
Figure 2-6: Inserting the latch into the latch receptacle
7) To expose the adhesive surface of the latch, remove the green film from the
back of the latch.
8) Close the door. Press down firmly on the bottom left of the door, so that the
latch adheres firmly to the latch-mount surface inside the door.
9) Open the door again and remove the white plastic protector from the latch.
The Eclipse HX door has now been fitted to the matrix.
Latch
receptacle
Latch
6

Eclipse | Upgrade Guide
Page 19
Figure 2-7: Removing the white plastic protector from the
latch
2.1.5 Help with upgrading
If you require more help with either a particular upgrade procedure or the
implementation of a whole system upgrade, contact either:
• Clear-Com Technical Support (http://www.clearcom.com/contact/support-
contacts).
• Your Clear-Com sales representative, to arrange for an engineer to visit your
site and assist you with the upgrade.
See page 2 of this guide for contact email addresses, or go to
http://www.clearcom.com/contact/sales-contacts.
9
White

Eclipse | Upgrade Guide
Page 20
3 Quick reference: Upgrading to Eclipse HX v12.1
The upgrade kit includes a Drivers USB, containing the latest firmware files (including Boot and FPGA / CPLD code files) for
your Eclipse HX devices. It also includes a software USB, containing the application code files for your Eclipse HX feature
applications. It includes the EHX configuration software, Dynam-EC audio routing software, and Eclipse HX v12.1
documentation. You require both upgrade media to complete a full system upgrade. For more information, see 2.1.3 Supplied
.
3.1 Upgrading from 5.2.5
The following table lists the procedures that you will require to upgrade from ECS v5.2.5 to Eclipse HX v12.1.
Important note:
The table lists the procedures in the order in which they must be carried out. To go to a procedure, click the cross-reference /
link.
Important note:
If you are upgrading to Eclipse HX 12.1 and are using an E-IPA-HX card, see the FreeSpeak II IP Transceiver Quick Start Guide
for information about IP setup and configuration.
Order
System component
Upgrade procedure(s)
Notes
1
E-QUE card
IVC-32 card
LMC-64 card
9.1 Identifying MK1 and MK2 E-QUE cards
9.2 Upgrading the E-QUE card (MK1 and MK2) via EHX
9.3 Upgrading the E-QUE card (MK1) via serial cable and third-
party TFTP tools
9.4 Upgrading the E-QUE card (MK2) via serial cable and
third-party TFTP tools
The procedures used to upgrade
E-QUE cards to Eclipse HX v12.1
can also be used to upgrade IVC-
32 and LMC-64 cards.
No PROM upgrade is required
/