Page is loading ...

IMPORTANT NOTICE
Place all wooden parts on a clean and smooth surface such as a rug or carpet to avoid the parts from being scratched.
Check to be sure that you have a ll parts and hardware.
Remove all wrapping materials, including staples & packing straps before you start to assemble.
Do not tighten all screws/bolts until completely assembled.
Keep all hardware parts out of reach of children.
Any problems or questions please call Regency Oce Furniture at 1-866-816-9822
A
B
C
D
E
F
G
A. Table Top
B. Large Base
C. Cylinder
D. Spider
E. Rod
F. Foot (4)
G. Screws (8)
Round Table Top INSTRUCTIONS
(MKTBX22, MKTBX30, MKTBX36, TTRD30, TTRD36, TTRD42, TTRD48)
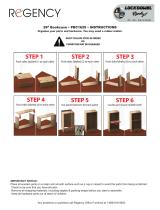
Step 1: Screw 4 feet (F) into
base (B) leg ends.
Step 2: Remove the nuts from
the rod (E), set the nuts aside.
STEP 4: Place spider down so the spider is ush on oor and rod
is sticking straight up. Insert cylinder (C) over rod so the at side is
touching the spider ush. Then place Large Base (B) into place and
screw bolt to tighten.
STEP 5: Turn table upside
down. Draw a line across the
table at the widest point up
and down and again left and
right to nd
center.
STEP 6: Place dot 1, located
on the back of this instruction,
directly over the crossing lines
on the table top (A).
1
STEP 7: Once aligned, punch a
pen through remaining
template dots 2,3,4,5 and
mark table bottom.
1
2
11
3
4
5
Organize your parts. You will need a drill,pencil and crescent wrench. Two people are required for assembly.
STEP 9: Line Up the marks
made on table from step 8
with the holes on the spider
arms.
STEP 10: Drill in all 8 screws (G)
and ip table over.
STEP 8: Place
table top (A) at
on the oor and
set the
completed base
(H) over the
center.
H
1
2
3
4
5
2
3
4
5
1
Step 3: Insert the rod (E) through
the hole in (D) and attach a nut to
exposed rod end. Have 1/4 inch of
rod extruding
at nut.
1

1
-The Outside dots are for 48” Table
tops and MKTBX 36 X-Bases.
-The Inside dots are for 30”, 36” and
42” Table tops and MKTBX 22 & 30
X-Bases.
2
3
4
5
/