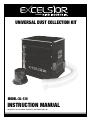
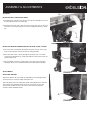
Excelsior XL-130 is a universal dust collection kit designed to fit Excelsior 32” x 24” Cast-iron Table or Excelsior 32” x 24” MDF Table. It helps to maintain a clean work area by effectively collecting dust and debris generated during routing operations. The kit includes a dust collection box with an adjustable air vent that allows users to optimize airflow based on the size and power of their dust collector. The front access panel on the dust collection box provides easy access for cleaning and maintenance.
Excelsior XL-130 is a universal dust collection kit designed to fit Excelsior 32” x 24” Cast-iron Table or Excelsior 32” x 24” MDF Table. It helps to maintain a clean work area by effectively collecting dust and debris generated during routing operations. The kit includes a dust collection box with an adjustable air vent that allows users to optimize airflow based on the size and power of their dust collector. The front access panel on the dust collection box provides easy access for cleaning and maintenance.


-
 1
1
-
 2
2
-
 3
3
-
 4
4
-
 5
5
-
 6
6


Excelsior XL-130 is a universal dust collection kit designed to fit Excelsior 32” x 24” Cast-iron Table or Excelsior 32” x 24” MDF Table. It helps to maintain a clean work area by effectively collecting dust and debris generated during routing operations. The kit includes a dust collection box with an adjustable air vent that allows users to optimize airflow based on the size and power of their dust collector. The front access panel on the dust collection box provides easy access for cleaning and maintenance.
Ask a question and I''ll find the answer in the document
Finding information in a document is now easier with AI
Other documents
-
King Canada PDM-30 User manual
-
-
-
-
-
-
-
-
-