Page is loading ...

ENDSL-A2+R2
ADSL2+ Modem
One Port Full-Rated Router
User’s Manual
JULY 2007

Copyright
Copyright © 2007 Encore Electronics Inc.. All rights reserved. No part of this publication may
be reproduced, transmitted, transcribed, stored in a retrieval system, or translated into any
language or computer language, in any form or by any means, electronic, mechanical,
magnetic, optical, chemical, manual or otherwise, without the prior written permission of this
company.
Disclaimer
This company makes no representations or warranties, either expressed or implied, with
respect to the contents hereof and specifically disclaims any warranties, merchantability or
fitness for any particular purpose. Any software described in this manual is sold or licensed
"as is". Should the programs prove defective following their purchase, the buyer (and not this
company, its distributor, or its dealer) assumes the entire cost of all necessary servicing, repair,
and any incidental or consequential damages resulting from any defect in the software.
Further, this company reserves the right to revise this publication and to make changes from
time to time in the contents hereof without obligation to notify any person of such revision or
changes.
Caution
This device complies with part 15 of the FCC rules. Operation is subject to the following two
conditions.
(1) This device may not cause harmful interference, and
(2) This device must accept any interference received, including interference that may cause
undesired operation.
Per FCC 15.21, you are cautioned that changes or modifications not expressly approved by
the part responsible for compliance could void the user’s authority to operate the equipment.
All brand and product names mentioned in this manual are trademarks and/or
registered trademarks of their respective holders.
1

Contents
1. Introduction.............................................................................................4
1.1 Introduction to ENDSL-A2+R2 router......................................................... 4
1.2 Product Features........................................................................................ 4
2. Hardware Installation..............................................................................7
2.1 System Requirements................................................................................ 7
2.2 Package Contents...................................................................................... 7
2.3 Front Panel Indicators and Description...................................................... 7
2.4 Back Panel................................................................................................. 8
2.5 Connect Related Devices........................................................................... 9
3. Connecting ENDSL-A2+R2 Router via Ethernet and USB.................10
3.1 Setup ENDSL-A2+4R2 router via Ethernet Cable.................................... 10
3.2 Setup ENDSL-A2+4R2 router via USB Cable .......................................... 10
3.3 Configure TCP/IP...................................................................................... 18
3.4 USB Device Driver Installation on MAC OS ............................................. 33
4. Configure ENDSL-A2+R2 Router via HTML Interface......................41
4.1 Login......................................................................................................... 41
4.2 Quick Start................................................................................................ 42
4.3 Interface Setup ......................................................................................... 44
4.3.1 Internet.............................................................................................44
4.3.2 LAN .................................................................................................48
4.4 Advanced Setup.......................................................................................... 50
4.4.1 Firewall............................................................................................50
4.4.2 Routing.............................................................................................50
4.4.3 NAT..................................................................................................52
4.4.4 QoS ..................................................................................................55
4.4.5 VLAN ..............................................................................................56
4.4.6 ADSL...............................................................................................57
4.5 Access Management................................................................................... 58
4.5.1 ACL..................................................................................................58
4.5.2 IP Filter ............................................................................................59
4.5.3 SNMP...............................................................................................63
4.5.4 UPnP................................................................................................63
2
4.5.5 DDNS...............................................................................................64

4.5.6 CWMP .............................................................................................65
4.6 Maintenance............................................................................................. 67
4.6.1 Administration .................................................................................67
4.6.2 Time Zone........................................................................................67
4.6.3 Firmware..........................................................................................68
4.6.4 System Restart .................................................................................69
4.6.5 Diagnostic........................................................................................70
4.7 Status ....................................................................................................... 71
4.7.1 Device Info.......................................................................................71
4.7.2 System Log ......................................................................................73
4.7.3 Statistics...........................................................................................74
5. Troubleshooting....................................................................................75
5.1 Using LEDs to Diagnose Problems .......................................................... 75
5.1.1 Power LED..........................................................................................75
5.1.2 LAN LED............................................................................................75
5.1.3 ADSL LED..........................................................................................76
5.2 Problems with the Web Interface.............................................................. 76
5.3 Problems with the Login Username and Password.................................. 77
5.4 Problems with LAN Interface.................................................................... 77
5.5 Problems with WAN Interface................................................................... 77
5.6 Problems with the Internet Access............................................................ 78
3

1. Introduction
1.1 Introduction to the ENDSL-A2+4R2 router
This ENDSL-A2+4R2 router is a full-featured ADSL2+ router that provides Ethernet
direct connections to individual PCs or local area network with 10/100 Base-T Ethernet. This
product use advanced ADSL chipset solution with complete set of industry standard features
and high-speed ADSL, ADSL2 and ADSL2+ Internet access solution for SOHO and residential
users. User can enjoy higher quality multimedia and real-time applications such as online
gaming, Video-on-Demand and other bandwidth consuming services. Also the feature-rich
routing functions are seamlessly integrated to ADSL2+ service for existing corporate or home
users.
1.2 Product Features
Application Diagram
High Speed Internet Access
This ENDSL-A2+4R2 router complies with ADSL / ADSL2 / ADSL2+ standards. It can
support downstream rates of up to 24Mbps and upstream rates of up to 1Mbps. This
ENDSL-A2+4R2 router is compliant with the following standards.
z ANSI T1.413 issue 2
z ITU-T G.992.1 (G.dmt)
z ITU-T G.992.2 (G.lite)
z G.994.1 (G.hs, Multimode)
z ITU-T G.992.3 (ADSL2 G.dmt.bis)
z ITU-T G.992.4 (ADSL2 G.lite.bis)
z ITU-T G.992.5 (ADSL2+; Annex A, B, I, J, L & M)
z Reach Extended ADSL (RE ADSL)
4

Quick Installation Wizard
Support Quick Installation Wizard Web GUI and Easy setup software to install this ADSL
router easily and quickly.
Multi-connection protocol support
z Multi Protocol over AAL5 (RFC1483 / 2684)
z Classical IP over ATM (RFC 1577)
z VC and LLC Multiplexing
z PPP over Ethernet (RFC 2516)
z PPP over ATM (RFC 2364)
Network Address Translation (NAT)
Network Address Translation (NAT) allows the translation of an Internet protocol address
used within one network (for example a private IP address used in a local network) to a
different IP address known within another network (for example a public IP address used on
the Internet).
Universal Plug and Play (UPnP)
Universal Plug and Play is a standard that uses Internet and Web protocols to enable
devices such as PCs, peripherals, intelligent appliances, and wireless devices to be plugged
into a network and automatically know about each other.
This protocol is used to enable
simple and robust connectivity among stand-alone devices and PCs.
Dynamic DNS Support
With Dynamic DNS support, you can have a static hostname alias for a dynamic IP
address, allowing the host to be more easily accessible from various locations on the Internet.
You must register for this service with a Dynamic DNS client.
5
DHCP Support
DHCP (Dynamic Host Configuration Protocol) allows individual clients to obtain TCP/IP
configuration at start-up from a centralized DHCP server. The ADSL router has built-in DHCP
server capability enabled by default. It can assign IP addresses, an IP default gateway and
DNS servers to DHCP clients. It can also act as a surrogate DHCP server (DHCP Relay)
where it relays IP address assignment from the actual real DHCP server to the clients.

Device Management
z Web-based GUI Configuration / Management
z Command-line Interpreter (CLI)
z Telnet Remote Management
z Firmware upgrade via FTP / TFTP (Web-based GUI)
z Built-in Diagnostic tool and IP Ping
SNMP (Simple Network Management Protocol) Support
It’s an easy way to remote control the router via SNMP.
10/100M Auto-negotiation Fast Ethernet switch
This auto-negotiation feature allows the router to detect the speed of incoming
transmissions and adjust appropriately without manual intervention. It allows data transfer of
either 10 Mbps or 100 Mbps in either half-duplex or full-duplex mode depending on your
Ethernet network.
Multiple PVC (Permanent Virtual Circuits) Support
z Supports OAM F4/F5 loop-back, AIS and RDI OAM cells.
z ATM Forum UNI 3.1/4.0 PVC
z Support up to 8PVCs.
Bridging / Routing support
z Ethernet to ADSL self-learning Transparent Bridging (IEEE 802.1D)
z IP routing-RIPv2 (backward compatible with RIPv1)
z Static IP routing
z Routing (TCP/IP/UDP/ARP/ICMP)
z IP Multicast IGMP v1/v2
Security
z PPP over PAP (Password Authentication Protocol; RFC1334)
z PPP over CHAP (Challenge Authentication Protocol; RFC1994)
z VPN (IPsec, PPTP, L2TP) pass through
z Built-in NAT Firewall
z IP-based Packet filtering
z Password Protected System Management
6

2. Hardware Installation
2.1 System Requirements
z Pentium III 266 MHz processor or higher
z 128 MB RAM minimum
z 20 MB of free disk space minimum
z RJ45 Ethernet Port
z USB Port
z CD-ROM drive
2.2 Package Contents
z ENDSL-A2+R2
z RJ-45 Ethernet cable
z RJ-11 Phone cable
z USB Cable
z Power Adapter
z Software driver CD
z Quick Installation Guide
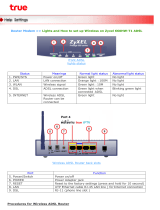
2.3 Front Panel Indicators and Description
Front panel of ENDSL-A2+R2 has LED indicators to display router’s operating status.
One-Port ADSL Router Front Panel
○ ○ ○ ○ ○
ADSL DATA LAN USB PWR
Descriptions of LED status
7
ADSL
When connection with Internet (ADSL Connected) is established, this LED will light up.
When this LED is flashing: NO ADSL physical connection
DATA When router is transferring data between Internet and router, this LED will be flashing.
LAN
When connection 10/100MB with end user is established, this LED will light up. When
router is transferring data between router and end user, this LED will be flashing.
USB When an active USB cable is connected with router, this LED will light up.
PWR When an active power adapter is connected with router, this LED will light up.

Four-Port ENDSL-A2+4R2 Router Front Panel
○ ○ ○ ○ ○ ○ ○
PWR USB LAN4 LAN3 LAN2 LAN1 ADSL
Descriptions of LED status
PWR When an active power adapter is connected with router, this LED will light up.
USB When an active USB cable is connected with router, this LED will light up.
LAN4 When port 4 connection with PC or Switch / Hub is established, this LED will light up.
LAN3 When port 3 connection with PC or Switch / Hub is established, this LED will light up.
LAN2 When port 2 connection with PC or Switch / Hub is established, this LED will light up.
LAN1 When port 1 connection with PC or Switch / Hub is established, this LED will light up.
ADSL
When connection with Internet (ADSL Connected) is established, this LED will light up.
When this LED is flashing: NO ADSL physical connection
2.4 Back Panel
One-Port ENDSL-A2+R2
Descriptions of All Connectors
LINE Connect with phone cable
USB Connect with USB cable to PC
DEFAULT Reset button.
LAN Connect with Ethernet Cable to Switch Hub or PC
PWR Connect with power adapter
ON/OFF Power switch button
Four-Port ENDSL-A2+4R2 Router
8
LINE USB DEFAULT LAN PWR ON/OFF
ON/OFF PWR 1X 2X 3X 4X DEFAULT USB
LINE

Descriptions of All Connectors
ON/OFF Power switch button
PWR Connect with power adapter
1X Connect with Ethernet Cable to Switch Hub or PC
2X Connect with Ethernet Cable to Switch Hub or PC
3X Connect with Ethernet Cable to Switch Hub or PC
4X Connect with Ethernet Cable to Switch Hub or PC
DEFAULT Reset button
USB Connect with USB cable to PC
LINE Connect with phone cable
2.5 Connect Related Devices
1) Connect Router to LINE
Plug the provided RJ-11 phone cable into LINE port on the back panel of the router
and insert the other end into splitter or wall phone jack.
2) Connect Router to LAN
Plug RJ-45 Ethernet Cable into LAN port on the back panel of the router and insert
the other end of the Ethernet cable on your PC’s Ethernet port or switch / hub.
3) Connect Router to Power Adapter
Plug Power Adapter to PWR port on the back panel of the router and the other end
to a power outlet.
4) Press ON/OFF button to start the router
5) If you connect your router via USB cable, plug the provided USB cable into USB
port on the back panel of the router and insert the other end of the USB cable to PC.
Warning! Only use the power adapter provided in the package, otherwise it may cause
hardware damage.
9

3. Connecting ENDSL-A2+4R2 Router via Ethernet and
USB
You can connect ENDSL-A2+4R router with PC through either Ethernet cable or USB
cable. After connection is established, you can configure the host PC to be a DHCP client.
You have to repeat the same steps for every host PC on your network if you use DHCP
function on your router.
3.1 Setup ENDSL-A2+4R2 router via Ethernet Cable
If there is an available LAN card present on your PC, you just simply connect ADSL
router and PC through the Ethernet cable. Once you establish Internet connection, you could
browse the Web through the Ethernet cable.
3.2 Setup ENDSL-A2+4R2 router via USB Cable
You can connect the ENDSL-A2+4R2 router with PC via USB cable when there is no
LAN card present on your PC. USB cable acts as another LAN connection in this scenario.
Once you establish Internet connection, you could browse the Web through the USB cable.
USB Device Driver Installation for Windows Vista/XP/2000/ME/98SE
Step 1: Connect ENDSL-A2+R2 Router and PC with USB cable.
Step 2: Once “Found New Hardware Wizard” window pops out, chooses “Install from a list
or specific location (advanced)” and click “Cancel”:
10

(Figure 1: For Windows Vista)
(Figure 2: For Windows 2000 and XP)
(Figure 3: For Windows 98SE and ME)
11

Step 3: Insert the installation CD and the Easy Setup main page will appear as below,
Install USB Driver: If router is connected through USB cable, click here to install USB driver.
Quick Setup: If router is connected through Ethernet cable or after USB driver is loaded, click
here to set the ADSL Router.
USER MANUAL: This CD provides Easy Setup and ADSL Router. Easy Setup describes the
installation procedures via Quick Setup utility and ADSL Router describes detailed router
setup and configuration.
Adobe: Click here to install Acrobat Reader.
(Acrobat 8 Reader for Windows Vista/XP; Acrobat 6 Reader for Windows 2000/ME/98SE)
Panda: Click here to start Panda Anti Virus program.
(Panda only supports Windows XP/2000/ME/98SE OS).
Exit: Click here to exit the installation procedures
12

Step 4: If router is connected with USB cable, click “Install USB Driver”, the software kit will
automatically install USB driver. Please wait for a while during the configuration.
Step 5: For Windows XP OS, Click “Continue Anyway” to process the next step.
13

Step 6: After device installation has successfully installed ADSL USB Modem, click “OK” to
exit.
[Note] In Windows 98SE Operation System, the setup program will ask restart the computer
to complete the installation. Please follow the below processes:
Step 6: Click “OK” to restart your computer.
Step 7: After system is rebooted, Insert Disk information window will show as below, click
“OK” to continue.
14
Step 8: The program will automatically direct the program files which is necessary. Click “OK”
to continue.

Step 9: After complete the installation process, the system will ask to restart your
computer. Please click “Yes” to reboot your system again.
To verify your router is installed properly, please follow the below descriptions:
[For Windows Vista]
15
Go through “Start Æ Control Panel Æ System Æ Device Manager” to check if USB
device is installed properly.

[For Windows XP]
Go through “Start Æ Control Panel Æ
System Æ Hardware Æ Device Manager”
to check if USB device is installed properly.
16

[For Windows 2000]
Go through “Start Æ Settings Æ Control
Panel Æ System Æ Hardware Æ Device
Manager” to check if USB device is installed
properly.
[For Windows 98SE & ME]
17
After OS boots up, go through “Start Æ Settings Æ Control Panel Æ System Æ Device
Manger” to check if USB device is installed properly,

3.3 Configure TCP/IP
For Windows 98SE and ME
18
Step 1: Click Start then Settings and choose Control Panel

Step 2: Double click Network icon.
Step 3: Select Configuration tab, then choose TCP/IP from the list of installed network
Components and click Properties button.
Step 4: You can setup the following configurations in two methods:
Option1: Get an IP from Router Automatically
Select the IP Address tab.
In this page, click Obtain an IP address automatically radio button.
19
1) Select Gateway tab and click OK
/