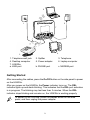
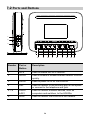
Huawei HG630a, a versatile home gateway, provides a seamless online experience. Connect to the internet via DSL, Ethernet, or USB modem, ensuring uninterrupted connectivity. Its wireless capabilities allow for easy device connection and sharing of internet access. Manage network settings, enable/disable Wi-Fi, change passwords, and configure firewall settings through the user-friendly web interface. Enjoy secure file sharing and remote access to internal resources with the built-in FTP server.
Huawei HG630a, a versatile home gateway, provides a seamless online experience. Connect to the internet via DSL, Ethernet, or USB modem, ensuring uninterrupted connectivity. Its wireless capabilities allow for easy device connection and sharing of internet access. Manage network settings, enable/disable Wi-Fi, change passwords, and configure firewall settings through the user-friendly web interface. Enjoy secure file sharing and remote access to internal resources with the built-in FTP server.


-
 1
1
-
 2
2
-
 3
3
-
 4
4
-
 5
5
-
 6
6
-
 7
7
-
 8
8
-
 9
9
-
 10
10
-
 11
11
-
 12
12
-
 13
13
-
 14
14
-
 15
15
-
 16
16
-
 17
17
-
 18
18
-
 19
19
-
 20
20
-
 21
21
-
 22
22
-
 23
23
-
 24
24
-
 25
25
-
 26
26
-
 27
27
-
 28
28
-
 29
29
-
 30
30
-
 31
31
-
 32
32
-
 33
33


Huawei HG630a, a versatile home gateway, provides a seamless online experience. Connect to the internet via DSL, Ethernet, or USB modem, ensuring uninterrupted connectivity. Its wireless capabilities allow for easy device connection and sharing of internet access. Manage network settings, enable/disable Wi-Fi, change passwords, and configure firewall settings through the user-friendly web interface. Enjoy secure file sharing and remote access to internal resources with the built-in FTP server.
Ask a question and I''ll find the answer in the document
Finding information in a document is now easier with AI