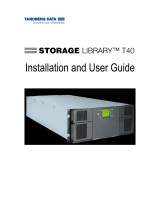
TANDBERG StorageLibrary T40+ User guide
- Category
- Tape auto loaders & libraries
- Type
- User guide

Revision 433599-06
2012-07-18

2

Copyright © 2012 Tandberg Data GmbH
The information contained in this document is subject to change without notice.
This document contains proprietary information which is protected by copyright. All rights are reserved. No part of
this document may be reproduced, modified, distributed, or translated to another language without the prior
written consent of Tandberg Data.
Tandberg Data Norge
Lorenveien 68
N-0580 Oslo, Norway
www.tandbergdata.com
This document may describe designs for which patents are pending, or have been granted. By publishing this
information, Tandberg Data conveys no license under any patents or any other rights.
Tandberg Data does not accept liability for errors contained herein or for incidental or consequential damages
(including lost profits) in connection with the furnishing, performance or use of this material whether based on
warranty, contract, or other legal theory. Tandberg Data makes no representation or warranty with respect to the
contents of this document and specifically disclaims any implied warranties of merchantability or fitness for any
particular purpose. Further, Tandberg Data reserves the right to revise or change this document without
obligation on the part of Tandberg Data to notify any person or organization of such revision or change.
Every effort has been made to acknowledge trademarks and their owners. All trademarks within this document
are the property of their respective owners. Trademarked names are used solely for identification or exemplary
purposes, and any omissions are unintentional.
Published: July 2012 Part No.: 433599-06

iv Contents
Table of Contents
1 About This Guide 11
Waste Electrical and Electronic Equipment Directive ............................................................................ 11
Regulatory Name ................................................................................................................................... 11
Explanation of Symbols and Notes ........................................................................................................ 11
Other Documents You May Need .......................................................................................................... 12
Getting More Information or Help ........................................................................................................... 12
International Headquarter ................................................................................................................ 12
Technical Support ............................................................................................................................ 12
2 Product Overview 13
Product Description ................................................................................................................................ 14
Tape Drive Support ......................................................................................................................... 14
Data Transfer Rates ........................................................................................................................ 14
Magazines ....................................................................................................................................... 14
Front Panel ...................................................................................................................................... 14
Rear Panel ....................................................................................................................................... 15
Library Features ..................................................................................................................................... 17
Operator Interfaces .......................................................................................................................... 17
ADI Bridging and LUN ..................................................................................................................... 17
Partitions .......................................................................................................................................... 17
Control Path ..................................................................................................................................... 17
I/E Station ........................................................................................................................................ 17
Simple Network Management Protocol (SNMP) ............................................................................. 17
Capacity on Demand (COD) ............................................................................................................ 17
Pass-Thru Upgrade ......................................................................................................................... 18
Redundant Power Supply ................................................................................................................ 18
Browser Requirements .................................................................................................................... 18
3 Unpacking the StorageLibrary 19
Finding a Location for the StorageLibrary .............................................................................................. 19
Unpacking .............................................................................................................................................. 19
4 Hardware Installation 21
Preparing for Installation ........................................................................................................................ 22
Installing one or more StorageLibrary Product(s) in a Rack .................................................................. 22
Remove the Transport Locking Screws ................................................................................................. 33
Mounting the Rack mount Ears .............................................................................................................. 34
Installing the Library Cables ................................................................................................................... 35
Connecting SCSI Cables ................................................................................................................. 35

StorageLibrary T40+ Series Installation and User Guide v
Connecting SAS Cables .................................................................................................................. 36
Connecting Fibre Channel Cables ................................................................................................... 37
System Power-on ................................................................................................................................... 38
Labeling Cartridges for the Barcode Reader ......................................................................................... 39
5 Operator Interfaces 41
Front Panel Interface (FPI)..................................................................................................................... 41
Scroll Function ................................................................................................................................. 41
Remote Management Interface (RMI) ................................................................................................... 42
Menu Trees ............................................................................................................................................ 42
Home Screen ......................................................................................................................................... 45
Operator Privileges ................................................................................................................................ 45
Words Commonly Used on the FPI and the RMI ................................................................................... 46
6 Configuring the Library 49
About the Setup Wizard ......................................................................................................................... 49
Using the Default Administrative User Account (Administrator) ...................................................... 49
Using the Setup Wizard ................................................................................................................... 50
Setup Wizard Tasks ........................................................................................................................ 50
Applying a License Key .......................................................................................................................... 52
Configuring Pass-Thru ........................................................................................................................... 52
Configuring I/E Slots .............................................................................................................................. 52
Configuring Cleaning Slots..................................................................................................................... 53
Configuring Auto Clean .......................................................................................................................... 54
Configuring Partitions ............................................................................................................................. 54
Creating Partitions ........................................................................................................................... 54
Re-configuring Partitions ................................................................................................................. 55
Changing Partition Modes ............................................................................................................... 55
Setting Drive ID................................................................................................................................ 56
Modifying the Control Path .............................................................................................................. 57
Configuring Menu Timeout ..................................................................................................................... 57
Setting Date and Time ........................................................................................................................... 57
Configuring Barcode Scan ..................................................................................................................... 58
Configuring Audible Alarm ..................................................................................................................... 58
Configuring Network Settings................................................................................................................. 58
Remote Access................................................................................................................................ 59
Configuring FPI Password ..................................................................................................................... 59
Configuring RMI Password .................................................................................................................... 59
Configuring SNMP ................................................................................................................................. 60
Configuring Notifications ........................................................................................................................ 60
Severity Level .................................................................................................................................. 60
Configuring E-mail Notification ........................................................................................................ 61
7 Running the Library 63
Logging In............................................................................................................................................... 63
Logging Out ............................................................................................................................................ 63
Importing Cartridges ............................................................................................................................... 63
Importing Cartridges via I/E Slot ...................................................................................................... 64
Import Cartridges via Bulk Loading of Magazines ........................................................................... 65
Exporting Cartridges .............................................................................................................................. 65
Loading to Tape Drives .......................................................................................................................... 65
Unloading from Tape Drives .................................................................................................................. 65
Cleaning Tape Drives ............................................................................................................................. 66
Importing Cleaning Media ................................................................................................................ 66
Cleaning Media Handling ................................................................................................................ 66
Exporting Cleaning Media ............................................................................................................... 66

vi Contents
Auto Clean ....................................................................................................................................... 66
Manual Clean ................................................................................................................................... 67
Taking a Library Online/Offline............................................................................................................... 67
Taking a Library Online ................................................................................................................... 67
Taking a Library Offline ................................................................................................................... 67
Magazine Handling ................................................................................................................................ 67
Using the Mail Slot ........................................................................................................................... 67
Removing the Magazine from the Unit ............................................................................................ 68
Inserting Cartridges into the Magazine ............................................................................................ 68
Removing Cartridges from the Magazine ........................................................................................ 69
Inserting a Magazine into the Unit ................................................................................................... 69
Manual/Emergency Release of Magazines ..................................................................................... 69
Standby Functionality ............................................................................................................................. 70
8 Getting Status and Information 71
Library Settings ...................................................................................................................................... 71
Partition and Drive Information............................................................................................................... 71
Network .................................................................................................................................................. 72
Statistics ................................................................................................................................................. 73
Event Log ............................................................................................................................................... 73
9 Adding, Removing and Replacing 75
Power Supply Unit .................................................................................................................................. 75
Replacing a Power Supply .............................................................................................................. 76
Adding a Redundant Power Supply................................................................................................. 77
Hot-Swapping a Redundant Power Supply ..................................................................................... 78
Tape Drive Unit ...................................................................................................................................... 79
Adding a Tape Drive ........................................................................................................................ 79
Permanently Removing a Tape Drive ............................................................................................. 79
Removing and Replacing a Tape Drive ........................................................................................... 80
10 Updating Firmware 81
Updating Library Firmware ..................................................................................................................... 81
Updating Drive Firmware ....................................................................................................................... 82
11 Working With Cartridges and Barcodes 85
Handling Cartridges Properly ................................................................................................................. 85
Write-Protecting Cartridges .................................................................................................................... 86
Barcode Requirements .......................................................................................................................... 86
Attaching Barcode Labels ...................................................................................................................... 86
12 Troubleshooting 87
About RAS Tickets ................................................................................................................................. 87
Viewing RAS Tickets ....................................................................................................................... 87
Closing RAS Tickets ........................................................................................................................ 88
Supported RAS Tickets ................................................................................................................... 88
Interpreting LEDs ................................................................................................................................... 93
The Maintenance Menus ................................................................................................................. 93
The Diagnostics Menu ..................................................................................................................... 93
Verifying Hardware ................................................................................................................................. 94
Software Checking ................................................................................................................................. 94
Verifying Recent Changes ..................................................................................................................... 94
Troubleshooting Matrix ........................................................................................................................... 95

StorageLibrary T40+ Series Installation and User Guide vii
13 Shipping or Transporting the StorageLibrary 101
Re-inserting the Transport Locking Screws ......................................................................................... 101
Packing the StorageLibrary .................................................................................................................. 102
14 Specifications 103
Library Dimensions .............................................................................................................................. 105
Library Component Weights................................................................................................................. 105
Power Requirements ............................................................................................................................ 106
Climatic Specifications ......................................................................................................................... 106
15 Safety and Regulatory Information 107
Safety Approvals .................................................................................................................................. 107
EMC Approvals .................................................................................................................................... 107
Conformity Declarations ....................................................................................................................... 108
16 Approved Drive Types 109

viii Contents
Figures
Figure 1. Front Panel of the StorageLibrary ............................................................................................................................... 15
Figure 2. Rear Panel of the StorageLibrary with 1 full-height SCSI Drive Installed ..................................................................... 16
Figure 3. Two T40+ units mounted in a rack .............................................................................................................................. 21
Figure 4. Position of the Rack Installation Stencil (Front View) ................................................................................................... 25
Figure 5. Matching the Hole-set ................................................................................................................................................. 25
Figure 6. Position of the Rack Installation Stencil (Rear View) ................................................................................................... 26
Figure 7. Aligning of the Rack Installation Stencils for systems with more than two units ........................................................... 26
Figure 8. The Rail Assemblies ................................................................................................................................................... 27
Figure 9. Screw Mounting Sequence (Front View) ..................................................................................................................... 27
Figure 10. Rear View of the Rack .............................................................................................................................................. 28
Figure 11. Rack-Ear Mounting Holes ......................................................................................................................................... 28
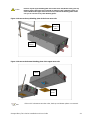
Figure 12. Remove the top blanking plate of the lower-most unit ............................................................................................... 29
Figure 13. Remove the bottom blanking plate of the upper-most unit ......................................................................................... 29
Figure 14. Slide the units onto the rails, leaving ~100mm for ear mounting ................................................................................ 30
Figure 15. Remove the transport locking screws ........................................................................................................................ 30
Figure 16. Mount the ears on the side of the units ..................................................................................................................... 31
Figure 17. Ear screws mounting sequence ................................................................................................................................ 31
Figure 18. Install the Pass-Thru box in the Pass-Thru magazine ............................................................................................... 32
Figure 19. Exchange the right lower-most magazine with the Pass-Thru magazine in all the units except the upper most unit .. 32
Figure 20. The Complete System .............................................................................................................................................. 33
Figure 21. Transport Locking Screws Marked with Red Plastic Tabs ......................................................................................... 33
Figure 22. Mounting the Rack Mount Ears ................................................................................................................................. 34
Figure 23. StorageLibrary Cabling (SCSI interface) ................................................................................................................... 35
Figure 24. StorageLibrary Cabling (SAS interface)..................................................................................................................... 36
Figure 25. StorageLibrary Cabling (Fibre Channel interface)...................................................................................................... 37
Figure 26. Positioning of Barcode Label for LTO Cartridges ...................................................................................................... 39
Figure 27. Available Tandberg Data Cartridge Labels. ............................................................................................................... 39
Figure 28. Front Panel Interface (FPI) Top Level Menu Tree ..................................................................................................... 43
Figure 29. Remote Management Interface (RMI) Top Level Menu Tree ..................................................................................... 44
Figure 30. Remote Management Interface Home Screen .......................................................................................................... 45
Figure 31. Maps Menu on the FPI. ............................................................................................................................................. 47
Figure 32. Removing a Magazine from the Library ..................................................................................................................... 68
Figure 33. Inserting a Cartridge into the Magazine Slot .............................................................................................................. 68
Figure 34. Ejecting a Cartridge from the Magazine Slot. ............................................................................................................ 69
Figure 35. Inserting a Magazine into the Unit ............................................................................................................................. 69
Figure 36. Ejecting a Magazine using the Emergency Release Tool .......................................................................................... 70
Figure 37. The Back of the Library ............................................................................................................................................. 75
Figure 38. Replacing a Power Supply ........................................................................................................................................ 76
Figure 39. Adding a second Power Supply ................................................................................................................................ 77
Figure 40. Hot-Swapping a Power Supply .................................................................................................................................. 78
Figure 41. Adding or Removing a Tape Drive ............................................................................................................................ 80
Figure 42. Cartridge Write-Protect Switch and Correct Label Location ....................................................................................... 86
Figure 43. Transport Locking Screws Marked with Red Plastic Tab ......................................................................................... 102
Figure 44. The StorageLibrary partly packed ........................................................................................................................... 102

StorageLibrary T40+ Series Installation and User Guide ix
Tables
Table 1. Date Transfer Rates ..................................................................................................................................................... 14
Table 2. Commonly Used Words on FPI and RMI ...................................................................................................................... 46
Table 3. Cartridge Present Symbols on FPI during Inventory and in the Maps Menu ................................................................. 46
Table 4. Supported RAS Tickets ................................................................................................................................................ 88
Table 5. Maintenance Menus - Item Name and Description ....................................................................................................... 93
Table 6. Diagnostics Menu - Item Name and Description ........................................................................................................... 93
Table 7. Troubleshooting Matrix - Power with Solution ............................................................................................................... 95
Table 8. Troubleshooting Matrix - Cartridge Movement with Solution ......................................................................................... 96
Table 9. Troubleshooting Matrix - Media with Solution ............................................................................................................... 97
Table 10. Troubleshooting Matrix - SCSI with Solution .............................................................................................................. 97
Table 11. Troubleshooting Matrix - Library Performance with Solution ....................................................................................... 98
Table 12. Troubleshooting Matrix - Cleaning with Solution ......................................................................................................... 98
Table 13. Troubleshooting Matrix - Write or Read Issues with Solution ...................................................................................... 99
Table 14. Troubleshooting Matrix - LED Error Messages with Solutions .................................................................................... 99
Table 15. Troubleshooting Matrix - Errors Displayed on Front Panel with Solution ................................................................... 100
Table 16. Troubleshooting Matrix - Remote Management with Solution ................................................................................... 100
Table 17. Troubleshooting Matrix - Forgot Password with Solution .......................................................................................... 100
Table 18. Library Specification Summary ................................................................................................................................. 103
Table 19. Library Dimensions .................................................................................................................................................. 105
Table 20. Library Component Weights ..................................................................................................................................... 105
Table 21. Library Power Requirements .................................................................................................................................... 106
Table 22. Temperature Range ................................................................................................................................................. 106
Table 23. Humidity Range ....................................................................................................................................................... 106
Table 24. Altitude Range ......................................................................................................................................................... 106
Table 25. Approved Drive Types and Compatible Cartridges ................................................................................................... 109


StorageLibrary T40+ Series Installation and User Guide 11
1
1 About This Guide
This guide contains information and instructions necessary for the normal operation and management
of the Tandberg Data StorageLibrary T40+ Series. It is intended for anyone interested in learning or
needing to know how to install, configure, and operate the StorageLibrary T40+ Series. Please note
that Administrator level privileges are required in order to configure many of the features described in
this guide.
Note
Be sure to read all operating instructions in this manual before operating this
product.
Waste Electrical and Electronic Equipment Directive
This product contains materials that are recyclable under the Waste Electrical and Electronic
Equipment (WEEE) directive of the European Union. This product should not be disposed of as
unsorted municipal waste.
Regulatory Name
The Tandberg StorageLibrary T40+ Regulatory Name is: Model 1040.
Explanation of Symbols and Notes
To highlight important information, the following symbols appear throughout this document.
Caution
Indicates a situation that may cause possible damage to equipment, loss of data,
or interference with other equipment.
Warning
Indicates a potentially hazardous situation which, if not avoided, could result in
death or bodily injury.
Note
Indicates information intended to help you make better use of your system.

12 About This Guide
Other Documents You May Need
The following documents are also available for this product. These documents can be found at
www.tandbergdata.com
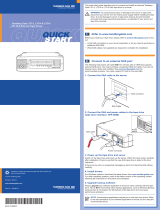
StorageLibrary T40+ Series, Quick Installation Guide (433559) gives you an overview of how to
install the library.
StorageLibrary T40+ Series, Pass-Thru Installation Manual (433831) helps you mount the
StorageLibrary T40+ Series or Pass-Thru system correctly into a rack.
StorageLibrary T40, SCSI Functional Specification, (433489) provides the SCSI interface
specification for the Tandberg Data StorageLibrary T40.
StorageLibrary T40+ Series , Customer Replaceable Unit (CRU) Tape Drive Instruction (433601).
StorageLibrary T40+ Series, Customer Replaceable Unit (CRU) Power Supply Instruction
(433602).
Getting More Information or Help
For further assistance please visit our web at www.tandbergdata.com or contact these regional
locations:
International Headquarter
Tandberg Data GmbH,
Feldstr. 81
44141 Dortmund
Germany
Tel: +49 (0) 231 5436 - 0
Fax: +49 (0) 231 5436 - 111
www.tandbergdata.com
Technical Support
Americas
USA and Canada: Tel: +1 303-417-7792
South America Tel: +11-50422270 Email: suporte@tandberg.com.br
Europe
Austria, Belgium , Czech Republic, Denmark, Finland, France, Germany, Hungary, Ireland, Italy,
Norway, Poland, Portugal, Spain, Sweden, Switzerland, The Netherlands, United Kingdom*
Tel: 00800 826 323 74 (toll-free)
Or +49 (0) 231 5436-142 Email: supportemea@tandbergdata.com
Asia
Australia Tel: 1300 309 108
New Zealand Tel: 0800 507 560
China, Malaysia, Philippines and Taiwan Tel: 00 800 8628 8000
Hong Kong, Singapore, Thailand Tel: 001 800 8628 8000
India Tel: 000 800 650 1187
Indonesia Tel: 001 803 65 7586
Pakistan Tel: 00 800 11065
Sri Lanka Tel: 2430 0800*
(* Enter “2” at the voice prompt, then dial 6396 0786)
Email: support@tandberg.com.sg

StorageLibrary T40+ Series Installation and User Guide 13
2
2 Product Overview
The Tandberg Data StorageLibrary T40+ Series is a professional tape backup and data protection
solution, providing excellent value for money. It is ideal for users who require a flexible, future-proof
and reliable backup solution with scalable capacities and maximum performance at a low cost per GB.
The StorageLibrary T40+ is a compact 4U high and can be mounted in a 19” rack or used as a
tabletop unit. The height of the rack mount version is 4U. The StorageLibrary T40+ contains 4
removable magazines, 40 tape slots and is available with either Half-Height (HH) or Full-Height (FH)
LTO tape drives (see Approved Drive Types).
The StorageLibrary T40+ is easy to use and is designed to simplify backup operations:
Optional Pass-Thru feature allows upto 5x units to be stacked together as one logical unit.
Optional Redundant Power Supply.
Four removable magazines allow easy management of data sets or archival storage.
A user friendly operator control panel, with backlit LCD provides easy access for configuration and
diagnostic operations.
Remote management interface to operate the library remotely via a Web Browser.
Menu Wizards for simplified library configuration.
Integrated barcode reader.
Support for SCSI/LVD, SAS and Fibre Channel Tape Drives.
On-board Diagnostics and fault analysis.
Standby functionality for power saving.
Customer replaceable tape drives and power supplies.
Customer upgradeable by adding tape drives, cartridge slots, and redundant power supply.
Caution
Review the Caution at the beginning of chapter Unpacking the StorageLibrary
before you power up the unit for the first time.

14 Product Overview
Product Description
Tape Drive Support
For additional specification information for this model, see Specifications. The drive types supported
by the StorageLibrary T40+ are given in chapter Approved Drive Types. The StorageLibrary T40+
supports 1-2 FH drives or 1-4 HH drives or a combination of HH and FH drives. The library supports
Fibre Channel, SAS and SCSI tape drive interfaces.
Tape drives are installed into tape drive bays at the back of the library. If a tape drive bay is empty, a
cover plate covers the empty tape drive bay to prevent dust from entering the library. Tape drives can
be installed in any available tape drive bay.
Data Transfer Rates
Table 1. Date Transfer Rates
StorageLibrary
Model
Maximum Sustained Rate,
Native
Maximum Sustained Rate, Compressed
LTO-3 SCSI
80MB/s
160MB/s
LTO-3 SAS
80MB/s
160MB/s
LTO-3 FC
80MB/s
160MB/s
LTO-4 SCSI
120MB/s
240MB/s
LTO-4 SAS
120MB/s
240MB/s
LTO-4 FC
120MB/s
240MB/s
Magazines
The library is equipped with four removable magazines, all accessible from the front of the unit. The
lower magazines hold 12 cartridges each and the two upper magazines hold 8 cartridges each. There
are no hidden slots. To cool the library, there are air intake holes on the front bezels. For easy
removal of the magazines, use the handles on the sides of the bezels. For details on magazine
handling, see the section Magazine Handling.
Front Panel
The Front Panel includes the Operator control panel with LCD display, four control buttons, two LED
indicators and a standby switch. The bezels of the four magazines are also visible from the front. See
Figure 1.
LCD – Liquid Crystal Display
The display is a backlit 128 x 68, dot-matrix graphical display that can show 8 lines of 20 characters.
In various modes of operation, the display panel screens and control buttons allow you to do the
following:
Enter settings for StorageLibrary configuration.
Issue operational commands.
View StorageLibrary status and information.
Test StorageLibrary functionality.

StorageLibrary T40+ Series Installation and User Guide 15
Figure 1. Front Panel of the StorageLibrary
Control Buttons
The labels for the four control buttons are displayed in the corners of the LCD. All buttons have “soft
function” for different modes of operation, i.e. the functions of the buttons change during different
activities. The actual function for each button is always visible on the display.
LED Indicators
The two LED indicators are green and amber. They indicate the StorageLibrary activity as follows:
Green LED on: The StorageLibrary is either running or ready for operation.
Green LED blinking: Short blinks followed by long intervals indicate that the library is in low power
standby mode.
Amber LED on: Fault LED; the StorageLibrary has encountered an electrical or mechanical
failure.
Standby Switch
A switch on the front panel provides a Library Standby mode. If the switch is pushed when the library
is active, the library completes the current operation and then goes offline and enters standby mode.
See Standby Functionality for more details.
Rear Panel
Figure 2 show the rear panel at the back of the library.
Cooling Fans
Forced-air cooling fans are integrated in the power supply, tape drive, and behind the library control
board. The fans pull air inwards through vents in the front bezels and expel it out the back. The fans
start when tape drive(s) are operating or if the internal temperature becomes too high.
Main Power Switches/Fuses/Power Cord Connections
The main power switches and power connectors are located at the back of the library. The fuses in
the fuse-holders are rated 250V 2A.
SCSI, SAS and Fibre Channel Interface Connectors
The library supports both SCSI, SAS and FC drives. The SCSI tape drive has two shielded 68-pin HD
SCSI connectors on the rear panel. The FC tape drive has one FC connector, and the SAS drive has
one SAS connector. The connectors are used for connecting the tape drive and the StorageLibrary to
the host.
The FC and SAS connectors can link to the following:
A shielded male HD68 SCSI cable

16 Product Overview
A shielded male HD68 SCSI terminator
SAS port cable
FC port cable
Ethernet Port
This port is for networking in support of the Web Client. It is also used to communicate between units
that share cartridges in a Pass-Thru system. It allows you to connect the StorageLibrary to a 10
BaseT compatible Ethernet network.
Battery Holder
The battery for the Real Time Clock (RTC) is located behind a plate at the back of the library. See
Figure 2. A drive power extension cable can be found in the same location.
Back Panel Cover plate
If a drive bay is empty, a cover plate covers the opening to prevent dust from entering the library.
Redundant Power Supply
A redundant power supply is installed in the power supply slot marked 2. See Adding, Removing and
Replacing for more information.
Figure 2. Rear Panel of the StorageLibrary with 1 full-height SCSI Drive Installed
Power Supply with
Fans in Slot 1
Redundant Power
Supply in Slot 2.
Back Panel
Cover Plates
Cooling
Fans
Ethernet
Port
Emergency
Release
Tool.
Real Time Clock-
battery and drive
power extension
cable behind
cover
SCSI
Connectors
Tape Drive
with Fan
Mains Power Switch,
Fuse and AC-inlet for
Power Supply in Slot 1

StorageLibrary T40+ Series Installation and User Guide 17
Library Features
This section describes several features of the StorageLibrary.
Operator Interfaces
The front panel is located on the front of the library and allows users to work locally on the library
using the Front Panel Interface (FPI). The Web Client is a Remote Management Interface (RMI) that
allows users to view and perform library functions from remote sites and is accessible through a
internet browser. For more information about the front panel and the remote management interface,
see Operator Interfaces.
ADI Bridging and LUN
The StorageLibrary implements Automation Drive Interface (ADI) bridging with Logical Unit
Numbering (LUN) addressing. The purpose of the LUN interface is to eliminate the requirement for a
host interface on the library controller board.This means that the library controller does not have its
own host interface, but SCSI commands to the library controller are sent via one of the installed tape
drives. The tape drive and the library controller will have a common SCSI ID but different LUN
numbers. The SCSI commands to/from the library controller are sent via the tape drive’s ADI port.
Partitions
The partitioning feature allows uses to create up to four virtual tape libraries for separating
departmental data. The StorageLibrary can be divided into a maximum of four partitions. At least one
tape drive and one magazine must be assigned to each partition. The robot, the import/export slots
and the cleaning slots are common resources to all partitions. For more information on partitions,
please see Configuring Partitions.
Control Path
The “control path” tape drive is used to connect a partition to a host application. Only one tape drive
can be selected as the control path at any time. By default, the first tape drive assigned to a partition
is designated the control path. In the event that the control path connection to the host application
fails, you may select a new control path for the partition.
I/E Station
I/E station enables the importing and exporting of cartridges without interrupting normal library
operations. I/E station slots are located in either the lower left or the upper left magazine. The number
of I/E slots for the 40 slot library is user settable to 0 (none), 3 or 8. The number of I/E slots for the 24
slot library is user settable to 0 (none) or 3.
The I/E slots are shared among all partitions. When a cartridge in an I/E slot is assigned to a partition,
only that partition can access that I/E slot. Access to the I/E slot is managed through the front panel
interface only.
Simple Network Management Protocol (SNMP)
The StorageLibrary supports system monitoring via SNMP and SNMP Notifications.
Capacity on Demand (COD)
In StorageLibrary, LTO storage slots are licensed for use. At any time, Capacity on Demand (COD)
allows you to enable the unused storage slots within a library via a firmware license key. The

18 Product Overview
StorageLibrary comes with 24 slots (two lower magazines) and supports licensing of an additional 16
slots (two upper magazines).
Details about the COD license key:
The license key does not expire.
Once a license key is installed it cannot be removed.
To order a COD License Key, please contact our Technical Support, or open a service request. For
contact information, see Getting More Information or Help.
To view your library’s current configuration and slot availability, open the home screen of the remote
management interface.
An instruction sheet describing how to use the license key is provided in the accessory kit. Once you
receive the license key, enter it via the front panel of the library. When the license key has been
entered, the total number of available slots in the library increases.
Pass-Thru Upgrade
The StorageLibrary T40+ Series incorporates the new Tandberg Data automation "Pass-Thru"
feature. The Pass-Thru feature allows up to five T40+ units to be stacked together in a 19” rack
configuration. The Pass-Thru feature is simple to install and allows users to add additional storage
capacity and drives to increase performance.
The Pass-Thru upgrade takes about 30 minutes and consists of removing the required blanking
plates, installing additional T40+ units directly above the existing T40+, and re-configuring the system.
After replacing the bottom right magazine with a Pass-Thru magazine, the system will briefly perform
a calibration before it is ready for use. For information on how to set-up Pass-thru, please see
Configuring Pass-Thru.
Redundant Power Supply
The StorageLibrary T40+ is supplied with redundant power supplies. The secondary power supply is
fitted to provide redundancy for mission critical operations, and to avoid power interruption to the
library. Both power supplies share the load under normal operating conditions. However, if one of the
power supplies fails, the other will provide the full load.
The two modular power supplies can be easily fitted and removed using thumb screws on the back of
the library. The two power supplies have independent power disconnect switches to enable hot-
swapping of each power supply. The auto-ranging power supplies are capable of using AC supplies
between 100v and 240v. See Adding a Redundant Power Supply for replacement of power supplies.
Browser Requirements
The supported browsers include:
Firefox™ version 1.0.6 and above
Internet Explorer™ version 6.0 and above

StorageLibrary T40+ Series Installation and User Guide 19
3
3 Unpacking the StorageLibrary
This chapter provides detailed information for preparing the library location.
Caution
After the library is unpacked it needs to acclimatise for 8 hours before the power
is turned on.
Finding a Location for the StorageLibrary
The StorageLibrary must be located in a stable environment.
The StorageLibrary is designed to operate in a horizontal position. Do not attempt to operate the
StorageLibrary in any other position than horizontally.
Make sure a power source is available (On StorageLibrary with redundant power you need two
power sources).
Route any cable to avoid walking on them or pinching them with items placed on or against them.
Pay particular attention to the cord at the wall plug, and the point where the cord exits from the
StorageLibrary.
Make sure that objects will not fall and liquids will not spill into the chassis openings of the
StorageLibrary.
Make sure the airflow around the front and back of the StorageLibrary is not obstructed.
Make sure there is a minimum of 60 cm (24 inch) free space in front of the unit to allow the
operator to safely remove the magazines.
Make sure the display and operator controls can easily be accessed.
Make sure the StorageLibrary is away from the floor and in a clean environment with
temperatures within specifications. See Specifications.
Unpacking
Caution
You must remove the transport locking screws when powering up the unit
for the first time or it will not operate. This procedure is described in the
Hardware Installation chapter.

20 Unpacking the StorageLibrary
To unpack the StorageLibrary, follow the instructions below.
Carefully unpack the unit from the shipping container. Save the container and packing materials in
case you need to transport the StorageLibrary in the future. The packaging is specifically designed for
the library to ensure it is not damaged during transportation.
The StorageLibrary could be lifted by one person if drives, power supply, and magazines are
removed. However, for absolute safety, it is recommended that two people lift the StorageLibrary. Full
library weight = 38 kg / 84 lbs (2 FH drives). Empty library weight = 23.6 kg / 52 lbs (does not include
drives, magazines or power supply).
Review the contents of the shipping container to be sure that all parts were included in the shipment
and no parts are damaged. A standard package for the StorageLibrary consists of the following items:
A factory-assembled StorageLibrary unit containing four cartridge magazines
A standard accessory kit containing:
Printed copy of the Quick Start Guide
Printed copy of the T40 Mounting installation Guide.
1 Warranty/Registration Information
Rack mounting kit including rack mount ears
2 power cords: one for USA/Japan and one for European power outlets
1 Ethernet cable
Media barcode label kit (contains media labels and cleaning cartridge labels)
There will be variations of this list. Depending on the number of drives in your library and whether
or not your library is equipped with SCSI, SAS or Fibre Channel drives. The accessory kit for
SCSI drives contains a terminator and SCSI cable.
The StorageLibrary accessory kit contains no cartridges.
Complete product registration online at http://www.tandbergdata.com, Support, Register Your
Product.
Page is loading ...
Page is loading ...
Page is loading ...
Page is loading ...
Page is loading ...
Page is loading ...
Page is loading ...
Page is loading ...
Page is loading ...
Page is loading ...
Page is loading ...
Page is loading ...
Page is loading ...
Page is loading ...
Page is loading ...
Page is loading ...
Page is loading ...
Page is loading ...
Page is loading ...
Page is loading ...
Page is loading ...
Page is loading ...
Page is loading ...
Page is loading ...
Page is loading ...
Page is loading ...
Page is loading ...
Page is loading ...
Page is loading ...
Page is loading ...
Page is loading ...
Page is loading ...
Page is loading ...
Page is loading ...
Page is loading ...
Page is loading ...
Page is loading ...
Page is loading ...
Page is loading ...
Page is loading ...
Page is loading ...
Page is loading ...
Page is loading ...
Page is loading ...
Page is loading ...
Page is loading ...
Page is loading ...
Page is loading ...
Page is loading ...
Page is loading ...
Page is loading ...
Page is loading ...
Page is loading ...
Page is loading ...
Page is loading ...
Page is loading ...
Page is loading ...
Page is loading ...
Page is loading ...
Page is loading ...
Page is loading ...
Page is loading ...
Page is loading ...
Page is loading ...
Page is loading ...
Page is loading ...
Page is loading ...
Page is loading ...
Page is loading ...
Page is loading ...
Page is loading ...
Page is loading ...
Page is loading ...
Page is loading ...
Page is loading ...
Page is loading ...
Page is loading ...
Page is loading ...
Page is loading ...
Page is loading ...
Page is loading ...
Page is loading ...
Page is loading ...
Page is loading ...
Page is loading ...
Page is loading ...
Page is loading ...
Page is loading ...
Page is loading ...
-
 1
1
-
 2
2
-
 3
3
-
 4
4
-
 5
5
-
 6
6
-
 7
7
-
 8
8
-
 9
9
-
 10
10
-
 11
11
-
 12
12
-
 13
13
-
 14
14
-
 15
15
-
 16
16
-
 17
17
-
 18
18
-
 19
19
-
 20
20
-
 21
21
-
 22
22
-
 23
23
-
 24
24
-
 25
25
-
 26
26
-
 27
27
-
 28
28
-
 29
29
-
 30
30
-
 31
31
-
 32
32
-
 33
33
-
 34
34
-
 35
35
-
 36
36
-
 37
37
-
 38
38
-
 39
39
-
 40
40
-
 41
41
-
 42
42
-
 43
43
-
 44
44
-
 45
45
-
 46
46
-
 47
47
-
 48
48
-
 49
49
-
 50
50
-
 51
51
-
 52
52
-
 53
53
-
 54
54
-
 55
55
-
 56
56
-
 57
57
-
 58
58
-
 59
59
-
 60
60
-
 61
61
-
 62
62
-
 63
63
-
 64
64
-
 65
65
-
 66
66
-
 67
67
-
 68
68
-
 69
69
-
 70
70
-
 71
71
-
 72
72
-
 73
73
-
 74
74
-
 75
75
-
 76
76
-
 77
77
-
 78
78
-
 79
79
-
 80
80
-
 81
81
-
 82
82
-
 83
83
-
 84
84
-
 85
85
-
 86
86
-
 87
87
-
 88
88
-
 89
89
-
 90
90
-
 91
91
-
 92
92
-
 93
93
-
 94
94
-
 95
95
-
 96
96
-
 97
97
-
 98
98
-
 99
99
-
 100
100
-
 101
101
-
 102
102
-
 103
103
-
 104
104
-
 105
105
-
 106
106
-
 107
107
-
 108
108
-
 109
109


TANDBERG StorageLibrary T40+ User guide
- Category
- Tape auto loaders & libraries
- Type
- User guide
Ask a question and I''ll find the answer in the document
Finding information in a document is now easier with AI
Related papers
-
 TANDBERG StorageLibrary T120+ Quick start guide
-
 TANDBERG STORAGE LIBRARY T40 User manual
-
 TANDBERG 840LTO Quick start guide
-
Tandberg Data LTO-5 User manual
-
 TANDBERG LTO-5 User guide
-
-
-
-
TANDBERG StorageLibrary T24 User manual
-


Other documents
-
-
-
Lenovo ThinkServe LTO User manual
-
-
-
-
IBM 4560SLX User manual
-
-
-