Page is loading ...

XR20
User’s Guide

Copyright © 1999 - 2002 Digital Monitoring Products, Inc.
Information furnished by DMP is believed to be accurate and reliable.
This information is subject to change without notice.
Silencing an Alarm
All/Perimeter and Home/Away Systems
While the alarm bell or siren is sounding, enter your user code. The keypad displays DISARM SILENCE.
Press the Select key under SILENCE to stop the bell or siren. This does NOT disarm the system.
Area Systems
While the alarm bell or siren is sounding, enter your user code. The system silences the alarm bell or siren.
What to do when a trouble tone is sounding
You can silence the trouble tone by pressing any one of the top row Select keys. This only silences the keypad and does not
correct the condition that originally caused the problem.

Security Command
®
User's Guide
XR20 Command Processor
TM
Panels
Table of Contents
Section Page Section Page
About Your Security System ........................................ 1
The Security Command Keypad ................................... 2
Special Security Command Messages ........................... 3
Special Security Command Tones ................................ 3
Understanding Security System Terms .......................... 4
How your System Operates ......................................... 6
Area System Arming .................................................. 7
Area System Disarming .............................................. 8
All/Perimeter System Arming ...................................... 9
All/Perimeter System Disarming ................................ 10
Home/Away System Arming ...................................... 11
Home/Away System Disarming .................................. 12
Security Command User Menu ................................... 13
User Check-in .......................................................... 14
Zone Activity Check .................................................. 14
Sensor Reset .......................................................... 15
Outputs On Off ....................................................... 15
Bypass Zones .......................................................... 16
Zone Monitor ........................................................... 16
System Test ............................................................ 17
User Codes ............................................................. 18
Ambush Codes ........................................................ 20
Schedules ............................................................... 20
Extended Schedules ................................................. 21
Date and Time......................................................... 21
Display Events ......................................................... 22
Zone Activity Check Event Display ............................... 22
Zone Bypass Event Displays ....................................... 23
Zone Event Displays ................................................. 23
Arming and Disarming Event Displays ......................... 24
User Check-in Event Displays ..................................... 24
User Code Change Event Displays .............................. 25
Supervisory Event Displays ........................................ 25
System Monitor Event Displays .................................. 26
Service Request? ..................................................... 26
System Setup .......................................................... 27
Protection Areas ...................................................... 27
Outputs .................................................................. 27
User Codes ............................................................. 28
Easy Entry™ User's Guide.......................................... 30
FA113 User's Guide .................................................. 32
Pager Direct™ User's Guide ....................................... 33
PhoneAccess™ User's Guide ...................................... 35
895 Voice Module ..................................................... 36
Common Keypad Displays ......................................... 37

ii
Emergency Evacuation Plans
The National Fire Protection Association recommends that you
establish an emergency evacuation plan to safeguard lives in the
event of a fire or other emergency. Use the following steps as a
guide.
Draw a floorplan of your home or business
On a clean sheet of paper, draw the walls, windows, doors, and
stairs. Also draw any obstacles that a person may encounter while
exiting the building such as large furniture or appliances.
Develop escape routes
Determine at least two routes the occupants in each room can take
to safely escape. One route can be the most obvious such as the
door. Another can be through a window that can be easily opened.
If the window is high off the ground, an escape ladder should be
provided. Draw arrows on the floorplan to show escape routes from
each room.
Decide where to meet
Prearrange a meeting place outside and away from where emergency
personnel are likely to be working. A neighbor's house or across the
street in the front of the house are good locations. Always perform
a head count to make sure all occupants safely exited. NEVER
ENTER A BURNING BUILDING. If the head count shows one or more
persons missing, give this information immediately to the authorities.
Never enter a building to look for someone.
Practice your escape plans
Devising an escape plan is only the beginning, before the plan can
be effective everyone should practice the escape routes from each
room.
Building Front Building Back
First Floor Second Floor
Fire Escape
Window Ladder
Early detection
The best way to survive a fire or other emergency is to get out early.
The installation of a fire alarm system, with smoke and carbon
monoxide detectors in each room, can greatly decrease your risk of
injury or loss.

XR20 Introduction 1
About Your Security System
Your Security Command system has been designed with your safety
and comfort in mind. It uses the latest in computer technology to
create the most user friendly security and fire system on the market
today.
The system combines ease of use with a simple to understand
Security Command keypad display to offer the full range of features
requested by today’s security system owners. Security Command
can protect both the interior and perimeter of your home or business
while you are away or just the perimeter when you are inside giving
you a wall of security and peace of mind.
You can turn portions of your protection on or off at any time by
pressing a few buttons. You can add, delete, and change personal
user codes at any time or check the status of all protection devices
in the system.
Parts of the System
There are two main parts to the Security Command system: the
Security Command keypad and the keypad User Menu.
Security Command keypad
This is the device we have placed at certain locations throughout the
premises that allows you to turn the system’s protection on and off
using your personal user code number.
Keypad User Menu
The keypad also supplies a User Menu containing all of the functions
you need to fully operate your system, such as the ability to change
a personal user code number.
A Note About False Alarms
One of the most important concerns facing the security industry
today is false alarms. The accidental dispatching of police and fire
agencies places others in jeopardy by limiting the response capability
of those emergency service units.
As part of our commitment to reducing false alarms, we would like
to encourage you to read this guide thoroughly. All the information
contained here can help you quickly, and comfortably, learn the
operation of the Security Command system. If you have any
additional questions, or feel that you need more training, please do
not hesitate to contact us.
Test Your System Weekly
It is recommended that you test the burglary portion of your system
at least once each week. Testing should involve an active test of
all doors, windows, and motion detectors connected to your
system. If your system also has fire protection, call the service
department to find out how this portion of your system should be
tested.
Refer to the System Test section of this guide for instructions on
testing the burglary portion of your system.
Introduction

2 XR20 Introduction
Data Entry keys
These keys allow you to enter your user code when arming or
disarming, and enter other information into the system.
Back Arrow key
The Back Arrow key is used to go back through the keypad displays
while operating your system. You can press the Back Arrow key to
back up through the list of functions in the User Menu or to make a
correction by erasing the last character you entered.
COMMAND key
The COMMAND key allows you to advance through the keypad
displays or User Menu or complete a data entry function.
AC LED
This LED remains on steady as long as your system is connected to
the AC power supply. Should there be an interruption, the LED turns
off and the system's backup battery maintains normal operation for
a time allowing you to contact our service department.
ARMED LED
This LED is ON steady anytime burglary protection is armed and OFF
when ALL areas are disarmed.
32-Character Keypad User Options Menu
Press and hold the Back Arrow and COMMAND keys for about two
seconds. The keypad display shows SET BRIGHTNESS. Use the left
Select key to lower the display brightness. Use the right Select key
to increase the display brightness. Press COMMAND.
At SET TONE, use the left Select key to lower the keypad tone. Use
the right Select key to raise the keypad tone. Press COMMAND.
At SET VOLUME LEVEL, use the left Select key to lower the keypad
volume. Use the right Select key to raise the keypad volume. Press
the Back Arrow key to exit out of the User Options.
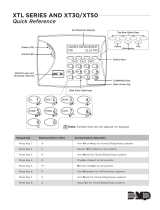
The Security Command Keypad
Your system may have one or more easy-to-use Security Command
keypads (16- or 32-character) that allow you to properly operate the
system. The illustration and descriptions below highlight some of
the keypad features.
Select keys
There are four keys under the display called the Select keys. These
keys are one of the features that make your system so easy to
operate. They allow you to choose what to do by pressing the Select
key under choices being shown in the display.
A B C D E F G H I
J K L
V W XMN O P Q R S T U
Y
Z
COMMAND
90
1234
56
7
8
POWER
JONES RESIDENCE
FR I 2 : 51 AM
ARMED
Lighted display
Select keys
Data Entry keys
COMMAND key
Back Arrow key
Lighted display
Select keys
AC LED
Data Entry keys
COMMAND key
Back Arrow key
12
3
4
567
8
90
COMMAND
A B C
DEF
GHI JKL
VWX
STUPQRMNO
YZ
POWER
32-Character Keypad
16-Character Keypad
AC
LED
ARMED
LED

XR20 Introduction 3
Special Security Command Tones
Your keypad also contains a small speaker that allows it to alert you
to events as they occur on your system. Below are brief descriptions
of the different tones you will hear from the keypad:
Fire alert: Your keypad may sound a fire tone to alert persons in the
vicinity to the alarm condition. This is in addition to the bell output
from the alarm panel.
Burglary alert: Your keypad may sound a burglary tone to alert
persons in the vicinity to the alarm condition. This is in addition to
the bell output from the alarm panel.
Key press tone: A short beep as you press a key on the keypad.
Prewarn tone: A continuous pulsed tone that sounds when you open
an entry delay door on a system that is armed (turned on) reminding
you to disarm the burglary protection.
Monitor tone: A short tone that sounds for one second whenever a
door or window is opened while you are using the zone monitor
function from the User Menu. See Zone Monitor.
Trouble tone: A steady tone indicating a trouble condition on your
system. Press a Select key to silence the trouble tone.
Zone Activity Check tone: A steady tone indicating no zone activity
has occurred on your system within the programmed period of time.
Press any key to silence the tone.
What to do when the trouble tone is sounding
You can silence the trouble tone by pressing any one of
the top row Select keys. This only silences the keypad
and does not correct the condition that originally caused
the problem.
Special Security Command Messages
As you use your system, you will occasionally see a keypad display
that asks you to enter a user code or describes a condition on the
system. Below are some examples of the displays you will see.
ALARM
A 24-hour zone, such as a fire or panic zone, or an armed burglary
zone has been faulted. Your system may sound bells or sirens.
ALARM CANCELLED
This message displays when an authorized user has cancelled an
alarm condition by entering a valid user code and an “Alarm
Cancelled” report was sent to the central station.
TROUBLE
There is a problem with a protection device or system component.
This display is accompanied by a description of the problem.
ENTER CODE
The system requires you to enter a personal user code. User codes
can be required for turning your system on (arming), turning your
system off (disarming), and performing many other system options.
As you enter your user code, the keypad display shows an asterisk
(*) in place of each digit pressed. This prevents others from seeing
your user code on the display as it is entered. TRY AGAIN
The user code entered is not recognized by the system. Check the
user code and try again.
INVALID CODE
The user code you have entered is considered invalid by the system.
SYSTEM TROUBLE or SERVICE REQUIRED
There is an electronic failure in your system. Contact the service
department as soon as possible.

4 XR20 Introduction
Understanding Security System Terms
Throughout this guide, and in some displays on your keypad, you will
see certain words or phrases that might be unfamiliar. Although
every effort has been made to use terms that are commonly known,
there are some for which there was no acceptable substitute.
Below are some terms you will see here and on the keypad display.
Arming
This is the term used for turning on the burglary protection in one
or more areas of the system. Your system may require you to enter
a user code. When armed, the system is able to sound alarm bells
or sirens and, if monitored, send alarm reports to a central station
when a burglary zone is faulted.
Fire, panic, and other 24-hour devices are always turned on and do
not need to be armed.
Disarming
This means turning off one or more areas of the system. When
disarmed, the system does NOT sound alarms or send alarm reports
to a central station when a burglary zone is faulted.
Zone
A zone refers to a group of one or more protected openings or
protection devices assigned the same zone number. Each door or
window, motion detector, smoke detector, or other device has a
zone number and a name.
Often, similar devices in the same general area will share the same
zone. For example, the windows on the east side of the premises
can all be grouped together in a zone named E. WINDOWS.
Entry or Exit Zone
Almost all systems have one or more doors through which you can
enter or exit the premises. These doors are programmed with a
delay time to allow you to enter or exit while the system is armed
without setting off the alarm.
When you arm the system, activity on all burglary zones is ignored
until the programmed exit delay time expires. Once that time has
expired and the system is fully armed, opening the door causes the
panel to start the entry delay time. During the entry delay time, you
must enter a valid user code to disarm the system or an alarm will
occur.
Instant Zone
Exterior windows and non-entry doors, or interior protection devices,
are typically not programmed with delay times. If these zones are
faulted while the system is armed, an alarm occurs instantly.
24-Hour Zone
A 24-hour zone is never assigned to an area and is not turned on or
off by arming or disarming your system. Some examples of 24-hour
zones are fire zones, panic zones, and temperature control zones.
Areas
An area is made up of burglary zones that can be armed or disarmed
together. The Perimeter area, for example, consists of all the doors
and windows on the outside of the building. When you arm the
Perimeter, these zones sound an alarm if tripped.

XR20 Introduction 5
Central Station Monitoring
Your system can also be programmed to automatically send alarm,
trouble, and arming and disarming reports to a central station.
Operators at the central station can then dispatch the appropriate
authorities or contact you with the specific event information.
Status
Status is a feature that automatically displays the armed or
disarmed status of your system on the Security Command keypads.
Alarm or trouble conditions on a zone or a system monitor such as
AC or battery trouble can also be displayed. There are two types
of status information available: Armed Status and Status List.
Armed Status
With Armed Status, the keypad displays the current armed condition
of areas within your security system.
The keypad displays When
PERIMETER ON The perimeter areas are on
ALL SYSTEM ON All areas are on
PERIM/INT ON The perimeter and interior areas are on
but the bedroom area is off
Also, for keypads that include an Armed LED, the Armed LED is ON
steady anytime a burglary protection area is armed and OFF when
ALL areas are disarmed.
Status List
The keypad Status List displays any alarm or trouble condition on a
zone and any trouble condition that occurs with the AC power or
battery power. If your system contains any Panic zones, these are
not displayed on the keypad for security reasons.
If an alarm occurs on a non-fire, 24-hour zone or a system monitor,
it remains in the Status List until it restores. If one or more armed
burglary zones trips, the last one to trip remains in the Status List.
The burglary zone alarm remains in the Status List for several
minutes or until it is cleared by disarming the system.
Zone Status
To display the status of a particular zone, enter the zone number
followed by the COMMAND key when the keypad is displaying the
Status List.
Exit Error
This is an automatic function of the panel that prevents an alarm
from occurring if an exit door does not close all the way after the
system has been armed. Here is how it works:
You close all doors and windows, arm the system, and then leave by
the front door. You close the door but it does not latch causing the
front door zone to show as an open to the system. After the exit
delay time expires the system attempts to arm the front door zone
but recognizes the open condition. Instead of sending an alarm
report to the central station, the system sends an Exit Error report
and force arms the door. (If the door closes at a later time it will
be included back into the system.) The system sounds the sirens for
15 seconds to alert you of the condition and allow you to close the
door.
The Exit Error feature allows the central station to acknowledge the
arming error without dispatching the police on a false alarm.

6 XR20 Introduction
How your System Operates
Your system has been programmed to operate in one of three
modes: Area Arming, All/Perimeter, or Home/Sleep/Away.
• Area Arming - Your burglary protection is divided into up to four
areas. Each area can have a custom name, be turned on or off
independently of other areas, and limit access to only those users
with the proper authority.
• All/Perimeter - Your burglary protection is divided into two areas:
Interior and Perimeter. You can turn on the just the Perimeter
protection while inside for security or turn on both as you leave.
• Home/Sleep/Away - Your burglary protection is divided into three
areas: Interior, Perimeter, and Bedrooms. You can turn on the
Perimeter, Perimeter and Interior, or all three areas separately.
Regardless of which mode has been programmed, much of the
operation is similar. Throughout this guide, any differences between
the systems are noted for your convenience.
Arming Functions
After making your arming selection, the keypad displays any zones
that are currently bypassed. These zones remain bypassed until the
system is armed and then disarmed. Any 24-hour zones in a bad
condition are also displayed.
During arming, the system verifies that all doors, windows, and
other protection devices to be armed are in normal condition.
If everything is normal, the system arms. If there is a problem on
one or more burglary zones the keypad displays the problem and
allows you to bypass those zones.
If the problem can be corrected by closing a door or window, do not
bypass the zone. Instead, correct the problem and try arming again.
If the problem cannot be corrected, you can bypass the zone or wait
until the zone can be repaired by a service technician. A bypassed
zone is ignored by the system during the armed period.
In some cases, you might see the keypad display FRONT DOOR —
FAULT. The keypad may then display PRIORITY ZONE which is a
zone that cannot be bypassed. The problem on the zone must be
corrected before the system can be armed.
Armed Message: After all bypassing is completed or zone faults
corrected, the areas you selected are armed. The keypad briefly
displays ALL SYSTEM ON if all areas in the system are arming and
PERIMETER ON or PERIM/INT ON if only selected areas are arming.
The keypad then displays the exit delay as it counts down. Zones
are not armed until the exit delay time expires.
If your system uses a keyswitch to arm an area, the exit delay time
is NOT shown on the keypad display.
DIALING . . . Message: If your system is monitored, it may be
programmed to wait for the arming report to be sent to the central
station before displaying the armed message. (See Arming Report
below.) This is to verify your phone lines are working properly.
While the system is waiting, the display reads DIALING.... If the
report is received, the keypad buzzes for one second and displays
the armed message. If the report is not received, the keypad
displays LOCAL ALARM ONLY before displaying the armed message.
Arming Report: Your system can be programmed to send arming or
zone bypass reports to a central station. This feature is optional and
can be programmed for you at any time.

XR20 Arming and Disarming 7
Area System Arming
Area Assignment: Your security system has been programmed into
separate areas. The number of areas and their names are listed in
the back of this guide.
Arming or Disarming: You can arm and disarm all areas at one time
or each area individually. You can only arm or disarm areas
authorized for your user code.
All or Selective Arming: After entering your user code, the system
allows you to arm either all of the areas to which you have access
or one or more selected areas. If you choose to arm all areas, the
system begins verifying that all zones in those areas are in a good
condition. If you choose to arm selected areas, the system prompts
you to choose the areas you want to arm.
Arming the System
1. Press the COMMAND key until ARM DISARM displays.
2. Select ARM to turn on all protection.
3. Enter your user code if required. The display reads ALL? NO
YES.
4. Select NO to arm only selected areas. Go to step 5.
Select YES to arm all areas authorized for your user code. Go
to step 6.
5. If NO is selected in step 4, the display begins to list each area
to which you have access followed by NO YES.
Example: OFFICE NO YES.
5a. Select YES for each area you want to arm.
5b. Select NO for each area you do NOT want to arm.
Note: You can also just press the area numbers you want to arm
while at the ALL? NO YES display. This changes the display to
AREAS:. The numbers you select appear in the display. For
example: AREAS: 2 4. Press COMMAND when done.
6. The system displays any zones that have been bypassed prior to
arming and any bad 24 hour zones. No action is required.
7. At this point you can force arm or bypass any bad zones. A zone
that is force armed will be restored into the system if it later
returns to normal. A zone that is bypassed will remain bypassed
until the system is disarmed. See steps 7a through 7d.
7a. If a problem exists on any zones, the zone name and
problem are shown followed by: OKAY BYPASS STOP.
7b. Select OKAY to force arm the zone(s) before arming.
7c. Select BYPASS to bypass the zone(s) before arming.
7d. Select STOP to stop the system from arming. Correct the
zone problem(s) and return to step 1.
8. The display reads SYSTEM ON if at least one area in the system
is armed, and ALL SYSTEM ON if all areas in the system are
armed.
9. The keypad then displays the exit time in seconds and counts
down the remaining time: EXIT: # # (# # = seconds remaining).
The exit zones arm when the delay time expires.

8 XR20 Arming and Disarming
Area System Disarming
Disarming: While the system is armed, you can only enter the
premises through an exit/entry delay door without causing an
alarm. After opening the door, the Security Command keypad
sounds a prewarn tone to remind you to disarm the system. You must
disarm the system before the delay time expires or an alarm will
occur.
During the prewarn tone, the keypad displays ENTER CODE: Enter
your user code to disarm the system. Only those areas authorized
for your user code will disarm.
All or Selective Arming: After entering your user code, the system
allows you to disarm either all of the areas to which you have access
or just selected areas. If you choose to disarm all areas, the system
automatically disarms them. If you choose to disarm selected areas,
the names of those areas will be displayed on the keypad.
Alarm Display: After disarming, the keypad displays any zones that
went into alarm or any communication problems that occurred
during the armed period. All burglary zones are then disarmed and
any bypassed zones are automatically reset.
Disarmed Message: The keypad displays ALL SYSTEM OFF after the
system disarms.
Central Station Report: A report of the disarming can be sent to the
central station. If your system does not have this feature, it can be
programmed for you at any time.
Disarming an Area System
1. Press the COMMAND key until ARM DISARM is displayed. During
entry delay this process starts at step 3 below.
2. Select DISARM to disarm areas.
3. The keypad displays ENTER CODE: . Enter your user code. The
keypad displays ALL? NO YES.
4. Select YES to disarm all areas authorized for your user code.
4a. Select NO to disarm only certain areas individually. The
keypad then displays the name of each area authorized for your
code followed by the NO YES display.
4b. Choose YES to disarm the area displayed.
4c. Choose NO to not disarm and to display the next area.
Note: You can also just press the area numbers you want to
disarm while at the ALL? NO YES display. This changes the
display to AREAS: . The area numbers you select appear in the
display. For example: AREAS: 2 4.
To remove an area number from the display, press its
corresponding number on the keypad.
Press COMMAND when done.
5. After all areas have been displayed, any alarms or
communication problems that occurred during the armed
period are shown.
6. If all areas have been disarmed, the keypad displays ALL
SYSTEM OFF.

XR20 Arming and Disarming 9
All/Perimeter System Arming
Area Assignment: Your security system is divided into two separate
areas. Motion detectors, inside doors, and other interior protection
devices are assigned to the Interior area while windows and exterior
doors are assigned to the Perimeter area.
Perimeter or All: When arming an All/Perimeter system, the
keypad displays PERIM ALL. If you select ALL, you arm both the
Perimeter and the Interior of the system. You will want to arm both
of these areas when leaving with nobody left inside. Selecting
PERIM arms only the Perimeter of the system. Perimeter arming is
for when you are staying inside but want the comfort of knowing the
exterior doors and windows are armed. Perimeter arming allows
you to move freely about inside without setting off any interior
alarms.
System Ready/System Not Ready Keypad Displays
When all zones in the system are in a normal condition, the keypad
displays SYSTEM READY. If there are one or more zones that are not
in a normal condition, the keypad displays SYSTEM NOT READY.
Pressing any top row Select key during this display shows the zone
name allowing you to investigate the problem.
Instant Arming
Instant: During the exit delay time, you can cancel the exit and
entry delays and cause all zones to be instant zones. Press the far
right select key under INSTNT while the exit delay is displayed. This
immediately arms the exit zones. However, no entry delay is
provided and an alarm will occur should an entry door be opened.
Arming an All/Perimeter System
1. Enter your code. The keypad displays PERIM ALL.
2. Select PERIM to arm the Perimeter area only.
3. Select ALL to arm both the Perimeter and Interior areas.
4. The keypad displays any bypassed zones and 24-hour zones that
are in a bad condition. No action is required by you.
5. At this point you can force arm or bypass any bad zones. A zone
that is force armed will be restored into the system if it later
returns to normal. A bypassed zone remain bypassed until the
system is disarmed. See steps 5a through 5d.
5a. If a problem exists on any zones, the zone name and
problem are shown followed by: OKAY BYPASS STOP.
5b. Select OKAY to force arm the zone(s) before arming.
5c. Select BYPASS to bypass the zone(s) before arming.
5d. Select STOP to stop the system from arming. Correct the
zone problem(s) and return to step 1.
6. The keypad displays PERIMETER ON if only the perimeter is
being armed and ALL SYSTEM ON if both the perimeter and
interior are being armed.
7. The keypad next displays EXIT: ## INSTNT and begins to count
down the number of seconds remaining for you to exit. When
the delay expires, all zones are armed.
8. You can select INSTNT while EXIT: ## INSTNT is displayed to
immediately arm all zones and make them instant. The keypad
displays INSTANT.
9. When the system is fully armed, the keypad displays PERIMETER
ON for perimeter arming and ALL SYSTEM ON for perimeter

10 XR20 Arming and Disarming
All/Perimeter System Disarming
Disarming: While the system is armed, you can only enter the
premises through an entry/exit delay door without causing an
alarm. After opening the door, the Security Command keypad
sounds a prewarn tone to remind you to disarm the system. You must
disarm the system before the prewarn tone expires or an alarm on
the door zone will occur.
During the prewarn tone, the keypad displays ENTER CODE:. Enter
your user code to disarm the system.
Alarm Display: After disarming, the keypad displays any zones that
tripped or any transmission problems that occurred during the
armed period. All burglary zones are then disarmed and any
bypassed zones are automatically reset.
Disarmed Message: The keypad displays ALL SYSTEM OFF after the
system disarms.
Central Station Report: A report of the system disarming can be
transmitted to the central station. This is optional and can be
programmed for you at any time.
Disarming an All/Perimeter System
1. During the entry delay time, the keypad displays ENTER CODE:.
Enter your user code.
2. The keypad displays any zones that went into alarm and any
communication problems that occurred during the armed
period.
3. The keypad next displays ALL SYSTEM OFF to confirm the
system is disarmed.
Disarming During an Alarm
1. While the alarm bell or siren is sounding, enter your user code.
The keypad displays DISARM SILENCE.
2. Press the Select key under DISARM to disarm the system and
silence the alarm.
The keypad next displays ALL SYSTEM OFF to confirm the
system is disarmed.
3. Press the Select key under SILENCE to stop the bell or siren but
NOT disarm the system.
If you do not press any Select key, or you press the COMMAND
key, the system will automatically disarm and silence the
alarm.
Note: If your system is programmed to send an Abort (alarm cancel)
report to the central station, selecting DISARM will send this report
to the central station. Be sure that you want the alarm message to
be cancelled BEFORE deciding to disarm the system. If you do not
want to disarm the system and send the abort report, press SILENCE
to only turn off the alarm bells.

XR20 Arming and Disarming 11
Home/Away System Arming
Area Assignment: Your security system is divided into two or three
separate areas. Motion detectors, inside doors, and other interior
devices are assigned to an Interior and possibly Bedroom area while
windows and exterior doors, are assigned to a Perimeter area.
Arming the system: When arming a Home/Away system, the keypad
displays HOME AWAY or HOME SLEEP AWAY. If you select AWAY,
you arm all areas of the system. You will want to arm all areas when
leaving with nobody staying inside. Selecting HOME arms only the
Perimeter of the system. Perimeter arming is for when you are
staying inside but want the comfort of knowing the exterior doors
and windows are armed. Selecting SLEEP arms the Perimeter and
Interior devices but leaves devices near bedrooms and other
nighttime areas off.
System Ready/System Not Ready Keypad Displays
When all zones in the system are in a normal condition and can be
armed without bypassing, the keypad displays SYSTEM READY. If
there are one or more zones that are not in a normal condition, the
keypad displays SYSTEM NOT READY. Pressing any top row Select
key during this display shows the bad zone name.
Arming a Home/Away System
1. Enter your user code. The keypad displays HOME AWAY or
HOME SLEEP AWAY (you may have three areas).
2. Select HOME to arm the Perimeter only.
3. Select SLEEP to arm the Perimeter and Interior.
4. Select AWAY to arm the Perimeter, Interior, and Bedroom.
5. The keypad displays zones that have been bypassed prior to
arming and 24-hour zones that are in a bad condition. No action
is required by you.
6. At this point you can force arm or bypass any bad zones. A zone
that is force armed will be restored into the system if it later
returns to normal. A zone that is bypassed will remain bypassed
until the system is disarmed. See steps 6a through 6d.
6a. If a problem exists on any zones, the zone name and
problem are shown followed by: OKAY BYPASS STOP.
6b. Select OKAY to force arm the zone(s) before arming.
6c. Select BYPASS to bypass the zone(s) before arming.
6d. Select STOP to stop the system from arming. Correct the
zone problem(s) and return to step 1.
7. The keypad displays PERIMETER ON if you selected HOME, or
PERIM/INT ON if you selected SLEEP, or ALL SYSTEM ON if you
selected AWAY.
8. The keypad next displays EXIT: ## INSTNT and begins to count
down the number of seconds remaining for you to exit. The
keypad will sound the exit delay alert when 20 seconds remain,
and when the delay expires, all zones are armed.
9. You can select INSTNT while EXIT: ## INSTNT is displayed to
immediately arm all zones and make them instant. The keypad
displays INSTANT.
10. When the system is fully armed, the keypad displays PERIMETER
ON for Perimeter arming, PERIM/INT ON for Perimeter and
Interior arming, and ALL SYSTEM ON for all areas armed.

12 XR20 Arming and Disarming
Home/Away System Disarming
Disarming: While the system is armed, you can only enter the
premises through an entry/exit delay door without causing an
alarm. After opening the door, the keypad sounds a prewarn tone
to remind you to disarm the system. You must disarm the system
before the prewarn tone expires or an alarm on the door will occur.
During the prewarn tone, the keypad displays ENTER CODE:. Enter
your code to disarm the system.
Alarm Display: After disarming, the keypad displays any zones that
tripped or any communication problems that occurred during the
armed period. All burglary zones are then disarmed and any
bypassed zones are automatically reset.
Disarmed Message: The keypad displays ALL SYSTEM OFF after the
system disarms.
Central Station Report: A report of the system disarming can be
transmitted to the central station. This is optional and can be
programmed for you at any time.
Easy Exit™ Feature
While the system is armed, you can also just press COMMAND and
then the 9 key to restart the exit delays to allow you to exit the
premises without disarming the system. After the exit delay time
expires, the system rearms automatically. This feature allows you
to get the paper, let your pet out, or leave for work without having
to disarm and then rearm the system.
Disarming a Home/Away System
1. During the entry delay, the keypad displays ENTER CODE:.
Enter your user code.
2. The keypad then displays any alarms or communication problems
that occurred during the armed period.
3. The keypad next displays ALL SYSTEM OFF to confirm the
system is disarmed.
Disarming During an Alarm
1. While the alarm bell or siren is sounding, enter your user code.
The keypad displays DISARM SILENCE.
2. Press the Select key under DISARM to disarm the system and
silence the alarm. The keypad next displays ALL SYSTEM OFF
to confirm the system is disarmed.
3. Press the Select key under SILENCE to stop the bell or siren but
NOT disarm the system.
If you do not press any Select key, or you press the COMMAND
key, the system will automatically disarm and silence the
alarm.
Note: If your system is programmed to send an Abort (alarm cancel)
report to the central station, selecting DISARM will send this report
to the central station. Be sure that you want the alarm message to
be cancelled BEFORE deciding to disarm the system. If you do not
want to disarm the system and send the abort report, press SILENCE
to only turn off the alarm bells.

XR20 User Menu 13
User Menu
Security Command User Menu
Many of the features of your system have been put into a User Menu
you can access from any Security Command keypad. The menu
requires you to enter your user code and then only shows those
functions to which you have access.
To access the User Menu:
1. Press the COMMAND key until MENU? NO YES displays.
2. Select YES. The keypad displays ENTER CODE: . Enter your
user code. You can now scroll down through the list of system
features available to your authority level.
User Menu Options
The list below shows the User Menu options:
Menu Option Description
USER CHECKIN Allows monitoring of children coming
home from school.
ACTIVITY CHECK Monitor a zone for non-activity.
SENSOR RESET Resets smoke or glassbreak detectors
that have latched due to an alarm
condition.
OUTPUTS ON/OFF Allows you to turn on or off any of the
outputs described in the System Setup
section of this guide.
BYPASS ZONES Allows you to Bypass a zone or reset an
already bypassed zone.
ZONE MONITOR Allows you to add or remove a zone
from the monitor mode.
SYSTEM TEST Tests the system's siren, communication
to the central station, and backup
battery.
USER CODES Allows you to add, delete, or change
user codes and authority levels.
SCHEDULES Allows you to add, remove, or change
system schedules.
TIME Allows you change the Day, Date, or
Time that is currently in the system.
DISPLAY EVENTS Allows you to view or print the last 140
events that occurred on your system.
SERVICE REQUEST Allows you to send a message to the
Central Station requesting service on
the alarm system.
The following pages detail each User Menu item and provide
instructions on when and how to use them properly.

14 XR20 User Menu
User Check-in
User Code Level: Master or Standard
Function: This feature allows you to monitor the arrival of children
from school or employees to work by having a special Check-in
Report sent to your alphanumeric or numeric pager. Your system
must be programmed for the Pager Direct™ option. The Appendix
section of this guide contains Quick Reference cards for your wallet
or purse.
Sending a Check-in Report:
1. After disarming the system, access the User Menu.
You may also press the COMMAND + 7 and then enter your user
code to send a Check-in Report.
2. At the USER CHECKIN? display, press any Select key. The
keypad displays USER CHECKIN: 22 ( 22 = user number).
3. The panel sends the Check-in Report containing your account
number and user number to the pager.
Zone Activity Check
User Code Level: Master or Standard
Your security system may be programmed for the Zone Activity
Check feature to monitor a person for non-activity. This could be
used for a person living alone to detect when they have not tripped
a disarmed zone within a programmed period of time. This feature
can be programmed for you at any time.
Function: This option allows you to enable or disable the Zone
Activity Check which monitors your system for no zone activity.
When the programmed time period is exceeded because no activity
is detected, your keypads will sound a steady tone and display PRESS
ANY KEY. Pressing any key on the keypad restarts the no activity
programmed time period and prevents your system from sending a
“User Activity Not Detected” report to the central station.
Note: The Zone Activity Check is disabled when a schedule is
entered to allow for sleeping hours and is automatically enabled
when an area is armed or disarmed.
Selecting Zone Activity Check:
1. At the ACTIVITY CHECK? display, press any Select key. The
keypad displays ENABLE? YES NO. The default is YES.
2. When NO is selected, the keypad displays CHECK DISABLED for
four seconds and then sends the Activity Check Disabled
message to the central station.
3. When YES is selected, the keypad displays CHECK ENABLED for
four seconds and then sends the Activity Check Enabled message
to the central station.

XR20 User Menu 15
Sensor Reset
User Code Level: Master or Standard
Function: Resets smoke or glassbreak detectors. Also clears Fire
and Supervisory zone alarms and trouble keypad displays. Sensor
Reset also clears low battery displays if your system is using wireless
sensors.
Once smoke or glassbreak detectors have tripped, they must be
reset before they can detect any additional alarm conditions. When
Sensor Reset is selected, power to the detectors is temporarily
removed by the system allowing them to reset.
Make sure all smoke is cleared from around the area of the smoke
detectors before performing a Sensor Reset to prevent the alarm
from occurring again.
Resetting the Sensors
1. Access the User Menu.
2. When SENSOR RESET? is displayed, press any Select key. The
keypad displays SENSORS OFF for five seconds followed by
SENSORS ON.
3. The keypad returns to the status display.
Enter your user code to reset sensors
While your system is disarmed, you can just enter your user code and
press COMMAND to reset the sensors. (This feature operates in All/
Perimeter and Home/Away systems only.)
This also activates the door strike if your system has an Easy Entry™
access control keypad.
Outputs On Off
User Code Level: Master or Standard.
Function: Allows you to turn the system's outputs on and off.
This function is used to individually turn your system’s relay outputs
on and off. Your system may use these outputs to control interior
and exterior lighting, or heating, air conditioning, or other appliances.
The names and numbers of the outputs on your system are located
in the System Setup section at the back of this guide.
Turning the Outputs On and Off
1. Access the User Menu.
2. Press the COMMAND key until OUTPUTS ON/OFF? displays.
3. Press any one of the Select keys.
4. The keypad displays OUTPUT: - ON OFF.
5. Enter the output number you want to turn on or off. The output
number appears in the display.
6. With the output number displayed, press the Select key under
ON or OFF. The output is then turned on or off, depending on
your selection, and remains in that state until you change it.
7. The system automatically removes the output number and a
new output number can be entered. Refer back to step 5.
To exit the Output menu option, press the Back Arrow key until you
have returned to the keypad's Status List.

16 XR20 User Menu
Bypass Zones
User Code Level: Master or Standard.
Function: Allows you to bypass a zone prior to arming the system.
Bypassing is usually done when a zone cannot be restored to normal
and you want to arm the system. Once bypassed, the system will
not respond to any activity on the zone.
A zone can be bypassed only while it is disarmed. Since Fire, Panic,
Emergency, and Supervisory zones are always armed, they can
never be bypassed.
The Bypass Zones function can also be used to restore a bypassed
zone back into the system.
When Bypass Zones is selected, a report of the bypassing can be sent
to your central station. This is optional and can be programmed for
you at any time.
Using the Bypass Zones Function
1. Access the User Menu.
2. Press the COMMAND key until BYPASS ZONES? displays.
3. Press any one of the Select keys. The keypad displays ZONE:
- RST BYPS.
4. To reset a zone, enter the zone number and press the Select key
under RST.
5. To Bypass a zone, enter the zone number and press the Select
key under BYPS.
Zone Monitor
User Code Level: Master and Standard.
Function: Allows the system to monitor selected disarmed zones
(doors, windows, or motion detectors). When a monitored zone is
tripped, the keypad sounds a tone and displays the zone name. This
is an ideal feature for monitoring door zones to tell when someone
comes in or goes out.
You can place any combination of disarmed zones in Zone Monitor
but only the most recent zone tripped is displayed. The displayed
zone name clears automatically after a short time or when the zone
is armed.
Zone Monitor does not function while the system is armed but a zone
placed into it will still be monitored when the system is disarmed.
Using Zone Monitor as part of your weekly system test: After using
the System Test function, place all perimeter and interior zones in
Zone Monitor. Starting at the front door, go around and open and
then close each door and window. You should hear the keypad beep
each time. The keypad will also display the name of each zone as
its device is opened.
Once all protected doors and windows have been tested, walk in
front of each motion detector. The keypad should beep to confirm
their operation. If at any time during your weekly testing a device
does not cause the keypad to beep, call the service department for
assistance.
/