Page is loading ...

Installation Guide
Single-Control Bath and Shower Trim
K-T16113, K-T16114, K-T16115,
K-T16116, K-T16117, K-T16139,
K-16213, K-16214, K-16217
M product numbers are for Mexico (i.e. K-12345M)
Los números de productos seguidos de
M corresponden a México (Ej.
K-12345M)
Français, page “Français-1”
Español, página “Español-1”
1025255-2-C

IMPORTANT INSTRUCTIONS
READ AND SAVE FOR THE
CONSUMER
WARNING: Risk of scalding or other severe injury.
•
Before completing installation, the installer must set the
maximum water temperature setting of this valve to minimize the
risks associated with scalding hazards according to ASTM F 444.
•
Do not install a shut-off device on either outlet of this valve. The
installation of any such device may create a cross-flow condition
at the valve and affect the water temperature.
•
Factors that change the temperature of the water supplied to the
valve, such as seasonal water temperature changes, and water
heater replacement or servicing, will change the maximum water
temperature supplied by the valve and may create a scalding
hazard.
•
The pressure-balanced valve will not compensate for changes in
the water supply temperature; adjust the maximum water
temperature setting of this pressure-balanced valve when such
changes occur.
•
Pressure-balanced valves may not provide protection against
scalding if there is a failure of other temperature-limiting devices
elsewhere in the plumbing system.
The installer is responsible for installing the valve and adjusting the
maximum water temperature of this valve according to instructions.
This valve meets or exceeds ANSI A112.18.1 and ASSE 1016.
If you do not understand any of the installation or temperature
adjustment instructions in this document, in the United States please
contact our Customer Service Department at 1-800-4-KOHLER.
Outside the U.S., please contact your distributor.
IMPORTANT NOTICE TO INSTALLERS! Please fill in the blanks in
the information box in the Homeowners Guide and on the valve label.
Retain the Homeowners Guide for future reference.
1025255-2-C 2 Kohler Co.

Tools and Materials
Thank You For Choosing Kohler Company
We appreciate your commitment to Kohler quality. Please take a few
minutes to review this manual before you start installation. If you
encounter any installation or performance problems, please don’t
hesitate to contact us. Our phone numbers and website are listed on
the back cover. Thanks again for choosing Kohler Company.
Before You Begin
CAUTION: Risk of product damage to the K-306-KS valve
assembly. When using this valve in a fiberglass or acrylic
installation, use the Thin Wall Installation Kit (88526).
Observe all local plumbing and building codes.
The finished wall or bath/shower unit must be installed prior to
installing this trim.
Before installing the trim, determine if the maximum water
temperature is acceptable to the user. If temperature adjustment is
needed, refer to the ″Water Temperature Adjustment″ section.
The valve shuts off by water pressure. Do not force the handle in
any direction. To turn the valve off, gently turn it to the ″Off″
position.
Shut off the main water supply.
Kohler Co. reserves the right to make revisions in the design of
products without notice, as specified in the Price Book.
Assorted
Screwdrivers
Strap
Wrench
Plumbers
Putty
Thread
Sealant
Hex Wrench
Kohler Co. 3 1025255-2-C

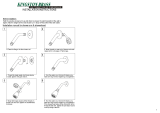
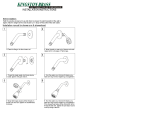
1. Install the Spout
CAUTION: Risk of internal seal damage. Do not use
petroleum-based lubricants when installing slip-fit spouts. If the
spout will not slide over the tubing, use soapy water or a
silicone-based lubricant.
Remove the temporary nipple.
Apply thread sealant and install a 1/2″ nipple so it extends 7/16″
(1.1 cm) beyond the finished wall.
Apply a bead of plumbers putty or other sealant around the inlet
end of the spout according to the manufacturer’s instructions.
Apply thread sealant to the nipple and thread the spout onto the
nipple.
Carefully tighten with a clean strap wrench.
Remove all excess putty.
Nipple
Apply plumbers
putty.
3-7/8"
(9.8 cm)
Threaded Spouts
1025255-2-C 4 Kohler Co.

2. Install the Showerhead
CAUTION: Risk of product damage. To avoid clogging the
showerhead spray outlets, use thread sealant tape on the shower
arm threads. Do not use thread sealant compound (pipe dope).
NOTE: A standard showerhead is shown.
Installing the Standard Showerhead
Remove the temporary nipple from the shower elbow.
Apply a bead of plumbers putty or other sealant to the back of
the escutcheon according to the manufacturer’s instructions.
Slide the escutcheon over the shower arm.
Apply thread sealant tape and install the shower arm to the
shower elbow.
Carefully tighten with a clean strap wrench.
Press the escutcheon against the finished wall and secure with the
setscrew.
Remove all excess putty.
Turn the main water supply on.
Run hot and cold water through the shower arm to flush out dirt
and debris.
Apply thread sealant tape to the shower arm and thread the
showerhead to the shower arm.
Apply plumbers putty.
Escutcheon
Setscrew
Standard
Shower Arm
Nonstandard
Shower Arm
Shower
Elbow
1/2"
Nipple
1/2"
Apply plumbers
putty.
Shower Arm
Showerhead
Kohler Co. 5 1025255-2-C

Install the Showerhead (cont.)
Installing the Nonstandard Showerhead
Remove the temporary nipple from the shower elbow.
Apply thread sealant tape and install a 1/2″ NPT nipple to
extend 1/2″ (1.3 cm) beyond the finished wall.
Apply a bead of plumbers putty or other sealant to the back of
the shower arm according to the manufacturer’s instructions.
Apply thread sealant tape to the nipple and thread the shower
arm onto the nipple.
Carefully tighten with a clean strap wrench.
Remove all excess putty.
With the showerhead off, flush out the system.
Apply thread sealant tape to the shower arm, and thread the
showerhead to the shower arm.
1025255-2-C 6 Kohler Co.

3. Water Temperature Adjustment
CAUTION: Risk of personal injury. The water temperature
should never be set above 120° F (49° C).
Turn the valve clockwise to the full open position and let the hot
water run for several minutes. Position a thermometer in the
water stream and check the temperature.
For minor water temperature changes, adjust the setscrew, and
recheck the water temperature.
For major water temperature changes, remove the O-ring and
collar from the valve stem. Slowly rotate the valve stem until the
desired maximum water temperature is reached.
Reinstall the collar on the valve stem with the setscrew against
the side of the tab.
Reinstall the O-ring, rotate the valve stem counterclockwise to
shut the water off.
Recheck the water temperature.
Complete the information on the valve label (if supplied).
O-Ring
Setscrew
Tab
Tab
Collar
Collar
Setscrew
Valve
Label
Standard
Valve
High Flow
Valve
Valve
Stem
Kohler Co. 7 1025255-2-C

4. Diverter Assembly
Remove and discard the plaster guard and/or dome, if installed.
Position the actuator over the diverter stem. Tighten the setscrew.
Slide the guide over the actuator and thread it onto the diverter
stem.
Guide
Setscrew
Actuator
Diverter Assembly
Valve
Stem
Diverter
Stem
Discard plaster
guard with dome.
1025255-2-C 8 Kohler Co.

5. Install the Faceplate and Handle
CAUTION: Risk of product damage to the K-306-KS valve
assembly. When using this valve in a fiberglass or acrylic
installation, use the Thin Wall Installation Kit (88526).
Remove and discard the plaster guard and/or dome, if installed.
Rotate the valve stem fully counterclockwise to the ″Off″ position.
Install the faceplate onto the valve. Secure with two screws. Do
not overtighten.
Slide the sleeve over the valve stem with the slot down and
facing outward.
Scroll Handle
Install the handle to the base.
Secure with a screw.
Align the handle assembly and press it onto the valve stem.
Secure the handle in place with the setscrew. Tighten the setscrew
to one quarter-turn past hand-tight.
Traditional Handle
Assemble the handle and bonnet.
Install the washer and O-ring onto the base.
Fit the handle assembly to the base.
Secure with a screw.
Faceplate
Sleeve
Slot
Valve Stem
Screw
Discard plaster
guard with dome.
Faceplate
Washer
O-Ring
Bonnet
Screw
Base
Setscrew
Traditional
Handle
Scroll
Handle
Kohler Co. 9 1025255-2-C

Install the Faceplate and Handle (cont.)
Align the handle and the base assembly. Press the handle onto the
valve stem.
Secure the handle in place with the setscrew. Tighten the setscrew
to one quarter-turn past hand-tight.
6. Complete the Installation
Turn the valve fully counterclockwise to the off position.
Remove the aerator assembly from the spout by turning it
counterclockwise.
Turn on the main water supply.
Turn the valve to the center and run water for approximately one
minute to flush the system.
Check all connections for leaks.
Reinstall the aerator.
1025255-2-C 10 Kohler Co.
/