See other side for how to use printer.
Installation Manual
Read this document carefully to use this product safely and correctly.
If your product is faulty, please read the included warranty card and
contact the store you purchased it from. If you require further assistance,
contact your local Epson customer support center.
See the Epson website for more information.
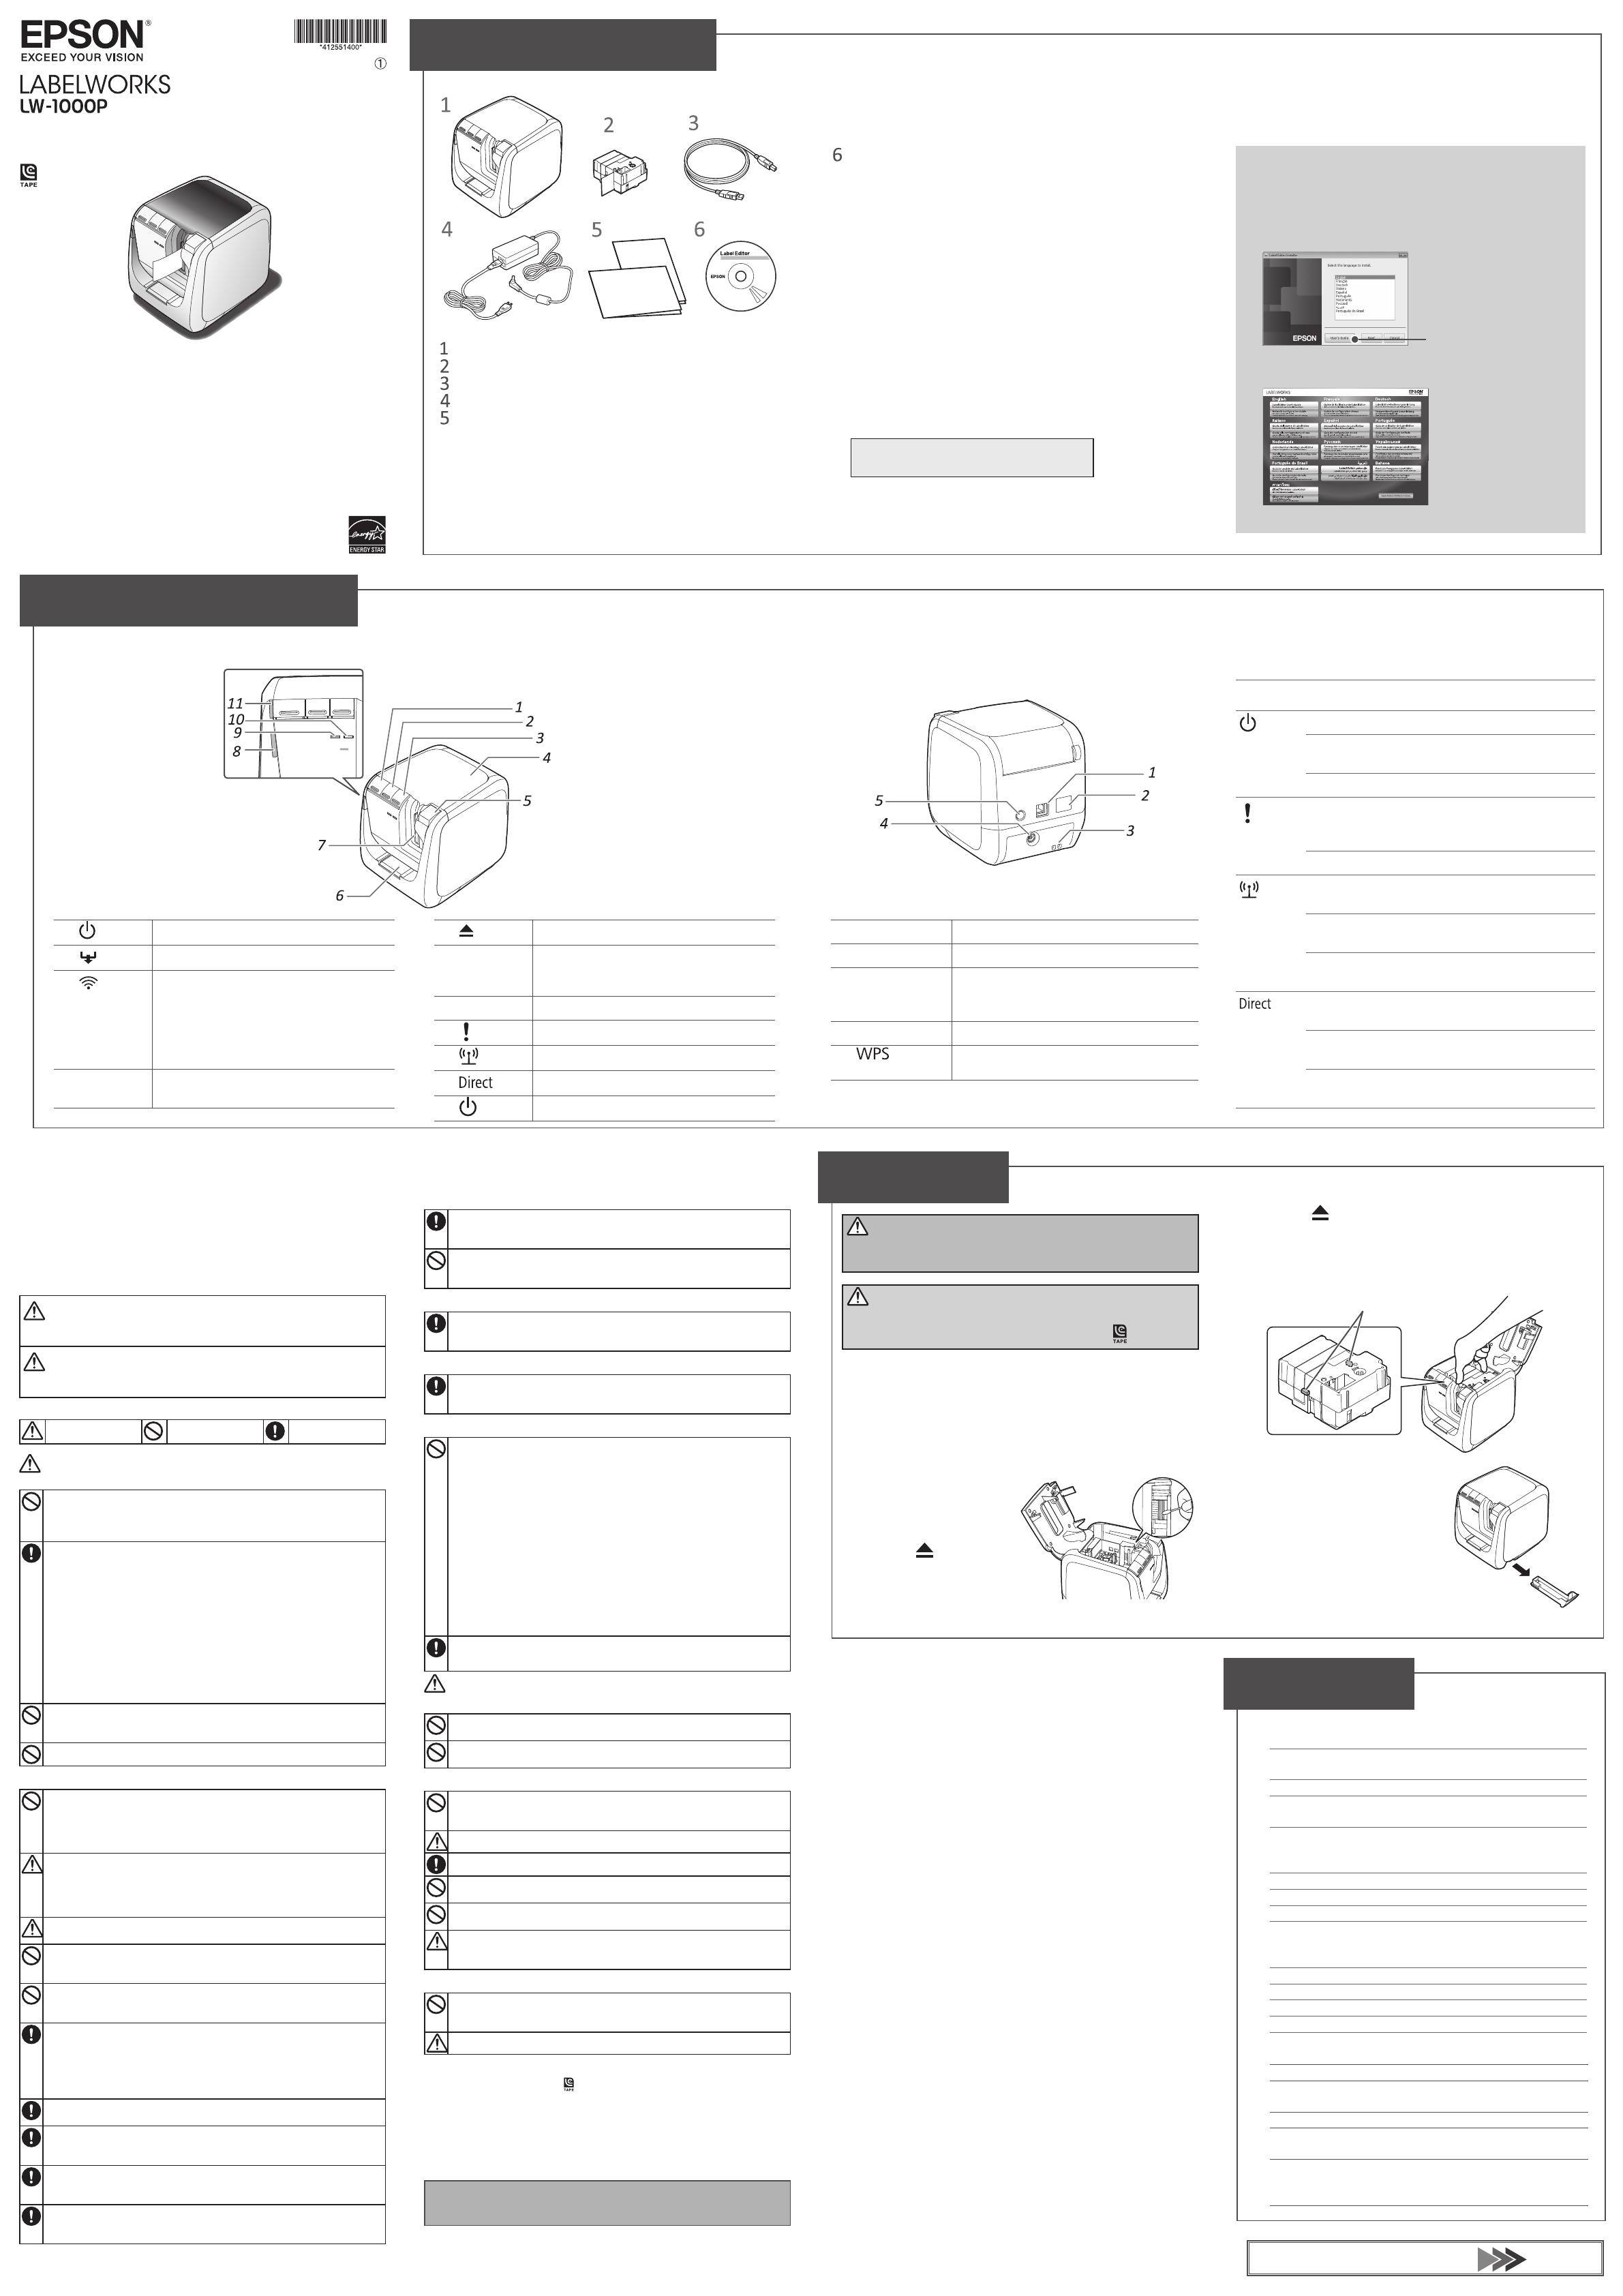
Before using the printer, check that you have all the items below.
Contact your place of purchase if anything is missing or damaged.
Front
Rear
LW-1000P
Tape cartridge
USB cable
AC adapter (AST1527Z1-1)
Documents
• Installation Manual (this sheet)
Describes the setup procedures needed to use the printer, and
provides information on printer problems and safety.
• Supplies Catalog
Epson has a variety of tapes for many dierent applications.
The Supplies Catalog has information on tape cartridges and
other consumable parts for the printer.
Checking Package Contents
Names and Functions of Parts
Cleaning
1.
button
Turns the printer power ON/OFF.
2.
button
Perform the tape feed operation.
3.
button
Switches the mode in accordance with the
wireless LAN connection method being used.
Switches to the next mode with each press.
Infrastructure Mode/Simple AP Mode/wireless
LAN OFF
The current mode is indicated by the lamps.
4.
Top cover
Can be opened to insert a tape cartridge, or
for print head cleaning.
1.
USB port
Connects the included USB cable.
2.
LAN port
Connects a LAN cable. *
3.
Security hole
Lets you secure the printer to a desk or post
with a commercial security wire lock or similar
tool.
4.
Power cord jack
Connects the included AC adapter.
5.
button
Press when setting a wireless LAN connection
using WPS.
* Use a twisted-pair, Category 5 or higher, straight-through Ethernet
cable wired for 10BASE-T or 100BASE-TX.
Meanings of lamps
The lamps indicate printer statuses.
Lamp
Lamp's
condition
Printer status
lamp
Lit Standby status
Flashing
Operating (such as initializing, printing or
feeding the tape)
Unlit Power OFF
lamp
Flashing
Printer error
Check the message displayed on the
computer screen.
Unlit Operating normally
lamp
Lit
Connected in Infrastructure Mode/
initializing printer
Flashing
Preparing to turn power ON/setting
Infrastructure Mode
Unlit
Connected in Simple AP Mode/wireless
LAN OFF
lamp
Lit
Connected in Simple AP Mode/initializing
printer
Flashing
Preparing to turn power ON/setting Simple
AP Mode
Unlit
Connected in Infrastructure Mode/wireless
LAN OFF
Printer
Dimensions Approx. 123 (W) x 153 (D) x 139 (H)
(mm)
Weight Approx. 1,080g
Supported tape width 6 mm, 9 mm, 12 mm, 18 mm,
24 mm, 36 mm
Interface USB 2.0 Full-speed,
wired LAN (10/100BASE-TX),
wireless LAN (IEEE 802.11b/g/n)
Power supply
Type AST1527Z1-1
Manufacturer Seiko Epson Corp.
Input AC100-240V, 0.9A, 50-60Hz
(dedicated adapter, power cable
only)
Output DC15V, 2.7A
Total output power 41 W
Operating temperature 5 to 35 degrees C
Storage temperature -10 to 55 degrees C
Operating environment
Operating system Windows, Mac OS X, iOS, Android
Hard disk space which
Label Editor uses
Windows
:
Approx. 300MB,
Mac OS X: Approx. 40MB
Drive DVD-ROM drive
Display XGA (1024 x 768), High Colour or
higher
Interface USB 2.0 Full-speed,
wired LAN (10/100BASE-TX),
wireless LAN (IEEE 802.11b/g/n)
Specications
CAUTION
Always turn the printer OFF before cleaning.
Always use dedicated tape cartridges having the
symbol.
Printer
Wipe the printer with a soft, dry cloth.
Never use solvents or chemicals such as benzine, paint thinner or
alcohol. Never use a chemical cloth.
Print head
If streaks or smears appear on
printouts, use a cotton swab or
similar materials to wipe dirt o
the print head.
1.
Press the button to open
the top cover.
2.
Clean the print head.
3.
Close the top cover.
WARNING
To prevent the risk of cuts, never insert ngers in the auto-
trimmer.
Replacing the tape cartridge
1.
Press the button to open the top cover.
2.
Remove the tape cartridge by pressing in the tabs on both
sides.
3.
Place a new tape cartridge in the printer.
4.
Close the top cover.
Tabs
Auto-trimmer
1.
Pull out the tray.
2.
Remove the tape scraps, then
insert the tray back in the printer.
5.
button
Press to open the top cover.
6.
Tape
insertion slot
for trimmer
Tape can be inserted here to cut rounded
corners.
7.
Tape outlet
Printed labels come out here.
8.
lamp
Flashes when an error occurs.
9.
lamp
Indicates the wireless LAN connection status.
10.
lamp
Indicates the wireless LAN connection status.
11.
lamp
Indicates the printer's power status.
Opening the instruction manuals
Follow the steps below to view the instruction manuals on the
DVD-ROM.
1.
Insert the DVD-ROM in the computer's DVD-ROM drive.
2.
Click "User's Guide" in the following window.
3.
Click the manual you want to read in the following
window.
The selected instruction manual is displayed.
For your safety, read the attached documents carefully to use this product
correctly. After you have read all instructions, keep this manual handy for future
reference and to make your concerns clear.
Items below indicate safety precautions to protect users, their surroundings and
their property from possible injury or damage.
Precautionary notations are categorised as follows according to personal injury
and damage to the equipment if the instructions are ignored or the equipment is
misused.
WARNING
This symbol indicates information that, if ignored, could possibly result in serious personal
injury or even death due to incorrect handling.
CAUTION
This symbol indicates information that, if ignored, could possibly result in personal injury,
physical damage, or damage to equipment due to incorrect handling.
The following describes the meaning of each symbol used in the precautions.
This indicates an
important reminder.
This indicates a
prohibited item.
This indicates a
mandatory procedure.
WARNING
When using the AC adapter and power cable
Do not use any AC adapter or power cable other than the dedicated AC
adapter and power cable. Do not use the AC adapter with other than the
specied voltage also. Otherwise, damage, overheating, re or electric
shock may occur.
Take the following precautions when handling the AC adapter and power
cable.
•Make sure to avoid octopus wiring.
•Make sure the plug is not dusty before inserting it into an outlet.
•Insert the plug rmly into the outlet.
•Do not hold the AC adapter or the plug with wet hands.
•Do not pull the power cable when disconnecting the plug. Be sure to
hold the plug when disconnecting it.
•Do not make any modication to the AC adapter or power cable.
•Do not apply strong shocks to or put a heavy object on the AC adapter or
power cable.
•Do not bend or twist the AC adapter or power cable forcibly.
•Do not place the AC adapter or power cable near a heater.
Do not use any damaged AC adapter or power cable. Otherwise, damage,
overheating or smoking may occur, which may result in re or electric
shock.
Do not touch the plug during thunderstorms.
When using this product
Do not apply any strong force or shocks to the product such as standing
on, dropping or hitting it. Otherwise, the product may be broken, which
may result in re or electric shock. If it is damaged, turn o the power
immediately, unplug the AC adapter, and then contact the Epson customer
support center. Continuous use may result in re or electric shock.
Take care not to spill any beverage such as tea, coee or juice onto the
product, or to spray aerosol insecticide. It may cause malfunction, re,
or electric shock. If any liquid has been spilled on the product, turn o
the power, unplug the AC adapter, and then contact the Epson customer
support center. Continuous use may result in re or electric shock.
Do not touch the printhead because it becomes very hot. Otherwise, there
is a risk of burns.
Do not open any covers other than the top cover. Doing so may result in
re or electric shock. Always use the product as instructed in this manual.
Otherwise, damage or injury may occur.
Never modify or disassemble this product. Doing so may cause re or
electric shock.Do not carry out any operations not described in this
manual, or the product may break or cause injury.
If any of the following abnormalities is observed, turn o the power
immediately, unplug the AC adapter, and then contact the Epson customer
support center.
•If smoke, strange odours or unexpected noises come from the product
•If liquid or foreign objects get inside the product
•If the product has been dropped or damaged
Do not touch the tape eject slot, during printing or when the auto cutter is
in operation. Otherwise there is a risk of injury.
May exert electromagnetic interference on, and cause malfunction of,
cardiac pacemakers. Before using this product, check that there is no one
in the vicinity using a cardiac pacemaker.
May exert electromagnetic interference on, and cause malfunction of,
sensitive medical equipment. Before using this product, check that there is
no sensitive medical equipment in the vicinity.
Use of this product on aircraft may be restricted in some countries. Before
using this product, check that use of this product is not restricted on the
aircraft.
When handling the auto trimmer
When removing the trimmer box, make sure to turn the power o. If the
product operates without the trimmer box, injury or damage may occur
with the blade inside the product.
When cleaning the trimmer box, do not touch the trimmer blade, as there
is a risk of injury. Do not insert anything other than labels into the trimmer
inlet slot. Otherwise, damage to the trimmer may occur.
When handling the auto cutter
Do not touch the tape outlet slot (where the labels come out) during
printing or when the auto cutter is in operation. Otherwise, there is a risk
of injury.
When handling the half cutter
Do not touch the tape outlet slot (where the labels come out) during
printing or when the auto cutter is in operation. Otherwise, there is a risk
of injury.
Others
Do not use or store the product, AC adapter, power cable, USB cable or
tape cartridges in the following places.
•In direct sunlight.
•Where it may become extremely hot such as in a vehicle with the
windows closed.
•Where it may become extremely hot such as near a heater or the
temperature becomes very unstable such as near the exhaust duct of an
air conditioner.
•Where the product may get wet due to a shower or rain such as in a
bathroom or outdoors.
•In a dusty place or where the product may be exposed to smoke or steam
such as near the kitchen or a humidier.
•On an unstable place such as on a shaky table or on an inclined place.
•Where it might be subjected to vibration or shock.
•Near high-voltage power lines or something that generates a magnetic
eld.
Keep the plastic bags used to contain the product or this manual out of reach of
children. Children may suocate if they swallow them or put their heads into the
bags.
CAUTION
When using the AC adapter and power cable
Do not unplug the AC adapter while the product is in operation, otherwise
printing may not be successful.
Do not use the AC adapter in a small, conned space, or cover it with a
cloth. Otherwise, the AC adapter may overheat and deteriorate.
When using this product
Do not stand or put anything heavy on the product or place it on an
unstable place such as on a shaky table or on an incline. Otherwise, the
product may fall and cause injury.
To ensure safety, unplug this product before leaving it unused.
Before cleaning, make sure to unplug the AC adapter from the outlet.
Do not use a moistened cloth or solvents such as alcohol, thinner or
benzine.
Do not block or insert objects into the supplied AC adapter socket or the
tape eject slot.
To comply with RF exposure compliance requirements, a distance of at
least 22 cm must be maintained at all times between the antenna of this
product and people in the vicinity.
Others
The supplied disc is a data DVD-ROM for computers. Do not play it in an
audio DVD player. Otherwise a very loud sound may be emitted, causing
risk to both your hearing and your audio equipment.
Be careful of continuous use of which may cause eye fatigue.
When handling tape cartridges
•Make sure to use a dedicated LC Tape.
•Some types of tape cannot be cut by the cutter. For the details, refer to the
tape's manual.
•Do not drop it or disassemble it. Doing so may cause damage.
•Do not pull out the tape forcibly by hand. But make sure to feed the tape.
Otherwise, the tape cartridge may be broken and unusable.
•Avoid using a tape cartridge without remaining tape. Doing so may cause
overheating of the printhead, which may result in damage or malfunction.
MEMO
Tape cartridges contain ink ribbons in them. When disposing of tape cartridges,
make sure to follow the local regulations for disposal.
DVD-ROM software
Take care to prevent the DVD-ROM from being subjected to excessive force or
becoming scratched. Do not store the DVD-ROM in excessively hot or cold locations.
Safety Instructions
Frequency Precautions
The frequency band for this product is 2.4 GHz. This frequency range is the
same frequency bandwidth as industrial, scientic, and medical devices such as
microwave ovens and mobile unit identication (RF-ID) systems (licensed premises
radio stations and unlicensed specied low-power radio stations) used in factory
production lines. Before using this product, check that there are no radio stations
for mobile unit identication or specied low-power radio station premises nearby.
In the event that this product should interfere electromagnetically with the
premises of a radio station used for mobile unit recognition, cease use immediately
and stop generating the electromagnetic eld. Contact your local Epson customer
support center if this product interferes electromagnetically with a special low-
power radio station used for mobile unit identication or causes similar problems.
International Travel Precautions
Wireless devices are designed to conform to the channel and frequency limits
of the country they are intended to be used in. This product is based on the
specications of the country of sale. If this product is used outside the country of
sale, check with your local Epson customer support center for more information.
Notes on Security when Using Wireless LAN
(Important information on customer rights (maintaining privacy))
The advantage of using a wireless LAN over a LAN cable is that, because information
is exchanged using radio signals, you can easily connect to the network if you are
within range of the radio signals. A disadvantage of this is that within a certain
range, the electromagnetic signals can pass through barriers such as walls, so that if
security countermeasures are not implemented in some way, problems such as the
following may occur.
•Communicated data can be intercepted
A third party may be able to receive wireless transmissions without
authorization, and they could obtain personal information from these
transmissions such as IDs, passwords, or credit card numbers, or they could
intercept the contents of personal e-mail messages.
•Unauthorized access to the network
A third party could access an individual or intra-company network
without permission and carry out any of the following activities.
- Retrieve personal data or other secret information (information leakage)
- Pose as another user and send inappropriate data (impersonation)
- Overwrite the contents of intercepted data and resend it (falsication)
- Introduce a computer virus which could cause data loss or system crashes
(damage)
Initially, the possibility that such problems could occur through settings
concerning the security of the wireless LAN product and by using the product
are decreased, because the wireless LAN card and the access point have security
measures to deal with these problems. We recommend that you use this
product after making security settings using your own judgment and assuming
full responsibility, and with your full understanding of problems that may occur
if you do not make any security settings.
Epson shall not be responsible for any leakage of data or information during data
communication over wireless LAN.
Other cautions
•Take care not to cut your ngers when cutting the label with scissors.
•Do not attach a label on human bodies, living things, public facilities ore other
people’s belongings.
International ENERGY STAR® Compliance Statement
The purpose of the International ENERGY STAR® Program is to promote
the development and popularization of energy-ecient oce
equipment.
As an ENERGY STAR® Partner; Seiko Epson Corporation has
determined that this product meets the ENERGY STAR®
guidelines for energy eciency.
Label Editor DVD-ROM (for Windows only)
Contains the following items:
Software
• Label Editor
Software used for label editing. Use it to create labels to print
with the printer.
• Network Conguration Tool
Used to check or change the printer’s network settings on the
computer connected to the printer.
• Printer driver
To be installed in the computer connected to the printer.
Instruction manuals
• Label Editor User’s Guide
Describes how to use the Label Editor software.
• Network Conguration Guide
Provides information not described in this manual on
network connection procedures, settings and connection
troubleshooting.
To view the documents, you need Adobe
Reader.
Click

