Page is loading ...

Cover Page

© Copyright 2016 TRENDnet. All Rights Reserved.
TRENDnet User’s Guide
Table of Contents
i
Contents
Product Overview ................................................................................. 1
Package Contents .......................................................................................................... 1
Features ......................................................................................................................... 1
Product Hardware Features ........................................................................................... 2
Using the Autorun Wizard ..................................................................... 3
Option A: Wired Connection by Using a Network Cable ............................................... 5
Option B: Connect Camera to Wireless Network by WPS Button ................................. 8
Option C: Manually Connect Camera to Wireless Network ........................................ 12
Mobile Apps........................................................................................ 17
Setup Wizard (Finding IP address of the cameras) ................................ 18
Web Browser Management ................................................................. 22
Main Web User Interface............................................................................................. 24
Setup ............................................................................................................................ 26
Wizard .......................................................................................................................... 26
Step 1: LAN Settings ................................................................................................ 27
Step 2: Internet Settings ......................................................................................... 27
Step 3: DDNS Settings ............................................................................................. 27
Step 4: Camera Name Settings ................................................................................ 28
Step 5: Time Settings ............................................................................................... 28
Step 6: Setup Complete........................................................................................... 29
System ......................................................................................................................... 30
Admin ...................................................................................................................... 30
Time and Date ......................................................................................................... 32
Network ....................................................................................................................... 33
Network .................................................................................................................. 33
Wireless Setup ........................................................................................................ 34
Dynamic DNS ............................................................................................................ 35
Audio/Video ................................................................................................................. 36
Audio and Video ....................................................................................................... 36
Image Setup ............................................................................................................. 38
Action ........................................................................................................................... 39
Recording ................................................................................................................. 39
Video Clip ................................................................................................................. 43
Snapshot .................................................................................................................. 45
Preset Position ......................................................................................................... 47
SD Management ...................................................................................................... 48
Motion Detection ........................................................................................................ 49
Sound Detection .......................................................................................................... 49
Tools ............................................................................................................................ 50
System ...................................................................................................................... 50
Firmware Update ..................................................................................................... 51
Advanced ..................................................................................................................... 51
Device Info ............................................................................................................... 52
Log ............................................................................................................................ 52
TRENDnetVIEW Pro Software .............................................................. 52
How to setup/access the camera remotely .......................................... 53
Troubleshooting ................................................................................. 57

© Copyright 2016 TRENDnet. All Rights Reserved.
TRENDnet User’s Guide
TV-IP662WI
1
Product Overview
TV-IP662WI
Package Contents
TV-IP662WI
Multi-Language Quick Installation Guide
CD-ROM (Utility & User’s Guide)
Network cable (1.8m / 6ft)
Power adapter (12V DC, 1A)
Camera mounting kit
If any package contents are missing or damaged, please contact the retail store, online
retailer, or reseller/distributor that the item was purchased.
Features
The Megapixel Wireless Day/Night PTZ Network Camera, model TV-IP662WI, provides
day and night monitoring over a large area. Pan and tilt the camera from a mobile
device, record video to a Micro SD Card, and have the camera email motion detection
video clips. A wall/ceiling mounting kit is included and the camera’s off white housing
blends into most environments.
Megapixel Video
Experience Megapixel 720p HD video with H.264 video compression
Night Vision
Night vision up to 7.5 meters (25 ft.) in complete darkness (indoor rating)
Dynamic DNS
Support for Dyn.com and NO-IP.com dynamic DNS service providers
Wireless N
High speed wireless n connection
PTZ
Pan, tilt, and zoom the camera from a mobile device
Preset Auto-Patrol
Define preset PTZ auto-patrol points
Digital Zoom
Zoom in by a factor of four
Motion and Sound Detection Emails
Receive email snapshots and video clips triggered by motion and sound
Mounting Hardware
Mounting bracket supports ceiling installation
Two-Way Audio
Built-in microphone and connect a third party speaker for two-way audio
Storage
Store video to a Micro SD card (up to 32 GB) or to a Samba server

© Copyright 2016 TRENDnet. All Rights Reserved.
TRENDnet User’s Guide
TV-IP662WI
2
Product Hardware Features
Front Panel View
Light Sensor – Detects the light source to turn IR on or off.
Microphone – Built-in microphone for audio can be turned on or off.
IR LED – Built-in 6 IR LED for night vision uses. (for TV-IP662WI)
Camera Lens – Focal Length: 4.6 mm, F2.0; Focal Depth: 20 cm – infinity
Focus Ring – Turn to adjust the focus of the camera.
Power/Link LED – This LED indicator is solid blue when your camera is powered
on. If this LED indicator is off, there is no power to your camera. This LED
indicator is blinking green when there is connection/data to your camera.
Rear Panel View
WPS (Wi-Fi Protected Setup) – Push and hold this button for 5 seconds to
activate WPS.
Micro SD Slot – Insert a micro SD card into this slot to store video/image data.
Reset Button – Use an item such as a paperclip to push and hold this button for
5 seconds and release to reset your camera to its factory defaults.
Power Port – Connect the included power adapter from your camera to an
available power outlet. Note: Use only the adapter that came with your
camera.
Speaker Port – Insert an external active speaker.
Air Vent – This is to cool the camera.
WPS LED – The LED is blinking green when WPS is activated.
Antenna – 2dBi detachable antenna.
Ethernet Port – Connect Ethernet cables to your wired network devices.

© Copyright 2016 TRENDnet. All Rights Reserved.
TRENDnet User’s Guide
TV-IP662WI
3
Wall mount installation
Please do not mount the camera until after you complete the installation steps from the
CD-ROM. Temporarily place the camera next to your computer.
To attach the metal plates carry out the following:
Remove the two rubber pads under the base of the Camera.
Slide the metal plate onto the base of the camera, making sure that the two
holes on the base of the camera align with the two screw holes on the base of
the camera.
Secure the metal plate to the base of the Camera with the two screws
provided.
The camera can now be mounted to the ceiling or a wall. See the diagram
below for more information.
Using the Autorun Wizard
The Autorun supports both Windows & Mac operating systems. Insert the Installation
CD-ROM into your computer’s CD-ROM drive to initiate the Autorun program. The
Autorun Wizard program will run automatically.
For Windows users: If the autorun wizard does not run, go to the CD-ROM folder and
run Autorun.exe to start installation wizard.
For Mac users: Please click InstallWizard to start installation wizard.

© Copyright 2016 TRENDnet. All Rights Reserved.
TRENDnet User’s Guide
TV-IP662WI
4
Begin by selecting a language from the drop-down list. There is a choice of five
languages – English, French, German, Spanish, and Russian.
1. Click Install Camera and follow the on-screen steps to continue the installation.
2. This step references information on the camera itself. Go to your camera and
check the details at the bottom of the device. Click Next to continue, Back to go
to the previous screen or Home to return to the main menu.
3. The most important part of the setup process is the network connection type.
There are three options:
a. Connect the camera to your network using a network cable
b. Connect the camera to your wireless network using Wi-Fi Protected Setup
(WPS) button (Verify your router has a WPS button. If not, select the next
option).
c. Connect the camera to your wireless network manually.

© Copyright 2016 TRENDnet. All Rights Reserved.
TRENDnet User’s Guide
TV-IP662WI
5
Option A: Wired Connection by Using a Network Cable
1. Click Connect camera to your network using a network cable. Click Next to
continue.
2. Connect one end of the included power adapter to the camera and the other
end to the power outlet. The Power/Link LED will be blinking. Click Next to
continue.
3. Connect one end of the network cable to your camera and the other end to
your router. Click Next to continue.
4. The wizard will search the network for your camera.

© Copyright 2016 TRENDnet. All Rights Reserved.
TRENDnet User’s Guide
TV-IP662WI
6
5. Select your camera. The wizard will show all cameras in the network. If there is
only one camera in the network, the wizard will automatically select it. The
wizard provides the Model Name and MAC Address of the camera. If you do
not see any of your camera(s) in the wizard, click Retry to scan the camera
again. Click Next to continue.
6. Change Password. The default username and password is admin. Tick the
Change Password checkbox to enter the new password details. The password
should be between 8 and 30 characters. Click Next to continue.
Note:
If you enter the incorrect admin details, you will be prompted to change the
configuration, as shown below.

© Copyright 2016 TRENDnet. All Rights Reserved.
TRENDnet User’s Guide
TV-IP662WI
7
If the password length is less than 8 characters, you will also be prompted to
alter the configuration, as shown below.
7. The wizard will configure your parameters.
8. The initial setup is complete. Click the link to navigate to the camera’s Web
User Interface for further configuration or click product image to create a
shortcut. Click Next to continue.

© Copyright 2016 TRENDnet. All Rights Reserved.
TRENDnet User’s Guide
TV-IP662WI
8
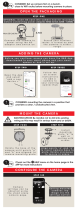
9. Scan the barcode to download the TRENDnetVIEW App for Apple iOS or
Android™
1
devices. The app can also be found by searching TRENDnet from the
Apple App Store or Google Play™
2
.
Please refer to the Mobile Apps section for additional app features
information.
You are now ready to use your camera. Click Finish to exit.
1
Android is a trademark of Google Inc.
2
Google Play is a trademark of Google Inc.
Option B: Connect Camera to Wireless Network by WPS
Button
1. Click Connect camera to your wireless using Wi-Fi Protected Setup (WPS)
button radio button.
Please consider these points before using WPS.
Find the access point (AP) or wireless router you wish to connect to from
the Available AP drop down menu.
In most cases you should leave the Channel set to Auto as the AP will
determine the channel of operation.
Select the type of authentication and encryption required by the access
point and enter the Key required to connect.
Click Next to continue, Back to go to the previous screen or Home to return to
the Main Menu.

© Copyright 2016 TRENDnet. All Rights Reserved.
TRENDnet User’s Guide
TV-IP662WI
9
2. Follow the instructions on the screen to Power up the Camera. Click Next to
continue.
3. Press the WPS button on your wireless router or access point for 5 seconds.
Within 2 minutes press and hold WPS button on the IP Camera for 5 seconds.
The WPS button will be start blinking. Wait until the WPS LED turns off and
Power/Link LED turn green. It can take up to 2 minutes for the camera to
connect to the wireless router or access point. Click Next to continue. If you
wish to go to the previous screen, click Back or click Home to return to the
main menu.

© Copyright 2016 TRENDnet. All Rights Reserved.
TRENDnet User’s Guide
TV-IP662WI
10
4. The wizard will now search for your camera.
5. Select your camera. The wizard will show all cameras in the network. If there is
only one camera in the network, the wizard will automatically select it. The
wizard provides the Model Name and MAC Address of the camera. If you do
not see any of your camera(s) in the wizard, click Retry to scan the camera
again. Click Next to continue.
6. Change Password. The default username and password is admin. Tick the
Change Password checkbox to enter the new password details. The password
should be between 8 and 30 characters. Click Next to continue.
Note:
If you enter the incorrect admin details, you will be prompted to change the
configuration, as shown below.

© Copyright 2016 TRENDnet. All Rights Reserved.
TRENDnet User’s Guide
TV-IP662WI
11
If the password length is less than 8 characters, you will also be prompted to
alter the configuration, as shown below.
7. The wizard will configure your parameters.
8. The initial setup is complete. Click the link to navigate to the camera’s Web
User Interface for further configuration or click product image to create a
shortcut. Click Next to continue.

© Copyright 2016 TRENDnet. All Rights Reserved.
TRENDnet User’s Guide
TV-IP662WI
12
9. Scan the barcode to download the TRENDnetVIEW App for Apple iOS or
Android™
3
devices. The app can also be found by searching TRENDnet from the
Apple App Store or Google Play™
4
.
Please refer to the Mobile Apps section for additional app features
information.
You are now ready to use your camera. Click Finish to exit.
3
Android is a trademark of Google Inc.
4
Google Play is a trademark of Google Inc.
Option C: Manually Connect Camera to Wireless Network
1. Click Connect camera to your wireless network manually button
2. Follow the instructions in the next screen to Power up the Camera. Click Next
to continue.

© Copyright 2016 TRENDnet. All Rights Reserved.
TRENDnet User’s Guide
TV-IP662WI
13
3. Connect one end of the network cable to your camera and the other end to
your router. Click Next to continue, Back to go to the previous screen or Home
to return to the Main Menu.
4. The wizard will now search the network for your camera.
5. Select your camera. The wizard will show all cameras in the network. If there is
only one camera in the network, the wizard will automatically select it. The
wizard provides the Model Name and MAC Address of the camera. If you do
not see any of your camera(s) in the wizard, click Retry to scan the camera
again. Click Next to continue.

© Copyright 2016 TRENDnet. All Rights Reserved.
TRENDnet User’s Guide
TV-IP662WI
14
6. Change Password. The default username and password is admin. Tick the
Change Password checkbox to enter the new password details. The password
should be between 8 and 30 characters. Click Next to continue.
Note:
If you enter the incorrect admin details, you will be prompted to change the
configuration, as shown below.
If the password length is less than 8 characters, you will also be prompted to
alter the configuration, as shown below.
7. The wizard will now configure your parameters.

© Copyright 2016 TRENDnet. All Rights Reserved.
TRENDnet User’s Guide
TV-IP662WI
15
8. Once your wireless network has been discovered, the wizard will provide you
with an option to select the Available Wireless Network and also to provide a
Wireless Network Password. If you do not see your wireless network details,
click the Rescan link to scan the network again.
9. The wizard will search for wireless Access Points. Click the Rescan button if you
do not find your AP.
10. Disconnect your network cable from the camera/router. Click Next to continue.
11. The camera will connect to the wireless network.

© Copyright 2016 TRENDnet. All Rights Reserved.
TRENDnet User’s Guide
TV-IP662WI
16
12. The initial setup is complete. Click the link to navigate to the camera’s Web
User Interface for further configuration or click product image to create a
shortcut. Click Next to continue.
13. Scan the barcode to download the TRENDnetVIEW App for Apple iOS or
Android™
5
devices. The app can also be found by searching TRENDnet from the
Apple App Store or Google Play™
6
.
Please refer to the Mobile Apps section for additional app features
information.
You are now ready to use your camera. Click Finish to exit.
5
Android is a trademark of Google Inc.
6
Google Play is a trademark of Google Inc.

© Copyright 2016 TRENDnet. All Rights Reserved.
TRENDnet User’s Guide
TV-IP662WI
17
Mobile Apps
Android Version
Using your mobile
7
device, an Android phone in this example, open the Bar Code
scanning app on your phone. Hold it up to the QR Code on the wizard that reads,
Android, and scan the image. The Bar Code app will read the QR Code and record it.
The app will copy the QR link and provides a HTML link to the TRENDnetVIEW app. You
will be directed to the Google Play™ Storefront to download the app. Download the
app, install it and use the app on your mobile device to view the TRENDnet camera.
7
Please use the Quick Installation Guide to install the mobile applications or learn how
to use mobile accessibility.
Apple iOS version
Scan the QR Code using one of IOS’s QR Code apps. The app will automatically create an
HTML link to the iTunes App Store. You will be immediately directed to the iTunes App
Store. Click the link to download.

© Copyright 2016 TRENDnet. All Rights Reserved.
TRENDnet User’s Guide
TV-IP662WI
18
Setup Wizard (Finding IP address of the cameras)
To locate the IP address of your camera(s) on the same network with your PC, please
install the Setup Wizard utility (for Windows only) from the SetupWizard folder .
1. Insert the included CD-ROM into your CD/DVD drive, browse to the CD drive of
the SetupWizard folder and run SetupWizardSetup_1.2.3.4804.msi to begin
the installation wizard.
2. The following screen will show up. Click Next and following the screen to finish
the installation.
3. Click Close to finish the installation.
4. Click Start > Programs > TRENDnet > SetupWizard > SetupWizard. The
TRENDnet Setup Wizard appears.
5. Connect an RJ-45 cable from a switch/router to the Ethernet port on the back
of the camera and connect the AC power adapter to the camera. Click Next to
proceed.
6. From the list of cameras that appears, select the camera and click Next to
continue. If your camera is not listed, please ensure your camera is powered on
and connected to the network then click Re-Scan to scan the camera from
your network.
/