Thermasol Total Wellness Package User manual

Type
User manual

Thermasol Total Wellness Package offers a luxurious spa-like experience in the comfort of your own home. With a simple-to-use ThermaTouch control panel, you can personalize your steam bath settings, including temperature, duration, and lighting. The package also includes a Serenity Light, Sound, and Rainhead system that transforms your steam bath into a multisensory oasis.

Thermasol Total Wellness Package offers a luxurious spa-like experience in the comfort of your own home. With a simple-to-use ThermaTouch control panel, you can personalize your steam bath settings, including temperature, duration, and lighting. The package also includes a Serenity Light, Sound, and Rainhead system that transforms your steam bath into a multisensory oasis.

Total Wellness ThermaTouch 10 Package
OVER 60 YEARS OF STEAM SHOWER INNOVATION
Installation Manual
For Tutorials and Troubleshooting visit www.thermasol.com/solutions
*Products available in square styling not shown
ThermaTouch Control
OVER 60 YEARS OF STEAM SHOWER INNOVATION
Installation Manual
For Tutorials and Troubleshooting visit www.thermasol.com/solutions
TT10-XX
ThermaTouch Control Installation Instructions
PLEASE REVIEW WARNINGS BELOW AND LEAVE THIS MANUAL WITH HOMEOWNER
DO NOT USE THIS PRODUCT UNLESS YOU HAVE CONSULTED WITH YOUR DOCTOR AND RECEIVED WRITTEN PERMISSION TO DO SO.
USE OF THIS PRODUCT MAY BE HAZARDOUS TO YOUR HEALTH.
PLEASE CONSULT YOUR PHYSICIAN BEFORE USING. IF YOU ARE PREGNANT, ELDERLY, HAVE HIGH BLOOD PRESSURE, DIABETES,
SUFFERING FROM HEART DISEASE, ARE INTOXICATED, OR NOT IN GOOD HEALTH, DO NOT USE THIS STEAM BATH.
STEAM IS HOT! DO NOT TOUCH OR GO NEAR THE STEAMHEAD FROM THE TIME THE UNIT IS “ON,” UP TO ONE HOUR AFTER IT HAS SHUT
OFF. SEVERE BURNS WILL OCCUR IF YOU COME IN CONTACT WITH THE STEAMHEAD OR STEAM EMITTING FROM THE STEAMHEAD.
NEVER ATTEMPT TO FILL AROMA RESERVOIR ON THE STEAMHEAD WHEN UNIT IS IN THE "ON" POSITION. SEVERE BURNS WILL OCCUR.
DO NOT USE THERMASOL AROMATHERAPY OILS, SKIN CARE PRODUCTS OR ANY PRODUCT ASSOCIATED WITH YOUR THERMASOL UNIT
WITHOUT CONSULTING WITH YOUR ALLERGIST OR DOCTOR BEFORE USE. THESE PRODUCTS MAY BE HAZARDOUS TO YOUR HEALTH.
DO NOT USE STEAM ROOM WHILE UNDER THE INFLUENCE OF ALCOHOL OR DRUGS, AS THIS CAN BE HAZARDOUS TO YOUR HEALTH.
YOUR SHOWER MAY BE A SLIP-AND-FALL HAZARD. CHECK WITH YOUR CONTRACTOR OR FLOORING MANUFACTURER REGARDING THE
SAFE USE OF YOUR FLOORING IN A STEAM APPLICATION. SLIPPING AND FALLING INTO THE STEAMHEAD ITSELF OR INTO THE STREAM
OF STEAM EMITTING FROM THE STEAMHEAD WILL CAUSE SERIOUS BURNS OR PHYSICAL INJURY.
IF YOU ARE FEELING UNCOMFORTABLE, DIZZY, FAINT, OR STARTING TO FALL ASLEEP, IMMEDIATELY EXIT THE STEAM ROOM.
DO NOT USE STEAM ROOM IF YOU ARE UNDER THE AGE OF 16 UNLESS SUPERVISED BY AN ADULT.
THERMASOL STEAM BATH GENERATORS ARE NOT DESIGNED TO BE USED FOR SPACE HEATING PURPOSES.
THERMASOL STEAM BATH GENERATORS ARE FOR INDOOR USE ONLY. THEY SHOULD NEVER BE LOCATED OUTSIDE THE HOME.
All products must be installed in accordance with installation instructions provided. Failure to do so may invalidate warranty at
manufacturer’s discretion. ©2019ThermaSol.
2THERMASOL.COM I 800.776.0711
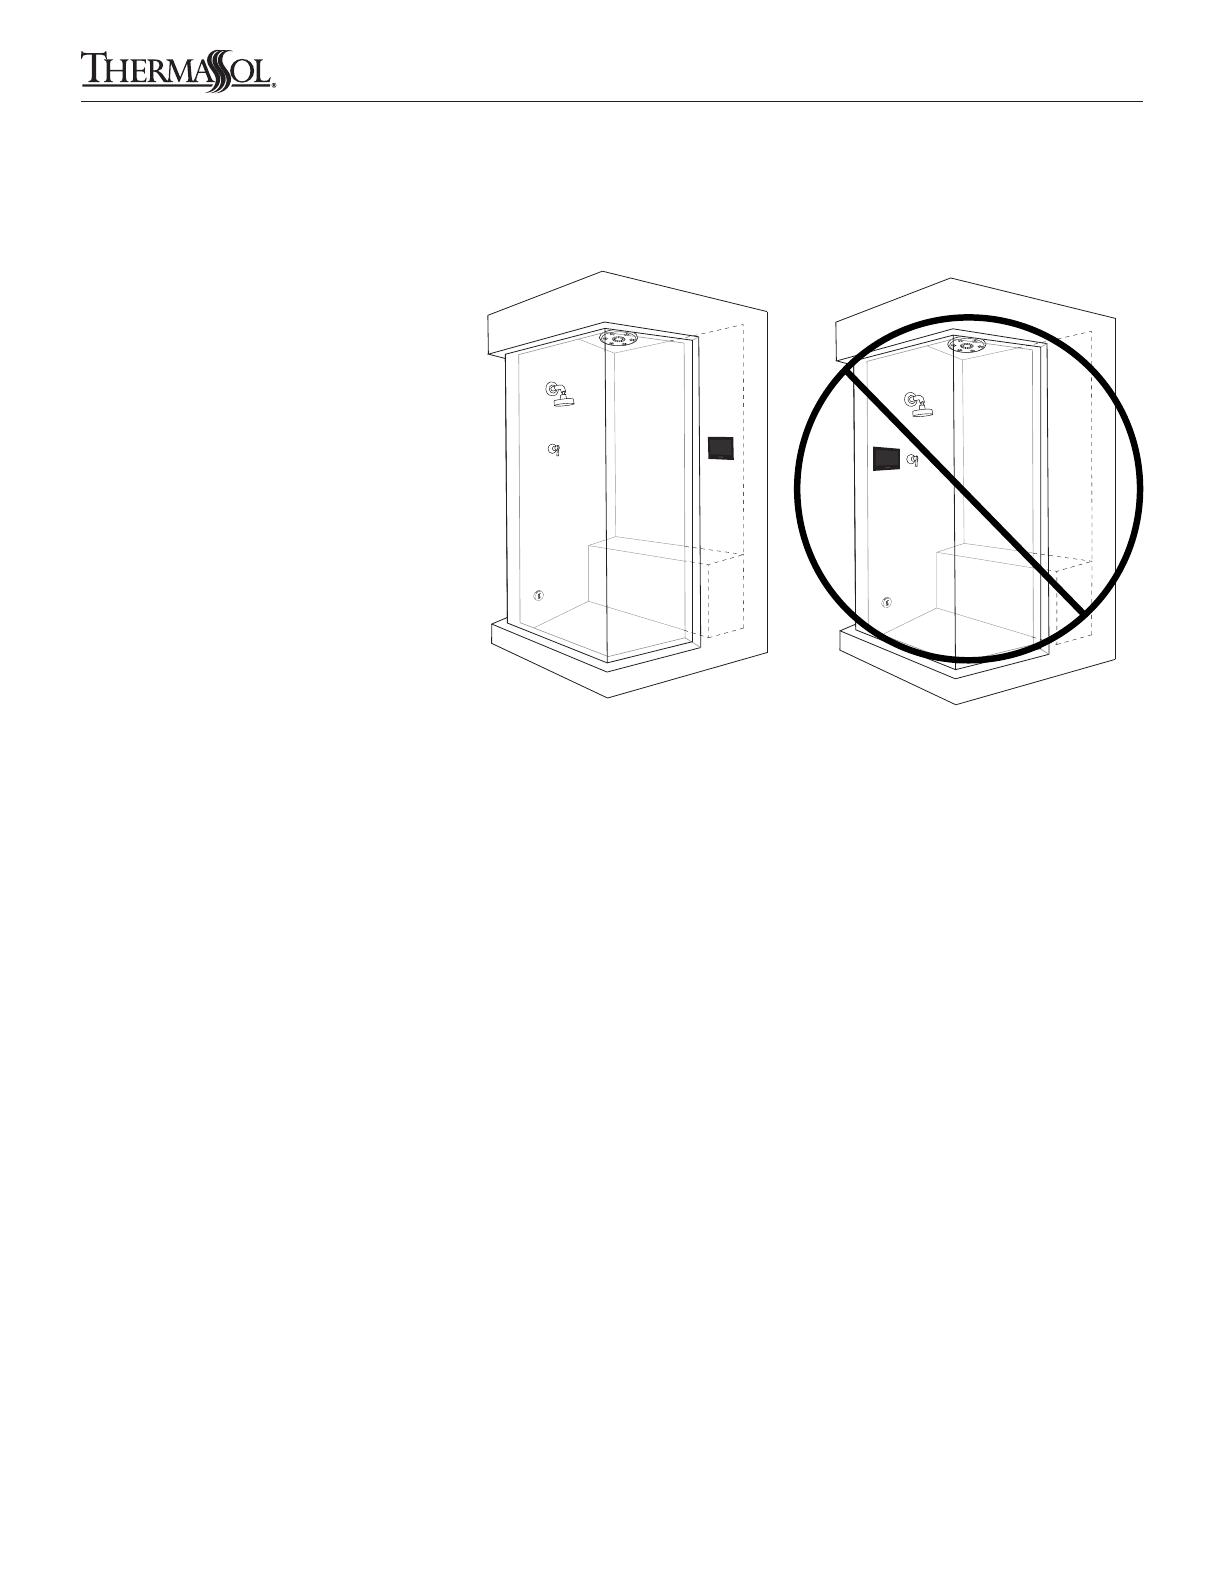
The ThermaTouch Control must be installed
inside the shower. The ThermaTouch control
will only function on the current TFX, SSA and
PRO Series generators.
The control should be installed 60" from
the oor of the shower and away from
the steamhead.
The steamhead should be installed 24" from
the oor and 6" from any wall. Locate as far
as possible from the bathing seating area
or location of the users and not below
any xtures.
IMPORTANT: When locating and installing the
ThermaTouch, it is required to not place the
control under any water-outlets, shower heads
or in the direct path of owing water.
SEE DIAGRAM FOR LOCATION EXAMPLE.
Read warnings on page 2. For illustrative purposes only. Consult with qualied professional for steam room construction details.
1 Important Information before You Install
THERMASOL.COM - 1.800.776.0711
3
Important Installation step
1a
YOUR THERMATOUCH SMART TOUCHSCREEN CONTROL COMES WITH A PREINSTALLED EARTH GROUNDING WIRE
ON THE BACK OF THE CONTROLLER. PRIOR TO INSTALLTION OF YOUR THERMATOUCH LOCATE THE CLOSEST EARTH
GROUND (COPPER WATER PIPE) AND ATTACHED THE WIRE AS SHOWN BELOW.
IF YOU HAVE ANY QUESITONS ABOUT THIS PROCESS PLEASE CONTACT US AT [email protected] OR BY
PHONE AT 800.776.0711
COPPER WATER
PIPE
EARTH GROUNDING
WIRE
GROUNDING STRAP
9.75"W x 6.375"H x 3.125"D opening for recessed mount TT10-XX Mud Ring
ThermaTouch Control Installation Instructions
4
THERMASOL.COM I 800.776.0711
Read warnings on page 2. For illustrative purposes only. Consult with qualied professional for steam room construction details.
3 Mud Ring Application
PDM
Item 10-8147
Silicone Installation instructions,
warranty, static cling
warning label
25-foot Yellow
M12 Cable
Item 03-7149-25
Mud Ring
Item 04-8567
2 Tools and Materials
Controller
Item TT10-XX
Shower wallShower wall
Mud Ring goes
inside wall opening
Finished wall must be ush
with the mud ring.
Power Supply Brick
Item 03-7142
Materials needed:
o ThermaTouch control
o M12 cable
o Silicone
o Power Distribution Module (PDM)
o Mud Ring
o Ethernet Cable with RJ-45 Connector (not supplied)
o Other materials as required
Back of Control
REMINDER
in order to receive software updates the unit must be plugged into
the internet using an Ethernet Cable connected to a Router
(Router and Ethernet Cable not supplied).
Power/Data
M12 connection
Audio Out
Plug in network cable
RJ-45 for updates
over the internet
Bluetooth
Antenna
RCA cable
25 foot
Item 03-7207
Earth Ground Wire
Route the M12 cable through the nished wall
to the back side of the control. (The other end
of the cable runs to the PDM location.) NOTE:
It is recommended to run the cable through
electrical conduit. DO NOT STAPLE the cable!
Run the M12 cable so the 90-degree end
connection will connect to the ThermaTouch
control. Then connect the M12 Cable to
ThermaTouch control. Do not over tighten.
If the Light, Sound, Rain Head option is not
used then amplied speakers are required for
sound.
Connect the data cable to Power Distribution Module (PDM).
(The other end of the cable runs to the back of the control in the shower location.)
DO NOT pinch, nail, staple, wedge, or bind the
data cable.
DO NOT wrap the data cable around steam line
or route it in a manner so that the hot steam line
could melt
the cable.
Any damage to the control cable will result in
the control not working properly.
Carefully connect the data cable to the PDM
and control BEFORE turning power on to the
generator or PDM.
"ON"
Turn Clockwise
"OFF"
Turn Counter Clockwise
• Do not staple, strain or damage data cable
• Align pins to receptacle visually before tightening
• Do not force plug
• Hand tighten only
Connector
Detail
Contact
pins
TTC
SLS
Connect to PDM
PDM requires 110V power
Contact
pins
Cable
ends
ThermaTouch Control Installation Instructions
5THERMASOL.COM I 800.776.0711
Read warnings on page 2. For illustrative purposes only. Consult with qualied professional for steam room construction details.
4 Control Installation and Data Cable Connection
M12 Cable
Ethernet cable with RJ-45
(not included)
RCA cable included with control
Shower wall
Earth Ground Wire
THESE STEPS MUST BE TAKEN FOR CORRECT INSTALLATION OF THE CONTROL. REMOVE MUD RING
FROM WALL CUTOUT BEFORE MAKING FINAL CABLE CONNECTIONS TO THE THERMATOUCH CONTROL.
TEST THAT ALL CONNECTIONS ARE WORKING BEFORE SEALING THE CONTROL TO THE WALL.
(Power on the control and see that it lights up).
Coat the entire groove on the control back with supplied waterproof silicone to fully seal the control to the wall.
Completely seal the control to the wall so moisture does not collect behind it.
Place the control on the wall pressing rmly.
(You may need to tape the control into place until the silicone dries.)
Be careful not to harm the wall or control with the tape. Let dry for 24 hours before using steam bath.
A
5 Sealing Control
Side View of Surface
Mount Control
Back Side of Surface
Mount Control
ThermaTouch Control Installation Instructions
6
THERMASOL.COM I 800.776.0711
Read warnings on page 2. For illustrative purposes only. Consult with qualied professional for steam room construction details.
SILICONE
A Wall
M12 Cable Connection
Ethernet Cable
Connection
Audio Cable
Connection
Wall
Wall
Earth Ground Wire
Bluetooth
Antenna
TTC
SLS
TTC
SLS
110v
110v
M12 Cable
Audio Cable
M12 Cable
M8 Cable
M12 Cable
6a Connecting ThermaTouch to Generator
6b Connecting ThermaTouch to Serenity Light,
Sound, Rainhead
ThermaTouch Control Installation Instructions
7THERMASOL.COM I 800.776.0711
Read warnings on page 2. For illustrative purposes only. Consult with qualied professional for steam room construction details.
TTC
SLS
TTC
SLS
110v
110v
M12 Cable
M12 Cable
M12 Cable
M12 Cable
Audio Cable
Audio Cable
M8 Cable
6c Connecting ThermaTouch to Digital Shower
6b Connecting Total Wellness Package
ThermaTouch Control Installation Instructions
8
THERMASOL.COM I 800.776.0711
Read warnings on page 2. For illustrative purposes only. Consult with qualied professional for steam room construction details.
Now you will need to decide on the steamhead placement in the shower so you can run the steam line from the generator to the
steamhead. There are a couple of things you need to know about the placement of the steamhead and steam line itself.
24"
6"
B
7 Steam Line and Steamhead
A
C
Steam Line
Shown installed
in attic
DO NOT install any valve in the steam line. Flow of steam must
be unobstructed.
DO NOT plumb any traps in the steam line.
The steam outlet on the generator requires a 1/2" brass
union for easy installation (not included).
Use 1/2” brass pipe or copper tubing from unit to
steamhead rough-in tting as permitted by code.
A
B
The steam line can run up and then down, once; or horizontal;
but never run down and then up. If it does, a steam trap will
be produced at the low point blocking the ow of steam.
Insulate the steam outlet piping if the piping run exceeds 10 feet or
is exposed to cold areas. Use steam rated insulation.
Pitch/angle steam lines back towards generator before any up or
down turns; pitch/angle towards steam room after any up or down
and avoid perfectly level plumbed lines.
ThermaTouch Control Installation Instructions
9THERMASOL.COM I 800.776.0711
Read warnings on page 2. For illustrative purposes only. Consult with qualied professional for steam room construction details.
Steamhead Location
Steamhead rough-in tting
to be installed ush and
sealed to nished wall
C
CInsert protective cap
into housing
Insert installation tool and
tighten housing into place
with a 1" socket and driver
DO NOT install the steamhead near the seating area or the user.
DO NOT forget to install the steamhead rough-in tting!
Install the steamhead 24" from the oor or bathtub rim
and 6" from any corner.
Steamhead is to be mounted as far as possible from
typical bathing position (seated or standing) and installed
as far from the in-shower controller as possible.
For retrot to existing nish wall:
Drill a 1-1/8" diameter hole in the shower wall or wall above
bathtub rim for the steam outlet rough-in tting and install
to be ush with the nished wall. this housing must be
sealed to the wall to not allow vapor or water behind it.
(plumbing must be done from backside of
nshed space)
For new framing: Mount and install rough-in tting to be
ush with nished wall.
Connect a 1/2" NPT brass pipe or copper tubing to
the steam outlet union (not included) on the generator
running the pipe to the steam head location in the wall
to connect with the steamhead rough-in tting. It is very
important that the pipe is rmly secured to the wall, so
that when the steamhead is installed it doesn’t push the
rough-in tting back into the wall. Install a 1/2” dropear
elbow on the end of the 1/2” pipe or tubing for the
rough-in tting.
Use the installation tool to tighten the housing in place
with a 1" socket and driver. Then insert the protective cap
into the housing.
For all the connections, use solder for copper joints and
Teon tape for pipe ttings and do not over tighten ttings.
DO NOT USE PVC CEMENT.
ThermaTouch Control Installation Instructions
10
THERMASOL.COM I 800.776.0711
Read warnings on page 2. For illustrative purposes only. Consult with qualied professional for steam room construction details.
D
D
Remove protective
cap from housing
Insert steamhead
into housing
Use the supplied
silicone to adhere
the steamhead to
the wall
Turn ON the water supply to the generator. Check all the connections for leaks.
Plug in generator (unless hardwired model).
Turn ON the power source or breaker.
Verify control panel lights up and test operation. Note: Initial power-on phase takes several minutes for generator to
heat up steam.
Please direct the home owner to visit www.thermasol.com/solution and click on the “I’m the home owner” button to
learn about set-up and programing (in order to set up the clock and any other options if applicable).
8 Final Pre-Check Before Operation
Upon nal installation mount steamhead with facing up
to allow aromatherapy well to dispense steam.
For detailed installation instructions of the steamhead please
see Installation section in thermasol.com/customer-support
Apply a small amount of
supplied lubricant directly
on the o-rings.
Once the shower wall is complete and the housing
is sealed to the wall, remove the protective cap and
insert the steamhead into housing. Use the supplied
silicone to adherethe steamhead to the wall sealing
out any water from getting behind the head.
Use supplied o-ring lubricant to assist in steam head
installation. A very small amount is all that is need directly
on the o-rings.
Allow 24 hours for silicone to dry before use.
ThermaTouch Control Installation Instructions
11 THERMASOL.COM I 800.776.0711
Read warnings on page 2. For illustrative purposes only. Consult with qualied professional for steam room construction details.
9 Trouble Shooting, Tutorials and Error Codes
ThermaTouch Control Installation Instructions
12
THERMASOL.COM I 800.776.0711
Read warnings on page 2. For illustrative purposes only. Consult with qualied professional for steam room construction details.
Visit www.thermasol.com/solutions.
Click on Troubleshoot then click on ThermaTouch Control Error Codes.
1958 STEAM WAY ROUND ROCK, TX 78665
PHONE: 800.776.0711 | FAX: 800.556.5257 | WWW.THERMASOL.COM 81227_A
Digital Shower Valve
OVER 60 YEARS OF STEAM SHOWER INNOVATION
Installation Manual
TDS-3000
Digital Shower Valve
2 Tools and Materials
2
Make sure the walls, ceiling and oor materials are suitable for use with this product. Ensure electrical power is turned off for the duration
of the installation.
IMPORTANT: The Digital Shower Valve must be accessible and should not be sealed in the wall
PLEASE REVIEW WARNINGS BELOW AND LEAVE THIS MANUAL WITH HOMEOWNER
BEFORE USING THE SHOWER, TEST THE WATER TEMPERATURE WITH YOUR HAND BEFORE FULLY ENTERING THE SHOWER.
DO NOT USE THERMASOL AROMATHERAPY OILS OR SKIN CARE PRODUCTS OR ANY PRODUCT ASSOCIATED WITH YOUR THERMASOL
PRODUCT WITHOUT CONSULTING WITH YOUR ALLERGIST OR DOCTOR BEFORE USE. THESE PRODUCTS MAY BE HAZARDOUS TO
YOUR HEALTH.
DO NOT USE THIS PRODUCT WHILE UNDER THE INFLUENCE OF ALCOHOL OR DRUGS, AS THIS CAN BE HAZARDOUS TO YOUR
HEALTH.
All products must be installed in accordance with installation instructions provided. Failure to do so may invalidate warranty at manufacturer’s
discretion.
©2018 ThermaSol.
Parts enclosed with the Digital Shower:
Digital Shower
10.9" x 6.93" x 2.95"
Set of screws,
2 × 5 × 50 mm
Set of connection nipples
All connections are 1/2" NPT
50-foot CAN-bus cable Digital Interface Back up battery
1 Important Information Before You Install
o Pencil
o Drill bit 8 mm
o Phillips head screwdriver
o Adjustable wrench
o Drill
o Level
Tools needed:
Digital Shower Valve
THERMASOL.COM I 800.776.0711
Read warnings on page 2. For illustrative purposes only. Consult with qualied professional for steam room construction details.
3
3 Typical System Layout
Easy Start Control
(Outside Shower)
Water Inlets
(Hot/Cold)
Shower Outputs (3)
TDS-3000
Digital Shower Valve
Digital
Interface
110V Power
208/240VAC
Steam
Generator
110V Power
Serenity
Light and Sound
TTC AUDIO OUT
TTC INPUT
SLS INPUT
CONTROL 2 INPUT
CONTROL 1 INPUT
24 VDC INPUT
STEAM UNIT INPUT
ThermaTouch Control
(Inside Shower)
To LAN/ROUTER
PDM
Digital Shower Valve
THERMASOL.COM I 800.776.0711
Read warnings on page 2. For illustrative purposes only. Consult with qualied professional for steam room construction details.
4
4 Scope of Application
IMPORTANT: The Digital Shower Valve must be
accessible and should not be sealed in the wall
TDS-3000
Digital Shower Valve
Digital Interface
PDM
Digital Shower Valve
THERMASOL.COM I 800.776.0711
Read warnings on page 2. For illustrative purposes only. Consult with qualied professional for steam room construction details.
Hot Water
Cold Water
Digital Shower Valve
THERMASOL.COM I 800.776.0711
Read warnings on page 2. For illustrative purposes only. Consult with qualied professional for steam room construction details.
Hot Water
Cold Water
  • Page 1 1
  • Page 2 2
  • Page 3 3
  • Page 4 4
  • Page 5 5
  • Page 6 6
  • Page 7 7
  • Page 8 8
  • Page 9 9
  • Page 10 10
  • Page 11 11
  • Page 12 12
  • Page 13 13
  • Page 14 14
  • Page 15 15
  • Page 16 16
  • Page 17 17
  • Page 18 18
  • Page 19 19
  • Page 20 20
  • Page 21 21
  • Page 22 22
  • Page 23 23
  • Page 24 24
  • Page 25 25
  • Page 26 26
  • Page 27 27
  • Page 28 28
  • Page 29 29
  • Page 30 30
  • Page 31 31
  • Page 32 32
  • Page 33 33
  • Page 34 34
  • Page 35 35
  • Page 36 36
  • Page 37 37
  • Page 38 38
  • Page 39 39
  • Page 40 40
  • Page 41 41

Thermasol Total Wellness Package User manual

Type
User manual

Thermasol Total Wellness Package offers a luxurious spa-like experience in the comfort of your own home. With a simple-to-use ThermaTouch control panel, you can personalize your steam bath settings, including temperature, duration, and lighting. The package also includes a Serenity Light, Sound, and Rainhead system that transforms your steam bath into a multisensory oasis.

Ask a question and I''ll find the answer in the document

Finding information in a document is now easier with AI