Page is loading ...

Chery S18D Service Manual
(Body Accessories & Dimensions)
After Sales Service Department of Chery Automobile
Co.,Ltd.

Chery S18D Service Manual
Contents
Chapter I Engine Hood & Luggage Boot ................................................................................................ 1
I. Removal and Installation of Engine Hood ........................................................................................................ 1
1. Preparations .............................................................................................................................................. 1
2. Precautions ................................................................................................................................................ 1
3. Removal and Installation of Engine Hood Accessories ........................................................................... 1
4. Removal & Adjustment of Engine Hood Assembly ................................................................................. 1
5. Removal of Engine Hood Lock ................................................................................................................ 2
6. Removal & Adjustment of Hood Cable ................................................................................................... 2
II. Removal and Installation of Trunk lid ............................................................................................................. 3
1. Preparations .............................................................................................................................................. 3
2. Removal of Trunk lid Trim Board ............................................................................................................ 3
3. Removal and Installation of Luggage boot Lock ..................................................................................... 3
4. Removal of Luggage Boot Lock Cylinder ............................................................................................... 4
5. Removal of Rear Wiper Nozzle ................................................................................................................ 5
6. Removal of Rear Wiper Motor ................................................................................................................. 6
Chapter II Removal of Interior Trim Parts .............................................................................................. 8
I. Removal and Installation of Seat Belts ............................................................................................................. 8
1. Preparations .............................................................................................................................................. 8
2. Precautions ................................................................................................................................................ 8
3. Removal and Installation of the Seat belt of Front Seats ......................................................................... 8
4. Removal and Installation of the Seat belt of Rear Seats ....................................................................... 10
II. Removal and Installation of Seats .................................................................................................................. 11
1. Preparations ............................................................................................................................................. 11
2. Removal of Front Seats .......................................................................................................................... 12
3. Removal of Rear Seats ........................................................................................................................... 12
4. Installation Procedure ............................................................................................................................. 13
III. Removal and Installation of Central Console .............................................................................................. 13
1. Preparations ............................................................................................................................................ 13
2. Removal Procedure ................................................................................................................................. 13
3. Installation Procedure ............................................................................................................................. 14
IV. Removal and Installation of Carpet .............................................................................................................. 14
1. Preparations ............................................................................................................................................ 14
2. Removal Procedure ................................................................................................................................. 14
3. Installation Procedure ............................................................................................................................. 16
Chapter III Removal & Maintenance of Vehicle Doors ........................................................................ 17
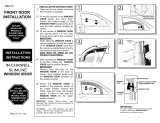
I. Removal, Installation & Maintenance of Front Doors .................................................................................... 17
1. Preparations ............................................................................................................................................ 17
2. Precautions .............................................................................................................................................. 17
3. Removal Procedure ................................................................................................................................. 17
4. Installation Procedure ............................................................................................................................. 21
II. Removal & Installation of Rear Doors .......................................................................................................... 21
1. Preparations ............................................................................................................................................ 21
2. Precautions .............................................................................................................................................. 21
3. Removal Procedure ................................................................................................................................. 22
4. Installation Procedure ............................................................................................................................. 25
Chapter IV Removal, Installation & Maintenance of Front/Rear Bumper ......................................... 26
2

Chery S18D Service Manual
I. Removal, Installation & Maintenance of Front Bumper ................................................................................ 26
1. Preparations ............................................................................................................................................ 26
2. Precautions .............................................................................................................................................. 26
3. Removal Procedure ................................................................................................................................. 26
4. Installation Procedure ............................................................................................................................. 27
II. Removal, Installation & Maintenance of Rear Bumper ................................................................................ 27
1. Preparations ............................................................................................................................................ 27
2. Precautions .............................................................................................................................................. 27
3. Removal Procedure ................................................................................................................................. 27
4. Installation Procedure ............................................................................................................................. 28
Chapter V Removal and Installation of Outside Lamps ..................................................................... 29
I. Preparations .................................................................................................................................................... 29
II. Precautions ..................................................................................................................................................... 29
III. Removal Procedure of Headlamp ................................................................................................................. 29
IV. Removal of Front Fog Lamp ......................................................................................................................... 30
V. Removal of Rear Fog Lamp ........................................................................................................................... 31
VI Removal of Tail Lamp ................................................................................................................................... 32
. Removal of License Lamp Ⅶ .......................................................................................................................... 32
. Installation & Adjustment of HeadlampⅧ ..................................................................................................... 33
. Installation of Tail LampⅨ ............................................................................................................................... 34
Chapter VI Removal and Installation of Vehicle Ceiling ..................................................................... 35
I. Preparations ..................................................................................................................................................... 35
II. Precautions ..................................................................................................................................................... 35
III. Removal and Installation of Sun Visor ........................................................................................................ 35
IV. Removal and Installation of Ceiling Armrest ............................................................................................... 35
V. Removal and Installation of Front Ceiling Lamp .......................................................................................... 36
VI. Removal and Installation of A-pillar Panel .................................................................................................. 36
VII. Removal and Installation of B-pillar Panel ................................................................................................ 37
VIII. Removal and Installation of C-pillar Panel ............................................................................................... 37
IX. Removal and Installation of Vehicle Ceiling ................................................................................................ 38
Chapter VII Removal and Installation of Instrument Panel & Instrument Panel Crossbeam ......... 40
I. Removal of Instrument Panel .......................................................................................................................... 40
1. Removal Procedure ................................................................................................................................. 40
2. Installation Procedure ............................................................................................................................. 45
3. Methods for Clearing Instrument Maintenance Indicator ...................................................................... 45
II. Removal of Instrument Panel Cross Beam .................................................................................................... 45
1. Removal Procedure ................................................................................................................................. 45
2. Installation Procedure ............................................................................................................................. 47
Chapter VIII Air Conditioning System ................................................................................................. 48
I. System Constitution ........................................................................................................................................ 48
II. Removal of Evaporator Assembly ................................................................................................................. 48
3

Chery S18D Service Manual
1. Preparations ............................................................................................................................................ 48
2. Removal and Installation Procedures .................................................................................................... 48
3. Installation of Evaporator Assembly ...................................................................................................... 50
III. Removal and Installation of Evaporator Interior ......................................................................................... 50
1. Preparation of Tools ................................................................................................................................ 50
2. Removal and Installation of Blower ....................................................................................................... 50
3. Removal and Installation of Blower Speed Regulation Module ............................................................ 51
4. Removal and Installation of Heater Exchanger ...................................................................................... 51
5. Removal and Installation of Mode Air Door Related Mechanism ......................................................... 52
6. Removal and Installation of Blend Air Door Related Mechanism ....................................................... 53
7. Removal and Installation of Int./Ext.Air Door Motor & Related Mechanism ..................................... 54
8. Removal and Installation of Evaporator ................................................................................................. 54
CHAPTER IX Body Dimension .............................................................................................................. 56
I. Basic Instructions on BIW Maintenance ......................................................................................................... 56
1. Vehicle Door Structure ........................................................................................................................... 57
2. Door Panel Maintenance Process ........................................................................................................... 57
3. Main Contents of Door Panel Maintenance ........................................................................................... 58
4. Basic Methods for Door Panel Maintenance .......................................................................................... 59
II. Body Assembly Dimension ............................................................................................................................ 63
1. Left Front Axonometric Drawing ........................................................................................................... 63
2. Left Rear Axonometric Drawing ............................................................................................................ 64
III. Engine Compartment Dimension ................................................................................................................ 65
4

Chery S18D Service Manual
Chapter I Engine Hood & Luggage Boot
I. Removal and Installation of Engine Hood
1. Preparations
Tools: slotted screwdriver, cross screwdriver, socket wrench, and etc.
2. Precautions
2.1. During removal and installation, be particularly careful to apply proper force and no abrupt or
violent operation is allowed.
2.2. During removal and installation of the interior trimming, be particularly careful to avoid surface
scratch.
3. Removal and Installation of Engine Hood Accessories
3.1. Removal Procedure
3.1.1. Pull off the washer fluid hose.
3.1.2. Press down the water nozzle clip under
the engine hood, and then push it up
while removing the noozle outward.
3.2. Installation Procedure
The installation procedures are reverse to those for removal. If the nozzle shall be replaced, please
adjust the nozzle water injection to suitable height and width.
4. Removal & Adjustment of Engine Hood Assembly
4.1. Screw off the four adjusting bolts of the
engine hood, and then the engine hood can
be taken down. And the positing of the engine
hood can be adjusted in left-right & front-rear
directions by loosening the four adjusting
bolts.
Installation torque: 25±2N.m
4.2. Installation of Engine hood Assembly:
The installation procedures are reverse to those for removal.
1

Chery S18D Service Manual
5. Removal of Engine Hood Lock
5.1. Removal Procedure
5.1.1. Remove three bolts on engine hood lock
body with 10# socket wrench to remove
the engine hood lock.
Installation torque: 7±1N.m
5.1.2. Remove the engine hood lock cable
return spring from the engine hood lock
assembly and remove the cable.
5.2. Installation Procedure
The installation procedures are reverse to those
for removal.
6. Removal & Adjustment of Hood Cable
6.1. Removal & Adjustment Procedures
6.1.1. Remove the plastic nut behind the pull
cover in driver’s cab.
6.1.2. Pull out of the engine hood cable handle
and remove the engine hood cable from
the slot of pull rod.
6.2. Installation Procedure
The installation procedures are reverse to those for removal.
2

Chery S18D Service Manual
II. Removal and Installation of Trunk lid
1. Preparations
Tools: plastic screwdriver, socket wrench, cross ratchet wrench and etc.
Material: plastic clip
2. Removal of Trunk lid Trim Board
2.1. Pry up the trim board clearance with a plastic
screwdriver, then remove the clips in
sequence and remove the trunk lid interior
trim board.
2.2.Remove the fixing bolts of license plate lamp
trim board with 10# socket wrench; remove
the license plate lamp trim board.
2.3. Installaiton of trunk lid trim board
Replace the damaged clips and align the clip with
the installation hole; tap them for installation.
Remark: the trim board tapping force shall be
suitable; clean the surface of interior trim board
after installation..
3. Removal and Installation of Luggage boot Lock
3.1. Removal Procedure
3

Chery S18D Service Manual
3.1.1. Remove the pull rod from the upper lock
body.
3.1.2. Disconnect the connector on upper lock
body.
3.1.3. Remove the screws on the upper lock
with cross ratchet wrench.
Installation torque: 12±1N.m
3.1.4. Remove the luggage boot lock.
3.2. Installation Procedure
The installation procedures are reverse to those
for removal.
Installation precautions: check if the lock cylinder
has deformation, if the riveted joint is in position, if
the luggage boot lock body sleeve is in good
condition, if the lock tongue can open and shut
freely.
4. Removal of Luggage Boot Lock Cylinder
4.1. Removal Procedure
4

Chery S18D Service Manual
4.1.1. Screw off the two fixing bolts of lock
cylinder with 10# socket wrench.
Installation torque: 7±1N.m
4.1.2. Push the lock cylinder out and remove it.
Note: the lock cylinder washer shall not be
throwed away.
4.2. Installation Procedure
The installation procedures are reverse to those
for removal.
Note: the clearance between the lock cylinder and
door sheet metal.
5. Removal of Rear Wiper Nozzle
5.1. Removal Procedure
5.1.1. Remove the fixing bolt of high mount
brake lamp cover with a 10# socket
wrench.
5.1.2. Remove the cover and disconnect the
connector; remove the high mount brake
lamp.
5

Chery S18D Service Manual
5.1.3. Pull off the rear water nozzle hose to
remove the rear water nozzle.
5.2. Installation Procedure
The installation procedures are reverse to those
for removal.
Note: water injection opening should be opposite
to wiper motor steering shaft.
6. Removal of Rear Wiper Motor
6.1. Removal Procedure
6.1.1. Remove the rear wiper blade and arm
seat cover.
6.1.2. Use a 10# socket wrench to loosen the
nut above the motor, and remove the rear
wiper blade.
Installation torque: 7±1N.m
6.1.3. Pull the wiper motor connector, remove
three fixing bolts of the rear wiper motor
with 10# socket wrench; remove the motor
assembly.
Installation torque: 12±1N.m
6

Chery S18D Service Manual
6.2. Installation Procedure
The installation procedures are reverse to those
for removal.
Notice to install the wiper seat sealing ring in place
to avoid water leakage of rear windshield.
7

Chery S18D Service Manual
Chapter II Removal of Interior Trim Parts
I. Removal and Installation of Seat Belts
1. Preparations
Tools: plastic screwdriver, wrench, socket wrench and etc.
Parts: disposable clip, expansion bolt.
2. Precautions
Keep the seat belts clean and free of oil, and check them for any damage.
3. Removal and Installation of the Seat belt of Front Seats
3.1. Remove the front and rear door weather strip.
3.2. Pry out the front doorsill pressure plate with
plastic screwdriver.
3.3. Remove the fixing bolts of rear doorsill with
cross screwdriver and remove the rear
doorsill pressure plate.
3.4. Remove the seat belt lower fixing bolt with
17# socket wrench.
Torque: 50±10N.m
8

Chery S18D Service Manual
3.5. Remove the two fixing screws of pillar B lower
panel with cross screwdriver (each one for
front and rear), remove the pillar B lower
panel.
3.6. Remove the pillar B upper panel.
3.7. Remove the seat belt retractor assembly with
17# socket wrench.
Torque: 50±10N.m
3.8. Remove the seat belt guide plate with cross
screwdriver.
3.9. Remove the seat belt upper fixing point bolt
with 17# socket wrench.
Torque: 50±10N.m
3.10. Installation Procedure
The installation procedures are reverse to those for removal.
9

Chery S18D Service Manual
Note:
1. Keep the seat belt clean and away from oil, check if there is damage of seat belt, adding screw
thread sealant during the mounting of seat belt fixing bolt.
2. The pillar panel shall be fit firmly with the body without any looseness, and it shall also be fit well
with roof and weather strip.
3. The fit clearance between B pillar lower panel and front/rear doorsill pressure plate shall be even
and less than 1 mm.
4. Removal and Installation of the Seat belt of Rear Seats
4.1. Remove the fixing screw of rear doorsill with
cross screwdriver, remove the rear doorsill
pressure plate. (refer to the removal and
installation of the seat belt of front door)
4.2. Remove the seat belt bolt with 17# socket
wrench.
Torque: 50±10N.m
4.3. Remove the back doorsill pressure plate with
cross screwdriver.
4.4. Remove the lower panel fixing bolt with cross
screwdriver and remove the lower panel.
10

Chery S18D Service Manual
4.5. Pry out the pillar C upper panel with plastic
screwdriver.
4.7. Remove the rear seat belt upper and lower
fixing point and rear seat fixing clip with 17#
socket wrench.
Torque: 50±10N.m
4.8. Installation Procedure
The installation procedures are reverse to those for removal.
Note:
1. Keep the seat belt clean and away from oil, check if there is damage of seat belt, adding screw
thread sealant during the mounting of seat belt fixing bolt.
2. The pillar panel shall be fit firmly with the body without any looseness, and it shall also be fit well
with roof and weather strip.
3. The fit clearance between C pillar lower panel and rear doorsill pressure plate shall be even and
less than 1 mm.
II. Removal and Installation of Seats
1. Preparations
Tools: socket wrench
11

Chery S18D Service Manual
2. Removal of Front Seats
2.1. Move the seat by pulling the movable handle
under the seat, after the fixing bolts come out,
use 13# socket wrench to remove the seat
bolts.
Torque: 25±3N.m
2.2. Pull out the seat connector and remove the
seat.
3. Removal of Rear Seats
3.1. Lift up the seat cushion and remove the fixing
bolts of the rear seat cushion with the 14#
socket wrench.
Torque: 25±3N.m
3.2. Remove the cushion after the removal of four
fixing bolts.
3.3. Open the luggage boot and take out the
luggage boot carpet.
12

Chery S18D Service Manual
3.4. Remove the fixing bolts of the seat backrest
with 13# socket wrench to remove the rear
seat backrest (two bolts on each side).
Torque: 25±3N.m
4. Installation Procedure
The installation procedures are reverse to those
for removal.
Note: keep the cleanness of vehicle interior trim
parts during removal and installation; avoid the
trim parts surface scratch when moving the seat.
III. Removal and Installation of Central Console
1. Preparations
Tools: cross screwdriver, plastic screwdriver and etc.
2. Removal Procedure
2.1. Use plastic screwdriver to pry open the panel
at the hand brake.
2.2. Use cross screwdriver to remove the front
fixing screws of the central console assembly.
13

Chery S18D Service Manual
2.3. Use cross screwdriver to remove the rear
fixing screws of the central console assembly
and cup holder lower fixing screws.
2.4. Use plastic screwdriver to pry open the
gearshift handle cover and rotate the gearshift
handle in anti-clockwise direction to remove it.
2.5. Lift up the rear part of center console and pull
the rear part to remove the center console.
3. Installation Procedure
The installation procedures are reverse to those for removal.
IV. Removal and Installation of Carpet
1. Preparations
Tools: slotted screwdriver, cross screwdriver; socket wrench and etc.
2. Removal Procedure
2.1. Remove the seats. (Refer the removal of
seat)
14

Chery S18D Service Manual
2.2. Remove the central console (Refer the
removal of central console)
2.3. Remove the seat belt, front and rear doorsill
panel and the upper/lower panel of pillar B.
(Refer the removal of seat belt)
2.4. Pry out the footreast cover by slotted
screwdriver.
2.5. Remove the footrest with 10# socket wrench.
2.6. Remove the pillar A lower panel with cross
screwdriver.
2.7. Remove the seat cushion of rear seats (See
removal of seats)
Remove the rear doorsill pressure plate with cross
screwdriver.
15

Chery S18D Service Manual
2.8. Remove the the carpet fixing clip and remove
the carpet.
3. Installation Procedure
Note: In installation, notice the carpet edges flatness and indoor related wiring harness direction.
3.1. Put the vehicle carpet inside the vehicle, and
take out the harness connected with the
seats, and then press the vehicle carpet
besides the middle passage tightly.
3.2. Let the seat holes exposed.
3.3. Spread the carpet under foot pedal and press
it tightly.
3.4. Spread the rear part of the carpet according
to the shape of the vehicle floor, expose the
mounting holes of the rear seats, and spread
and press the rear part of the carpet
according to the shape of the vehicle floor.
16
/