Xerox 5030/5050 Installation guide

Category
Networking
Type
Installation guide
Version 7.0
09/11
Xerox
®
Smart Card
Installation Guide
Xerox
®
WorkCentre 5632/5638/5645/5655/5665/5675/5687
Xerox
®
WorkCentre 5735/5740/5745/5755/5765/5775/5790
Xerox
®
WorkCentre 5135/5150
Xerox
®
WorkCentre 5030/5050 (software version 05.004.xx.xxx)
©2011 Xerox Corporation. All Rights Reserved. Unpublished rights reserved under the copyright laws of the United States. Contents
of this publication may not be reproduced in any form without permission of Xerox Corporation.
XEROX® and XEROX and Design® are trademarks of Xerox Corporation in the United States and/or other countries.
Changes are periodically made to this document. Changes, technical inaccuracies, and typographic errors will be corrected in
subsequent editions.
Document version 7.0: September 2011
Xerox® Smart Card
Installation Guide
3
Table of Contents
1Introduction
Compatibility . . . . . . . . . . . . . . . . . . . . . . . . . . . . . . . . . . . . . . . . . . . . . . . . . . . . . . . . . . . . . . . . . . . . . . . . . . . . .6
Card Readers and Card Types . . . . . . . . . . . . . . . . . . . . . . . . . . . . . . . . . . . . . . . . . . . . . . . . . . . . . . . . . . . . . .7
Supported Card Types . . . . . . . . . . . . . . . . . . . . . . . . . . . . . . . . . . . . . . . . . . . . . . . . . . . . . . . . . . . . . . . . .7
Supported Card Readers . . . . . . . . . . . . . . . . . . . . . . . . . . . . . . . . . . . . . . . . . . . . . . . . . . . . . . . . . . . . . . .7
Documentation and Support . . . . . . . . . . . . . . . . . . . . . . . . . . . . . . . . . . . . . . . . . . . . . . . . . . . . . . . . . . . . . . .8
2Preparation
Server Specifications . . . . . . . . . . . . . . . . . . . . . . . . . . . . . . . . . . . . . . . . . . . . . . . . . . . . . . . . . . . . . . . . . . . . 10
Electrical Requirements . . . . . . . . . . . . . . . . . . . . . . . . . . . . . . . . . . . . . . . . . . . . . . . . . . . . . . . . . . . . . . . . . . 10
3Installation
Software Enablement . . . . . . . . . . . . . . . . . . . . . . . . . . . . . . . . . . . . . . . . . . . . . . . . . . . . . . . . . . . . . . . . . . . 12
Configuring the Smart Card . . . . . . . . . . . . . . . . . . . . . . . . . . . . . . . . . . . . . . . . . . . . . . . . . . . . . . . . . . . . . . 13
Hardware Installation . . . . . . . . . . . . . . . . . . . . . . . . . . . . . . . . . . . . . . . . . . . . . . . . . . . . . . . . . . . . . . . . . . . 26
Using the Smart Card. . . . . . . . . . . . . . . . . . . . . . . . . . . . . . . . . . . . . . . . . . . . . . . . . . . . . . . . . . . . . . . . . . . . 34
4 Troubleshooting
Fault Clearance . . . . . . . . . . . . . . . . . . . . . . . . . . . . . . . . . . . . . . . . . . . . . . . . . . . . . . . . . . . . . . . . . . . . . . . . . 36
Locating the Serial Number . . . . . . . . . . . . . . . . . . . . . . . . . . . . . . . . . . . . . . . . . . . . . . . . . . . . . . . . . . 36
Troubleshooting Tips . . . . . . . . . . . . . . . . . . . . . . . . . . . . . . . . . . . . . . . . . . . . . . . . . . . . . . . . . . . . . . . . . . . . 37
During Installation: . . . . . . . . . . . . . . . . . . . . . . . . . . . . . . . . . . . . . . . . . . . . . . . . . . . . . . . . . . . . . . . . . . 37
After Installation:. . . . . . . . . . . . . . . . . . . . . . . . . . . . . . . . . . . . . . . . . . . . . . . . . . . . . . . . . . . . . . . . . . . . 38
A Retrieving the Certificate from a Domain Controller or OCSP Server
B Determining the Domain in which your Card is Registered
Xerox® Smart Card
Installation Guide
4
Xerox® Smart Card
Installation Guide
5
1
Introduction
The Xerox Smart Card solution brings an advanced level of security to sensitive information.
Organizations can restrict access to the walk-up features of a Xerox device. This ensures only
authorized users are able to copy, scan, e-mail and fax information.
The key benefit of this solution is its two-factor identification requirement. Users must insert their
access card and enter a unique Personal Identification Number (PIN) at the device. This provides
added security in the event that a card is lost or stolen.
Once validated, a user is logged into the Xerox device for all walk-up features. The system allows for
functions to be tracked for an added layer of security.
The Xerox Smart Card enablement kit integrates with Xerox multifunction printers and existing smart
and personal identity verification cards and readers.
This guide explains how to install and configure the Smart Card solution. It identifies the resources and
equipment required to complete a successful installation.
Should you require any further information, please contact your Local Xerox Representative.
Introduction
Xerox® Smart Card
Installation Guide
6
Compatibility
This solution is compatible with the following product and configurations:
To identify the software level on your machine, perform the following steps:
1. Press the Machine Status button on the control panel.
2. Information about the machine is displayed. If necessary, select Machine Details to display the
System Software Version number.
Configuration Software Level
Xerox WorkCentre 5030/5050 Multifunction
a
a. If your machine has software level 05.003.xx.xxx, the Smart Card software can not be installed without first upgrad-
ing the machine software. Please contact your Xerox Representative for details.
05.004.xx.xxx
Xerox WorkCentre
5632/5638/5655/5665/5675/5687 Multifunction
21.113.xx.xxx
b
21.120.xx.xxx
25.054.xx.xxx
b. If your machine has software level 21.113.02.070 or lower, the Smart Card software can not be installed without first
upgrading the machine software. Please contact your Xerox Representative for details.
Xerox WorkCentre 5135/5050 Multifunction 21.120.xx.xxx
Xerox WorkCentre
5735/5740/5755/5765/5775/5790 Multifunction
06x.130.xxx.xxxxx
06x.131.xxx.xxxxx
Introduction
Xerox® Smart Card
Installation Guide
7
Card Readers and Card Types
Supported Card Types
The customer is responsible for purchasing and configuring the access cards. The following card types
are recommended:
Gemalto TOP DL GX4 144K V2.6.2b Applets
Oberthur ID-One Cosmo v5.2 128K V2.6.2 Applets
Oberthur ID-One Cosmo v5.2 72K V2.6.1 Applets
Oberthur ID-One Cosmo v5.2D 72K V2.6.1 Applets
Oberthur ID-One Cosmo v5.2 72K V2.6.2 Applets
Gemalto GemCombiXpresso R4 dual interface 72K V2.6.2 Applets
Axalto Access 64KV1
Axalto Access 64KV1
Gemplus GXP3 64V2N V2.6.1 Applets
Gemalto Cyberflex Access V2C 64K V2.6.1 Applets
Oberthur ID-One Cosmo V5.2D 64K
Oberthur OCS Galactic V1 32K V1 Applets
Oberthur Cosmo V4 32K V1 Applets
Schlumberger / Axalto Cyberflex V2 32K V1 Applets
Other card types may function with the solution, but have not been validated.Supported Card Types
Supported Card Readers
The customer is responsible for providing a card reader for each Xerox device. The following card
readers are compatible with the solution:
Gemplus GemPC USB SL
•Gemplus GEMPC Twin
•SCM Micro SCR3310
•SCM Micro SCR3311
OmniKey Cardman 3021 USB
OmniKey Cardman 3121 USB
ActivCard USB Reader V2 with SCR-331 firmware
Other CCID compliant readers may function with the solution, but have not been validated.
Note: Information about CCID compliant card readers can be obtained from various websites, for
example www.pcsclite.alioth.debian.org/ccid.This site is not a Xerox website and is not endorsed
by Xerox.
Introduction
Xerox® Smart Card
Installation Guide
8
Documentation and Support
For information specifically about your Xerox product, the following resources are available:
System Administrator Guide provides detailed instructions and information about connecting
your device to the network and installing optional features. This guide is intended for
System/Machine Administrators.
User Guide provides detailed information about all the features and functions on the device. This
guide is intended for general users.
Most answers to your questions will be provided by the support documentation supplied on disc with
your product. Alternatively you can contact the Xerox Support Center or access the Xerox website at
www.xerox.com.
Xerox® Smart Card
Installation Guide
9
2
Preparation
This section explains the preparation and resources required to install the Smart Card.
The installation will take approximately one hour for each device. The following items are required in
order to complete the installation:
To set up the Domain Controller (DC) validation, you will need to determine if your site validates the DC
against the Online Certificate Status Protocol (OCSP) server. Many sites use OCSP to validate
individuals, but do not register the DC with it. If you set up the Xerox device to validate the DC and it
isn't registered, the procedure will fail.
If your site does register the DC with OCSP, you will need to decide whether:
to validate the DC against OCSP before validation of the user, or
to validate the DC after validation of the user
Item Supplier
Compatible Card Reader (refer to Supported Card Types on page 7) Customer
Compatible Access Card (refer to Supported Card Types on page 7) Customer
Smart Card enablement kit 498K17544
(one for each Xerox device)
Xerox
Feature Enable Key Xerox
TCP/IP enabled on the device Customer
DNS Host name or static IP address assigned Customer
Network Settings to be checked to ensure network is fully functional Customer
Domain Controller (DC) information:
Domain Controller authentication environment
lP address or Host Name
Domain information
Domain Controller Root and Intermediate certificates
Check that all certificates are in 64 bit X.509 format
Determine if the DC is registered with the OCSP at this site
Customer
Online Certificate Status Protocol (OCSP) Server Information:
•OCSP Server URL
OCSP - Root and Intermediate Certificates
Check that all certificates are in 64 bit X.509 format
Customer
Proxy Server configuration details Customer
Preparation
Xerox® Smart Card
Installation Guide
10
The first method requires installation of the DC certificate as part of this procedure and is the more
accepted method for validation. The second method retrieves the DC certificate automatically for each
authentication and doesn't require installation of the DC certificate onto the Xerox device.
An additional option is to combine the first and second options and compare the retrieved DC
certificate to the one stored at installation. This provides the most security as it prevents rogue DCs
masquerading as the real DC.
Note: Certificates are often obtained from the Information Technology professionals that support
your organization. If you are unable to obtain the required certificates, refer to the process
outlined in Appendix A. You can determine the domain that you are registered in using the process
outlined in Appendix B.
Server Specifications
Prior to installation, ensure your network infrastructure supports Smart Card or Personal Identification
Verification (PIV).
Names or IP addresses of all servers and domains are required during setup.
Electrical Requirements
The USB port on the back of the Xerox device network controller provides the power required for any of
the supported card readers.
Xerox® Smart Card
Installation Guide
11
3
Installation
This section provides instructions for installing and configuring the Smart Card solution.
There are 4 main installation procedures to follow in sequence.
Software Enablement
Use the Feature Enable Key to enable the Smart Card to be configured.
Configuring Smart Card
Enabling the Smart Card function and customizing the settings.
Hardware Installation
Unpacking the Smart Card Enablement kit and installing the card reader device.
Using Smart Card
Instructions on how to use the card reader device to access the device functions.
Installation
Xerox® Smart Card
Installation Guide
12
Software Enablement
Prior to installing the Xerox Smart Card solution, the software requires enabling on your Xerox device
using Internet Services. The Feature Enable Key is printed on the inside cover of the Enablement guide
provided within the Xerox Smart Card kit.
Follow the instructions below to enable the device software:
Xerox WorkCentre 5632/5638/5655/5665/5675/5687, Xerox WorkCentre 5135/5150 and Xerox
WorkCentre 5030/5050:
1. Access Tools at the device
a. At the Xerox WorkCentre, press the Access button on the control panel.
b. Enter the appropriate User ID and Password to access Tools.
Note: The default user name and password are: admin and 1111.
c. Select Go to Tools.
2. Enable the Smart Card Software
a. Select More to access additional Tools options.
b. Select Optional Services. If necessary, use More to navigate to the option.
c. Select Smart Card. If necessary, use More to navigate to the option.
d. When prompted, select the Option Kit Number entry box and enter the unique Feature
Enable Key provided on the inside cover of the Smart Card Enablement Guide.
e. Select Exit Tools.
Xerox WorkCentre 5735/5740/5755/5765/5775/5790:
1. Access Tools at the device
a. At the WorkCentre, press the Machine Status button on the control panel.
b. Select the Tools tab.
c. Enter the appropriate User ID and Password to access Tools.
Note: The default user name and password are: admin and 1111.
2. Enable the Smart Card Software
a. Select Service Settings.
b. Select Optional Services.
c. Select Smart Card.
d. When prompted, select the entry box and enter the unique Feature Enable Key provided on
the inside cover of the Smart Card Enablement Guide.
e. Select Enter.
f. Reboot the device (the device may automatically reboot).
Once the reboot is complete, the Smart Card function is ready to be configured using the Int
ernet
Services int
erface.
Note: No services will be restricted until Smart Card has been configured using Internet Services.
Installation
Xerox® Smart Card
Installation Guide
13
Configuring the Smart Card
Once the Xerox Smart Card feature has been enabled on the device it can be configured using Internet
Services.
Follow the instructions below to enable and configure the Smart Card:
1. Access Internet Services
a. Open the web browser from your Workstation.
b. In the URL field, enter http://
followed by the IP Address of the
device. For example: If the IP
Address is 192.168.100.100,
enter the following into the URL
field: http://192.168.100.100.
c. Press Enter to view the Home page.
2. Access Properties
a. Select the Properties tab.
b. If prompted, enter the Administrator User ID and Password. The default is admin and 1111.
c. Select the Login button.
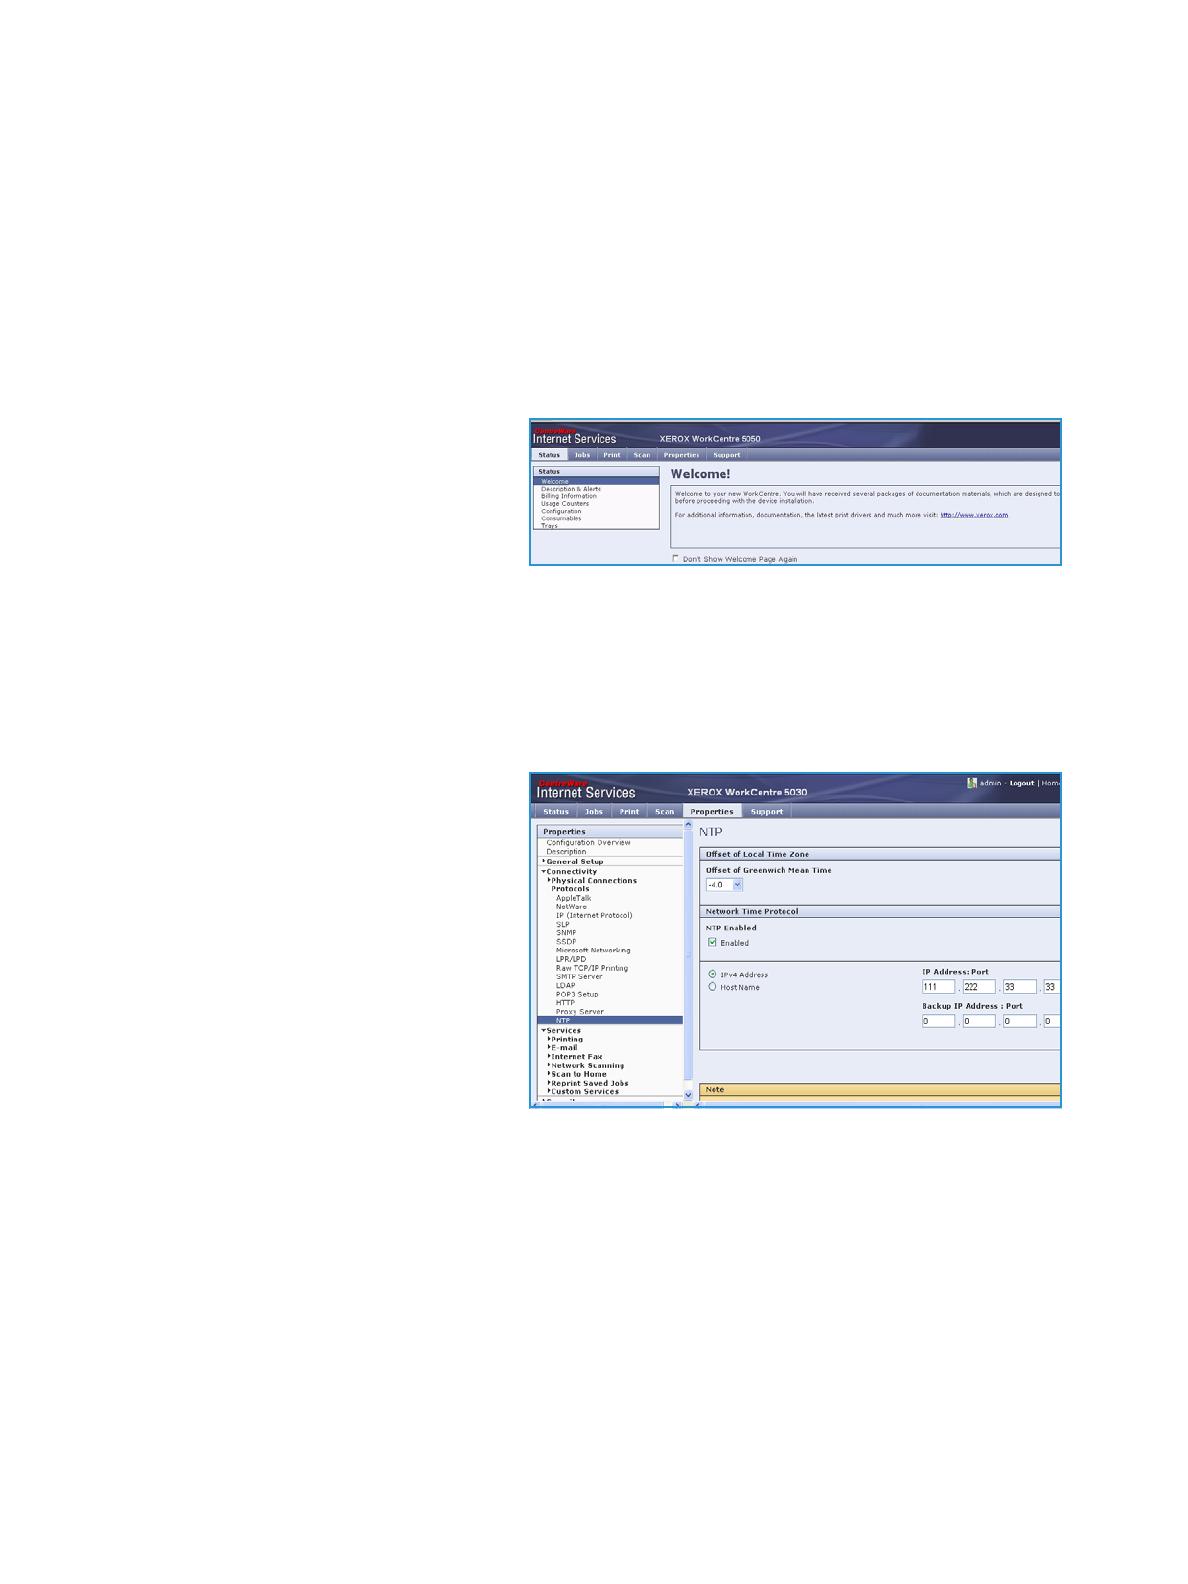
3. Configure the date and time to update automatically
a. Select Connectivity.
b. Select Protocols and then NTP.
Note: A pop-up window may appear
requiring you to login.
c. Ensure the NTP Enabled box is
checked for the Network Time
Protocol option, then enter the IP
Address or the NTP Host Server
Name.
In most cases this will be your DHCP
server, and it will provide the time in
Greenwich which must be corrected
for your time zone by the GMT offset.
d. At the Offset of Local Time Zone option select the GMT offset that is correct for your region.
e. Select Apply. The device may reboot.
Note: The sign in front of the number is important. Most of Europe is plus of Greenwich Mean
Time, while North America is minus. Please consider the implications of Daylight Savings Time
when selecting the Offset of Local Time Zone option.
Note: If Network Time Protocol is not available, check that the time set on the device matches the
network time on the Domain Controller Authentication Server.
Installation
Xerox® Smart Card
Installation Guide
14
To determine the network time, view the time as displayed on your computer. To observe or set the
time on the machine use the following instructions:
Note: If using Network Time Protocol (NTP) do not change the time on the device. The device will
obtain the time from the NTP server.
WorkCentre 5632/5638/5655/5665/5675/5687, Xerox WorkCentre 5135/5150 and Xerox
WorkCentre 5030/5050:
a. At the Xerox WorkCentre, press the Access button on the control panel.
b. Input your User Name and/or Password.
c. Select Go to Tools.
d. Select System Settings.
e. Select Time and Date.
f. Select Set Date and Time.
g. Select Set Time.
h. Observe the time and if it is not correct, validate that the GMT offset is correct for your
region.
Note: If any changes are made, the device will automatically reboot.
WorkCentre 5735/5740/5755/5765/5775/5790:
a. At the WorkCentre, press the Machine Status button on the control panel.
b. Select the Tools tab.
c. Enter the appropriate User ID and Password to access Tools.
Note: The default user name and password are: admin and 1111.
d. Select Device Settings.
e. Select General.
f. Select Date & Time.
Date: Select the Format required and enter the Month, Day and Year.
Time: Enter the correct Hour and Minutes and select PM or AM. If a 24 hour clock is
required, select the 24 hour clock option and enter the Hour and Minutes using the 24
hour clock format.
GMT Offset (Time Zone) (System Software 06x.130.xxx.xxxxx): Use this option to set
the difference between your local time and Greenwich Mean Time. Enter the GMT Offset
time between -12.0 and 14.0 hours using the arrow buttons.
Time Zone (System Software 06x.131.xxx.xxxxx): Touch the Time Zone drop down
menu and select the correct time zone for your device’s locale. The machine time is
automatically adjusted if daylight savings is in effect in your time zone.
g. Select Reboot to save and reboot the device.
Installation
Xerox® Smart Card
Installation Guide
15
4. Access CAC configuration settings
The next steps vary depending on which Xerox WorkCentre model you have.
For Xerox WorkCentre 5030/5050 refer to page 15.
For Xerox WorkCentre 5632/5638/5655/5665/5675/5687, Xerox WorkCentre 5135/5150 and
Xerox WorkCentre 5735/5740/5755/5765/5775/5790 refer to page 16.
Xerox WorkCentre 5030/5050:
a. Select Security and select Authentication Configuration.
Note: If this is the first time you are entering the authentication wizard, you may be prompted to
enter a password.
b. Enter the password and select
Next.
c. Select Next.
d. Select CAC/PIV and select Next.
e. Select Configure.
The Authentication Configuration
screen is displayed.
Installation
Xerox® Smart Card
Installation Guide
16
f. Enter the Smart Card Timeout
required between 1 and 120
minutes.
The default setting is 5 minutes.
g. If the machine is inactive for the
period of time specified, it will
end the session automatically.
Note: When the Smart Card is removed, the user session will timeout.
Xerox WorkCentre 5632/5638/5655/5665/5675/5687, Xerox WorkCentre 5135/5150 and
Xerox WorkCentre 5735/5740/5755/5765/5775/5790 (System Software 06x.130.xxx.xxxxx):
a. Select Security and select Authentication Configuration.
Note: If this is the first time you are entering the authentication wizard, you may be prompted to
enter a new password that is different from the default password.
b. Enter new password and select
Next.
c. Select Next.
d. Select the Device User Interface
Authentication option CAC/PIV
and select Next.
Note: This screen is dependent on the
selection made on the previous
screen.
Installation
Xerox® Smart Card
Installation Guide
17
e. Select the Device User Interface
Authentication option
Configure.
The Authentication Configuration
screen is displayed.
f. Enter the Smart Card Timeout
required between 1 and 120
minutes. The default setting is 5
minutes.
If the machine is inactive for the
period of time specified, it will end the
session automatically.
Note: At the completion of
configuration of CAC, you can return to this screen and Configure the Device Access permissions if
desired. Please refer to the system administrator guides appropriate for your product.
5. Domain Controller validation
If your site does not register the DC with OCSP:
a. Uncheck all three Domain Controller OCSP Certificate Validation boxes and add the
required Domain Controller.
b. Select Save. Go back and add other Domain Controllers as required.
If you wish to validate the DC against OCSP before validation of the user:
a. Check the box for Validate Before CAC/PIV Authentication.
b. Enter the OCSP Server Service URL details.
Note: Depending on your environment, these details may be case sensitive.
If you wish to validate the DC against OCSP after validation of the user:
a. Check the box for Validate after
CAC/PIV User Authentication.
b. Enter the OCSP Server Service
URL details.
c. If you wish to validate the DC
certificate retrieved as part of
the user authentication process
against the one stored during
installation, check the box for
Domain Controller Signature
must match uploaded Domain
Controller Certificate.
Installation
Xerox® Smart Card
Installation Guide
18
6. Enter the Domain Controller details
for the authentication server.
a. Determine how many Domain
Controllers used in your
environment need to be
accessed from the particular
device.
b. Identify the order the Domain
Controllers should be
interrogated when users present
their card for authentication. The
Domain Controller which services
most of your users should be first followed by less popular Domain Controllers.
c. Enter the controllers in the preferred search order.
Note: The search order can be modified at a later date.
d. Select Add.
e. Ensure the Domain Controller
Type is configured correctly for
your authentication
environment.
f. Enter the IP Address or enter the
Domain Controller Host Name
(this must be the fully qualified
Host Name).
g. Ensure Port 88 is selected unless
your Kerberos Port is different.
h. Enter the Domain Name (this
must be the fully qualified Domain Name).
i. Select Save.
If you selected the option that the Domain Controller Signature must match the uploaded
Domain Controller Certificate, then a field will be presented to enter that certificate. This field will
be missing if it is not required to upload the Domain Controller Certificate.
j. At the Domain Controller Certificate option select Add and browse to the Domain Controller
Certificate.
Note: If you are unable to obtain the required certificates, refer to Retrieving the Certificate from a
Domain Controller or OCSP Server on page 39.
k. Select the Certificate then select Upload Domain Controller Certificate.
Installation
Xerox® Smart Card
Installation Guide
19
If the Domain Controller certificate is
not available, the certificate that was
used to issue the Domain Controller
certificate can be uploaded instead.
The Domain Controller certificate, or
its issuing certificate is needed by the
device to validate the interactions
between the device and the domain
controller.
l. Select Save.
m. Repeat the process to enter the
details for all Domain Controllers.
If an error is made, select the Domain Controller from the list, and make any corrections.
n. Select Edit.
o. Make any changes, then Select Save.
Note: To change the Domain Controller search order, select the controller and use the up and
down arrows on the right side of the screen to promote or demote the controller order.
7. Upload certificates
Note: These steps are Read Only if
using any of the OCSP Certificate
Validation options.
Load the DC root and intermediate
certificates and the OCSP root and
intermediate certificates:
a. Select the Link to Security >
Trusted Certificate Authorities
Page option or select Trusted
Certificate Authorities from the
menu.
b. At the Trusted Certificates
Authorities screen, select Add.
c. Browse to the previously
retrieved certificates and add
them one at a time.
d. Select the certificate then select
the Upload Certificate
Authority button to add each
one.
e. Repeat the process until all
certificates are installed.
f. Select Close.
Installation
Xerox® Smart Card
Installation Guide
20
8. Check the Proxy Server details are configured
a. If required by your network
environment, ensure the Proxy
Server details have been
configured.
b. Select the Properties tab, then
Connectivity, Protocols and
Proxy Server and enter the
details.
c. Select Apply.
d. The Smart Card settings are now
configured.
The Smart Card settings are now
configured. You are now ready to install
the Smart Card hardware using the
instructions starting on page 26.
Xerox WorkCentre 5735/5740/5755/5765/5775/5790 (System Software 06x.131.xxx.xxxxx):
1. At the WorkCentre, press the Machine Status button on the control panel.
2. Select the Tools tab.
3. Enter the appropriate User ID and Password to access Tools.
Note: The default user name and password are: admin and 1111.
4. Select Service Settings.
5. Select Optional Services.
6. Select Smart Card.
7. Using the keypad, enter the Feature Enablement Key included in the Smart Card Enablement Kit,
and press Enter.
1 / 1

Xerox 5030/5050 Installation guide

Category
Networking
Type
Installation guide

Ask a question and I''ll find the answer in the document

Finding information in a document is now easier with AI

Ask the document