Xerox WORKCENTRE 5745 User guide

Type
User guide
-!8
5
1
2
3
4
6
7
8
9
0
C
#
*
*
A4
5.5"
A5
A4
5
1
2
3
4
6
7
8
9
0
C
#
*
*
A4
A
B
Xerox
®
WorkCentre™ 5735/5740/5745/
5755/5765/5775/5790
XEROX®, XEROX and Design® are trademarks of Xerox Corporation in the United States and/or other countries. ©2011 Xerox
Corporation. All rights reserved.
Preparation
Load your documents face up in the document feeder input tray or 1.
face down onto the document glass.
Press the 2. Clear All (AC) button to cancel any previous screen
programing selections.
Scan
Press the 3. Services Home button and select the Copy option. The
Copy features are displayed.
Select the required features- Reduce/Enlarge, 2-Sided Copying, etc.4.
Enter the copy quantity using the numeric keypad.5.
Press 6. Start to scan the originals and process the Copy job.
The Copy job enters the job list ready for printing.
More information
For more information, please refer to:
user guides - available to print via the Machine Status button on the
control panel, or
http://www.support.xerox.com
3
3
1
6
How to Make a Copy
1
1
6
5
1
2
3
4
6
7
8
9
0
C
#
*
*
A4
5.5"
A5
A4
5
1
2
3
4
6
7
8
9
0
C
#
*
*
A4
A
B
-!
8
Xerox
®
WorkCentre™ 5735/5740/5745/
5755/5765/5775/5790
XEROX®, XEROX and Design® are trademarks of Xerox Corporation in the United States and/or other countries. ©2011 Xerox
Corporation. All rights reserved.
Preparation
Load your documents face up in the document feeder input tray or 1.
face down onto the document glass.
Press the 2. Clear All (AC) button to cancel any previous screen
programing selections.
Scan
Press the 3. Services Home button and select the Fax option. The Fax
features are displayed.
Select the Enter Number area on the touch screen and enter the 4.
number using the numeric keypad. Select Add to add the number to
the recipient list. Enter additional numbers as required.
Make any programming changes that are required.5.
Press 6. Start to scan the originals and process the Fax job.
The Fax job enters the job list ready for sending.
More information
For more information, please refer to:
user guides - available to print via the Machine Status button on the
control panel, or
http://www.support.xerox.com
3
3
How to Send a Fax
1
3
1
6
5
1
2
3
4
6
7
8
9
0
C
#
*
*
A4
5.5"
A5
A4
5
1
2
3
4
6
7
8
9
0
C
#
*
*
A4
A
B
-!
8
Xerox
®
WorkCentre™ 5735/5740/5745/
5755/5765/5775/5790
XEROX®, XEROX and Design® are trademarks of Xerox Corporation in the United States and/or other countries. ©2011 Xerox
Corporation. All rights reserved.
Preparation
Load your documents face up in the document feeder input tray or 1.
face down onto the document glass.
Press the 2. Clear All (AC) button to cancel any previous screen
programing selections.
Scan
Press the 3. Services Home button and select the Server Fax option.
The Server Fax features are displayed.
Select the Enter Number area on the touch screen and enter the 4.
number using the numeric keypad. Select Add to add the number to
the recipient list. Enter additional numbers as required.
Make any programing changes that are required.5.
Press 6. Start to scan the originals and process the Server Fax job.
The Server Fax job enters the job list ready for sending.
More information
For more information, please refer to:
user guides - available to print via the Machine Status button on the
control panel, or
http://www.support.xerox.com
3
How to Send a Server Fax
1
3
1
7
5
1
2
3
4
6
7
8
9
0
C
#
*
*
A4
5.5"
A5
A4
5
1
2
3
4
6
7
8
9
0
C
#
*
*
A4
A
B
-!
8
Xerox
®
WorkCentre™ 5735/5740/5745/
5755/5765/5775/5790
XEROX®, XEROX and Design® are trademarks of Xerox Corporation in the United States and/or other countries. ©2011 Xerox
Corporation. All rights reserved.
Preparation
Load your documents face up in the document feeder input tray or 1.
face down onto the document glass.
Press the 2. Clear All (AC) button to cancel any previous screen
programing selections.
Scan
Press the 3. Services Home button and select the Internet Fax option.
The Internet Fax features are displayed.
Select New Recipient.4.
Select To, CC or Bcc for the recipient using the drop-down menu 5.
to the left of the entry box. Using the keyboard enter the e-mail
address. Select Add to add the e-mail address to the recipient list.
Select Save.
Make any programing changes that are required.6.
Press 7. Start to scan the originals and process the fax job.
The fax job enters the job list ready for sending.
More information
For more information, please refer to:
user guides - available to print via the Machine Status button on the
control panel, or
http://www.support.xerox.com
3
How to Send an Internet Fax
1
1
-!
8
1
3
Xerox
®
WorkCentre™ 5735/5740/5745/
5755/5765/5775/5790
XEROX®, XEROX and Design® are trademarks of Xerox Corporation in the United States and/or other countries. ©2011 Xerox
Corporation. All rights reserved.
Saving Jobs for Reprinting
Load your documents face up in the document feeder input tray or 1.
face down onto the document glass.
Press the 2. Clear All (AC) button to cancel any previous screen
programing selections.
Press the 3. Services Home button and select the Copy option. The
Copy features are displayed. Program the required job features.
Select the 4. Job Assembly tab and then Save Job for Reprint.
Select 5. Copy & Save to save and print the job, or Save Only to save
the job.
Select a folder location and select 6. New Job Name and enter a
name for the job. Select Save.
Press 7. Start to scan the originals and process the job.
Jobs can also be saved using the print driver options or Internet
Services.
Reprinting Saved Jobs
Press the 1. Services Home button and select the Reprint Saved Jobs
option. The Saved Jobs are displayed.
Select the folder required. Use the scroll bar to access all the folders.2.
Select the job. If the job settings require changing prior to printing 3.
the job, select the settings option.
Select 4. Print, Print and Save or Save.
More information
For more information, please refer to:
user guides - available to print via the Machine Status button on the
control panel, or
http://www.support.xerox.com
How to Save and Reprint Jobs
1
3
1
6
5
1
2
3
4
6
7
8
9
0
C
#
*
*
A4
5.5"
A5
A4
5
1
2
3
4
6
7
8
9
0
C
#
*
*
A4
A
B
-!
8
Xerox
®
WorkCentre™ 5735/5740/5745/
5755/5765/5775/5790
XEROX®, XEROX and Design® are trademarks of Xerox Corporation in the United States and/or other countries. ©2011 Xerox
Corporation. All rights reserved.
Preparation
Load your documents face up in the document feeder input tray or 1.
face down on the document glass.
Press the 2. Clear All (AC) button to cancel any previous screen
programing selections.
Scan
Press the 3. Services Home button and select the E-mail option. The
E-mail features are displayed.
Select New Recipient.4.
Select To, CC or Bcc for the recipient using the drop-down menu 5.
to the left of the entry box. Using the keyboard enter the e-mail
address. Select Add to add the e-mail address to the recipient list.
Select Save.
Press 6. Start to scan the originals and process the E-mail job.
The E-mail job enters the job list ready for sending.
More information
For more information, please refer to:
user guides - available to print via the Machine Status button on the
control panel, or
http://www.support.xerox.com
3
How to Send an E-mail
1
3
1
6
5
1
2
3
4
6
7
8
9
0
C
#
*
*
A4
5.5"
A5
A4
5
1
2
3
4
6
7
8
9
0
C
#
*
*
A4
A
B
-!
8
Xerox
®
WorkCentre™ 5735/5740/5745/
5755/5765/5775/5790
XEROX®, XEROX and Design® are trademarks of Xerox Corporation in the United States and/or other countries. ©2011 Xerox
Corporation. All rights reserved.
Preparation
Load your documents face up in the document feeder input tray or 1.
face down on the document glass.
Press the 2. Clear All (AC) button to cancel any previous screen
programing selections.
Scan
Press the 3. Services Home button and select the Workfl ow Scanning
option. The Workfl ow Scanning features are displayed.
Select a template for the job from the templates displayed in the 4.
list.
Select the required features for your scanning job using the touch 5.
screen.
Press 6. Start to scan the originals and process the job.
The scanned images are fi led to the location specifi ed on the template
ready for retrieval by the user.
More information
For more information, please refer to:
user guides - available to print via the Machine Status button on the
control panel, or
http://www.support.xerox.com
3
How to Scan to Your Network
1
Xerox
®
WorkCentre™ 5735/5740/5745/
5755/5765/5775/5790
XEROX®, XEROX and Design® are trademarks of Xerox Corporation in the United States and/or other countries. ©2011 Xerox
Corporation. All rights reserved.
Services Home Help
Interrupt
Start
Language
Clear All
StopTouch Screen
Log In/Out
Job Status
Services
Machine Status
Numeric Keypad
Copy E-mail
Fax
Internet Fax
Server Fax
Reprint
Saved Job
Workfl ow
Scanning
More information
For more information, please refer to:
user guides - available to print via the Machine Status
button on the control panel, or
http://www.support.xerox.com
Machine Overview
Control Panel
Depending on the confi guration of your
device, it is capable of the following:
Features
Paper Tray 3 and 4
Control Panel
Tray 5 (Optional)
Paper Trays 1 and 2
Tray 6 (Inserter) (Optional)
Original Document Feeder and Document Glass
2
1
3
7
4
5
2
1
3
5
4
6
2
1
3
5
4
6
7
9
8
10
12
11
13
7
13
5
11
6
8
10
12
9
Bypass Tray
7
High Volume Finisher (Optional)
8
6
8
Machine Overview
2
1
3
4
Energy Saver
14
14
2
Xerox
®
WorkCentre™ 5735/5740/5745/
5755/5765/5775/5790
XEROX®, XEROX and Design® are trademarks of Xerox Corporation in the United States and/or other countries. ©2011 Xerox
Corporation. All rights reserved.
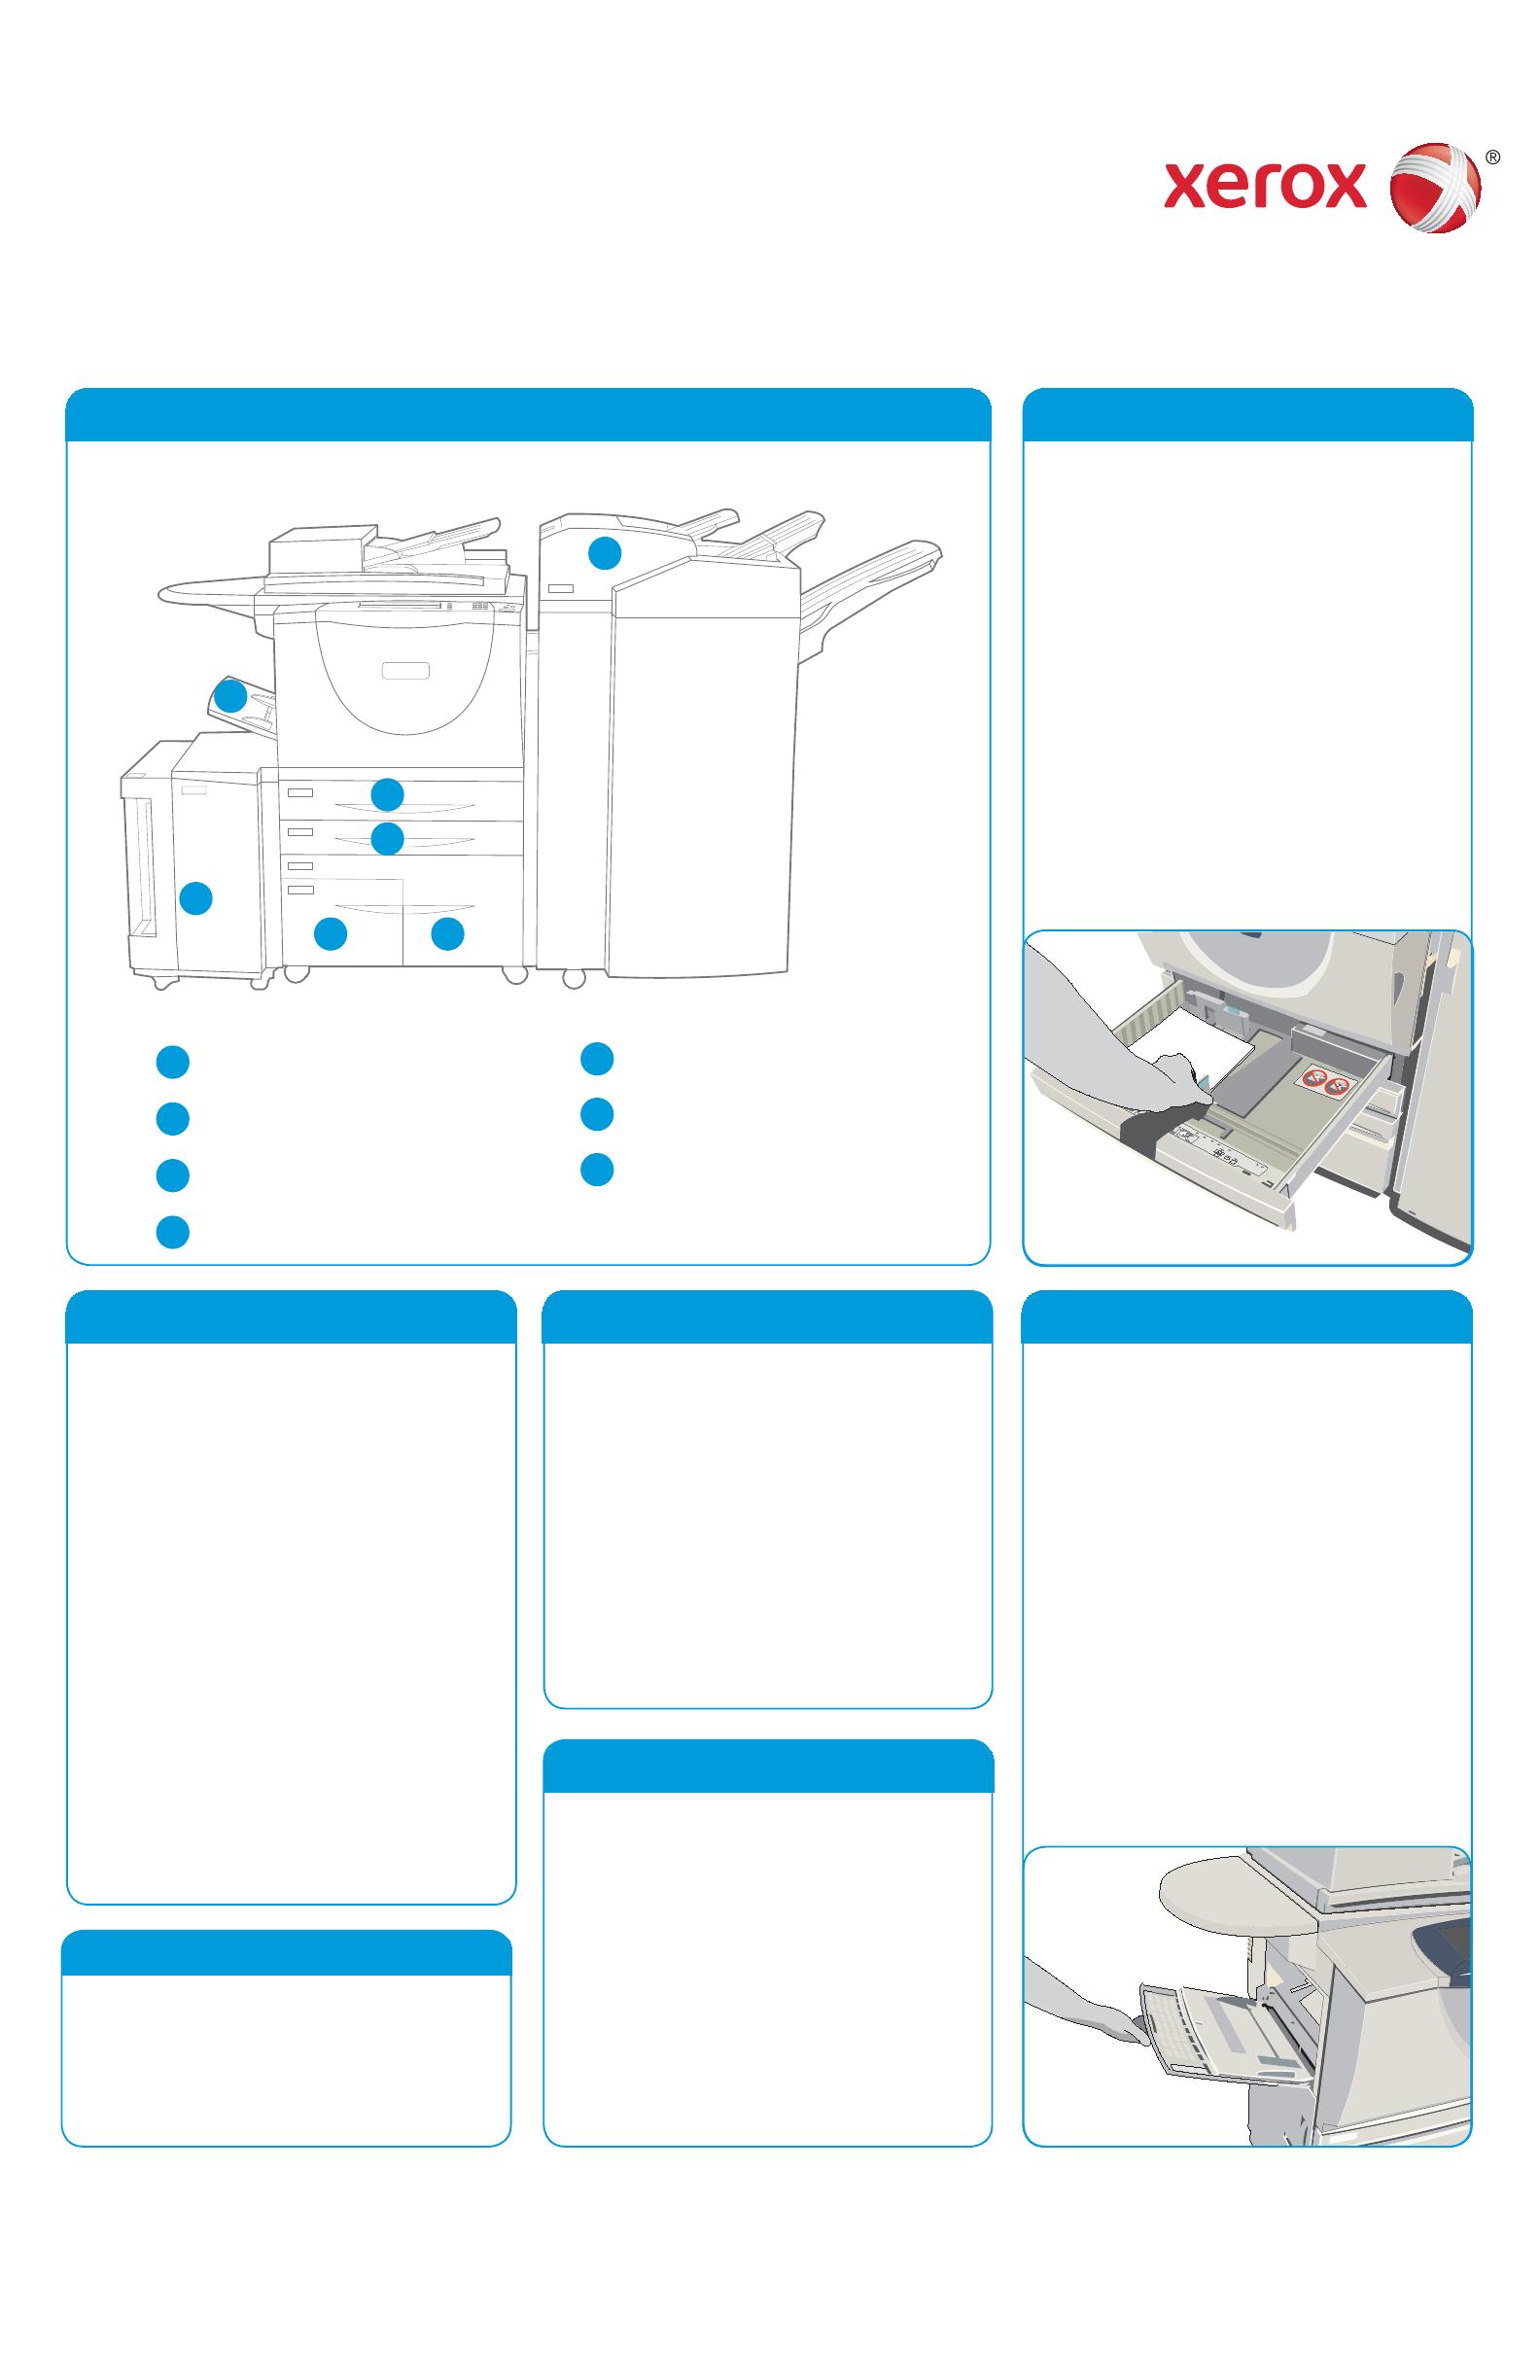
Inserter Tray 6 (optional)
Paper Tray 2
Paper Tray 4
Paper Tray 3
Paper Tray 5 (optional)
Paper Tray 1
Machine Overview Trays 1 and 2
Open the tray. Do not open Tray 1 if Tray 2 1.
is open.
Place the media in the tray. Media must 2.
be positioned against the left side of the
tray. Paper must not be loaded above the
maximum fi ll line.
Make sure that the paper guides just touch 3.
the paper.
Close the paper tray. The paper settings for 4.
the tray are displayed on the touch screen.
Confi rm or change the settings as required.5.
Trays 3 and 4
Opening the tray automatically lowers an 1.
elevator in the base of the tray.
The media required is displayed on the 2.
screen. Ensure the correct media is loaded.
Place the media in the tray. Media must 3.
be positioned against the left side of the
tray. Paper must not be loaded above the
maximum fi ll line.
Close the paper tray. When the tray is 4.
closed the elevator rises to feed the media.
Tray 5
Press the button to open the door.1.
Wait for the paper tray to lower.
The media required is displayed on the 2.
screen, ensure the correct media is loaded.
Place the media in the tray. Media must 3.
be positioned against the right side of the
tray.
Close the door. When the door is closed the 4.
tray rises to feed the media.
Tray 6 (Inserter)
Place the media in the correct orientation 1.
for the job. The labels on the top of Tray 6
(Inserter) provide instructions for input and
output orientations.
The paper is registered to the left edge of 2.
the tray. Paper must not be loaded above
the maximum fi ll line.
Make sure that the guides just touch the 3.
paper.
1
3
5
4
6
2
1
3
5
4
6
user guides - available to print via the
Machine Status button on the control
panel, or
http://www.support.xerox.com
More information
How to Load Paper
7
7
Bypass Tray
Make sure the tray is in the down position. 1.
For larger media, use the tray extension.
Place the media on the tray. Locate the 2.
media to the right edge. Paper must not be
loaded above the maximum fi ll line
Make sure that the guides just touch the 3.
paper. The paper settings for the tray are
displayed on the touch screen.
Confi rm or change the settings, as required.4.
Bypass Tray
2
  • Page 1 1
  • Page 2 2
  • Page 3 3
  • Page 4 4
  • Page 5 5
  • Page 6 6
  • Page 7 7
  • Page 8 8
  • Page 9 9

Xerox WORKCENTRE 5745 User guide

Type
User guide

Ask a question and I''ll find the answer in the document

Finding information in a document is now easier with AI