Page is loading ...

FENDER ROLLER
INSTRUCTIONS
Part #31158
U.S. Patent No. 5,488,849

BEFORE
ROLLING
AFTER
ROLLING
2 Eastwood Technical Assistance: 800.544.5118 >> techelp@eastwood.com To order parts and supplies: 800.345.1178 >> eastwood.com 3
SET UP
The tool is designed to allow two length confi gurations.
It is assembled at the factory in the “long”
confi guration (Fig. A) which provides a 17” to 23”
hub-center-to-roller distance for use on most stock
height cars. It can easily be adjusted to the “short”
confi guration (Fig. B) which will provide a hub-
center-to-roller distance of 14” to 20”, which will
accommodate most cars which have already been
lowered. Reconfi gure as follows:
1. Remove clip and pivot pin, then remove the
2 socket head cap screws on the adjuster
bar. (Fig. A)
2. Relocate the pivot pin and the 2 socket head
cap screws to the alternate holes on the side
plates. (Fig. B).
3. Replace clip and tighten screws. You are
now ready to use the Fender Roller on your
lowered car.
OPERATION
Please note that many variables may affect the
resistance to the paint cracking in the work area:
Type of fi nish, age, thickness, and the amount of
forming required in that area. Please be aware that
paint and metal damage can occur with use of this
tool, and the user assumes all responsibility for such
damage. The use of a Heat Gun, such as Eastwood’s
#43522, will greatly reduce the chance of paint
cracking by allowing it to soften and fl ex with the
metal. Using an IR thermometer, such as Eastwood
#11476 or 11477, is highly recommended to avoid
overheating and damaging the fi nish.
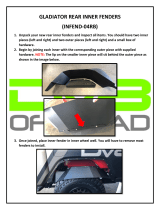
1. If paint damage does occur at the newly formed bend area, you can apply primer and touch-up
paint or a coating of RTV silicone to the non-visible areas to prevent further paint lifting.
2. Raise and support either the entire vehicle or the vehicle corner on which the fender-rolling
operation is to occur.
3. Remove wheel and place hub fl ange portion of the Eastwood Fender Roller over wheel lugs.
Place the beveled washers (included) onto the wheel lugs. Use wheel nuts to hold tool in place;
tighten snugly.
SAFETY PRECAUTIONS
Be sure to observe all applicable safety precautions prior to and during the use of this equipment.
Applicable safety precautions include, but are not limited to:
• Properly raising and supporting the vehicle
• Wearing of appropriate eye and hand protection
ADDITIONAL TOOLS REQUIRED
The following items should be present and in proper operating condition to conduct the
fender-rolling operation:
• Floor jack • Jack stands • Heat gun • Manual lug wrench for wheel lugs
The EASTWOOD FENDER ROLLER relies on a simple, basic yet extremely effective design to reshape
front wheel opening fl anges and lips to provide additional tire clearance when mounting oversized
wheels and for lowered vehicles.
WARNING
• This tool is designed to be used on single thickness automotive body metal. Never attempt to
use it on double thickness fl anges as found on the rear fenders of most vehicles or personal
injury and or serious tool damage could result.
• Work slowly and never tighten the Pressure Bar (with threaded stem) more than 1/4 turn
between rolling passes or tool overloading and serious damage will occur.
Clip and
Clip and
pivot pin
pivot pin
Fig. A
Fig. B
Socket
Socket
head screw
head screw
Clip and
Clip and
pivot pin
pivot pin
Socket
Socket
head screw
head screw
Outer fender
Fender lip
Mounts to
vehicle studs

© Copyright 2012 Easthill Group, Inc. Instruction part #31158Q Rev. 8/12
If you have any questions about the use of this product, please contact
The Eastwood Technical Assistance Service Department:
800.544.5118 >> email: techelp@eastwood.com
The Eastwood Company 263 Shoemaker Road, Pottstown, PA 19464, USA
US and Canada: 800.345.1178 outside US: 610.718.8335
Fax: 610.323.6268 eastwood.com
Handwheel
Handwheel
Pressure bar
Pressure bar
Release
Release
lever
lever
4. Loosen the handwheel located on the arm of the
tool and adjust the arm length until the Fender
Roller wheel is centered on the inner fender lip.
Tighten the handwheel (Fig. C).
5. Using the release lever, adjust the roller angle to
match the desired shape of the inner lip to
be formed (Fig. D).
6. Adjust the Pressure Bar (with threaded stem) to
apply gentle pressure to the formed fender
fl ange or lip.
NOTE: Do not overtighten and apply excessive
pressure or serious tool or fender damage
could occur.
7. Use a heat gun to gently warm the paint to about
120°F in the area to be rolled (to prevent cracking).
8. Grasp the tool fi rmly and repeatedly swing it in
an arc across the inner fender fl ange or lip to
gently bend it in and upward. It will be necessary
to adjust and tighten the Pressure Bar after every
few passes as the metal forms, however; never
tighten more than 1/4 turn at a time or serious tool
damage will occur.
9. Some wheel arch shapes have varying radii
with some being fl atter on top than the sides.
Depending on the design of the wheel arch, it
may be necessary to form the fl ange or lip in small
sections at a time, readjusting for the radius of
each section.
Fig. C
Fig. D
/