Illumina Direct TST0957C1 Installation guide
- Type
- Installation guide

ISSUED 09-2014
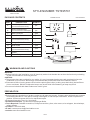
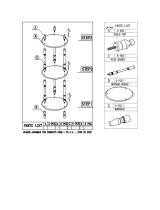
PACKAGE CONTENTS
1OF4
STYLE NUMBER: TST0957C1
A
B
C
D
E
F
G
H
I
J
WARNING:
CAUTION:
● Before beginning the installation, turn off electricity at the circuit breaker box or the main fuse box by switching
off the circuit breaker or removing the fuse.
● These instructions are provided for your safety. It is very important that they are read completely before the
installation of your fixture. We strongly recommend that a professional electrician install the fixture.
● Disconnect fixture from the power source before replacing the bulb(s), making sure that bulb(s) had sufficient
time to cool down. DO NOT subject the lamp to any shock while lit as shattering of lamp may result.
● Do not touch the bulb with bare hands use a cloth or glove.
WARNINGS AND CAUTIONS
● Before beginning installation of product, make sure all parts are present. Compare parts with package contents
list and diagram above. If any part is missing or damaged, do not attempt to assemble, install or operate the
product. Contact customer service for replacement part.
● Estimated Assembly Time: 20 - 30 minutes
●
● : Flathead screwdriver, Phillips screwdriver, pliers, wire cutters, wire strippers, electrical tape,
safety glasses.
● 1-866-535-1869
● www.illuminadirect.com
Bulb Recommended:
Tools Required
Phone #:
E-mail:
website:
.(3) 60W Clear G9 Halogen Bulbs
PREPARATION
www.illuminadirect.com
1-866-535-1869
UM-TST0957C1
PART
DESCRIPTION
QUANTITY
C
D
E
F
G
H
I
Shade
Fixture Body
Wire Connector
Outlet Box Screw
Socket Collar
(Pre-assembled to fixture body)
J
3pcs
3pcs
4pcs
3pcs
3pcs
3pcs
1pc
Mounting Screw
(Pre-assembled to fixture body)
2pcs
Bulb Shield
Halogen Bulb
()G9
A
B
Inner Backplate
(Pre-assembled to fixture body)
1pc
1pc
Green Ground Screw
(Pre-assembled to Inner Backplate)

2OF4
UM-TST0957C1
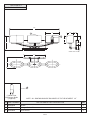
FINISH: Brushed Nickel
NOTE: ALL DIMENSIONS ARE ROUNDED UP TO THE NEAREST 1/2"
(3)60W Clear
G9 Halogen Bulbs
(Supplied)
2
PART NUMBER
G2829SH
I826SC
REPLACEMENT PART DESCRIPTION
Shade
Halogen Bulb G9
()
REQ.
3
3
NO.
1
2
3
G2830BS Bulb shields
3
3.5”
3.5”
4.5”
7”
25”
7”
5”
11”
1.5”
1
3
4.5”
Outlet Box Center

3OF4
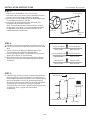
INSTALLATION INSTRUCTIONS
STYLE NUMBER: UM-TST0957C1
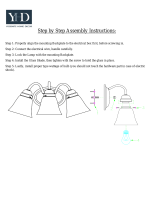
STEP 2:
a. Connect the House Ground Wire to the Fixture Ground
Wire.
b. Connect the House White (or Ribbed) Wire to the
Fixture Supply Wire (White or Ribbed Side).
c. Connect the House Black (or Red) Wire to the Fixture
Supply Wire (Black or Smooth Side).
d. Wrap each connection with approved electrical tape
and carefully stuff all of the connected wires into the
Outlet Box.
WHITE OR RIBBED
BLACK (OR RED) WIRE
GROUND WIRE
WHITE OR RIBBED
BLACK OR SMOOTH
GROUND WIRE
FROM HOUSE
FROM HOUSE
FROM HOUSE
FROM FIXTURE
FROM FIXTURE
FROM FIXTURE
Use Wire Connectors (supplied) to connect the wires.
Mounting Screw
Outlet Box
Outlet Box
Screw
Fixture Body
Inner Backplate
Backplate
Inner Backplate
STEP 3:
a. Carefully tuck all wires into the outlet box and position
the Fixture Body over the outlet box. Line up holes on
the Backplate and mounting holes on the folded edge of
the Inner Backplate. Secure by threading Mounting
Screws into the mounting holes on the Inner Backplate.
Thread screws into top first. Do not fully tighten.
Thread screws into bottom, tighten bottom screws with
screwdriver. Then , tighten top screws with
screwdriver.
STEP 1:
Note: Prior to installation, close or cover the
sink drain and/or any vents near the installation site to
prevent loss of mounting hardware if dropped.
. Secure the to the outlet box (not
included) with Outlet Box Screws.
Note: Fixture Body can be installed with the sockets
facing either up or down. The should
be adjusted accordingly to match the holes on the
backplate of the Fixture Body.
a. Remove the Inner Backplate from the Backplate on the
Fixture Body as shown in STEP 3.
b Inner Backplate
Inner Backplate

4OF4
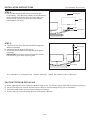
INSTALLATION INSTRUCTIONS
STEP 4:
a. Remove the Socket Collar from the socket on the
Fixture Body . Then place the Shade over the Socket on
the Fixture Body as shown. Secure by threading the
Socket Collar onto the socket on the Fixture Body.
Hand-tighten until snug.
Fixture Body
Shade
Socket Collar
Fixture Body
Bulb Shield
Bulb
STYLE NUMBER: UM-TST0957C1
Socket
Socket
Your installation is completed now Restore electricity Retain this sheet for future reference.. .
STEP 5:
a
b
. This fixture uses clear G9 Halogen Bulbs (supplied).
Maximum 60 watts.
. Insert bulb and sit properly into place.
c. Screw Bulb Shield onto the Socket and hand tighten
until snug.
Do not touch the bulb with bare hands
use a cloth or glove when replacing bulb.
IMPORTANT:
CAUTION FOR BULB REPLACING
A. When replacing bulb, turn off power and allow lamp to cool. For safety purpose, wear gloves and eye protection.
B. If bulb is scratched or cracked, DO NOT use the lamp to avoid breakage during use or installation.
C. Use bulbs rated for the fixtures correct wattage and voltage.
D. Prevent the bulb from contacting liquid or combustible materials.
-
 1
1
-
 2
2
-
 3
3
-
 4
4


Illumina Direct TST0957C1 Installation guide
- Type
- Installation guide
Ask a question and I''ll find the answer in the document
Finding information in a document is now easier with AI
Related papers


Other documents
-
Feiss WB1460ORB Installation guide
-
 Yosemite Home Decor JH053-3SN Operating instructions
-
 Homecraft Furniture RVJW107AWH Operating instructions
-
CWI Lighting 1030W8-1-217 Installation guide
-
Global Direct 22512 Installation guide
-
Quoizel QFL5586SGD Installation guide
-
Quoizel GIB8613C Installation guide
-
Triarch 25614 User manual
-
-
Quoizel PCCAL8523C Installation guide

