Vega Water/Air cooling SOLITRAC 31 Supplementary instructions

Type
Supplementary instructions

This manual is also suitable for

Supplementary instructions
Water cooling -
SOLITRAC 31, POINTRAC 31
Active water cooling system for radiation-
based sensors
Document ID: 48523
2
Contents
Water cooling - SOLITRAC 31, POINTRAC 31 • Active water cooling system for radiation-based sensors
48523-EN-180130
Contents
1 Product description ................................................................................................................. 3
1.1 Conguration
.................................................................................................................... 3
2 Mounting ................................................................................................................................... 5
3 Replacement parts ................................................................................................................. 20
3.1 Available spare parts - water cooling .............................................................................. 20
4 Supplement ............................................................................................................................ 21
4.1 Technical data ................................................................................................................ 21
4.2 Dimensions .................................................................................................................... 23
Editing status: 2018-01-29
3
1 Product description
Water cooling - SOLITRAC 31, POINTRAC 31 • Active water cooling system for radiation-based sensors
48523-EN-180130
1 Product description
1.1 Conguration
The active water cooling system is suitable for radiation-based sen-
sors of series SOLITRAC 31 and POINTRAC 31.
The water cooling system consists of several modules.
The housing cooling lid can be screwed onto the instrument housing
instead of the normal housing lid.
The cooling module for the scintillator cools the active measuring part
of the sensor.
B
A
Fig. 1: Active water cooling system with fastening bracket
A Housing cooling lid
B Scintillator cooling
The following parts belong to the scope of delivery of the water cool-
ing system:
Scintillator cooling (1 piece)
Mounting clamp (quantity depending on sensor length)
Fastening bracket
Housing cooling lid
Sealing ring 78 x 3 (2 pcs.)
Isolating sleeve (6 pieces)
Fixing screw M8 x 50 (2 pieces)
Fixing screw M8 x 40 (4 pieces)
Housing cooling lid (A)
Scintillator cooling (B)
Scope of delivery
4
1 Product description
Water cooling - SOLITRAC 31, POINTRAC 31 • Active water cooling system for radiation-based sensors
48523-EN-180130
Washer for M8 (12 pieces)
Hexagon nut M8 (6 pieces)
Coolant hose ¼", length: 550 mm (21.65 in)
NPT threaded adapter for cooling hoses ¼" (optional)
Information:
When the sensor is ordered with cooling, the sensor and the water
cooling system are shipped already premounted.
If the cooling is ordered later, you have to mount the water cooling
system on the sensor.
Youcanndfurtherinformationinchapter"Mounting".
5
2 Mounting
Water cooling - SOLITRAC 31, POINTRAC 31 • Active water cooling system for radiation-based sensors
48523-EN-180130
2 Mounting
Mounting preparations
Take note of the operating instructions manuals of the corresponding
radiation-based sensors and the source holder.
Warning:
During all mounting and dismounting work, the source container must
be in switch position "OFF" and secured by a lock.
Carry out all work within the shortest possible time and at the largest
possible distance. Provide suitable shielding.
Avoid risk to other persons by taking suitable measures (e.g. safety
fence, etc.).
Mountingmayonlybecarriedoutbyauthorized,qualiedpersonnel
who are monitored for radiation exposure according to local laws or
thehandlingpermit.Takenoteofthespecicationsinthehandling
permit. Also take the local conditions into account.
Caution:
The cooling system is used in areas with high temperatures. There-
fore, use temperature-resistant cable and install it in such a way that
contact with hot components is avoided.
Information:
When the sensor is ordered with cooling, the sensor and the water
cooling system are shipped already premounted.
If the cooling is ordered later, you have to mount the water cooling
system on the sensor.
Required tools:
Fork wrench SW13 mm (2 pieces) - for the housing cooling
Fork wrench SW19 mm (2 pieces) - for the mounting clips and the
hosettingsofthecoolingcircuit
Acid-free grease - for greasing the sealing rings
Take note of the following general mounting instructions:
First of all, mount the fastening bracket and the scintillator cooling,
and then the sensor
The small lid of the instrument housing must point to the front after
mounting the fastening bracket (x)
The sensor together with the water cooling system is very heavy.
Use a suitable lifting device for mounting, e.g. a sling
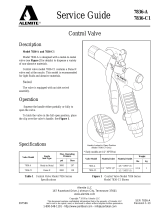
1. Slightly grease the two sealing rings (14) with acid-free grease.
2. Insert the two sealing rings (14) from the inside into the grooves
of the scintillator cooling (B).
The following illustration shows the inside grooves.
Operating instructions
General mounting
instructions
Insert the sealing rings
6
2 Mounting
Water cooling - SOLITRAC 31, POINTRAC 31 • Active water cooling system for radiation-based sensors
48523-EN-180130
B
14
Fig. 2: Insert the sealing rings inside into the scintillator cooling
14 Sealing ring (2 pieces)
B Scintillator cooling
1. Place the isolating sleeves (4) between the scintillator cooling (5)
and the fastening bracket (1).
1
2
3
4
5
6
Fig. 3: Scintillator cooling
1 Fastening bracket
2 Hexagon screws M8 x 40 (4 pieces)
3 Washer for M8 (8 pieces)
4 Isolating sleeve (4 pieces)
5 Scintillator cooling
6 Hexagon nut M8 (4 pieces)
2. Place the fastening bracket (1) onto the scintillator cooling (5).
Make sure that the coolant connections point in a suitable direc-
tion.Rotatingtheholdingbracketlater(1)isverydicult.
3. Connect the fastening bracket (1) with the scintillator cooling (5)
according to the illustration and tighten the screws (2, 3, 6) with a
torque of 15 Nm (11.06 lbf ft).
Take note of the following general mounting instructions:
Mount the fastening
bracket
Scintillator cooling
7
2 Mounting
Water cooling - SOLITRAC 31, POINTRAC 31 • Active water cooling system for radiation-based sensors
48523-EN-180130
The sensor together with the water cooling system is very heavy.
Use a suitable lifting device for mounting
1. The sensor marking is no longer visible when the scintillator cool-
ingismounted.Youcanndthepositionofthesensormarking
according to the following illustration.
Add the sensor marking with a waterproof marker or a permanent,
coloured adhesive tape to the outside of the scintillator cooling.
a
b
ø 114 mm
(4.49")
50 mm
(1.97")
38 mm
(1.50")
223 mm
(8.78")
127 mm
(5.00")
51 mm
(2.01")
14 mm
(0.55")
152,5 mm
(6.00")
20 mm
(0.79")
G 1/4
38 mm
(1.50")
67,5 mm
(3.23")
Fig. 4: Position of the sensor marking and drilling template of the fastening
bracket - SOLITRAC 31, POINTRAC 31
a Position of the lower measuring range end
b Sensor marking on the upper edge of the lateral connection nozzle
Mounting the scintillator
cooling
8
2 Mounting
Water cooling - SOLITRAC 31, POINTRAC 31 • Active water cooling system for radiation-based sensors
48523-EN-180130
a
b
ø 141,3 mm
(5.56")
29 mm
(1.14")
38 mm
(1.50")
223 mm
(8.78")
127 mm
(5.00")
51 mm
(2.01")
14 mm
(0.55")
152,5 mm
(6.00")
111,5 mm
(4.39")
20 mm
(0.79")
G 1/4
38 mm
(1.50")
82 mm
(3.23")
82 mm
(3.23")
Fig. 5: Position of the sensor marking and drilling template of the fastening
bracket - POINTRAC 31 - short version (46 mm)
a Position of the lower measuring range end
b Sensor marking on the upper edge of the lateral connection nozzle
2. Insert the sensor into the scintillator cooling.
The small lid of the instrument housing must point to the front
after mounting on the fastening bracket (x).
It is advisable to place the sensor and the scintillator cooling on
theoorwhileinserting.Thisappliesmainlytolongersensorver-
sions. Protect the sensor by covering the sensor housing during
mounting.
In case of long instrument versions, it can be possible that the
sensor does not immediately slide completely into the scintillator
cooling due to its own weight. Turn the sensor and the scintillator
cooling by 90° and try to slide in the sensor during the rotating
movement.
Mount the sensor with the two screws in the respective position.
9
2 Mounting
Water cooling - SOLITRAC 31, POINTRAC 31 • Active water cooling system for radiation-based sensors
48523-EN-180130
5
1
x
Fig. 6: Mounting direction of the sensor towards the fastening bracket
1 Fastening bracket
5 Scintillator cooling
x Mounting direction of the housing
Mount the sensor according to the following assembly drawing:
1
7
9
4
9
43
Fig. 7: Mounting the sensor - SOLITRAC, POINTRAC
1 Fastening bracket
4 Isolating sleeve (2 pieces)
7 Hexagon screw M8 x 25 (2 pieces)
9 Washer for M8 (4 pieces)
43 Nut M8, self-locking (2 pcs.)
10
2 Mounting
Water cooling - SOLITRAC 31, POINTRAC 31 • Active water cooling system for radiation-based sensors
48523-EN-180130
1
7
8
9
4
Fig. 8: Mounting the sensor - POINTRAC - short version
1 Fastening bracket
4 Isolating sleeve (2 pieces)
7 Hexagon screw M8 (2 pieces)
8 Retaining washer for M8 (2 pieces)
9 Washer for M8 (2 pieces)
Mount the scintillator cooling with the fastening bracket in the required
position.
Information:
The sensor together with the water cooling system is very heavy. Use
a suitable lifting device for mounting.
Useaslingwithsucientliftingcapacity.Takenoteoftheslingmark-
ing.Youcanndtherespectiveweightofthewatercoolingsystemin
chapter "Technical data".
Place the lifting sling around the cooling tube directly below the
ange.Theloopisaso-calledlark'sfoot.
Fasten the hoisting sling according to the following illustration.
Fig. 9: Attaching the sling
Lifting of the water
cooling system
11
2 Mounting
Water cooling - SOLITRAC 31, POINTRAC 31 • Active water cooling system for radiation-based sensors
48523-EN-180130
You can mount the sensor on your vessel with the enclosed mounting
clamps. Two mounting clamps come with the water cooling system
from 1 m (39 in) sensor length.
Adapt the distances of the attached mounting clamps.
28
29
30
31
32
33
34
35
Fig. 10: Mounting clamps
28 Hexagon screw M12 x 190
29 Washer for M12
30 Cover plate - metal
31 Upper clamping jaw
32 Fastening screws (provided by the customer)
33 Metal inserts
34 Lower clamping jaw
35 Bottom plate - metal (with slot holes)
1. Determine the exact mounting position of one or several mounting
clamps and mark the holes.
Youcanndthedrillingtemplateinthetechnicaldata.
Align the mounting positions exactly and average the distances
between the enclosed mounting clamps.
Drill appropriate holes (max. M12) for fastening the mounting
clamps.
Note:
The mounting clamps do not come with fastening screws. Use fasten-
ing elements that are appropriate for the situation in your plant.
2. Insert the two metal inserts (33) into the gaps of the lower clamp-
ing jaw (34).
3. Place the lower clamping jaw (34) onto the bottom plate (35) and
placethepartsinthespeciedmountingposition.
Mounting the sensor
12
2 Mounting
Water cooling - SOLITRAC 31, POINTRAC 31 • Active water cooling system for radiation-based sensors
48523-EN-180130
4. Insertthexingscrews(providedbythecustomer)throughthe
metal inserts (33), the lower clamping jaw (34) and the bottom
plate (35) and fasten the lower part of the mounting clamp.
5. Fasten a probable second mounting clamp exactly aligned in the
same way.
6. Insert the sensor with the cooling system into the premounted
mounting clamps and align the cooling system.
7. Place the cover plate (30) onto the upper clamping jaw (31) and
place the two parts onto the lower clamping jaw (34).
8. Insert the two hexagon screws (28) with the washers (29) into the
holes of the upper clamping jaw (31).
9. Tighten the two hexagon screws (28) with a torque of 45 Nm
(33.18 lbf ft).
Youcanndfurtherinformationonsensormountingintheoperating
instructions manual of the sensor.
The housing cooling lid is screwed onto the existing sensor housing
like a housing lid.
1. Unscrew the housing lid (18) from the sensor.
2. Connect the sensor to power supply. Keep the instructions of the
operating instructions manual of the appropriate sensor in mind.
There is a connection diagram in the housing lid (18). This
diagram is not in the housing cooling lid (19). So please note the
details of the electrical connection in the operating instructions
manual of the sensor.
Note:
The cooling system is used in areas with high temperatures. There-
fore, use temperature-resistant cable and install it in such a way that
contact with hot components is avoided.
1. Clean the thread of the housing cooling lid (19) and the thread on
the housing.
2. Screw the housing cooling lid (19) onto the sensor instead of the
housing lid (18) and turn the housing cooling lid (19) up to the
stop.
Electrical connection
Mounting of the housing
cooling lid
13
2 Mounting
Water cooling - SOLITRAC 31, POINTRAC 31 • Active water cooling system for radiation-based sensors
48523-EN-180130
18
19
21
20
Fig. 11: Mounting of the housing cooling lid
18 Housing lid
19 Housing cooling lid
20 Connection opening for the coolant hose
21 Sensor
The scintillator cooling and the housing cooling lid must be connected
to the cooling circuit.
All threads for the cooling connection on the sensor are inner threads.
The required coolant hose is part of the scope of delivery.
Use clean tap water or distilled water for cooling. Oil or salt water are
not suitable for the cooling system.
Make sure that the coolant cables do not freeze, e.g. in case of a
shutdown.
Youcanndinformationonthethroughputandthetemperatureofthe
cooling water in the technical data section.
Coolant pump
The water cooling may only be operated in an unpressurized state.
Use an open cooling circuit that circulates the coolant through the
system by means of a pump.
Plan the coolant pump and a possible re-cooling system according to
the required inlet temperature, pumping height and water throughput.
If you want to integrate a gate valve into the system, then install it only
in the feed line to avoid pressurization in the cooling system.
Caution:
Make sure that the cooling water supply is reliable und interruption-
free. Plan the necessary steps for a possible pump failure, missing
coolant, etc.
Werecommendinstallingatemperaturesensor(inthereturnow)
that triggers an alarm when a critical temperature is reached.
If you want to use the water cooling in an application that is SIL quali-
ed,youhavetoassesstheSILfailureratesofthecompletewater
cooling system and the cooling water supply yourself.
Connect cooling
14
2 Mounting
Water cooling - SOLITRAC 31, POINTRAC 31 • Active water cooling system for radiation-based sensors
48523-EN-180130
1. Install the coolant hose in such a way that it does not get kinked
or come into contact with hot components.
Information:
Notetheowdirectionofthecoolant.Thedirectionofowshouldbe
from bottom to top so that no voids can arise.
15
2 Mounting
Water cooling - SOLITRAC 31, POINTRAC 31 • Active water cooling system for radiation-based sensors
48523-EN-180130
SOLITRAC 31, POINTRAC 31
cd
b
a
a
b
c
d
ab
c
d
AB
C
Fig. 12: Mounting position of the cooling system - note ow direction of the
coolant (a, b, c …)
A Vertical mounting - housing head on top
B Vertical mounting - housing head on bottom
C Horizontal mounting
16
2 Mounting
Water cooling - SOLITRAC 31, POINTRAC 31 • Active water cooling system for radiation-based sensors
48523-EN-180130
POINTRAC 31 - short version (46 mm)
dc
a
b
d
c
a
b
C
BA
a
b
d
c
Fig. 13: Mounting position of the cooling system - note ow direction of the
coolant (a, b, c …)
A Vertical mounting - housing head on top
B Vertical mounting - housing head on bottom
C Horizontal mounting
2. Connect the lines for the cooling water.
All threads for the cooling connection on the sensor are inner
threads.
17
2 Mounting
Water cooling - SOLITRAC 31, POINTRAC 31 • Active water cooling system for radiation-based sensors
48523-EN-180130
SOLITRAC 31, POINTRAC 31
b
d
c
a
Fig. 14: Flow direction of the coolant
a Coolant inlet - scintillator cooling
b Coolant outlet - scintillator cooling
c Coolant inlet - housing cooling lid
d Coolant outlet - housing cooling lid
23 Coolant hose
18
2 Mounting
Water cooling - SOLITRAC 31, POINTRAC 31 • Active water cooling system for radiation-based sensors
48523-EN-180130
POINTRAC 31 - short version (46 mm)
b
a
c
d
23
Fig. 15: Flow direction of the coolant
a Coolant inlet - housing cooling
b Coolant outlet - housing cooling
c Coolant inlet - housing cooling lid
d Coolant outlet - housing cooling lid
23 Coolant hose
Note:
The enclosed coolant hose (23) is pre-fabricated in its length. One
endofthehosehasaxedconnectionthread,theotherhasarotat-
able connection.
This ensures that the coolant hose remains straight.
All connection threads have seals already in place. Make sure that the
seals are there when mounting.
24
26
23
25
Fig. 16: Pre-assembled coolant hose
23 Coolant hose
24 Rotatable connection thread
25 Fixed connection thread
26 Double nipple ¼" (DIN ISO 228)
3. Firstscrewinthexedconnectionthread(25)ofthecoolanthose
(23)andtightenthettingwithatorqueof25Nm(18.43lbfft).
4. Unscrew the double nipple (26) from the rotatable connection
thread (24) of the coolant hose and mount it in the connection
hole of the sensor cooling.
19
2 Mounting
Water cooling - SOLITRAC 31, POINTRAC 31 • Active water cooling system for radiation-based sensors
48523-EN-180130
Tighten the double nipple (26) with a torque of 25 Nm
(18.43 lbf ft).
5. Screw the rotatable thread (24) into the double nipple (26). Apply
counterforce on the rear nut with a fork wrench (SW 19) and
tighten the connection thread with a second fork wrench with a
torque of 25 Nm (18.43 lbf ft).
6. Fill the water cooling system.
Checkthetightnessofthesystemandthehosettings.
The cooling system may only be operated in an unpressurized
state.
Caution:
Do not loosen any screws or hose connections during operation and
make sure that the coolant supply is reliable and interruption-free.
Take note of the operating instructions manuals of the corresponding
radiation-based sensors and the source holder.
When handling radioactive substances, unnecessary radiation expo-
sure must be avoided.
If there are gaps or intervening spaces after mounting, provide pro-
tective fences or grids to keep hands away from the dangerous area.
Such areas must be marked accordingly.
Install a safety barrier on both sides of the cooling system. A sheet
metal cover or an appropriately shaped plastic sheet can also be
used.
Install a protective grid
20
3 Replacement parts
Water cooling - SOLITRAC 31, POINTRAC 31 • Active water cooling system for radiation-based sensors
48523-EN-180130
3 Replacement parts
3.1 Available spare parts - water cooling
Selected components of the cooling are available as replacement
parts. The following parts are available:
The stated quantity is the quantity delivered.
2
2
1
Fig. 17: Scintillator cooling - hoses and adapters
1 Coolant hose - housing cooling/housing cooling lid
2 Threaded adapter - water cooling ¼ NPT (1 pce.)
2
1
2
Fig. 18: Scintillator cooling - hoses and adapters
1 Coolant hose - housing cooling/housing cooling lid
2 Threaded adapter - water cooling ¼ NPT (1 pce.)
Water cooling -
SOLITRAC 31, POINTRAC
31
Water cooling -
POINTRAC 31 - short
version (46 mm)
  • Page 1 1
  • Page 2 2
  • Page 3 3
  • Page 4 4
  • Page 5 5
  • Page 6 6
  • Page 7 7
  • Page 8 8
  • Page 9 9
  • Page 10 10
  • Page 11 11
  • Page 12 12
  • Page 13 13
  • Page 14 14
  • Page 15 15
  • Page 16 16
  • Page 17 17
  • Page 18 18
  • Page 19 19
  • Page 20 20
  • Page 21 21
  • Page 22 22
  • Page 23 23
  • Page 24 24
  • Page 25 25
  • Page 26 26
  • Page 27 27
  • Page 28 28

Vega Water/Air cooling SOLITRAC 31 Supplementary instructions

Type
Supplementary instructions
This manual is also suitable for

Ask a question and I''ll find the answer in the document

Finding information in a document is now easier with AI