Bosch Appliances 4000 User manual
- Category
- Security access control systems
- Type
- User manual
Bosch Appliances 4000: Your versatile kitchen companion for culinary adventures. With its advanced features and intuitive operation, cooking becomes a breeze. From precise temperature control to energy-efficient performance, this appliance will transform your kitchen into a culinary haven.
Bosch Appliances 4000: Your versatile kitchen companion for culinary adventures. With its advanced features and intuitive operation, cooking becomes a breeze. From precise temperature control to energy-efficient performance, this appliance will transform your kitchen into a culinary haven.


-
 1
1
-
 2
2
-
 3
3
-
 4
4
-
 5
5
-
 6
6
-
 7
7
-
 8
8
-
 9
9
-
 10
10
-
 11
11
-
 12
12
-
 13
13
-
 14
14
-
 15
15
-
 16
16
-
 17
17
-
 18
18
-
 19
19
-
 20
20


Bosch Appliances 4000 User manual
- Category
- Security access control systems
- Type
- User manual
Bosch Appliances 4000: Your versatile kitchen companion for culinary adventures. With its advanced features and intuitive operation, cooking becomes a breeze. From precise temperature control to energy-efficient performance, this appliance will transform your kitchen into a culinary haven.
Ask a question and I''ll find the answer in the document
Finding information in a document is now easier with AI
in other languages
- français: Bosch Appliances 4000 Manuel utilisateur
Other documents
-
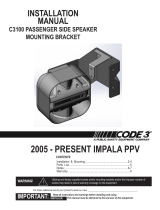
 Code 3 C3100 Install Instructions
-
 Code 3 C3100 Installation guide
-
Vixen Horns VXS-9060C Owner's manual
-
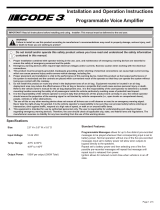 Code 3 PRMAMP Installation guide
-
 Code 3 universal Install Instructions
-
 Code 3 3955 Installation And Operation Instructions Manual
-
teko Astra-10 User manual
-
 Code 3 C3100 Installation guide
-
Interlogix JDS108 Installation guide
-
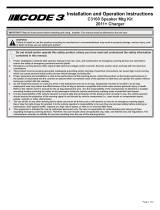 Code 3 Charger Installation And Operation Instructions Manual


