Vielen Dank für den Kauf der TeraStation
von Buffalo.
Installation
Merci d’avoir acheté une TeraStation
Buffalo.
Installation
Grazie per aver acquistato TeraStation
Buffalo.
Installazione
Aprire Impostazioni (per
più opzioni)
Gracias por adquirir TeraStation de
Buffalo.
Instalación
Apertura de Configuración
(para obtener más opciones)
1) Después de instalar NAS
Navigator2, aparecerá el icono
de NAS Navigator en el
escritorio de su equipo. Si
dispone de un equipo Mac,
aparecerá en el Dock.
2) Haga doble clic en el icono para
abrir NAS Navigator2, la utilidad
de cliente de TeraStation. Haga
clic con el botón derecho del
ratón en el icono de la
TeraStation en NAS Navigator2 y
seleccione [Configuración].
Configuración se abrirá.
3) Introduzca el nombre de usuario
y la contraseña de
administrador y haga clic en
[OK] para iniciar sesión en
Configuración. Hasta que no se
cambie, el nombre de usuario
predeterminado será "admin" y
la contraseña, "password".
1) Dopo l'installazione del NAS
Navigator2, sul desktop del PC
apparirà l'icona del NAS
Navigator. Su un Mac, l'icona
sarà visibile nel Dock.
2) Fare doppio clic sull'icona per
aprire NAS Navigator2, l'utility
client di TeraStation. Fare clic
con il tasto destro sull'icona
della TeraStation sul NAS
Navigator2 e selezionare [Apri
impostazioni Web]. Si
apriranno le impostazioni.
3) Inserire il nome utente e la
password di amministratore,
quindi cliccare su [OK] per
accedere alle impostazioni. Si
consiglia di cambiare la
password amministratore.
Finché non cambiano, il nome
utente e la password
predefiniti sono,
rispettivamente "admin" e
"password".
1) Nach der Installation von NAS
Navigator2 finden Sie ein NAS
Navigator-Symbol auf dem
Desktop. Auf einem Mac wird
dieses im Dock angezeigt.
2) Doppelklicken Sie auf dieses
Symbol, um NAS Navigator2,
das Client-Dienstprogramm der
TeraStation, zu öffnen. Klicken
Sie mit der rechten Maustaste
auf das TeraStation-Symbol in
NAS Navigator2, und klicken Sie
anschließend auf [Öffnen Sie
die Webeinstellungen]. Die
Einstellungen werden geöffnet.
3) Geben Sie den Benutzernamen
und das Kennwort des
Administratorkontos ein, und
klicken Sie auf [OK], um sich bei
den Einstellungen anzumelden.
Wir empfehlen, das
Administratorkennwort zu
ändern. Bis es geändert wird,
lautet der standardmäßige
Benutzername "admin" und das
Kennwort "password".
Öffnen der Einstellungen
(für weitere Einstellungen)
1) Une fois le NAS Navigator
installé, une icône NAS
Navigator apparaîtra sur le
bureau de votre PC. Sous Mac,
elle apparaîtra sur le Dock.
2) Double-cliquez sur l'icône pour
ouvrir le NAS Navigator2,
l'utilitaire client de la
TeraStation. Effectuez un
clic-droit sur l'icône de la
TeraStation dans le NAS
Navigator2 et sélectionnez
[Ouvrir les paramètres Web].
Les Réglages s'ouvrent.
3) Pour vous connecter aux
Settings, saisissez le nom
d'utilisateur et le mot de passe
administrateur, puis cliquez sur
[OK]. Il est recommandé de
modifier le mot de passe
administrateur. Par défaut, le
nom d'utilisateur est “admin”
et le mot de passe "password".
Ouvrir Réglages (pour plus
d'options)
1) Schließen Sie das
Ethernet-Kabel und das
Netzkabel an die TeraStation
an und schalten Sie sie ein.
2) Führen Sie die Datei
TeraNavigator auf der
Software-CD in Ihrem
TeraStation-Paket aus. Oder
laden Sie die
TeraNavigator-Software unter
www.buffalo-technology.com
herunter und führen sie aus.
3) Klicken Sie auf [NAS Navigator2
Installieren]. Der Assistent führt
Sie durch die Installation von
NAS Navigator2.
4) Konfigurieren Sie die IP-Adresse
der TeraStation mit NAS
Navigator2. Stellen Sie in den
Einstellungen (wie nachfolgend
beschrieben) die Systemuhr der
TeraStation ein.
Weitere Informationen
entnehmen Sie dem
TeraStation-Benutzerhandbuch,
das Sie über den Link in
TeraNavigator oder unter
www.buffalo-technology.com
herunterladen können. Ihr
Computer muss mit dem Internet
verbunden sein, damit Sie auf das
Benutzerhandbuch zugreifen oder
es herunterladen können.
1) Connectez le câble Ethernet et
les câbles d'alimentation de la
TeraStation puis allumez-la.
2) Lancez TeraNavigator à partir
du CD du logiciel fourni dans le
package de la TeraStation ou
téléchargez et installez le
logiciel TeraNavigator à partir
du site :
www.buffalo-technology.com.
3) Cliquez sur [NAS Navigator2
Installer]. L'assistant vous guide à
travers l'installation de NAS
Navigator2.
4) Configurez l'adresse IP de la
TeraStation avec le NAS
Navigator2. Puis accédez aux
Réglages (comme indiqué
ci-après) et configurer l'heure de
la TeraStation.
Pour plus d'informations,
reportez-vous au manuel
d'utilisation de la TeraStation
disponible depuis le lien du logiciel
TeraNavigator ou sur le site
www.buffalo-technology.com.
Votre ordinateur doit être connecté
à Internet pour accéder au manuel
d'utilisation ou pour le télécharger.
1) Collegare il cavo Ethernet e di
alimentazione della
TeraStation e accenderla.
2) Avviare TeraNavigator dal CD
software nel pacchetto
TeraStation. Oppure, scaricare
ed eseguire il software
TeraNavigator da
www.buffalo-technology.com.
3) Fare clic su [NAS Navigator2
Installa]. La procedura guidata
assisterà l'utente
nell'installazione di NAS
Navigator2.
4) Configurare l'indirizzo IP di
TeraStation con NAS
Navigator2. Inoltre, andare su
Impostazioni (come descritto
di seguito) e impostare
l'orologio di TeraStation.
Per maggiori informazioni, far
riferimento al manuale utente di
TeraStation, disponibile dal link in
TeraNavigator o su
www.buffalo-technology.com.
Per accedere o scaricare il
manuale utente è necessario che
il computer sia connesso a
Internet.
1) Conecte los cables de Ethernet
y de alimentación de la
TeraStation y enciéndala.
2) Ejecute TeraNavigator desde el
CD del software de su paquete
de la TeraStation o descargue y
ejecute el software
TeraNavigator en
www.buffalo-technology.com.
3) Haga clic en [NAS Navigator2
Instalar]. El asistente le guiará
durante la instalación de NAS
Navigator2.
4) Configure la dirección IP de la
TeraStation con NAS
Navigator2. Asimismo, vaya a
Configuración (tal y como se
describe a continuación) y
configure el reloj de la
TeraStation.
Para obtener más información,
consulte el manual de usuario de
la TeraStation, que encontrará al
hacer clic en el enlace de
TeraNavigator o en
www.buffalo-technology.com. Su
ordenador debe estar conectado a
Internet para acceder al manual de
usuario o para descargarlo.
Français
Español
Italiano
Deutsch
AC Adapter
Asian Power Devices Inc. DA-48P12
Installation
Thank you for purchasing Buffalo’s TeraStation.
TS1200D Quick Setup Guide
Opening Settings (for more options)
1) After installing NAS Navigator2, your PC will have a NAS Navigator icon on the desktop. On a Mac, it will
appear in the Dock.
2) Double-click the icon to open NAS Navigator2, the TeraStation’s client utility. Right-click on the
TeraStation’s icon in NAS Navigator2 and select Settings. Settings will open.
3) Enter the administrator username and password, then click OK to log in to Settings. We recommend
that you change the administrator password. Until it is changed, the default username is “admin” and
the password is “password”.
For more information, refer to the TeraStation’s user manual, available from the link in TeraNavigator or
from www.buffalotech.com. Your computer must be connected to the Internet to access or download the
user manual.
2014-07
3) Click NAS Navigator2 Install. The wizard will
guide you through installing NAS Navigator2.
4) Open NAS Navigator2. Right-click on the TeraStation’s icon in NAS Navigator2 and select Properties. Set
the TeraStation’s IP address. Then, log in to Settings (as described below) and set the TeraStation’s
clock.
2) Launch TeraNavigator from the software CD in
your TeraStation package. Or, download and run
the TeraNavigator software from
www.buffalotech.com.
TeraNavigator
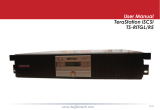
The socket-outlet shall be installed near the equipment and shall be easily accessible.
Power Cable
LAN Port
Insert the Ethernet cable until it clicks.
Ethernet Cable
Computer
Power Connector
1) Connect the TeraStation’s Ethernet and power cables and turn it on.
ON
OFF
5 mm5 mm
① ② ③