Page is loading ...

User Manual
TeraStation Pro II
TS-HTGL/R5
www.buffalotech.com
v1.7

2
Introduction
Congratulations on your new TeraStation! Your TeraStation Pro is a powerful le server that’s
as easy to use as a hard drive. With its straightforward conguration GUI, anyone can easily
congure the TeraStation’s settings. You don’t even necessarily need to congure it at all;
right out of the box it’s ready to be plugged in and put to work. But the TeraStation remains
a fast, reliable Linux-based server, with four huge hard drives that may be congured in
RAID 0, RAID 1, RAID 5, or RAID 10 arrays. It also includes SAMBA 3.0, allowing it to join
Active Directory domains, download users, passwords, and groups, and keep them up to
date. This user manual is intended to assist you in conguring your new TeraStation.
Because we’re constantly updating our product, the images and text in this manual may vary
slightly from the images and text displayed by your TeraStation. These changes are minor
and should not affect the ease of setup adversely. As time passes, future user interfaces,
updated software, and later versions of this manual may be freely available for download at
our web site: http://www.buffalotech.com.
If you run into difculties or need additional help, feel free to contact our technical support.
Contact information for Buffalo Technology and our technical support is available on pages
76 and 77.

3
Table of Contents
TeraStation Quick Setup ...................................................4
Installing Software ............................................................8
Accessing TeraStation Data from a PC ............................. 11
Accessing TeraStation Data from a Mac...........................15
TeraStation Layout..........................................................20
Advanced Settings ........................................................... 23
Network Settings .............................................................27
Hard Drive Settings ......................................................... 29
Adding Extra Hard Drives ............................................... 35
Shared Folders ................................................................ 41
Groups ........................................................................... 45
Users ..............................................................................46
Troubleshooting Multiple Shares..................... ................48
Backups .........................................................................50
Maintenance Settings ...................................................... 54
UPS Settings ...................................................................55
System Information ......................................................... 62
Client Utility ................................................................... 67
Troubleshooting .............................................................. 69
Changing Hard Drives ..................................................... 71
Technical Specications .................................................. 75
Technical Support ...........................................................77
GPL Information .............................................................79

4
Begin setting up your TeraStation by plugging
your
power cable and Ethernet cable into the
back of the TeraStation as shown.
TeraStation Quick Setup

5
Plug the power cord into a wall socket or
surge protector. Plug type and socket will
differ according to country of use.
Plug the other end of the Ethernet cable
into a hub, router, or switch in your
network.
TeraStation Quick Setup
Connect your cables

6
TeraStation Quick Setup
Press the power button on the front panel. LEDs will light
as your TeraStation boots up.
After your TeraStation has completed booting up, check the
LINK/ACT LED on the front of the TeraStation. If it’s lit, then
your TeraStation is connected properly, and you can go on
to page 8. If it’s not lit, turn to page 7 for troubleshooting.

7
The TeraStation’s Ethernet port will automatically adjust to use either a Crossover or Patch cable,
so you may connect the TeraStation to your network with either type of Ethernet cable. Buffalo
Technology doesn’t recommend connecting the TeraStation directly to a PC.
Verify that the LINK/ACT LED on the front of TeraStation is lit (see page 6’s picture). If it’s lit, go to
page 8 to continue setting up TeraStation. If the LINK/ACT LED is still not lit, try the suggestions
below to verify that you’re not suffering from common setup problems.
Having problems? Make sure that:
• the TeraStation and the router, hub or switch are both powered on,
• the Ethernet cable is securely plugged in at both ends, and
• the Ethernet cable is not damaged. Verify this by trying a different Ethernet cable.
If problems persist, you may contact Buffalo Technology’s technical support. See pages 66 and 67
for technical support contact information.
TeraStation Quick Setup

8
Installing Software
Insert the TeraNavigator CD into your computer’s CD-ROM drive.
On a PC, setup should automatically launch. If it does not, manually
launch setup.exe by pressing Start and selecting the Run... option.
When the Run dialog opens, type d:\setup.exe (where d is the drive
letter of your CD-ROM drive). Press OK to continue.
If you are installing the software on a Mac, open the CD and click
TeraNavigator to begin installation.

9
TeraNavigator Setup
Press the Begin Installation button to begin.
If you’re installing on a PC, click on Connect this PC to
TeraStation (the green, lower button). Mac users can skip this
step.
Click Next to step through the installation.

10
TeraNavigator Setup
Continue pressing Next to step through the installation.
When installation is complete, you may close the installation
window.

11
Two new icons will be on your desktop: Shortcut for TS-TeraStation_
name and Buffalo NAS Navigator.
Clicking Shortcut for TS-TeraStation_name takes you directly to the
folders on your TeraStation. Share is the main folder that you can
put les and folders in. Info contains a copy of your user manual.
The Buffalo NAS Navigator icon opens the TeraStation’s client utility.
Turn to page 67 for more on using the NAS Navigator client utility.
Using your TeraStation with a Windows PC

12
To Access TeraStation Data from a PC:
Your TeraStation uses “shares” (folders) to hold data. A share called “share” is already congured on
your TeraStation, and you can create additional shares on page 41. To start using your TeraStation,
you can either click on the Shortcut for TeraStation on your desktop, or you may just use drive T in
My Computer, which setup has mapped to the default share in your TeraStation.
Accessing TeraStation Data from your PC

13
You can map additional driveletters to shares on your TeraStation.
From the Start menu, select Run.... Enter your TeraStation’s
hostname (you can get it from the NAS Navigator utility) or IP address.
Press
OK.
Your TeraStation should open. “Share” is a data folder in your
TeraStation by default. “Info” contains your user manuals. If you
have created other folders, they will be visible here too. You can map
drive letters to any of these folders.
Accessing TeraStation Data from your PC

14
From the Tools pull-down menu, select Map Network Drive. Choose a drive letter from the Drive:
pull down menu. To specify the folder to map, either nd it with Browse or enter \\TeraStation_
Name\share_name in the Folder: eld, where TeraStation_Name is your TeraStation’s hostname
and share_name is the name of a folder on your TeraStation. Check the Reconnect at logon checkbox
to have Windows connect to this mapped drive everytime it starts. When nished, press the Finish
button. Your share is now mapped to a drive letter.
Accessing TeraStation Data from your PC

15
After installing the TeraNavigator software, your Mac will have two
new icons on the desktop.
The Share folder is the main folder that you can put les and folders
in.
NAS Navigator is the TeraStation’s client utility.
Clicking Share opens the main folder on your TeraStation. You can
put les and folders in Share as though it were any other hard drive
connected to your computer.
The NAS Navigator icon opens the TeraStation’s client utility. See
page 67 for more on using the NAS Navigator client utility.
Using your TeraStation with a Mac

16
You can manually add TeraStation Shares
(folders) to your desktop by adding them to the
Mac’s server list. Begin by clicking Go, and
then choose Connect to Server.
Accessing TeraStation Data from a Mac
In the Server Address eld, enter your
TeraStation’s IP address in the form smb://
ipaddress (where “ipaddress” is your
TeraStation’s IP address), and click Connect.
If you don’t know your TeraStation’s IP
address, see page 18.

17
Select Guest and click on Connect. Note: If you have congured share
permissions on your TeraStation, select Registered User and enter your
Registered User credentials.
Accessing TeraStation Data from a Mac
Select the volume that you want to mount, such as share or share-mac,
from the list of folders on the TeraStation.
The share will open. A link to the shared folder will appear on your
desktop.

18
If you don’t know your TeraStation’s IP address, there are
several ways to get it.
One simple method is to use the NAS Navigator client utility
(included on your CD) to nd your TeraStation(s). Just click
on the tab for your TeraStation and you’ll be able to read its IP
address. See page 67 for more on the client utility.
You can get the TeraStation’s IP address from the LCD display
on the front of the TeraStation as it boots up.
You can always get the TeraStation’s IP address from your
router’s conguration utility. Many Buffalo routers list this
information on the Client Monitor page, as shown to the right.
Consult your router’s documentation for instructions on
identifying the TeraStation’s IP address.
Accessing TeraStation Data from a Mac

19
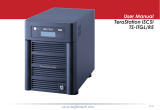
TeraStation Expansion
TeraStation Pro has two USB 2.0 ports on the rear. These ports can be used for adding external
USB Hard Drives or UPS systems. TeraStation will share connected USB storage devices, allowing
everyone on the network to use them. Up to two external USB hard drives may be added to
TeraStation Pro. To connect a USB hard drive or UPS to TeraStation, simply plug it into one of the
USB Ports.
You may plug in additional USB hard drives to either of the USB ports on your TeraStation. See
page 35 for setting up your USB hard drive on the TeraStation. Page 50 shows you how to set up
TeraStation to backup to a USB Hard Drive.
See page 55 for more information on using the TeraStation with a UPS.

20
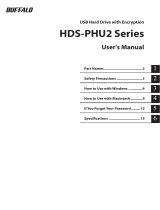
Power Button – Press and release the Power Button
to turn the TeraStation on. Hold it down for three
seconds to turn the TeraStation off.
Hard Drive Access – The Access LEDs will blink
green when the associated hard drive is accessed.
During startup, it’s normal for all the lights to
blink.
Hard Drive Cage – The tubular lock prevents
physical access to hard drives when locked. See
page 71 for information on replacing hard drives.
TeraStation Layout
/