Page is loading ...

INTRO |
Hey there, thanks for buying this DIY kit! We – Erica Synths and Moritz Klein – have
developed it with one specific goal in mind: teaching people with little to no prior
experience how to design analog synthesizer circuits from scratch. So what you’ll find in
the box is not simply meant to be soldered together and then disappear in your rack. !
Instead, we want to take you through the circuit design process step by step, explaining
every choice we’ve made and how it impacts the finished module. For that, we strongly
suggest you follow along on a breadboard , which is a non-permanent circuit prototyping
1
tool that allows you to experiment and play around with your components. To help you
with this, we’ve included suggested breadboard layouts in select chapters.!
In addition to this, you can also play around with most of the chapter’s circuits in a circuit
simulator called CircuitJS. CircuitJS runs in your browser. You’ll find weblinks in the
footnotes which will direct you to an instance that already has example circuits set up for
you. We strongly encourage you to fiddle with the component values and general
structure of those circuits to get a better understanding of the concepts we’re laying out.!
Generally, this manual is intended to be read and worked through front to back, but there
were a few things we felt should go into a dedicated appendix. These are general
vignettes on electronic components & concepts, tools, and the process of putting the
module together once you’re done experimenting. Don’t hesitate to check in there
whenever you think you’re missing an important piece of information. Most importantly
though: have fun!!
TABLE OF CONTENTS
CIRCUIT SCHEMATIC ……………………..…………………………………………………."2!
BILL OF MATERIALS ……….……………………………………………………….…..…… "3!
POWERING YOUR BREADBOARD …………….…………………………………………… "6!
CIRCUIT DESIGN CLOSE-UP …………………………………………………………..…… "7
COMPONENTS & CONCEPTS APPENDIX ………………………………………………. "39!
TOOLS APPENDIX …………………………………………………………………………… "52!
MODULE ASSEMBLY APPENDIX …………………………………………………………. "55!
SOLDERING APPENDIX …………………………………………………………………….. "69!
Note that there is no breadboard included in this kit! You will also need a pack of jumper wires
1
and two 9 V batteries with clips. These things are cheap & easy to find in your local electronics
shop.
1

THE COMPRESSOR
Need some professional polish in your modular system? With this simple diode-based
compressor, you can shape the dynamics of your sound, adding punch and consistency
to your patches. Whether you’re looking to beef up your basslines, add sustain to your
leads, or tame the peaks of your percussion, this circuit’s got you covered.!
!
2

BILL OF MATERIALS
Before we start, please check if your kit contains all of the necessary components. In
addition to a PCB, panel and power cable, your box should also contain:!
An array of resistors. The specific values (in ohms,
which you should check for with a multimeter) are!
470k"x2!
330k"x1
220k"x1!
120k"x1
100k x11!
47k"x1!
33k"x4!
20k x1!
10k"x4!
3k3 x4!
2k x1!
470Ωx 1!
200Ωx 1!
10Ω"x2!
!
A bunch of capacitors. The specific values (which are
printed onto their bodies) are!
!
47µF (electrolytic) x2!
1.5µF (1.5J63/foil) x3!
100nF (104/ceramic) x8!
680pF (681/ceramic) x1
3

Some diodes. The specific model names (which are
printed onto their bodies) are!
1N4148 (signal)"x13!
SB140 (schottky)"x2!
2
!
!
A couple of transistors. The specific model names
(which are printed onto their bodies) are!
2N3904 (NPN) x5!
!
A handful of regular potentiometers. Their specific
values (which may be encoded & printed onto their
bodies) are!
1M (A105) x1!
500k (A504) x1!
100k (A104) x2!
20k (A203) x1!
10k (A103) x1!
!
A few jack sockets. The specific models (which you
can identify by their color) are!
Switched mono (black)"x3!
Please note that these could also be a different model (e.g. 1N5818).
2
4

!
A couple chips. Their specific models (which are
printed onto their bodies) are!
TL074 (quad op amp) x1!
TL072 (dual op amp) x2!
!
A few LEDs (light emitting diodes). The specific
models (which you can identify by measuring their
body’s width) are!
3mm (red) x2!
3mm (green) x3!
You will also find a few sockets that are only relevant when assembling the module in the
end. !
5

POWERING YOUR BREADBOARD
Before we can start building, you’ll need to find a way of providing your breadboard with
power. Ideally, you’d use a dual 12 V power supply for this. Dual power supplies are great
– and if you want to get serious about synth design, you should invest in one at some
point. But what if you’re just starting out, and you’d like to use batteries instead?
Thankfully, that’s totally doable. You just need to connect two 9 V batteries to your
breadboard like shown here. For this, you should use 9 V battery clips, which are
3
cheap & widely available in every electronics shop.!
By connecting the batteries like this, the row on the left side labeled + becomes your
positive rail, the row on the right side labeled + becomes your negative rail, and both rows
labeled – become your ground rails. !
4
Please make sure you disconnect the batteries from your breadboard when you
make changes to the circuit! Otherwise you run the risk of damaging components.!
Since the circuits in this manual were designed for a 12 V power supply, we assume that to be
3
the default. Everything will still work roughly the same with 9 V, though.
This is a bit awkward because breadboards weren’t really made with dual supply voltages in
4
mind.
6

COMPRESSION BASICS
Compression is an effect that I personally only know from my DAW. I’ve never touched a
hardware compressor, much less an analog one. Which made it all the more intriguing to
try and design one myself. Since I never bothered to really understand the plug-in I was
using (I just tweaked the settings until I liked what I heard), the obvious first step was to
take a closer look at what it actually does to a waveform.!
For that, I recorded a beat from my drum machine, which you can see here as a visual
representation.!
Unfortunately, the levels are all messed up – the kick and snare are way too loud, while
the hats & toms are super quiet. This is visible in the waveform itself: these big, wide
bumps are the kick and snare, while hats and toms only show up as tiny blips. And here’s
what that same clip looks like after I’ve run it through the compressor.!
Suddenly, the kick and snare aren’t that loud anymore. You can clearly see this in the
waveform: the bumps are much smaller than before. Curiously, the small blips stayed the
same volume, though. So it’s not like we simply reduced the overall volume of the clip.!
Instead, we somehow specifically reduced only the volume of the kick and snare
hits. Making our beat’s mix much more balanced as a result.!
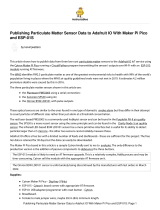
Cool, but how does this work? How does the compressor know which parts of the
waveform are too loud – and how does it turn them down selectively? The magic control
for this is the compression threshold, which it uses to decide if a sound is too loud,
and subsequently, whether it needs to turn down the output volume. If you’re having
trouble visualizing this, here’s a quick illustration. !
7

In the box up top, we have our input waveform and the original compression threshold –
and below it, the compressor’s output. As you can see, all the parts that cross the
threshold in the input are significantly reduced in volume in the output. Though
interestingly, they still cross it in the result!!
Why is that? Because of the compressor’s ratio setting, which tells it by how much it
should reduce the volume when the input crosses the threshold. In the example
above, that setting is dialed to a pretty moderate level. That’s why the compressor
doesn’t simply cut off the signal at the threshold. If we crank it up all the way, though,
that’s precisely what happens: the threshold turns into a brick wall that the output cannot
cross.!
There are two more controls that I regularly use when working with a compressor. First
up, there’s the attack time, which tells the compressor how long it should wait
8

before reducing the output volume. In our examples above, it was turned down
completely, so the volume was reduced the instance the signal crossed the threshold.
Let’s turn it up and see what happens.!
As expected, the compressor now lets the signal push beyond the threshold for a
moment before proceeding to squash it. !
Finally, let’s look at the release control, which is basically the symmetrical counterpart to
the attack control. It tells the compressor how long it should wait before restoring the
output volume. In our previous examples, it was turned down completely. So the volume
was restored the instance the signal fell back below the threshold. Let’s try bump this one
up, too.!
As you can see, the parts of the waveform that directly follow the big bumps are now
affected – even though they don’t cross the threshold. !
9

COMPRESSION THRESHOLD
Cool! So for a very basic little compressor circuit, these are the four features I’d definitely
want to replicate: compression threshold, compression ratio, attack and release. To make
our lives a bit easier, we’ll start by singling out the compression threshold. Conceptually,
here’s how I think it could be implemented. !
First up, we need a block that allows us to manipulate the volume of our input signal.
Since this has to happen automatically, we’ll want a solution that can be controlled with a
voltage. Next, we need to know how loud the output of that first block currently is. This
might sound like a pretty simple question, but it’s not exactly trivial to answer. We’ll get to
that in a bit.!
After this, we need to compare the current volume level to a threshold and determine if
we’re above or below it – and by how much. Finally, we want to use this information to
control the output volume of our first block. This way, we establish a feedback loop that
works something like this: At any given moment, we ask: how loud is the output
signal? Then: is it louder than the set threshold? If yes, then reduce the output
volume. If no, leave it as-is.!
This way, we’d get something akin to the brick wall compression we’ve seen earlier -–
where the compression threshold is basically a hard volume ceiling. (This is also called
limiting, by the way.) Cool! Now, in order to turn this idea into an actual circuit, we’ll need
to come up with implementations for these four individual blocks. Let’s start with volume
modulation.!
10

DIODE-BASED VCA
If you’ve already built a couple of our DIY kits, you might already be thinking in a certain
direction here. As was I – which is why I decided to go with a VCA-based solution. VCA, if
you don’t know, is short for voltage controlled amplifier. It does exactly what we’re
looking for: adjusting the volume of an input signal in response to a given control voltage.
Thankfully, I did already come up with a couple VCA designs, so we can just use one of
those. My diode-based implementation seems like a great fit, as it is really quite simple.
Here’s what it looks like after I tinkered with it a little to make it fit our specific needs.!
And while this might seem like a lot at first glance, the functional core is just this string of
six diodes with a 100k resistor attached to its central node. Here’s how it works. We apply
a scaled-down version of our input signal to the resistor, the control voltage to the top of
the diode string – and an inverted copy to the bottom. !
11

The output can then be picked up from the central node. If the control voltage is 0, the
output will be identical to the input. That’s because there is no current flowing: neither
through the diodes, nor through the resistor, since the input is not strong enough to push
or pull the diodes open. And if a voltage is not allowed to transform into current, it’s
preserved as-is. This is why we need to scale the input down, by the way. Because if it’s
too loud, it opens the diodes in this scenario, which would result in noticeable distortion.!
Okay, now if we bump the control voltage to 2 V, the diodes are wide open and a large
current flows from top to bottom. Since the diode string is essentially a 50% voltage
divider, the central node will sit at 0 V – exactly halfway between top and bottom voltage.!
Now, if the input signal goes above or below 0 V, a current flows through the resistor. But
since that current is so much smaller than the one flowing through the diodes, the central
node voltage will remain almost unaffected. The signal is basically washed away, if you
will. And the output stays silent. So in summary: the more current flows through the
diodes, the more we reduce the output volume. Looking at the circuit as a whole again,
we can see that everything else is just there to support this mechanism. !
12

First, we scale the input signal down with a 100k/10k voltage divider. Then, we buffer it
and apply it to the 100k resistor. Next, we buffer the incoming CV before inverting it and
then applying both versions to our string of diodes. (The 2k resistor after the CV buffer is
just to limit the maximum amount of current we push through the diodes. Wouldn’t want
to overdo it, right?)!
Finally, we pick up the output from the central node and then amplify it to reverse the
downscaling at the input. If you’ve been wondering why we use a string of six diodes
instead of just two –$here’s the reason: we want to keep the gain of the output
amplifier as low as possible to prevent random noise from creeping in. Multiple
diodes in series are much harder to open, which means that we can apply a louder input
signal without risking distortion. In turn, the output stage doesn’t need as much gain to
restore the signal. !
And that’s it. Now by increasing the CV, we can decrease the output volume – which is
exactly what we were looking for. Great! So grab your breadboard and put this to the
5
test.!
If you now send any audio signal (oscillator, drum machine, …) into the signal input on the
left, you should be able to change the output volume by turning the 100k potentiometer’s
knob, which produces a control voltage between 0 and 3 V.!
You can try this chapter’s circuit in a simulator. I’ve already set it up for you right here. You can
5
change all values by double clicking on components.
13

SIMPLE PEAK DETECTOR
Great, so we’ve got the first block down. Next, we’ll tackle the volume detector. For that,
we’ll first have to define what we mean when we talk about volume in this case. Here’s
what a single snare drum hit looks like when viewed on an oscilloscope. !
The line in the middle marks ground level – 0 V. As is typical for audio signals, the snare
oscillates around that line. Now, strictly speaking, you’d determine the volume of this
sound by measuring the height of the waveform at any given point, top to bottom. But
since audio signals, this one included, are often roughly symmetrical, we can take a little
shortcut here.!
Instead of measuring top to bottom, we’ll simply discard the lower half and treat the
distance between the current peak and ground as the absolute volume reading for
now. This will greatly simplify the first iteration of our circuit.!
Okay, so that’s the y-axis. We also need to talk about the x-axis, though. That’s because
the answer to the question “how loud is this sound currently” depends heavily on what
we mean by “currently”. At this scale, for the first fifth of the waveform, the approximate
answer would be 5 V. But if we zoom in on the x-axis by a lot, that answer changes.!
Because now, we get wildly different volume levels directly next to each other that we
can’t simply round up to an approximate value. That’s of course due to the fact that
14

sounds are oscillations. And it means that in order to get a useful answer to our
question, we have to measure the sound’s volume over a significant period of time.!
How do we pull that off? Easy: with a circuit called a peak detector, which consists of just
three components: a diode, a capacitor and a resistor. !
If you set them up like this and send your audio signal into the diode, you can pick up its
current volume level on the other side. Here’s how it works. Whenever the input rises
significantly above the 0 V-line, a large current is pushed through the diode and into the
capacitor, filling it up. Once the voltages on both sides are (almost) the same, the
current flow will stop. We’ve sampled the current volume level. !
Next, when the input voltage drops, the charge inside the cap will very slowly drain out
through the resistor. This is how we measure the voltage level over an extended period of
time. !
Because if the input signal is returning to the same peak in rapid succession, the voltage
at our capacitor will stay roughly constant. And once that peak drops for a while, the
excess current will drain out and the voltages equalize. For this to work properly, we’ll
15

need to find the right values for both the cap and resistor, though. If they’re very small, the
time interval we’re looking at will be very short – and vice versa. In my experiments,
combining a 100k resistor with a 1.5 μF capacitor gave me the best results. !
Still, if you’d set this up on the breadboard and compared the peak detector’s output
to the input waveform using an oscilloscope, you’d notice that the volume we detect
is a good deal too low. Why is that? Well, we can actually blame the diode here.
Because as we saw earlier, diodes will only let current pass through if the input voltage is
significantly higher than the output voltage. This means that our capacitor can never be
charged to the input signal’s actual peak level. Simply because the current flow will stop
prematurely. !
To fix this, we can make use of a nifty trick involving another op amp. If we combine it
with our diode like this, we get rid of the gap between the signal’s peak and the capacitor
voltage.!
That’s because the op amp will simply increase its output voltage until the two input
voltages are equal, neutralizing the voltage drop across the diode in the process. Great!
So let’s set this up on the breadboard and see how we fare. !
6
You can try this chapter’s circuits in a simulator. I’ve already set them up for you right here. You
6
can change all values by double clicking on components.
16

To test this properly, you’ll need a 2-channel oscilloscope. Connect one channel to the
VCA’s output, and the other to the peak detector’s output. Apply the same vertical &
horizontal scaling to both, and you should be able to see that the waveform’s peaks are
now properly traced by the peak detector. !
7
If you don’t have a 2-channel oscilloscope, you can watch me do this experiment here.
7
17

VOLTAGE SUBTRACTOR
So that’s the second block down – just one more to go! Here, we want to compare the
detected volume level to a variable threshold and decide if it’s above or below it – and by
how much. This sounds more tricky than it actually is, though. Because all we need is
simple subtraction. If we take the detected volume and subtract the threshold from it,
the result will tell us all we need to know. A positive result means we’re above the
threshold. A negative one means we’re below it. With the absolute value telling us by how
much in both cases.!
Now, how do we implement this? Thankfully, voltage subtraction is yet another operation
that op amps can help us with. Even if the setup is a little more involved than, say, a
simple buffer.!
Since I’ve already explained the mechanics behind this circuit in detail in a different
manual, I’ll skip it here. You can find a link to that manual in the footnotes. The basic gist
8
is this, though: the op amp will subtract the voltage at the inverting input from the
voltage at the non-inverting input and then set its output to the result of that
calculation. So all we need now is a variable threshold voltage. !
For that, we’ll simply set up another potentiometer as a
variable voltage divider. Since we don’t expect our
9
input signal peaking at anywhere near 12 V, it makes
sense to restrict its range somewhat. Otherwise the
knob would have a huge dead zone.!
If we put a 10k resistor between the potentiometer and
the positive rail, we pin the maximum threshold to 6 V.
Which should give us a comfortable amount of
headroom, considering that the highest expected value
in a eurorack synthesizer is 5 V.!
The manual is available here, and the explanation begins on page 25.
8
The threshold is effectively setting a volume ceiling, so we should use a logarithmic
9
potentiometer to make it feel natural/linear.
18

Great, so let’s see how this pans out when we set it up on the breadboard. !
10
You’ll again want to monitor both the VCA’s output and the voltage subtractor’s output on
two separate oscilloscope channels. Dial in a relatively low threshold, and you should
11
get positive bumps whenever the input signal crosses it – and negative ones when it
doesn’t.!
You can try this chapter’s circuit in a simulator. I’ve already set it up for you right here. You can
10
change all values by double clicking on components.
Again, you can watch me do this here if you don’t have a 2-channel oscilloscope.
11
19

CLOSING THE LOOP
So that’s the final block done. Now we just need to send the subtractor’s output into the
VCA’s CV input. !
Because then, whenever the input signal crosses the set threshold, the subtractor will
send out a positive voltage, which in turn reduces the VCA’s gain. Conversely, if the
output is below the threshold, the subtractor sends out a negative voltage –$which allows
the input to pass through the VCA unchanged. That’s because current cannot flow
through the VCA’s diode string in reverse – so it basically just ignores negative CV
inputs. Great! Let’s see if this works as expected. !
12
Ideally, you’ll want to monitor both the compressor’s output and the set threshold voltage
on two separate oscilloscope channels. That way, you should be able to see that
13
lowering the threshold does indeed reduce the volume of big peaks. Though weirdly, they
You can try this chapter’s circuit in a simulator. I’ve already set it up for you right here. You can
12
change all values by double clicking on components
You can again watch me do this here if you don’t have a 2-channel oscilloscope.
13
20
/