Page is loading ...

LIFE IS ABOUT BALANCE
AND EATING WELL
12 Cup Programmable Coffee Maker
I M P O R TA N T N O T I C E
If you have any problems with this unit, contact
Consumer Relations for service PHONE: 1-800-275-8273
or visit our website at wphousewares.com
Please read operating instructions before using this
product. Please keep original box and packing materials
in the event that service is required.
W.W.
P.
P.
A
A
A
PP
PPPP
P
P
LI
L
L
AN
AN
CE
S,
S,
I
N
NC
C
.
T T
olol
l
l
Fr
Fr
ee
ee
(
(
80
80
0)
0)
)
2
2
2
2
2
75
75
75
7
-8
-8
-8
2727
7
7
3
3
Mo
o
o
dede
e
l
l
l
CC
CC
CC
C
DC
DC
D
M0
M0
30
0
Pr
Pr
in
in
te
te
d d
In
n
C
C
hi
hi
na
na
RE
RE
RE
E
E
V
V
V
1.
1.
1
00
0
All
A
tr
t
tr
r
ade
ade
ade
mar
mar
mar
k
ks,ks,
se
s
rvi
ce
e
mar
m
r
ks
ks
and
and
tr tr
adeade
na na
mes
mes
(c
(c
c
ol
oll
ol
oll
l
o
e
e
ect
ect
ect
ive
iv
ive
ly ly
the
the
“M
M
ar
rk
a
s”)
”
ar
ar
e
e
propro
p
p
pri
pri
pri
eta
eta
ta
ry
y
ry
to
to
o
Wo
Wol
fga
ng
ng
P
Puc
uc
k W
k W
orl
orl
d W
d W
ide
ide
.
USE AND CARE

I
MP
O
RTANT SAFE
G
UARD
S
SAVE THESE INSTRU
C
TI
O
N
S
H
O
USEH
O
LD USE
O
NLY
When using electrical appliances, basic safety precautions should
always be followed, including the following:
R
e
ad all instru
c
ti
o
ns
.
Do not touch hot sur
f
aces. Use handles or knobs
.
To protect a
g
ainst electrical shock, do not immerse cord, plu
g
or unit
in water or other li
q
uid.
C
l
ose supervision is necessary w
h
en any app
l
iance is use
d
b
y o
r
near c
h
i
ld
ren
.
Unplu
g
from outlet when from outlet when not in use and befor
e
cleanin
g
. Allow to cool before puttin
g
on or takin
g
off parts an
d
before cleanin
g
the appliance
.
Do not operate any app
l
iance wit
h
a
d
amage
d
cor
d
or p
l
ug o
r
a
f
ter the appliance mal
f
unctions, or has been damaged in an
y
manner. Return appliance to the nearest authorized service
f
acilit
y
f
or examination, repair or adjustment
.
The use of accessor
y
attachments not recommended b
y
the appliance
manufacturer ma
y
result in fire, electric shock, or personal in
j
ur
y
.
Do not use out
d
oors
.
Do not let cord han
g
over ed
g
e of table or counter, or touch ho
t
surfaces, includin
g
the stove
.
Do not place on or near a hot
g
as or electric burner, or in
a
h
eate
d
oven
.
To disconnect, turn any control to “o
ff
’’, then remove plug
f
ro
m
e
l
ectrica
l
out
l
et.
N
e
v
e
r
u
s
e
w
a
rm
o
r h
o
t w
a
t
e
r t
o
fill th
e
w
a
t
e
r r
e
s
e
rv
o
ir. Us
e
co
l
d
water onl
y.
Scalding may occur i
f
the cover is li
f
ted or removed during th
e
b
rewing cyc
l
e
.
Do not use this appliance
f
or other than intended use
.
Snap the lid securely to the cara
f
e be
f
ore serving
.
1
2
3
4
5
6
7
8
9
1
0
11
1
2
1
3
14
1
5
A
dditional Sa
f
ety In
f
ormatio
n
G
R
O
UNDIN
G
INSTRU
C
TI
O
NS
:
T
h
is app
l
iance must
b
e groun
d
e
d
. It is equippe
d
wit
h
a 3-prong cor
d
h
aving a groun
d
e
d
p
l
ug. T
h
e p
l
ug must
b
e p
l
ugge
d
into an out
l
et w
h
ic
h
is proper
l
y insta
ll
e
d
an
d
groun
d
e
d.
Warn
i
ng
:
Improper use o
f
the grounded cord can result in the risk o
f
electric shock. Consult a quali
fi
ed electrician i
f
necessary. Do not attempt
to de
f
eat this sa
f
ety
f
eature by modi
f
ying plug
.
A s
h
ort power-supp
l
y cor
d
is provi
d
e
d
to re
d
uce t
h
e
h
azar
d
s resu
l
tin
g
f
rom entanglement or tripping over a longer cord. I
f
it is necessary t
o
use an extension cor
d
, it s
h
ou
ld
b
e positione
d
suc
h
t
h
at it
d
oes no
t
d
rape over t
h
e counter or ta
bl
etop w
h
ere it can
b
e pu
ll
e
d
on
b
y c
h
i
ld
re
n
or trippe
d
over an
d:
A.
Use on
l
y 3-prong extension cor
d
wit
h
3-
bl
a
d
e groun
d
ing p
l
ug
.
B.
The marked rating o
f
the extension cord must be equal to o
r
greater then the rating o
f
this appliance. The electrical rating i
s
listed on the bottom o
f
this unit
.
Never use the cara
f
e on a range top or in a conventional or microwave
o
v
en.
D
o
n
o
t s
e
t
a
h
o
t
ca
r
afe
o
n
a
w
e
t
o
r
co
l
d
s
u
r
face.
Do not use a cracked carafe
,
or a carafe that has a loose or weakened
h
a
n
d
l
e.
Do not clean the co
ff
ee maker with scouring powders, steel woo
l
pa
d
s, or ot
h
er a
b
rasive materia
l
s
.
1
6
17
1
8
1
9
2
3

Wol
f
gang Puck
,
owner o
f
the
f
amou
s
Spa
g
o restaurants an
d
one o
f
the most in
fl
uential che
f-
restauranteurs in America, is credited
with reviving California’s rich culinar
y
h
eritage. His coo
k
ing innovations,
a
result o
f
blending
f
resh Cali
f
ornia
in
g
redients with his classical French
tec
h
niques, are enjoye
d
b
y wor
ld
leaders
,
stars and fellow chefs alike.
He established other trend-settin
g
restaurants
l
i
k
e Postrio in San
F
rancisco, Chinois on Main in Santa Monica, Trattoria del Lupo, Cut, and
h
is latest creation, Jai, an Asian fusion restaurant in San Die
g
o. Home
c
he
f
s can also share Mr. Puck’s talents through his cookbooks, cutlery,
c
ookware and, of course, through his appliances
!
B
efo
r
e
Y
o
ur First Us
e
C
are
f
ully unpack the co
ff
ee maker and remove all packaging materials.
C
aut
i
on:
D
o not immerse the co
ff
ee maker housing in water or other liquid.
T
o remove any
d
ust t
h
at may
h
ave accumu
l
ate
d
on t
h
e remova
bl
e parts
d
uring packaging, wash the cara
f
e, lid,
fi
lter basket, and co
ff
ee
fi
lter
w
it
h
warm, soapy water. Rinse an
d
d
ry. Do not use
h
ars
h
or a
b
rasive
c
leansers. I
f
necessary, wipe the co
ff
ee maker housing with a clean,
d
amp c
l
ot
h
.
N
ote:
W
e recommend that prior to brewing your
fi
rst pot o
f
co
ff
ee, you “brew”
c
old water only, without ground co
ff
ee. This will remove any dust that
m
ay have settled inside the co
ff
ee maker.
I
mportant:
U
se on
l
y co
ld
water - t
h
e automatic
b
rewing system
h
as
b
een
d
esigne
d
t
o wor
k
on
l
y wit
h
co
ld
water.
T
abl
e
of
Co
nt
e
nts
Important Sa
f
e
g
uards
Additional Safety Information
B
e
f
o
r
e
Y
ou
r First Us
e
About Wol
fg
an
g
Puc
k
Kn
o
w Y
ou
r
Co
ff
ee
M
a
k
er
Using Your Coffee Make
r
Pause & Pour Feature
A
u
t
o
Sh
u
t
O
f
f
Setting The Cloc
k
Usin
g
The Pro
g
rammable Timer
Presetting T
h
e Brewing Cyc
l
e
Care And Cleaning
Decalci
f
yin
g
Rec
ip
es
Limited Warrant
y
Contact In
f
ormatio
n
2
3
4
4
6
8
9
9
9
10
1
0
1
1
11
12
19
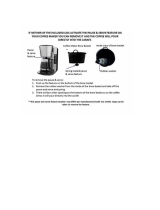
B
ac
k
4
5

K
n
o
w Y
o
ur
Coffee
Mak
e
r
A
ctua
l
pro
d
uct may
d
i
ff
er s
l
ig
h
t
l
y
f
rom images on t
h
is page
6
7
DELAY BREW BUTT
O
N
:
Press this button to en
g
a
g
e
the dela
y
brew time
r
LC
D DISPLAY:
I
n
d
icates Current Time
,
K
ee
p
Warm E
l
a
p
se
d
Time,
o
r De
l
a
y
Program Timer
BLUE P
O
WER
LI
G
HT
:
Ill
u
min
a
t
e
s wh
e
n
co
ff
ee
m
a
k
e
r
is brewin
g
or
in Kee
p
Warm
m
ode
H
O
UR BUTT
O
N
:
T
h
is
b
utton a
d
vances t
h
e
hour display
f
or the clock
an
d
timer. See t
h
e section
“Setting the Clock”
f
or proper
us
e
D
ELAY LI
G
HT:
I
n
d
i
ca
t
e
s th
a
t th
e
c
offee maker is in dela
y
t
im
e
r m
ode
a
n
d
will
b
r
e
w
a
t th
e
s
e
t tim
e
programmed
MINUTE BUTT
O
N:
T
h
is
b
utton a
d
vances t
h
e
minute display
f
or the clock
an
d
timer. See t
h
e section on
“Setting the Clock”
f
or proper
us
e
O
N
/
OFF:
Use t
h
is
b
utton to imme
d
iate
l
y
b
egin
b
rewing cyc
l
e, or to stop t
h
e
b
rewing cyc
l
e. T
h
is
b
utton is a
l
so
u
se
d
to cance
l
t
h
e DELAY BREW
mo
d
e or KEEP WARM mo
d
e
P
ROGRAM BUTTON:
T
his button allows you to preset
t
he brewing c
y
cle to begin at a
se
l
ec
t
ed
tim
e
. S
ee
th
e
s
ec
ti
o
n
o
n
“
Usin
g
the Timer” for proper use
W
a
t
e
r L
e
v
el
Win
dow
C
offee Maker Housin
g
Lid
Warmin
g
Plat
e
ous
i
ng
H
Swing Out Spray Hea
d
P
e
rm
a
n
e
nt Filt
e
r with
Measurin
g
Spoo
n
12 Cu
p
G
l
a
ss
Ca
r
a
f
e
Filt
er
B
a
sk
et

Usin
g
Your Co
ff
ee Make
r
P
ause & Pour Feature
Y
our co
ff
ee maker has been designed with a Pause & Pour
f
eature.
A
t any time
d
uring t
h
e
b
rewing cyc
l
e, you may temporari
l
y remove t
h
e
g
lass cara
f
e
f
rom the unit and pour hot co
ff
ee
f
rom the cara
f
e. The
b
rewing cycle will be interrupted and no co
ff
ee will drip
f
rom the
fi
lte
r
b
asket. Replace the cara
f
e on the warming plate to restart the brewing
p
r
oce
ss.
W
arn
i
ng:
R
eturn cara
f
e within 30 seconds i
f
removed during brewing or
fi
lter
b
asket may over
fl
ow.
C
aut
i
on:
C
o
ff
ee maker will remain ON
f
or 2 hours unless it is turned OFF. Do not
l
eave an empty cara
f
e on heated warming plate.
Place your drip co
ff
ee maker on a
fl
at, level sur
f
ace, such as a
countertop. P
l
ug unit into a 120 vo
l
t 60Hz AC-on
l
y out
l
et
.
Lift the top cover of the coffee maker strai
g
ht up
.
Your co
ff
ee maker comes equipped with a permanent co
ff
ee
fi
lter;
however, a cone paper
fi
lter may be used instead i
f
desired (8 to
12-cup size). To add co
ff
ee grounds to the
fi
lter
fi
rst rotate the spray
h
ea
d
counterc
l
oc
k
wise unti
l
it is over t
h
e water reservoir. P
l
ace t
h
e
desired amount o
f
ground co
ff
ee into the
fi
lter and swing the spray
h
ea
d
b
ac
k
into position an
d
c
l
ose t
h
e
l
i
d
. See t
h
e c
h
art
b
e
l
ow to
determine the amount o
f
co
ff
ee to use
.
Fill glass cara
f
e with cold water up to the marked level
f
or th
e
desired amount o
f
co
ff
ee. Pour water
f
rom cara
f
e into water reservoir.
Close the top cover o
f
the co
ff
ee maker. Place glass cara
f
e, with lid i
n
p
l
ace, on t
h
e warming p
l
ate
.
Im
p
ortant
:
Do not operate
y
our coffee maker if the filter basket doe
s
not close completel
y
. Use onl
y
cold water; the automatic brewin
g
s
y
stem has been designed to work onl
y
with cold water
.
N
ote
:
An over
fl
ow hole is located at the back o
f
the water reservoi
r
to prevent over
fi
lling. Do not add water past the MAX line on indicated
on t
h
e water reservoir viewing win
d
ow
.
Press the ON
/
OFF button once. The blue power indicator light wil
l
illuminate indicating that your co
ff
ee maker has begun the brewin
g
cycle. I
f
you wish to use the timer to preset the co
ff
ee maker, see th
e
section on “Using the Timer”. In a
f
ew minutes, your co
ff
ee maker wil
l
be
fi
nished brewing
f
resh co
ff
ee
.
When the brewing cycle is complete, your co
ff
ee maker will
automatica
ll
y switc
h
over to a warming mo
d
e, w
h
ic
h
wi
ll
k
ee
p
the co
ff
ee warm
f
or the next two hours
.
No
t
e:
We recommend using coffee ground specificall
y
for automati
c
drip co
ff
ee makers. A
f
ter using your co
ff
ee maker a
f
ew times, adjus
t
the amount to suit your own taste
.
1
2
3
4
5
6
N
umber o
f
Cups
2
4
6
8
10
12
R
ecommen
d
e
d
2 T
b
sp
.
4 T
b
sp
.
6 T
b
sp
.
1/
2 Cup
1
/
2 Cup + 2 Tbsp
.
3/
4 Cup
R
eco
mm
e
nd
e
d am
o
unt
o
f
co
ff
ee
A
ut
o
Shut
O
f
f
Settin
g
T
h
e C
l
oc
k
As an added convenience, your co
ff
ee maker has been designed with an
auto shuto
ff
f
eature. Two hours a
f
ter the brewing cycle is complete, th
e
co
ff
ee maker will automatically shut itsel
f
o
ff.
Press the PROGRAM button until
y
ou see the CLOCK indicator displa
y
on
th
e
s
c
r
ee
n. Pr
e
ss th
e
H
O
UR
bu
tt
o
n
u
ntil th
e
de
sir
ed
tim
e
is r
eac
h
ed
. Y
ou
can hold the hour button down to scroll at a faster rate. Ensure that
y
ou
have the correct hour of the da
y
set as it relates to AM or PM. The AM or
PM indicator is displa
y
ed to the left of the time. For the minute setting
press the MINUTE button until
y
ou reach the desired time. You can hold
th
e
MINUTE
bu
tt
o
n
do
wn t
o
s
c
r
o
ll
a
t
a
f
a
st
e
r r
a
t
e.
Once the correct time has been set, do not press an
y
buttons. After 15
seconds the clock will leave the “Set Time” mode, and the blue backli
g
ht
will
g
o out
.
N
o
t
e:
Unplu
gg
in
g
the unit will reset the clock to 12:00
.
8
9

C
are And Cleanin
g
U
sin
g
The Pro
g
rammable Timer
P
resetting The Brewing Cycle
Y
our co
ff
ee maker has a delay-brew timer built into the
f
ace o
f
the unit.
T
he
f
ollowing sections describe the proper use o
f
this timer.
T
o preset your co
ff
ee maker to begin brewing at a later time,
fi
rst
f
ollow
s
teps 1 through 5 in the section “Using Your Co
ff
ee maker.”
Ch
ec
k
to ma
k
e sure t
h
at t
h
e c
l
oc
k
is set to t
h
e correct time. See “Setting
th
e C
l
oc
k
,” page 9.
P
ress t
h
e PROGRAM
b
utton unti
l
TIMER appears in t
h
e
d
isp
l
ay a
b
ove t
h
e
cl
oc
k
.
P
ress t
h
e HOUR
b
utton unti
l
t
h
e
d
esire
d
time is reac
h
e
d
. You can
h
o
ld
t
he hour button down to scroll at a
f
aster rate. Ensure that you have
t
he correct hour o
f
the day set as it relates to AM or PM. The AM or PM
i
ndicator is displayed to the le
f
t o
f
the time. For the minute setting press
th
e MINUTE
b
utton unti
l
you reac
h
t
h
e
d
esire
d
time. You can
h
o
ld
t
h
e
M
INUTE button down to scroll at a
f
aster rate.
O
nce t
h
e correct
d
e
l
ay time
h
as
b
een set, press t
h
e DELAY BREW
b
utton to activate t
h
e timer. You wi
ll
notice t
h
at t
h
e DELAY BREW
i
ndicator light will illuminate and the clock
/
timer will return to the current
ti
me.
T
o cancel the delay time, simply press ON
/
OFF button once and the
D
ELAY BREW indicator light will turn o
ff
.
C
aut
i
on: Be sure to unplug this appliance be
f
ore cleaning. To protect
a
gainst e
l
ectrica
l
s
h
oc
k
,
d
o not immerse cor
d
, p
l
ug or unit in water or
o
t
h
er
l
iqui
d
.
W
ash the cara
f
e and cara
f
e lid with warm, soapy water or place in top
r
ack o
f
dishwasher.
T
he
fi
lter basket and permanent
fi
lter may be washed in warm,
s
oapy water. Remove the
fi
lter basket by sliding the spray head
c
ounterclockwise until it is positioned over the water reservoir. Li
f
t the
p
ermanent
fi
lter and
fi
lter basket out o
f
the co
ff
ee maker by the handle.
T
o reinsert, place the
fi
lter basket in
fi
rst,
f
ollowed by the permanent
fi
lter, and then swing the spray head back over the
fi
lter basket. The
C
o
ff
ee maker Housing may be wiped with a clean damp cloth when
nece
ssary.
I
mportant:
N
ever immerse the co
ff
ee maker housing in water or other liquid.
D
o not try to clean the inside o
f
the water reservoir with a cloth because
t
his will leave a residue o
f
lint and may clog your drip co
ff
ee maker. Just
r
inse wit
h
co
ld
water perio
d
ica
ll
y.
Decalcif
y
in
g
C
alcium buildup frequentl
y
occurs in drip coffee makers. The buildup
i
s quite normal and is caused b
y
minerals commonl
y
found in drinking
wa
t
e
r.
W
e recommend periodicall
y
decalcif
y
ing
y
our coffee maker with a
s
olution of white vine
g
ar and cold water. Use a solution of 1 cup white
v
ine
g
ar in one carafe of cold water filled to the 4-cup line.
P
our the solution into the water reservoir, put the empt
y
carafe and
e
mpt
y
filter basket in place, and close the lid. Switch the coffee maker on
a
nd allow the coffee maker to “brew” the vine
g
ar solution.
W
hen the vinegar solution has finished brewing, empt
y
the carafe and
r
inse in clean water. Refill the water reservoir with clean
,
cold water and
r
un a second “brew” c
y
cle. This will rinse out an
y
remaining vinegar
s
olution. If necessar
y
, repeat this last step.
W
e recommend decalcif
y
ing
y
our drip coffee maker four times a
y
ear or
a
t an
y
time the brewing time takes longer than normal.
10
1
1

Black Pe
pp
er Scones
Ma
k
e
s 18 s
co
n
e
s
IN
G
REDIENTS
4
cu
p
s
p
lus 1 tables
p
oon all-
p
ur
p
ose flour
1
/2 cup su
g
ar
2
1/2 teaspoons bakin
g
powder
1
/2 teas
p
oon salt
1
3 tables
p
oons (6 1/2 ounces) unsalted butter, cut into small
p
ieces and chilled
1
1/2 tablespoons medium
g
rind black pepper
2
1/2 teaspoons finel
y
chopped lemon peel
1
1/2 cups heav
y
cream, plus 2 tablespoons for brushing
METH
OD
1
.
I
nto a large bowl, si
f
t together the
fl
our, sugar, baking powder and
s
a
l
t. Using two
k
nives or a pastry
bl
en
d
er, cut in t
h
e
b
utter unti
l
t
h
e
m
ixture resembles coarse meal. Gentl
y
stir in the pepper and lemon
p
eel. Add the 1 1/2 cups cream all at once and mix until the dou
g
h
j
ust comes toget
h
er.
2.
T
urn out onto a lightl
y
floured surface and knead the dough into a
b
all. For a flakier consistenc
y
, do not knead the dough into a smooth
b
all. I
f
smooth, the scone will be more cake-like. Wrap in plastic wrap
a
nd re
f
rigerate
f
or at least 30 minutes, up to overnight.
3
.
C
ut the dou
g
h into three equal pieces. Workin
g
with one piece
a
t
a
t
ime, keepin
g
the other two pieces covered, roll out to a circle,
6
inc
h
es in
d
iameter an
d
?-inc
h
t
h
ic
k
(see note
b
e
l
ow). Cut t
h
e circ
l
e
i
nto 6 we
d
ges an
d
arrange t
h
e we
d
ges on one or two
b
a
k
ing trays
l
ined with parchment paper. Repeat with the remainin
g
dou
g
h.
4
.
P
re
h
eat t
h
e oven to 350
d
egrees F. Lig
h
t
l
y
b
rus
h
t
h
e scones wit
h
t
h
e
r
emaining 2 tablespoons o
f
cream and bake until golden, about 10-12
m
in
u
t
e
s.
N
ote: The scones can be cut out with a 2 1
/
2-inch cookie cutter if
d
esire
d
. Ro
ll
out t
h
e
d
oug
h
, cut, an
d
p
l
ace on a
b
a
k
ing tray. Rero
ll
th
e
d
oug
h
an
d
continue cutting out circ
l
es. Procee
d
as in step 4.
5
.
S
erve warm with butter, and
j
am if
y
ou like.
R
ecipe courtesy Wo
lf
gang Puc
k
Recipe
s
1
2
1
3

S
trawberry Marzipan Tar
t
IN
G
REDIENTS
1
/3 recipe su
g
ar dou
g
h (see separate recipe, pa
g
e 16)
1
/2 pound unsalted butter, slightl
y
softened
1
/2 cup su
g
ar
3
e
gg
s
2
tablespoons oran
g
e liqueur
Z
est of 2 oranges, finel
y
grated
1
teas
p
oon almond extract
2
cups
g
round almonds
1
/4 cup currant
j
ell
y
, melted
2
baskets strawberries, sliced 1
/
4-inch thick
M
ETHO
D
1
.
P
re
h
eat t
h
e oven to 350
d
egrees F.
2.
O
n a floured surface, roll the pastr
y
3/8-inch thick and line a 10-inch
fl
an ring with it. Place the ring on a parchment paper lined baking
sh
eet an
d
c
h
i
ll
it unti
l
nee
d
e
d
.
3
.
C
ream the butter and sugar lightl
y
in an electric mixer; don’t let the
b
utter get too so
f
t. Add the eggs and mix lightly.
4
.
S
tir in t
h
e
l
iqueur, zest an
d
a
l
mon
d
extract, t
h
en mix in t
h
e groun
d
a
lm
o
n
d
s.
5
.
P
our into the chilled pastry shell and bake
f
or 1 hour to 1 hour and 15
m
inutes, or unti
l
t
h
e pastry an
d
marzipan are a
d
eep go
ld
en
b
rown.
6
.
R
emove the tart from the oven and let cool to room tem
p
erature.
7
.
B
rush the top o
f
the tart with the currant jelly. Cover the top o
f
the
t
art wit
h
s
l
ice
d
straw
b
erries arrange
d
in concentric circ
l
es or in a
fl
ower petal desi
g
n, makin
g
certain the whole top of the tart is
co
v
e
r
ed
.
8
.
R
emove the
fl
an ring and trans
f
er the tart to a
fl
at serving platter.
C
ut into wed
g
es.
R
ecipe courtesy Wo
lf
gang Puc
k
P
ec
an P
ie
M
akes one 10-inch tart
,
to serve 6-8
IN
G
REDIENTS
1
1/2 cups light corn s
y
rup
3
/4 cup su
g
ar
3
/4 cup li
g
ht brown su
g
ar
4
e
gg
s
2
egg
y
olks
3
tables
p
oons unsalted butter
1
/2 recipe Su
g
ar Dou
g
h (see separate recipe pa
g
e 16)
1
1/2 cu
p
s
p
ecan halves
METH
OD
1
.
P
re
h
eat t
h
e oven to 350
d
egrees F.
2.
I
n a lar
g
e skillet over medium heat, toast the pecans, shakin
g
f
requentl
y
, for about 7 minutes or until golden and fragrant.
3
.
Pl
ace t
h
e corn syrup, sugars, eggs, an
d
egg yo
lk
s in a mixing
b
ow
l
.
Bea
t w
e
ll.
4
.
H
eat t
h
e
b
utter in a sma
ll
s
k
i
ll
et over me
d
ium
h
eat unti
l
it turns
b
rown an
d
h
as as nutty aroma. Stir it into t
h
e corn syrup mixture.
5
.
L
ine a 10-inch tart pan with the Su
g
ar Dou
g
h. Arran
g
e the pecan
h
alves in the bottom of the shell. Ladle the fillin
g
over the pecans.
6
.
B
ake the tart
f
or 40 to 45 minutes, or until a skewer inserted
nea
r th
e
ce
nt
e
r
co
m
e
s
ou
t
c
l
ea
n. R
e
m
o
v
e
a
n
d
l
e
t
coo
l
a
t
r
oom tem
p
erature.
7
.
C
ut into wedges and serve with rum-
fl
avored whipped cream or a
s
coop o
f
vanilla ice cream.
R
ecipe courtes
y
Wolfgang Puck
Ma
k
e
s
o
n
e
1
0
-in
c
h t
a
rt
14 15

S
u
g
ar Dou
g
h
M
akes about 1 1/2
p
ounds or two 9-inch tart shells
IN
G
REDIENTS
2
1/3 cups cake or pastr
y
flour
1
/3 cup su
g
ar
1
/2
p
ound (2 sticks) unsalted butter, chilled, cut into small
p
ieces
2
egg
y
olks
1
or 2 tablespoons heav
y
cream
M
ETHO
D
1
.
I
n a food
p
rocessor fitted with the steel blade, combine the
fl
our and su
g
ar. Add the butter and process until the texture
re
s
e
m
b
l
e
s fin
e
m
ea
l.
2
.
I
n a small bowl, whisk together the yolks and 1 tablespoon o
f
the
c
ream. Scrape into the machine and process until a ball be
g
ins to
f
orm, using the additional tablespoon of cream, if necessar
y
. Remove
t
he dough
f
rom the machine, and on a lightly
fl
oured sur
f
ace, press
d
own into a circle. Wrap in plastic wrap and re
f
rigerate
f
or at least
1
h
our.
3
.
U
s
e
a
s n
eeded
.
R
ecipe courtesy Wo
lf
gang Puc
k
M
a
c
ar
oo
ns
IN
G
REDIENTS
1
/2 pound confectioner’s su
g
ar, about 1 7/8 cups
1
/4
p
ound almond meal, about 1 cu
p
1
/2 cup e
gg
whites, about 4 lar
g
e e
gg
whites
P
in
c
h
c
r
ea
m
o
f t
a
rt
a
r
1
1/2 ounces
g
ranulated su
g
ar, about 1/4 cup
5
drops red food colorin
g
METH
OD
1.
P
r
e
h
ea
t th
e
o
v
e
n t
o
3
2
5
°F.
2
.
M
eanwhile, si
f
t together the con
f
ectioner’s sugar and almond meal
d
irect
l
y into a me
d
ium mixing
b
ow
l
. Set asi
d
e.
3
.
I
n another bowl, beat the egg whites until foam
y
. Add the cream
o
f tartar and continue beating until the
y
form soft peaks when
t
he beaters are li
f
ted out. Continue beating while pouring in the
g
ranulated sugar in a steady stream; then, add the
f
ood coloring
a
nd continue beating until full
y
blended, about 30 seconds.
4
.
S
poon the mixture into a piping bag
fi
tted with the round tip. Pipe
th
e mixture into 1-inc
h
roun
d
s on a parc
h
ment paper-
l
ine
d
b
a
k
ing
s
heet. Put the sheet in the oven and bake
f
or 5 minutes; rotate the
s
heet 180 de
g
rees and bake for 7 minutes more, until the macaroons
a
r
e
firm.
5
.
R
emove the baking sheet
f
rom the oven and let the macaroons cool
b
efore transferrin
g
to an airti
g
ht container.
R
ecipe courtesy Wo
lf
gang Puc
k
M
akes a
b
out 3
d
oze
n
1
6
1
7

Limited Warrant
y
T
his warranty covers all defects in workmanship or materials in the
m
echanical and electrical parts, arisin
g
under normal usa
g
e and care, in
t
his
p
roduct for a
p
eriod of 12 months from the date of
p
urchase
p
rovided you are able to present a valid proo
f
-o
f
-purchase. A valid
p
roo
f
-o
f
-purchase is a receipt speci
f
ying item, date purchased, and
c
ost of item. A
g
ift receipt with date of purchase and item is also an
a
cce
p
table
p
roof-of-
p
urchase. Product is intended for household use
o
n
l
y. Any commercia
l
use voi
d
s t
h
e warranty.
T
his warranty covers the original retail purchaser or gift recipient. During
t
he applicable warrant
y
period within normal household use, we will
r
epair or replace, at our discretion, an
y
mechanical or electrical part
w
hich proves de
f
ective, or replace unit with a comparable model.
T
o obtain service under the terms o
f
this warranty,
c
all Toll Free
(
800
)
275-8273.
T
HIS LIMITED WARRANTY
CO
VERS UNITS PUR
C
HASED AND USED
W
ITHIN THE UNITED STATES AND D
O
ES N
O
T
CO
VER:
2O[OUSa
T
`][W[^`]^S`W\abOZZObW]\
2STSQba]bVS`bVO\[O\cTOQbc`W\
U
RSTSQba
2O[O
U
SaT`][[WacaSOPcaSOQQWRS\bOZbS`ObW]\ZOQY]T^`]^S`
care an
d
maintenance, or incorrect current or vo
l
tage.
2O[OUS
T
`][aS`dWQSPg]bVS`bVO\O\OcbV]`WhSRRSOZS`]`
s
e
rvi
ce
ce
nt
e
r.
Th
is warranty gives you specia
l
l
ega
l
rig
h
ts an
d
you may a
l
so
h
ave ot
h
er
r
ights to which you are entitled which may vary
f
rom state to state.
R
ec
ip
e Notes
1
8
19
/