Page is loading ...

quickstart guide
HD-DAx-4K-E Series
www.crestron.com
888.273.7876 201.767.3400
Specifications subject to
change without notice.
QUICKSTART DOC. 7655A (2042047) 08.14
HDMI
®
Express Distribution Amplifiers
For regulatory compliance information, refer to Doc. 7704.
HD-DAx-4K-E Series
Introduction
1
The Crestron
®
HD-DAx-4K-E Series consists of the
HD-DA2-4K-E, HD-DA4-4K-E, and HD-DA8-4K-E, which
distribute one HDMI
®
source to a maximum of two, four, or
eight outputs, respectively. The HD-DAx-4K-E Series provides
high-performance 4K signal splitting to feed multiple displays,
switchers, AV receivers, and other devices.
Mounting
2
Mount the distribution amplifier on a flat surface or on a rack
rail as appropriate for the installation.
NOTE: If a different display is connected to
OUTPUT 1 after the EDID switch has been
placed in the COPY 1ST position, the EDID
settings can be updated by moving the switch
to the DEFAULT position and then back to
the COPY 1ST position. The EDID settings
remain in effect regardless of power cycles
and hotplug events.
NOTE: If the switch is in the COPY 1ST
position but a display is not connected to
OUTPUT 1, the EDID settings of the last
display connected to OUTPUT 1 are sent to
the input device.
3
Connections
Mounting on a Flat Surface
Using four mounting screws (not supplied), mount the
distribution amplifier on a flat surface such as a wall or a table.
Mounting of the HD-DA2-4K-E on a wall is shown below.
Mounting on a Rack Rail
Mount the distribution amplifier on the front or rear rail of a rack
as follows:
EDID Settings
4
Control EDID (Extended Display Identification Data)
settings by moving the EDID switch (located on the
top panel of the distribution amplifier) to the desired
position:
● DEFAULT: (Factory-default setting)
The distribution amplifier sends predefined
Crestron EDID settings to the input device.
The Crestron EDID supports 2-channel LPCM
audio and the following video resolutions:
1920 × 1080 @ 60 Hz (1080p60, preferred
resolution)
1920 × 1080 @ 30 Hz (1080i30)
1280 × 720 @ 60 Hz (720p60)
720 × 480 @ 60 Hz (480p)
● COPY 1ST: The distribution amplifier copies the
EDID settings of the display connected to
OUTPUT 1 and sends the EDID settings to the
input device.
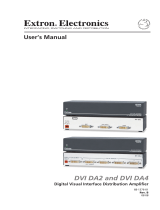
Connect the bottom panel of the distribution
amplifier as follows:
● INPUT: Using an HDMI cable (not supplied),
connect the INPUT port to the HDMI output port
of the audio/video source (for example, a
Blu-ray™ player).
● OUTPUT 1–2, 1–4, or 1–8: Using HDMI cables
(not supplied), connect the OUTPUT ports to the
HDMI input ports of the receiving devices (for
example, HDMI displays).
● SERVICE: Reserved for factory use only.
● 24 V 0.75 A: Using the supplied 24 Vdc power
pack, connect the 24 Vdc power connector to an
ac wall outlet.
Bottom Panel Connections, HD-DA2-4K-E Shown
LED Indicators
5
LED indicators (located on the top panel of the distribution
amplifier) are as follows:
● PWR: Lights green to indicate that power is being
applied to the device.
● INPUT: Lights green to indicate that the HDMI source
signal is being received.
● OUTPUT 1–2, 1–4, or 1–8: Light green to indicate that
the HDMI signal is being sent to the corresponding
outputs.
LED Indicators, HD-DA2-4K-E Shown
EDID Switch, HD-DA2-4K-E Shown
The specific patents that cover Crestron products are listed at patents.crestron.com.
Crestron and the Crestron logo are either trademarks or registered trademarks of Crestron
Electronics, Inc. in the United States and/or other countries. Blu-ray is either a trademark or
registered trademark of the Blu-ray Disc Association in the United States and/or other countries.
HDMI and the HDMI logo are either trademarks or registered trademarks of HDMI Licensing, LLC in
the United States and/or other countries. Other trademarks, registered trademarks, and trade
names may be used in this document to refer to either the entities claiming the marks and names or
their products. Crestron disclaims any proprietary interest in the marks and names of others.
Crestron is not responsible for errors in typography or photography.
This document was written by the Technical Publications department at Crestron.
©2014 Crestron Electronics, Inc.
Mounting Screws (4)
(Not Supplied)
Rack Mounting Screws
(Not Supplied)
DISPLAY
DISPLAY
POWER
PACK
BLU-RAY
TM
5
1. Position either the left or
right mounting flange of the
device so that the holes in
the flange align with the
holes in the rack rail.
Mounting of the right flange
of the HD-DA2-4K-E is
shown to the right.
2. Secure the device to the
rack using two rack
mounting screws
(not supplied).
/