Item Number: 458-424
Model Number: ERZ782478W-4
FOUR-LEVEL STEEL BULK STORAGE RACK
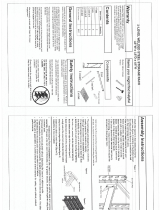
Tools Required
GUARANTEED FOREVER. If your Husky tool or storage
unit ever fails bring it back and we will replace it for
free. This full warranty gives you specific rights which
vary from state to state. If this product is defective con-
tact the manufacturer for repair or replacement parts.
Warranty
Hammer or Rubber Mallet
Adjustable Wrench
Slotted Screwdriver
Contents
Description Quantity Part Number Size
A: beam
8 ERB72BLK 72”
B: frame 2 ERF7824BLK 24” x 78”
C: tie bar 4 ERTB24BLK 24”
D: wire deck
4 RWD2472SF 24” x 72”
E: fasteners 1 bag nuts (8) bolts (8)
F: push clips 16 ERPCLP
Components
A: beam
D: wire shelf
General Instructions
Assembly of this unit is done by fitting the brackets of
the beams into the slots of the post frames.
A rubber mallet should be used on the ledge of the
beams to properly seat the beam brackets..
The stepped surface of the beam ledge is the top, and
should face upwards. This is the surface that the wire
deck will rest on.
A bracket should engage and fit firmly into the tapered
slot of the post frame. This engagement is a tight
swaged fit and will apply resistance as it fully engages.
A visual inspection should be made to show that the
bracket is properly engaged in the slot.
If a hammer is used care should be taken to protect the
beam surface to avoid damage by using a protective
cloth or block of wood. After assembly re-check each
beam for proper engagement.
Safety Instructions
These units should be placed on a level surface. Fail-
ure to do so can result in poor product performance or
create a possible safety hazard.
This unit should be securely anchored to a wall or floor
with suitable fasteners, which are not included.
Do not use this unit for anything other than the manu-
facture’s intended purpose.
Do not stand on any part of the unit, or use it as a lad-
der.
Use care when working with metal parts.
* Evenly distribute the weight on each level and always
keep the heavier loads on the bottom.
B: frame
C: tie bar
F: push clip

Assembly Instructions
Thank You. We appreciate the trust and confidence you have placed in Husky through the purchase of this shelf storage rack.
Should you have any comments, damage, missing parts, or problems with this unit please contact our
Husky Manufacturing Facility at 773-475-3137 or serv[email protected] and request Quality Service.
To obtain replacement parts please provide the following: Model Number, Part Number & Description, Location & Date Purchased.
To purchase additional Storage products please visit www.HomeDepot.com MADE IN CHINA
This storage rack unit must be placed on a level surface. Failure to do so can result in unit failure, poor
product performance, or a possible “tipping” safety hazard.
DO NOT STAND ON THE UNIT OR USE THE UNIT AS A LADDER ! DO NOT OVERLOAD.
Evenly distribute the weight on each shelf, and keep the heaviest loads on the bottom shelf. Use care
and the proper attire when working with metal parts.
Figure 1
Beam
Bracket Tabs
Beam
End Frame Post
End Frame Post Slots
Plastic
Push Clip
Wire Deck Shelving
Figure 3 Figure 2
Tie Bar
Inside Bottom
Edge of Beam
Attach the beams to the welded end frame
posts (see figure 1) starting at the bottom level
by using both end frames to establish the left
and the right sides of the units.
After a beam has been placed in both end
frame posts slots, tap the beam down at both
ends with a rubber mallet to help drive the
beam bracket tabs into the slots to secure the
beam. Continue assembling each level from
bottom to top level (front and back).
If the beam bracket tabs become bent due to
mishandling. It may be necessary to adjust the
tabs back to their proper form.
Place a plastic push clip into the hole of the
beam end clip, then tap the plastic clip with a
mallet to drive it into the hole of the end frame
post to secure the beam to the end frame (see
figure 1).
The completed unit should have four (4) levels
evenly spaced for maximum stability.
Although the beams are adjustable in height,
it’s recommended to evenly space them so
that the stability of the unit is not compro-
mised.
Tie bars are used to assist with a heavy load.
Insert a tie bar in each level by aligning the
holes located on the ends of the tie bar, to the
holes located toward the center and on the in-
side bottom edge of the beams (see figure 2).
Use the nuts and bolts provided to properly
fasten.
Husky Bulk Storage Rack is engineered to offer maximum flexibility as well as ease and quickness of assembly. The rack
units can stand individually, or for greater stability, be joined together using the common post.
Individual beams can be adjusted without disturbing the beams in adjoining units.
These instructions should be followed exactly. All parts supplied must be used as shown. Any alteration or deviation from this
instruction sheet can result in unit failure.
After the unit is assembled, it must be placed on a level surface for safety, and optimal product performance.
-
 1
1
-
 2
2
Husky ERZ782478W4R Installation guide
- Type
- Installation guide
- This manual is also suitable for
Ask a question and I''ll find the answer in the document
Finding information in a document is now easier with AI
Related papers
-
Husky ERZ7824W-1 Operating instructions
-
Husky MR361872W4 Operating instructions
-
Husky MR481886W6B Operating instructions
-
Husky MR602478W5BH User manual
-
Husky MR361872W4 Operating instructions
-
Husky URP481878 Installation guide
-
Husky 80-538-111 Operating instructions
-
Husky ERZ652454W3B Operating instructions
-
Husky G13310S-US User manual
-
Husky 202306 User manual
Other documents
-
Edsal BW2472W4 Assembly Manual
-
 Muscle Rack MWR482448WD3109 Operating instructions
-
Edsal ZB1500 Assembly Manual
-
 Storage Works 8529620 Owner's manual
-
Edsal BW2472 Assembly Manual
-
Edsal BW2472LM4 Assembly Manual
-
Edsal 7224PRB Assembly Manual
-
Edsal ZB2472BCHDPB Assembly Manual
-
Edsal TP722472W3 Operating instructions
-
 Muscle Rack TP601872W4 Operating instructions


