ZKTeco RevFace15 User guide

Type
User guide

ZKTeco RevFace15 is a state-of-the-art facial recognition terminal that offers a range of advanced features for access control and time attendance applications. With its powerful processor and high-resolution camera, the RevFace15 can accurately identify individuals even in low-light conditions. It also supports multiple verification methods, including face, card, and password, providing businesses with a flexible and secure way to manage employee access.

ZKTeco RevFace15 is a state-of-the-art facial recognition terminal that offers a range of advanced features for access control and time attendance applications. With its powerful processor and high-resolution camera, the RevFace15 can accurately identify individuals even in low-light conditions. It also supports multiple verification methods, including face, card, and password, providing businesses with a flexible and secure way to manage employee access.

Quick Start Guide
RevFace15
Due to regular upgrades of systems and products, ZKTeco could not guarantee exact consistency between the
actual product and the written information in this manual
Version: 1.1
.
-1-
Overview
Near-infrared flash
Flash
Camera
Microphone
Speaker
Back plate
Under-screen Card
Reading Area
7" Touchscreen
Device Installation
Place the mounting template sticker onto the wall, and drill holes according to the mounting paper.
Fix the back plate onto the wall using wall mounting screws.
Fix the device into back plate.
Use the safety screw to fasten the device to the back plate.
Installing on the wall
-2-
Baseline
-3-
Standalone Installation
Card Reader
Alarm Smoke
Detector
Lock TCP/IP
Exit Button
Door Sensor
Port Introduction
RJ45 Port
Power
RS232_TXD
RS232_RXD
GND
GND
GND
12VIN
12VIN
AL+
AL-
NC
COM
NO
BUT
GND
SEN
GND
AUX
GND
12V-OUT
GND
IWD0
IWD1
WD0-OUT
WD1-OUT
12V-OUT
GND
485A
485B
RS232
RS485
Wiegand In
Wiegand Out
Alarm
Lock
Exit Button
Sensor
Auxiliary Input
Power Out
Power Out
Power In
Printer Connection
RS232_TXD
RS232_RXD
GND
GND
GND
12VIN
12VIN
RS232
Printer
-4-
Wiegand Reader Connection
Wiegand Reader
GND
+12V
WD1
WD0
Access
Controller
WD1
WD0
+12V
GND
12V-OUT
GND
IWD0
IWD1
WD0-OUT
WD1-OUT
12V-OUT
GND
485A
485B
-
+
Detector
Power
SmokeDetector
COM
NO
-5-
RS485 Connection
RS485 Reader
485+
485-
+12V
GND
Door Sensor, Exit Button & Alarm Connection
Alarm Power
Alarm
-
+
-
+
ExitButton
Door Sensor
AL+
AL-
NC
COM
NO
BUT
GND
SEN
GND
AUX
GND
12V-OUT
GND
IWD0
IWD1
WD0-OUT
WD1-OUT
12V-OUT
GND
485A
485B
Lock Relay Connection
1) Device not sharing power with the lock 2) Device sharing power with the lock
The system supports both Normally Opened Lock and Normally Closed Lock. The NO Lock (normally
open when powered) is connected with 'NO' and 'COM' terminals, and the NC Lock (normally close
when powered) is connected with 'NC' and 'COM' terminals. The power can be shared with the lock or
can be used separately for the lock, as shown in the example with NC Lock below:
DC12V
FR107
NC Lock
DC12V
DC12V
FR107
NC Lock
Ethernet Connection
Connect the device and the software over an Ethernet cable. An example is shown below:
: 192.168.1.201Default IP address
: 255.255.255.0 Subnet mask
: 192.168.1.130IP address
: 255.255.255.0 Subnet mask
Click [Comm.] > [Ethernet] > [IP Address], input the IP address and click [OK].
Note: In LAN, the IP addresses of the server (PC) and the device must be in the same network
segment when connecting to ZKBioAccess IVS software.
+12V
GND
AL+
AL-
NC
COM
NO
BUT
GND
SEN
GND
AUX
GND
+12V
GND
AL+
AL-
NC
COM
NO
BUT
GND
SEN
GND
AUX
GND
-6-
Power Connection
Recommended AC adapter: 12V 3A,
AC adapterTo share the power with other devices, use a with higher current ratings. n
DC 12V, 3A
-7-
User Registration
Method 1: Register on the device
When there s no super administrator set in the device, click on enter the menu. Add a new i to
user and set User Role to Super Admin, then the administrator’s the system will request for
verification before entering the menu. It is recommended to register a super administrator initially
for security purposes.
Tap on > [ ] > [ ] to register a new user. The options include entering the User ID User Mgt. New User
and Name, setting User Role, registering Face, Card Number, Password, adding Profile Photo, and set-
ting Access Control Role.
Main Menu
User Mgt. User Role COMM. System
Data Mgt.Personalize Attendance
Search
Autotest System Info
Access Control
L
Print
User Mgt.
New User
All Users
Display Style
Search
Device Type Serial Number
MAC Address Subnet
Mask
Gateway
Address
Serial
Number
Device
Type
Set Server Operations
Refresh New Delete Export Search Control Set up View / Get Communication
Search No device found? Download Search Tools to Local Disk
Total Progress
IP Address
IP Address
Searched devices count:1
192.168.1.10 255.255.255 192.168.1.1
-8-
Method 2: Register on ZKBioAccess IVS software
Please set the IP address and cloud service server address in the Comm. menu option on the device.
1. Click [Access] > [Device] > [Device] > [Search] to search the device on the software. When an
appropriate server address and port is set on the device, the searched devices are displayed
automatically.
CJHC203336 RevFace1 Add
Step1
Step2
Step3
The current systen communication port is 6609, please make sure the device is set correctly.
Close
Add
Device Name
Icon Type
Area
Add to Level
Clear Data in the Device when Adding
[Clear Data in the Device when Adding] will delete data in the device(except event
record), please use with caution!
OK Cancel
192.168.1.102
Door
Area Name
Step 4
Enroll Face
Enrolled Successfully
-9-
2. Click [Add] in operation column, a new window will pop-up. Select Icon type, Area, and Add to
Level from each dropdown and click [OK] to add the device.
3. Click [Personnel] > [Person] > [New] and fill in all the required fields to register a new user in
the software.
4. Click [Access] > [Device] > [Control] > [Synchronize All Data to Devices] to synchronize all the
data to the device including the new users.
For more details, please refer to the ZKBioAccess IVS User Manual.
Method 3: Register on the phone
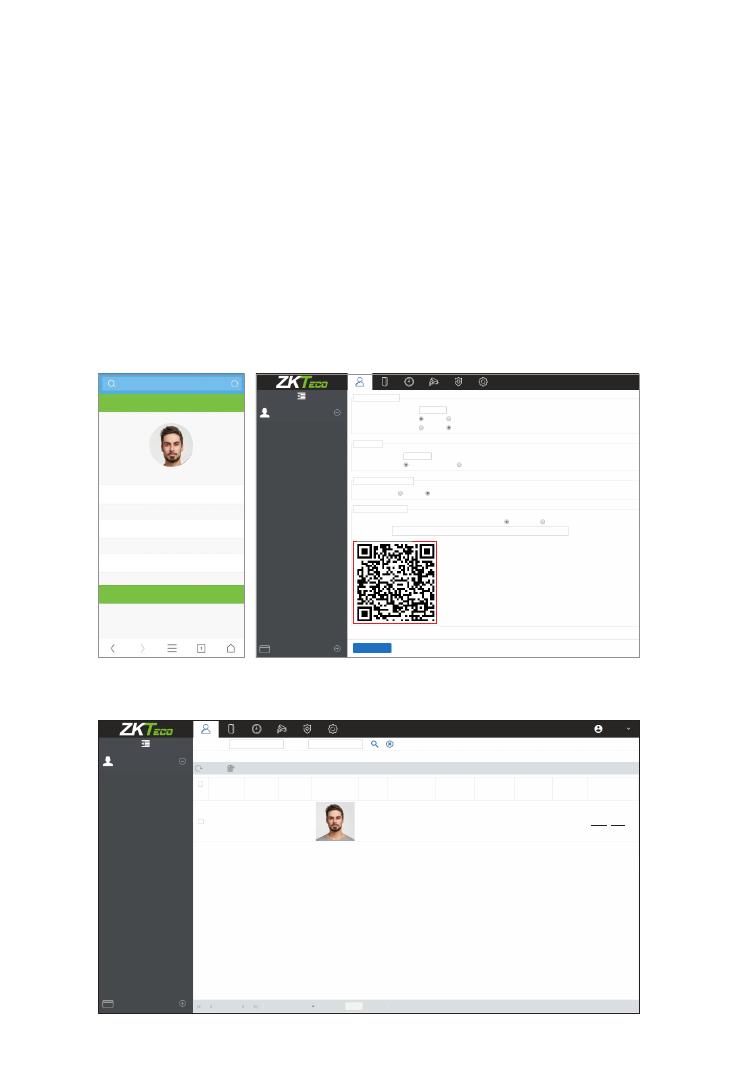
2. The users will be displayed in [Personnel] > [Pending Review], click on [Review] option and
assign a department and click [OK] to successfully add the user.
Once the ZKBioAccess IVS software is installed, users can enroll face via a browser application on their
mobile phone.
1. Click [Personnel] > [Parameters], input http://Server address: Port in the QR Code UGL bar. The " "
software will automatically generate a QR code. Scan the QR code or login onto
http://Server address: Port/app/v1/adreg by the mobile phone to register the user." "
Personnel ID Name
admin
Personnel
Person
Department
Pending Review
Custom Attributes
Parameters
The current query conditions None
Refresh Delete
Personnel ID First Name Last Name Mobile Phone Status Create Time OperationsAny exposure to
suspected
cases
Any symptoms
in the last 14
days
City visited in
past 14 days
Remarks on
health
4835 Mike Lee Approved 2020-12-03 12:00:59 No None 7 Review Delete
Card Management 1-1 50 rows per page Jump To 1 /0 Page Total of 0 records
Personnel
Person
Department
Pending Review
Custom Attributes
Parameters
Perso nnel I D Setting
The M axim um Le ngth :
Support Lett ers:
Perso nnel I D Auto-incre ment:
Card S ettin g
The M axim um L engt h:
Card F orma t Dis play:
Pend ing p ers onne l set tin gs
Ena ble Au to- aud it:
Self-servic e Regi strat ion
QR C ode UR L:
Yes No
Yes No
Bits(Binary)
Deci mal Hex ade cim al
Yes No
http://Server address:Port
Down loa d QR cod e ima ge
15
32
OK
Card Management
Personnel Registration
Personnel ID
First Name
Last Name
Lee
Mike
4835
OK
Enab le th e declaration of health i nfor mati on: Yes No
Main Menu
User Mgt. User Role COMM. System
Data Mgt.Personalize Attendance
Search
Autotest System Info
Access Control
L
Print
Main Menu
User Mgt. User Role COMM. System
Data Mgt.Personalize Attendance
Search
Autotest System Info
Access Control
L
Print
Ethernet and Cloud Server Settings
Click on > [COMM.] > [Ethernet] to set the network parameters. If the TCP/IP communication of the
device is successful, the icon will be displayed in the upper right corner of the standby interface.
Click on > [COMM.] > [Cloud Server Settings] to set the server address and server port, i.e., the IP
address and port number of the server after the software is installed. If the device communicates with
the server successfully, the icon will be displayed in the upper right corner of the standby interface.
Access Control Setting
Click on to enter the access control management interface and set relevant > [Access Control]
parameters of the access control.
192.168.163.200
114.114.114.114
4370
255.255.255.0
192.168.163.1
IP Address
Subnet Mask
Gateway
DNS
TCP COMM. Port
DHCP
Display in Status Bar
Ethernet
ADMS
8081
0.0.0.0
Server Mode
Enable Domain Name
Server Address
Server Port
Enable Proxy Server
HTTPS
Cloud Server Settings
Access Control Options
Time Rule setting
Holidays
Combined Verification
Anti-passback Setup
Duress Options
Access Control
-10-
Main Menu
User Mgt. User Role COMM. System
Data Mgt.Personalize Attendance
Search
Autotest System Info
Access Control L
Print
Attendance Record
Click on > [Event Logs] to enter the records query interface, input the > [Attendance Search]
user ID and select the time range . The corresponding event logs will be displayed.
01-05
01-06
01-07
4
2
3
1
3
2
4
1
4
3
2
11:25
11:25 11:22
11:25
11:29
11:29 11:21
11:28
11:26
11:27
11:27
11:27
11:27
Personal Record Search
Date User ID Time
Number of Records:04
Main Menu
User Mgt. User Role COMM. System
Data Mgt.Personalize Attendance
Search
Autotest System Info
Access Control
L
Print
Detection Management Settings
Click on > [System] > [Detection Management] to enter the setting interface.
You can enable mask detection function, and enable the Deny Access Without Mask and the
Trigger External Alarm, the device will send an alarm prompt when the user doesn’t wear a mask,
meanwhile the user will be forbidden to access, as shown in the following figure.
When the Allow Unregistered People to Access is enabled, you can also set Enable Capture of
Unregistered Person to save the user photo.
-11-
1
2
Event Logs
Attendance Photo
Blocklist ATT Photo
Attendance Search
L
L
L
When the Multi-face Identifying is enabled, the device can perform facial recognition of multiple
people at once. For more details, please refer to the User Manual.
-12-
Click on > [System] > [Face] > [Face Identifying Settings] > [Identifying Mode] to enter the
setting interface.
Multi-face Identifying Settings
Main Menu
User Mgt. User Role COMM. System
Data Mgt.Personalize Attendance
Search
Autotest System Info
Access Control
L
Print
Anti-Spoofing Settings
Image Exposure Settings
Face Identifying Settings
Fill Light Sensitivity
Motion Detection Sensitivity
Face Algorithm
Face
80
4
Multi-face Identifying
Content Mode to Dis...
Count to Display
Tracking Identification
Identifying Mode
User ID
3
12:00
12:00:00
Michael
12:00:00
Jordan
12:00:00
Gabrielle
12:00:00
Raffaella
Copyright@2023 ZKTECO CO., LTD. All Rights Reserved.
ZKTeco Industrial Park, No. 32, Industrial Road,
Tangxia Town, Dongguan, China.
Phone : +86 769 - 82109991
Fax : +86 755 - 89602394
www.zkteco.com
  • Page 1 1
  • Page 2 2
  • Page 3 3
  • Page 4 4
  • Page 5 5
  • Page 6 6
  • Page 7 7
  • Page 8 8
  • Page 9 9
  • Page 10 10
  • Page 11 11
  • Page 12 12
  • Page 13 13
  • Page 14 14

ZKTeco RevFace15 User guide

Type
User guide

ZKTeco RevFace15 is a state-of-the-art facial recognition terminal that offers a range of advanced features for access control and time attendance applications. With its powerful processor and high-resolution camera, the RevFace15 can accurately identify individuals even in low-light conditions. It also supports multiple verification methods, including face, card, and password, providing businesses with a flexible and secure way to manage employee access.

Ask a question and I''ll find the answer in the document

Finding information in a document is now easier with AI