Page is loading ...

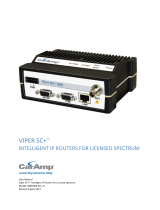
INTEGRA-TR™
WIRELESS MODEM FOR LICENSED SPECTRUM
USER MANUAL
PN 001-4008-100 REV 6
FEBRUARY 2013

REVISION HISTORY
Rev 0 June 2011
Initial Release.
Rev 1 August 2011
Changed Dual Band references to Dual IF, sections 1.6 and 1.8.
Deleted Synthesizer reference, section 4.3.1.3.
Rev 2 January 2012
Added VHF Dual Band specifications and part numbers, splinter channel frequencies and FCC/IC indicators.
Rev 3 April 2012
Corrected part numbers in section 1.6.
Rev 4 September 2012
Updated VHF model numbers, FCC and IC Emission Designators.
Rev 5 November 2012
Added the 12.5/6.25 kHz bandwidths for the UHF Integra.
Rev 6 February 2013
Corrected errors in Table 4 regarding the 2424048351 and 2424048551 Models.
Change the UHF RF Exposure Compliance Requirements table

Important Notices
Because of the nature of wireless communication, transmission and reception of data can never be guaranteed. Data may
be delayed, corrupted (i.e., have errors), or be totally lost. Significant delays or losses of data are rare when wireless devices
such as the Integra-TR are used in a normal manner with a well-constructed network. Integra-TR should not be used in
situations where failure to transmit or receive data could result in damage of any kind to the user or any other party,
including but not limited to personal injury, death, or loss of property. CalAmp accepts no responsibility for damages of any
kind resulting from delays or errors in data transmitted or received using Integra-TR, or for the failure of Integra-TR to
transmit or receive such data.
This document provides the information required for the operation and preventive maintenance of the Integra-TR
integrated wireless modem. This manual is intended for system designers, installers and maintenance technicians. The
Field Programming Software for the Integra is the professional service installer interface. The Field Programming
Software should never be made available to unqualified personnel.
Copyright Notice
© 2011 CalAmp Corp. All rights reserved.
Products offered may contain software proprietary to CalAmp. The offer of supply of these products and services does not
include or infer any transfer of ownership. No part of the documentation or information supplied may be divulged to any
third party without the express written consent of CalAmp. CalAmp reserves the right to update its products, software, or
documentation without obligation to notify any individual or entity. Product updates may result in differences between the
information provided in this manual and the product shipped.
RF Exposure Compliance Requirements
The Integra-TR radio is intended for use in the Industrial Monitoring and Control and SCADA markets. The
Integra-TR unit must be professionally installed and must ensure a minimum separation distance listed in the
table below between the radiating structure and any person. An antenna mounted on a pole or tower is the
typical installation and in rare instances, a 1/2-wave whip antenna is used.
Antenna Gain
Min Safety Distance (cm @max power)
5 dBi
10 dBi
15 dBi
VHF
79.3 cm
141.0 cm
250.8 cm
UHF
74.8 cm
133 cm
236.4 cm
900 MHz
45.0 cm
80.1 cm
142.5 cm
It is the responsibility of the user to guarantee compliance with the FCC MPE regulations when operating this device in a
way other than described above.
Integra-TR uses a low power radio frequency transmitter. The concentrated energy from an antenna may pose a health
hazard. People should not be in front of the antenna when the transmitter is operating.
The installer of this equipment must ensure the antenna is located or pointed such that it does not emit an RF field in
excess of Health Canada limits for the general population. Recommended safety guidelines for the human exposure to radio
frequency electromagnetic energy are contained in the Canadian Safety Code 6 (available from Health Canada) and the
Federal Communications Commission (FCC) Bulletin 65.
Any changes or modifications not expressly approved by the party responsible for compliance (in the country where used)
could void the user's authority to operate the equipment.

Table of Contents
1
PRODUCT OVERVIEW ........................................................................................................................................................... 6
1.1 General Description ..................................................................................................................................................... 6
1.2 Operational Characteristics ......................................................................................................................................... 6
1.3 Physical Description ..................................................................................................................................................... 7
1.4 Front Panel ................................................................................................................................................................... 7
1.4.1 Antenna Connector .............................................................................................................................................. 7
1.4.2 LED Indicators ...................................................................................................................................................... 7
1.4.3 COM Port ............................................................................................................................................................. 8
1.4.4 Setup Port ............................................................................................................................................................ 9
1.5 Rear Panel .................................................................................................................................................................... 9
1.5.1 Heat Sink ............................................................................................................................................................ 10
1.5.2 Power – I/O Connector ...................................................................................................................................... 10
1.6 Part Number Breakdown ........................................................................................................................................... 10
1.6.1 Transceiver Identification .................................................................................................................................. 11
1.7 Accessories and Options ............................................................................................................................................ 11
1.8 Specifications ............................................................................................................................................................. 12
2 Getting Started .................................................................................................................................................................. 14
2.1 Device Connections .................................................................................................................................................... 14
2.2 Field Programming Software ..................................................................................................................................... 14
2.2.1 Installing the FPS ................................................................................................................................................ 15
2.2.2 Using the FPS ..................................................................................................................................................... 16
3 Network Applications ........................................................................................................................................................ 17
3.1 RF Path and Communications Range ......................................................................................................................... 17
3.2 Common Architecural Characteristics ....................................................................................................................... 17
3.2.1 Point-to-Point System ........................................................................................................................................ 17
3.2.2 Point-to-Multipoint System ............................................................................................................................... 18
3.2.3 Extending a Landline (Tail Circuit) ...................................................................................................................... 20
4 Integra-TR Field Programming Software ........................................................................................................................... 21
4.1 Integra-TR Programmer Window ............................................................................................................................... 21
4.2 File Menu ................................................................................................................................................................... 21
4.3 Edit Menu................................................................................................................................................................... 22
4.3.1 Setup Modem/Radio Parameters ...................................................................................................................... 23
4.3.2 Version Request ................................................................................................................................................. 32
4.3.3 List Information .................................................................................................................................................. 33
4.3.4 Apply Integra Reset ............................................................................................................................................ 33
4.3.5 Program Comment/ID ........................................................................................................................................ 33
4.3.6 Program Parameters .......................................................................................................................................... 34
4.3.7 Read Parameters ................................................................................................................................................ 35
4.3.8 Copy Parameters ................................................................................................................................................ 35
4.4 Utilities Menu ............................................................................................................................................................ 35
4.4.1 Port Settings ....................................................................................................................................................... 36
4.4.2 Swap COM Ports ................................................................................................................................................ 39
4.4.3 Port Statistics ..................................................................................................................................................... 39
4.4.4 Offline Link Test ................................................................................................................................................. 41
4.4.5 Offline Diagnostics ............................................................................................................................................. 42
4.4.6 Online Diagnostics ............................................................................................................................................. 45
4.4.7 Diagnostic IDs and Alarms.................................................................................................................................. 48
4.4.8 User Test ............................................................................................................................................................ 49
4.4.9 Packet Test ......................................................................................................................................................... 51
4.4.10 Array Test ........................................................................................................................................................... 53

4.4.11
Ping Test ............................................................................................................................................................. 55
4.4.12 ASCII/Hex Terminal ............................................................................................................................................ 57
4.5 Program Code Menu .................................................................................................................................................. 59
5 Network Optimization ....................................................................................................................................................... 60
5.1 Choose the best protocol ........................................................................................................................................... 60
5.2 Check timer settings .................................................................................................................................................. 60
5.3 Avoid flow control ...................................................................................................................................................... 60
5.4 Use the highest suitable port baud rate .................................................................................................................... 60
5.5 Evaluate the need for online diagnostics ................................................................................................................... 60
5.6 Interpreting RSSI Readings ......................................................................................................................................... 60
5.7 Interpreting Power Readings ..................................................................................................................................... 61
5.8 swr and Reverse Power .............................................................................................................................................. 61
6 DEFINITIONS ...................................................................................................................................................................... 62

1 PRODUCT OVERVIEW
This document provides the information required for the operation and preventive maintenance of the Integra-TR
integrated wireless modem. This manual is intended for system designers, installers and maintenance technicians. The
Field Programming Software for the Integra is the professional service installer interface. The Field Programming
Software should never be made available to unqualified personnel.
1.1 GENERAL DESCRIPTION
Integra-TR is a high-speed transparent integrated wireless modem. It is FCC refarming compliant and designed specifically
to fit the needs of SCADA, telemetry and control applications. Integra-TR provides the communication links to data
equipment for installations where wired communication is impractical.
Integra-TR works with most makes and models of remote terminal units (RTU) and programmable logic controllers (PLC)
and their protocols. Configuration settings allow tailoring for a variety of applications. Integra-TR supports:
• Point to point Master-Remote or Peer-to-Peer configurations in simplex or half-duplex modes.
• Point to multipoint Master-Remote configuration in simplex or half-duplex modes and offers full-duplex in dual-
unit configuration. These configurations are available as I-Base products. Contact your CalAmp Representative for
details.
1.2 OPERATIONAL CHARACTERISTICS
Integra-TR has the following operational characteristics:
Selectable network speeds of 4800 and 9600 b/s for half
channel units as well as 4800, 9600 and 19200 b/s for full
channel units
Backward compatible with the Integra-T for bit rate of 4800 and 9600 b/s (full channel units only)
One COM port for connection to DTE. Speed of 1200 - 19200 baud
One Setup port for configuration and diagnostics (speed fixed to 9600 baud, 8 bit, no parity, 1 stop bit)
Built-in 5-watt transceiver (adjustable 1-5 watts), operating in the VHF, UHF or 900 MHz communications
bands.
Half-duplex or simplex operation
Fully transparent operation with error-free data delivery
Allows transmission of “break” characters
DOX (Data Operated Transmit) or RTS mode
Stations may be set as “master” or “remote” to prevent remote stations from hearing each other in a simplex RF
configuration
Full local and remote diagnostics
Two configurable I/O lines programmable as either 8-bit analog inputs or digital outputs
12 VDC, negative ground device
CWID provides the ability to program the unit to periodically identify itself on the air by sending the FCC Station ID
in Morse code
Disable Tx w/Carrier Present configures the unit to prevent transmission when the radio channel is busy
Low power consumption modes: “sleep” and “suspend” modes (< 20 mA)
Multi-channel capability under system PLC control provides advanced network monitoring
Page | 6

1.3 PHYSICAL DESCRIPTION
Integra-TR consists of a logic PCB (which includes modem circuitry) and a radio module. Each logic PCB and radio module
are matched together and characterized in the factory to optimize performance as an intelligent unit. The two boards then
slide into the rails of an extruded aluminum case.
DTE connection is made via a front panel connector. Power is applied through a rear panel 4-pin connector which includes
two programmable analog connections usable as inputs or outputs.
The unit is not hermetically sealed and should be mounted in a suitable enclosure when dust and/or a corrosive
atmosphere are anticipated. Physically, there are no external switches or adjustments. All operating parameters are set
using the Field Programming Software.
1.4 FRONT PANEL
Integra-TR front panel elements are described in Figure 1 - Integra TR Front Panel Figure 1.
Figure 1 - Integra TR Front Panel
1.4.1 ANTENNA CONNECTOR
Integra-TR antenna connector is a female 50-ohm SMA- type. Units operating with a rubber duck connected directly to the
antenna connector may exhibit unusual operating characteristics and high levels of reverse power.
1.4.2 LED INDICATORS
Integra-TR has four two-color LED indicators. Their functions are shown in Table 1. LED indicators may vary during startup.
Table 1 - LEDs
LED
Color
Functions
RUN/PWR
Green
Normal operation
Flash Yellow and Green Setup mode or loading new application or new bootloader
Flash Red Firmware error (Contact Technical Support)
Red
CPU or PROM failure (Contact Technical Support)
Page | 7

CS/SYN
Off No RF RX carrier
Green
Receive carrier present
Red (Reserved)
RX/TX
Off No RF RX carrier
Green Receiving network data
Yellow
Synthesizer unlocked
Red Transmitter is on
RD/TD
Off Idle
Green RX data outgoing from RS-232 port
Red
TX data incoming at RS-232 port (or Buffered in CSMA Mode)
1.4.3 COM PORT
Integra-TR is configured as DCE. DTE devices should be connected using a nine-conductor pin-to-pin straight cable (PN 697-
4008-408). Some RTUs or PLCs may require a special cable to route the signals correctly. Refer to your data equipment
documentation package.
DTE baud rates from 1200 to 19200 are supported. Integra-TR's are factory set for or 9600 b/s, 8 bits, no parity, and 1 stop
bit. Unless required by your operating protocol, we advise restricting port speed to be equal to or less than the RF network
speed.
Table 2 - COM Port Signals
Pin Name Function
1 DCD
Output: Always asserted or asserted when receive RF carrier present (selectable via Field
Programming Software)
2 RXD Output: Data from Integra-TR to DTE
3 TXD Input: Data from DTE to Integra-TR
4 DTR Input: Ignored
5 GND Signal and chassis ground
6 DSR Output: always positive
7 RTS Input: Used as a “begin transmission” signal in RTS mode
8 CTS
Output: Used for handshaking in RTS mode and used for flow control in DOX mode RTS mode: RTS
to CTS delay in 4 ms DOX mode: CTS always asserted except when data overflow is detected
9 RI Not internally connected, reserved
The DE-9F pin out is shown in Figure 2 for reference.
Figure 2 - COM and Setup Port Connectors Pin Locations
5 4 3 2 1
9 8 7 6
Page | 8

For DTE that lack RTS control, Integra-TR can operate in DOX (Data Operated Transmit) mode with only Transmit Data,
Receive Data and Ground. This 3-wire interface is shown in Figure XX.
Figure 3 - 3-wire Interface
1.4.4 SETUP PORT
The Setup port uses a DE-9 female connector configured as DCE. Signals are described in Table 3.
Table 3 - Setup Port Signals
Pin Name Function
1 DCD Tied directly to DTR
2 RXD Data from Integra-TR to setup PC
3 TXD Data from setup PC to Integra-TR
4 DTR Tied directly to DCD
5 GND Signal and chassis ground
6 DSR Output: always positive (asserted)
7 RTS Tied to CTS
8 CTS Tied to RTS
9 RI Not internally connected, reserved
The Setup port uses a proprietary communications protocol designed to work with the Integra-TR Field Programming
Software program. It is also designed to provide alpha numeric (ASCII) diagnostics information when connected to a PC
terminal emulator.
1.5 REAR PANEL
Figure 4 - Integra-TR Rear Panel
Page | 9

1.5.1 HEAT SINK
The rear panel heat sink is essential for proper operation of the Integra-TR transmitter. The unit must be mounted in a
location that permits free air circulation past the heat sink. Cooling will be best if the fins are vertical.
1.5.2 POWER – I/O CONNECTOR
The Integra-TR power requires a regulated power source of 13.3 VDC nominal (10-16 VDC MAX) negative ground with a 3.0
A rating. An internal surface-mount 3A fuse (not field-replaceable) and a crowbar diode protect the main RF power
components from reverse polarity. Application of more than 16 VDC will damage the unit and is not covered by the
warranty.
The 4-pin power/analog connector pin out is shown in Figure 5.
Figure 5 - I/O Connector
Note: If I/O connections are not used the green and white wires should be cut back and/or taped to prevent contact (power
I/O cable part number 697-4008001 see Table 5).
1.6 PART NUMBER BREAKDOWN
The following table provides a breakdown of the Integra-TR part number.
Table 4- Integra-TR Part Number Breakdown
242-40W8-XYZ*
W
X
Y
Z
1 VHF
4 136-162 MHz
5
0 Dual IF 12.5 & 25 kHz
4 136-162 MHz
5
1 Dual IF 6.25 & 12.5 kHz
5 148-174 MHz
5
0 Dual IF 12.5 & 25 kHz
5 148-174 MHz
5
1 Dual IF 6.25 & 12.5 kHz
4 UHF
3 406.1-440 MHz (for U.S.)
5
0 Dual IF 12.5 & 25 kHz
3 406.1-440 MHz (for U.S.)
5
1 Dual IF 6.25 & 12.5 kHz
5 440-476 MHz (for U.S.)
5
0 Dual IF 12.5 & 25 kHz
5 440-476 MHz (for U.S.)
5
1 Dual IF 6.25 & 12.5 kHz
3 406.1-430 MHz (for Canada)
5
0 Dual IF 12.5 & 25 kHz
3 406.1-430 MHz (for Canada)
5
1 Dual IF 6.25 & 12.5 kHz
5 450-470 MHz (for Canada)
5
0 Dual IF 12.5 & 25 kHz
5 450-470 MHz (for Canada)
5
1 Dual IF 6.25 & 12.5 kHz
*An F should follow any part number to designate an Integra-TR with the cooling fan option.
Page | 10

1.6.1 TRANSCEIVER IDENTIFICATION
The transceiver identification is a random, unique serial number (SN) that can be found on the side label of the
Integra-TR device. It is also printed on the box label.
1.7 ACCESSORIES AND OPTIONS
Table 5 - Accessories
Part Number
Accessory
250-4008-001
Integra-TR Field Programming Kit includes software, technical manual on CD ROM with
programming cable (Part Number 697-4008-408)
697-5000-101
SMA to Type N-Male Adapter Cable
002-4008-100
Start-Up Disc includes Field Programming Software, Manual and Quick Start Guide
Catalog Number + (F)
Factory Installed Cooling Fan
697-4008-001
Power cable
250-0300-133
Switching Power Converter (SPC)
250-0300-175
Demo Power Kit
250-0045-103
Data Interface Kit
250-0005-105
Data Diagnostic Kit
250-5800-408
Integra-TR DIN-rail Mounting Kit
Contact Technical Service
*Full-duplex base station
Figure 6: Integra-TR Mechanical Specifications
Page | 11

1.8 SPECIFICATIONS
These specifications are subject to change without notice. RF specifications are measured per TIA/EIA-603 with a
psophometric baseband filter.
General
Frequency
VHF 136-174 Dual IF, UHF 406.1-476 MHz Dual IF
Channels
Multi-channel capability under system PLC control
Channel Bandwidth
VHF - 6.25 and 12.5 kHz or 12.5 and 25 kHz (software programmable)
UHF - 12.5 and 25 kHz (software programmable)
Operating Temperature
-30° to + 60° C
Supply Voltage
10 - 16 VDC maximum (nominal 13.3) Fuse protected against reverse voltage
RX Current Drain at 13.3 VDC
< 270 mA (with a terminal connected to Integra-TR COM port)
TX Current Drain at 13.3 VDC
<2.6 A
Power Saving Mode Current Drain
<20 mA
Cold Start
1
4 sec (typical)
Warm Start Rx
2
45 to 60 ms (depending on radio model and temperature)
Warm Start Tx
3
55 to 70 ms (depending on radio model and temperature)
Tx Turn On Time
4
15 ms (typical)
RX/TX Bandwidth (without tuning)
38 MHz 136-174 (Dual), 34 MHz (406.1-440 Dual)
+
Includes 102 cm power cable
Receiver
Sensitivity 0.35 µV for 12 dB SINAD
Alternate Channel Selectivity (6.25 kHz)
>65 dB minimum
Adjacent Channel Selectivity (12.5 kHz)
>60 dB minimum x51 - Dual IF 6.25 & 12.5 kHz models
Adjacent Channel Selectivity (12.5 kHz)
>55 dB minimum x50 - Dual IF 12.5 & 25.0 kHz models
Adjacent Channel Selectivity (25 kHz)
>65 dB minimum
Intermodulation >70 dB minimum
Spurious Rejection
>70 dB minimum
Conducted Spurious < -57 dBm
1
Cold Start: Time from DC power applied until unit is fully ready to receive or transmit data
2
Warm Start Rx: In power saving modes (sleep or suspend), wake-up time for full receiver recovery
3
Warm Start Tx: In power saving modes (sleep or suspend), wake-up time for full transceiver operation
4
Tx Turn On Time: Typical Rx to Tx switching time for stable transmission
Transmitter
RF Power Output 1 to 5 Watts, software adjustable
Spurious and Harmonics <-57 dBc (-20 dBm)
Frequency Tolerance
+ 1.5 PPM
Tx Duty Cycle 50%, max. Tx time 30 seconds, extended Tx time with the cooling fan option
Page | 12

Modem/Logic
Operation Simplex/half duplex
Data Bit Rates (b/s) 25 kHz: 4800/9600/19200; 12.5 kHz: 4800/9600
Modulation Type DRCMSK (Differential Raise-Cosine Minimum Shift Keying)
RTS/CTS Delay (RTS mode)
4 ms
Addressing
10 bit station address, 1 bit station type (master / remote)
Bit Error Rate (BER)
12.5 kHz @ 9.6 kbps: -104 dBm, 1x10⁻⁶ @ 1.4 µV
25 kHz @ 4.8 or 9.6 kbps: -107 dBm, 1x10⁻⁶ @ 1.0 µV
25 kHz @ 19.2 kbps: -100 dBm, 1x10⁻⁶ @ 2.3 µV
COM Port
Interface
EIA RS-232C
Data Rate
1200 - 19200 b/s
Protocol
Transparent, 7 or 8 data bits, 1 or 2 stop bits, even, odd or no parity
Transmit Control
RTS or DOX (data operated transmit)
Set Up Port
Data Format Proprietary binary for setup, ASCII for diagnostics
Data Rate 9600 b/s, 8 bit, no parity, 1 stop bit
Analog Inputs
Interface
Two inputs, 0-10 VDC, 8 bits. May be read only via Offline Diagnostics.
Absolute maximum input voltage < 20 Vdc. Inputs are reverse-voltage protected.
Digital Outputs
Interface Two outputs, requires external pull-up to 2 to 10 Vdc. Set via Offline Diagnostics
Display
4 Bi-color status LEDs RUN/PWR/ CS/SYN, RX/TX, RD/TD
Connectors
RF SMA Female
COM DE-9F
SETUP/DIAG
DE-9F
Power - I/O
Snap & Lock 4-Pin DC Power Jack
Diagnostics
Online
Short ID, temp, B+ voltage, local RSSI, remote RSSI, fwd and rev power, Rx Quality
Offline
Online plus: Demodulated Signal Voltage, Analog Input Levels, Digital Outputs
Approvals/Certifications VHF
FCC IDENTIFIER
NP44018450 3K20F1D, 4K00F1D, 5K67F1D, 8K08F1D, 9K30F1D, 16K3F1D
IC IDENTIFIER 773B-4018450 3K20F1D, 4K00F1D, 5K67F1D, 8K08F1D, 9K30F1D, 16K3F1D
Page | 13

Approvals/Certifications UHF
FCC IDENTIFIER
NP44048350 9K30F1D, 15K3F1D
IC IDENTIFIER 773B-4048350 9K30F1D, 15K3F1D
FCC IDENTIFIER NP44048351 3K30F1D, 3K40F1D, 8K80F1D
FCC IDENTIFIER NP44048551 3K30F1D, 3K40F1D, 8K80F1D
IC IDENTIFIER
773B-4048351 3K30F1D, 3K40F1D, 8K80F1D
IC IDENTIFIER 773B-4048551 3K30F1D, 3K40F1D, 8K80F1D
2 GETTING STARTED
It is easy to set up an Integra-TR network to verify basic unit operation and experiment with network designs and
configurations. An RX/TX antenna is required for basic operation. It is important to use attenuation between all demo units
to reduce the amount of signal strength in the test environment.
2.1 DEVICE CONNECTIONS
Refer to the diagram below for the proper device connections for basic operation.
2.2 FIELD PROGRAMMING SOFTWARE
The Integra-TR Field Programming Software (FPS) is the programming and diagnostics software for the Integra-TR wireless
modem. The software allows the user to edit and program user programmable settings, interactively tune modem and RF
parameters, and monitor diagnostic data from the Integra-TR.
There are two specific model categories. The 2424048X50 models are the 12.5/25.0 kHz models and the 2424048X51 are
the 12.5/6.25 kHz models. The models are set up at the factory. The model specific parameters are grayed out in the Field
Programming Software and cannot be changed outside of the factory.
Page | 14

Integra-TR FPS is available on the Start-Up CD-ROM as a .zip file. You may also visit the Download Library available from the
Support Menu at
www.calamp.com for the most current version available. The Field Programming Software for the
Integra is the professional service installer interface. The Field Programming Software should never be made
available to unqualified personnel.
2.2.1 INSTALLING THE FPS
To use the software, you will need a PC with Windows 98 or later and at least one operational COM Port available.
STEP 1 Open the .zip file and double-click on the setup.exe application. After the application is extracted from the .zip
file, you will be brought to the Integra-TR Setup screen. Click OK to begin.
STEP 2 Click the image of the PC to install the software.
STEP 3 The program will then be added to the folder name shown in the Program Group box, the default is Dataradio
Utils. Click Continue to finish the install.
Page | 15

2.2.2 USING THE FPS
Make sure all connections are made as shown in the diagram and then power on the device.
STEP 1 Locate the Dataradio Utils folder (or if you named the Program Group box differently during install) and select the
IntegraTR application.
STEP 2
From the Integra-TR Programmer screen, click on the Program button in the upper left corner. This will bring up the
Program Parameters screen and display the option to automatically configure the device as a Remote or Master.
Click OK.
Page | 16

STEP 3 Click the Parms button in the upper left corner of the FPS screen. Here the Modem, Com/Analog, Radio and
Frequencies settings can be changed. Click OK when done.
Your modem is now ready for use.
3 NETWORK APPLICATIONS
Integra-TR is suited to a variety of network applications. Its primary design goal was to satisfy the needs of SCADA systems
using RTUs or PLCs in either point-to-point or point-to-multipoint service. Below is an overview of common configurations.
3.1 RF PATH AND COMMUNICATIONS RANGE
Integra-TR is designed for use over distances up to 30 miles + (50 km) depending on terrain and antenna system. To assure
reliable communications, the RF (radio frequency) path between stations should be studied by a competent professional
who can determine what antennas are required and whether or not a repeater is needed.
3.2 COMMON ARCHITECURAL CHARACTERISTICS
The networks described in this section share common characteristics:
1. The DTE (data terminal equipment) network speed (1200, 2400, 4800, 9600 and 19,200 b/s) must be the same for all
stations in a network.
2. Transmission of online diagnostics may be enabled or disabled at any station or stations without affecting their ability
to communicate with other stations.
3.2.1 POINT-TO-POINT SYSTEM
A simple point-to-point connection is shown in Figure 7. In this system, the user's equipment (DTE) may be set up in either a
peer-to-peer or a Master-Remote configuration.
Page | 17

Figure 7 - Point-to-Point System
3.2.2 POINT-TO-MULTIPOINT SYSTEM
A basic point-to-multipoint system is shown in Figure XX.
Figure 8 - Point-to-Multipoint System (simplex or half-duplex)
If a half-duplex radio network is used (i.e. two frequencies with the master station transmitting and receiving on the reverse
pair from the remotes), the master station can be either full duplex or half-duplex.
If a simplex radio network is used (i.e. a single frequency for all stations), we recommend that the master Integra-TR be set
to “master”, the remotes to “remote” and all units to “selective” data delivery. This will prevent remote stations from
hearing each other's responses. For full duplex configuration, set the receiving unit Rx/Tx Mode to Rx Only (using the Field
Programming Software). Set the transmitting unit mode to Tx Only.
Figure 9 - Point-to-Multipoint System (full-duplex)
Page | 18

Figure 10 - Point-to-Multipoint System (full-duplex repeater)
Page | 19

3.2.3 EXTENDING A LANDLINE (TAIL CIRCUIT)
Integra-TR may be used to extend a landline circuit (giving access to difficult locations, etc.).
This type of connection is called a “tail circuit” and is shown in Figure 11. The tail circuit assembly may be used in any of the
network types described in the preceding sections.
Figure 11 - Landline (Tail Circuit)
Note: The line modems should be full-duplex units.
Figure 12 - DCE Crossover Cable for RTS-CTS Mode
Some point-to-point FDX landline modems or line drivers may require the use of DOX mode and an alternate pinout for
DTR, DCD, CTS and RTS as shown in Figure 13.
Figure 13 - DCE Crossover Cable for DOX Mode
Page | 20
/