Page is loading ...

Kambrook - Australia
Building 2, Port Air Industrial Estate
1A Hale Street
Botany NSW 2019
Australia
Customer Service Line 1300 139 798
Customer Service Fax 1800 621 337
www.kambrook.com.au
Due to continual improvement in design or otherwise, the product you
purchase may differ slightly from the illustration in this book. Issue E12
Kambrook - New Zealand
Private Bag 94411
Botany, Manukau
Auckland 2163
New Zealand
Customer Service Line/
Spare Parts 0800 273 845
Customer Service Fax 0800 288 513
www.kambrook.co.nz

Instruction Booklet
Pressure Express
Pressure Cooker
KPR600

Important
Please retain your instruction
book for future use.
In the event that you need some assistance with your
Kambrook appliance, please contact our Customer Service
Department on 1300 139 798 (Australia) or 0800 273 845
(New Zealand). Alternatively, visit us on our website at
www.kambrook.com.au or www.kambrook.co.nz

Contents
Kambrook Recommends p4
Safety First
Your Kambrook Pressure Express p7
Using Your Kambrook p8
Pressure Express
Pressure Express Cooking Guide p15
Trouble Shooting Guide p20
The Do’s & Don’ts p21
of Pressure Cooking
Care, Cleaning and Storage p22
Handy Hits for Pressure Cooking p25
Recipes p26

4
Kambrook Recommends Safety First
IMPORTANT: Please retain your
instruction book for future use.
At Kambrook, we believe that safe performance is the first priority in any
consumer product, so that you, our valued customer can confidently
use and trust our products. We ask that any electrical appliance that
you use be operated in a sensible fashion with due care and attention
placed on the following important operating instructions.
Important Safeguards For Your Kambrook
Pressure Express Pressure Cooker
• Carefully read all instructions before operating
the pressure cooker for the first time and save
for future reference.
• Remove and safely discard any packaging
material and promotional label before using
the pressure cooker for the first time.
• To eliminate a choking hazard for young
children, remove and safely discard the
protective cover fitted to the power plug
of this pressure cooker.
• Do not place the pressure cooker near the
edge of a bench or table during operation.
Ensure that the surface is level, clean and
free of water and other substances.
• Position the pressure cooker so that the steam
vent/pressure relief valve is directed away
from yourself. Lift and remove the lid carefully
to avoid scalding from escaping steam.
• Do not operate the pressure cooker on a sink
drain board.
• Do not place your face or any other body
part over the appliance whilst in use as the
steam can cause serious burns.
• Always ensure pressure cooker is properly
assembled before use. Follow the instructions
provided in this book.
• Do not touch hot surfaces. Use handles on
the sides of the appliance and on lid for
lifting and carrying the pressure cooker.
• Always insert the connector end of the power
cord into the appliance inlet before inserting
power plug into power outlet and switching
on appliance. Ensure the appliance inlet is
completely dry before inserting the connector
end of the power cord.
• This pressure cooker cooks under pressure.
Improper use may result in injury.
• When using this pressure cooker, ensure the lid
is properly assembled and locked into position
before use.
• Do not touch hot surfaces, use oven mitts to
remove the lid and removable cooking bowl.
Lift and remove the lid carefully and away from
yourself to avoid scalding from escaping steam.
• Use the removable cooking bowl supplied with
the pressure cooker only. Do not use any other
bowl inside the pressure cooker housing.
• Do not use a damaged or dented removable
cooking bowl. If damaged or dented, replace
bowl before using.
• Never plug in or switch on the pressure cooker
without having the removable cooking bowl
placed inside the pressure cooker housing.
• Do not place food or liquid in the pressure
cooker housing. Only the removable cooking
bowl is designed to contain food or liquid.

5
• Never operate the pressure cooker without
food and liquid in the removable cooking
bowl. Ensure that the level of food and
liquid inside the removable cooking bowl
is not below ‘2’ level mark before cooking
commences. Always follow the maximum
and minimum quantities of liquid stated in
instructions and recipes.
• Always operate the pressure cooker on
a stable and heat resistant surface.
• Do not use chemicals, steel wool, metal
scouring pad or abrasive cleaners to clean
the outside of the pressure cooker housing
or cooking bowl as these can damaged the
housing or the coating of the cooking bowl.
• Do not place anything, other than lid, on top
of pressure cooker when assembled, when in
use and when stored.
• Do not allow water from the lid to drip into
the pressure cooker housing, only into the
removable cooking bowl.
• Always have the lid placed correctly into
position on the pressure cooker throughout
operation of the pressure cooker unless states
in the recipe to have it removed.
• Do not leave the pressure cooker unattended
when in use.
• Do not place anything on top of the lid when
assembled, when in use and when stored.
• Extreme caution must be used when pressure
cooker contains hot food and liquids and/or is
under pressure. Improper use may result in injury.
When using this appliance, make sure the lid is
properly locked and aligned before operating.
• Ensure the removable cooking bowl is
correctly positioned in the pressure cooker
base before you commence cooking.
• Before placing removable cooking bowl into
stainless steel base ensure base of bowl and
base of pressure cooker is dry by wiping with
a dry soft cloth.
• Do not use the pressure cooker for anything
other than its intended use. Do not attempt to
operate pressure cooker by any method other
than those described in this instruction book.
• Some foods to avoid when pressure cooking are;
apple sauce, cranberries, pearl barley, oatmeal
and other cereals, potatoes, noodles and pasta,
and rhubarb; these foods can foam, froth and
splatter and clog the pressure regulator/release
valve and pressure indicator valve.
• Removable cooking bowl can be extremely
heavy when full of ingredients, care should be
taken when lifting from pressure cooker base.
• Do not use the lid handle to carry appliance
when in use and after use.
• Always ensure that the removable cooking
bowl has cooled sufficiently before handling
and use oven mitts when removing the
removable cooking bowl from the stainless
steel housing.
• Do not adjust the “pressure regulator/release
valve” whilst in use.
• Use only recommended “Steam Release” to
depressurise cooker after use.
• Do not exceed maximum fill level. Some foods
expand during pressure cooking such as rice and
legumes, do not fill removable cooking pan over
½ full. Over filling may cause a risk of clogging
the pressure regulator/release valve/release
valve and pressure indicator valve. It may also
lead to the development of excess pressure.
• Do not use abrasive cleaners, steel wool, or
metal scouring pads as these can damage
the non-stick surface.
• The temperature if accessible surfaces will be
high when the pressure cooker is operating
and for some time after use.
• Do not place the removable cooking bowl
when hot on any surface that may be
affected by heat.
• Avoid sudden temperature changes.
Do not place frozen or very cold foods into
the removable cooking bowl when it is hot.
Do not place hot removable cooking bowl
into cold water.
• Do not use the removable cooking bowl for
food storage. The removable cooking bowl is
not designed for storing food in the freezer.
• Ensure pressure cooker is fully cooled before
storing power cord inside the removable
cooking bowl.
• To prevent scratching the non-stick surface
of the removable cooking bowl, always use
wooded or plastic utensils.
• Always position steam vent on lid away from
yourself to avoid scalding from escaping steam.
• Suggested cooking times in this instruction
book are approximate. Cooking times can
vary depending on ingredients and quantities
in recipes.
• Do not attempt to open the pressure cooker
lid after pressure cooking until all internal
pressure has been released and is slightly
cooled. If the lid will not turn to unlock, this
indicates that appliance is still under pressure
– do not force the lid open. Any pressure
remaining can be hazardous. See operating
instructions for “steam release” directions in
this instruction book.
• Always check pressure regulator/release valve
and pressure indicator valve for clogging
before use and clean if necessary. Check to
make sure the pressure indicator rod moves
freely from under the lid.
• The appliance connector must be removed
before the pressure cooker is cleaned and
that the appliance inlet must be dried before
the pressure cooker is used again.
• Do not immerse pressure cooker housing/base,
power cord or plug in water or any other liquid.

6
• Do not move the pressure cooker when in use.
• Keep the pressure cooker clear of walls, curtains
and other heat or steam sensitive materials.
• Use the pressure release/regulator valve to
release steam pressure.
• Never use the removable cooking bowl to
sauté ingredients on a ceramic, electric or
gas stove. Ensure that the safety locking lid is
properly aligned, locked and closed before
operating (see instructions on page 8).
• The pressure cooker is not intended to be
operated by means of an external timer or
separate remote control system.
• Always ensure that the power is off at the
power outlet and remove power plug from the
power outlet before attempting to move the
appliance before cleaning and storing.
• Keep the pressure cooker clean. Follow the
cleaning instructions provided in the book
(see page 22).
Important Safeguards For All
Electrical Appliances
• Fully unwind the power cord before use.
• Connect only to 230V or 240V power outlet.
• Do not let the power cord hang over the edge
of a bench or table, touch hot surfaces or
become knotted.
• To protect against electric shock, do not
immerse the power cord, power plug or
appliance in water or any other liquid, unless it
is recommended in the cleaning instructions.
• The appliance is not intended for use by
persons (including children) with reduced
physical, sensory or mental capabilities, or lack
of experience and knowledge, unless they
have been given supervision or instruction
concerning use of the appliance, by a person
responsible for their safety.
• Children should be supervised to ensure that
they do not play with the appliance.
• It is recommended to inspect the appliance
regularly. Do not use the appliance if the
power supply cord, plug, connector or
appliance becomes damaged in anyway.
Return the entire appliance to the nearest
authorised Kambrook Service Centre for
examination and/or repair.
• Any maintenance other than cleaning should
be performed at an authorised Kambrook
Service Centre.
• This appliance is for household use only. Do not
use this appliance for other than its intended
use. Do not use in moving vehicles or boats.
Do not use outdoors. Misuse may cause injury.
• The installation of a residual current device
(safety switch) is recommended to provide
additional safety protection when using
electrical appliances. It is advisable that a
safety switch with a rated residual operating
current not exceeding 30mA be installed in
the electrical circuit supplying the appliance.
See your electrician for professional advice.
• Always turn the appliance to the OFF
position, switch off at the power outlet
and unplug at the power outlet when the
appliance is not in use.
• Before cleaning, always turn the appliance to
the OFF position, switch off at the power outlet,
unplug at the power outlet and remove the
power cord, if detachable, from the appliance
and allow all parts to cool.
• Do not place this appliance on or near a heat
source, such as hot plate, oven or heaters.
• Position the appliance at a minimum
distance of 20cm away from walls, curtains
and other heat or steam sensitive materials
and provide adequate space above and on
all sides for air circulation.

7
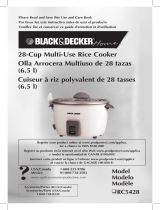
Your Kambrook Pressure Express
1. Cool touch lid handle
2. Pressure regulator/release valve -
controls the rate at which steam
vents from the Pressure Express
and degree of the pressure
inside the Pressure Express
3. Pressure release venting position
to release the pressure inside the
pressure cooker
4. Safety locking lid – can not be
opened during pressure cooking
5. 6 litre non-stick removable
cooking bowl
6. Selection control dial allows you
to select from settings 1 to 6, as
well as the Sauté function
7. Cool touch handles
8. Brushed stainless steel housing
Not Shown
• Stainless steel trivet raises food out
of the liquid when pressure cooking
• Removable power cord
• Rice measuring cup
• Heat resistant serving spoon
• Heat resistant soup serving ladle
• Pressure safety release valve cover

8
Using Your Kambrook Pressure Express
Before First Use
Remove and safely discard any
packaging material and promotional
stickers before using the Pressure
Express for the first time.
To eliminate a choking hazard for
young children, remove and safely
discard the protective cover fitted
to the removable power cord of
this appliance.
1. Make sure that the power
outlet is switched off and that
the removable power cord is
unplugged from the power outlet
and the Pressure Express.
2. Remove the safety locking lid
by taking hold of the handle,
turning it clockwise from the
locked position to the unlock/
align position and lift the lid up
and off the appliance (see Fig. 1).
Fig. 1
3. Remove the silicone rubber
gasket from the safety locking lid
(see Fig. 2) and wash with warm
soapy water. Dry thoroughly. Wash
the safety locking lid in warm
soapy water and dry thoroughly.
Fig. 2
4. Return the dry and clean silicone
rubber gasket securely to the
gasket holder (see Fig. 3).
Fig. 3
NOTE: If the silicone rubber
gasket is not correctly fitted
back into the gasket holder, the
lid will not close properly and it
will prevent the Pressure Express
from operating correctly.
5. Wipe the inside and the outside
of the stainless steel housing with
a soft damp cloth, and then dry
thoroughly.

9
6. Remove and wash the removable
cooking bowl in warm soapy
water, rinse and dry thoroughly.
Make sure there is no unwanted
material on the exterior surface of
the removable cooking bowl. The
removable cooking bowl must sit
flat on the temperature sensor to
ensure proper contact.
Using the Pressure Cooker
1. Make sure that the power
outlet is switched off and that
the removable power cord is
unplugged from the power outlet
and from the Pressure Express.
WARNING: Always check
the pressure release
valve and pressure
indicator valve for
clogging before use and
clean if necessary. Check
to make sure the pressure
indicator rod moves
freely from under the lid.
2. Remove the safety locking lid by
turning the handle clockwise to
the unlock/align position and
then lift. (see Fig. 4).
Fig. 4
3. Insert the removable cooking
bowl into the stainless steel
housing (see Fig. 5). The removable
cooking bowl must sit flat on the
temperature sensor to ensure
proper contact.
Fig. 5
4. Ensure that the silicone rubber
gasket is fitted correctly into the
safety locking lid (see Fig. 3).
WARNING: Always
operate the pressure
cooker on a stable and
heat resistant surface
5. Place the food to be cooked
(as per recipe being used) into
the Pressure Express.
NOTE: Ensure that the minimum
liquid amount of 250ml is placed
into the removable cooking
bowl before proceeding.

10
Using Your Pressure Express continued
Fig. 6
6. Once all the ingredients have
been entered into the removable
cooking bowl, take the safety
locking lid, align the handle
with the unlock/align position.
When the safety locking lid is
sitting correctly, turn it counter-
clockwise to lock into position.
(see Fig. 6).
NOTE: Ensure that the locking
graphics are aligned so that
the Pressure Express can
function correctly.
7. Make sure that the pressure
regulator/release valve is sitting
in the sealed position (see Fig. 7).
If the pressure regulator/release
valve is in the venting position, the
Pressure Express will not build up the
required pressure needed to cook.
Fig. 7
8. Plug the removable power cord
into the stainless steel housing
and into a 230V or 240V power
outlet and switch on. The power
light will activate, which indicates
that the pressure cooker is ready
for use.
9. Set the selection control dial to
the desired setting that is to be
used by turning the selection
control dial clockwise. The light will
now activate. During the pressure
build up, the pressure indicator
rod and the pressure regulator/
release valve will begin to “hiss”
and release minimal steam.
WARNING: Do not place
your face or any other
body part over the
appliance whilst in use
as the steam can cause
serious burns.
WARNING: Do not
attempt to open the
pressure cooker lid after
pressure cooking until
all internal pressure has
been released and is
slightly cooled. If the lid
will not turn to unlock,
this indicates that the
pressure cooker is still
under pressure – do
not force the lid open.
Any pressure remaining
can be hazardous. See
operating instructions
for “steam release”
directions in this
instruction booklet.

11
NOTE: The selection control dial
will not begin to count down
until the required pressure has
built up.
10. Once the selection control dial
has reached the ‘OFF’ position,
allow approximately 10 minutes
before releasing pressure. Use the
heat resistant serving spoon or
an oven mitt to turn the pressure
regulator/release valve to the
venting position
. This will cause
the Pressure Express to release
the extra steam that has built
up inside the appliance. Allow
several minutes for the steam to
be released.
WARNING: When
pressure is released,
there may be hot
condensation liquid/
steam droplets spitting
through the pressure
regulator/release valve.
Avoid scalding yourself
from any escaping hot
liquid or steam.
NOTE: Ensure that the Pressure
Express is placed in an open
area with proper ventilation.
11. Switch off at the power outlet and
remove the removable cord from
the power outlet and the stainless
steel housing.
12. Once the pressure release value
has released all the steam,
and the appliance has been
unplugged from the power
source, it is now safe to open the
safety locking lid. Turn the handle
clockwise to the unlock/align
position, and then lift up the safety
locking lid. Place the lid on a heat
resistant surface.
NOTE: The pressure indicator
rod will go to the original
position once all the pressure
has been released.
NOTE: Steam will rise quickly
when the lid is taken off and
can cause burns. Take extreme
care when removing the safety
locking lid. Angle the lid away
from you face, and ensure that
your hand and arm are not in
the path of steam.
13. Check food to see if it has been
cooked sufficiently. If yes, use the
heat resistant serving spoon or
heat resistant soup serving ladle
provided to serve the food. If not,
replace lid and lock into position
following the previous steps.
Choose a lower setting if slightly
undercooked.

12
WARNING: Do not touch
hot surfaces, use oven
mitts to remove the
lid and or removable
cooking bowl. Lift and
remove the lid carefully
and away from yourself
to avoid scalding from
escaping steam.
14. Wait until the Pressure Express
has cooled before cleaning.
Follow the cleaning and storage
instructions on page 22.
WARNING: When
cooking under pressure,
the safety locking lid can
not be opened. Do not try
to force the lid open.
WARNING: After pressure
cooking, allow several
minutes before releasing
pressure and removing
the lid to make sure that
hot liquid inside will not
boil over.
WARNING: Use caution
when opening the
safety locking lid. Steam
escapes as soon as the
lid is opened. Never
place your face or
hands over the Pressure
Express when removing
the lid. Always use oven
mitts when handling the
removable cooking bowl.
The Control Dial
The control dial has 6 settings as well as
a ‘Sauté’ setting, to sauté vegetables
and seal meat before cooking.
The cooking table provides a summary
of the main recipes and the setting to
be used.
Setting Recipes Approx.
Cooking
Time*
(see Note)
1 Porridge 7 min
2 White Rice, Rice
Pudding
10 min
3 Brown Rice,
Casseroles and
Curries
15 min
4 Meat Cuts
(Various)^
20 min
5 Soup 24 min
6 Legumes (e.g.
chickpeas, dried
beans), Corned
Beef (Silverside),
Chicken Stock
28 min
Sauté Vegetables,
simmer sauces
and seal meat
Reset dial to
Sauté if more
time required
*The time above is only an indication
and does not include the time it takes
for the pressure cooker to reach full
pressure.Timer will not start until the
cooker is pressurised.
^ For a Rare to Medium Rare finish for
1kg size cuts. Use settings 5 or 6 for a
more cooked finish. Use setting 6 for
Corned Beef or Chicken Stock.
Using Your Pressure Express continued

13
Using the Sauté Function
1. Make sure that the power
outlet is switched off and that
the removable power cord is
unplugged from the power outlet
and from the Pressure Express.
2. Remove the safety locking lid
by turning the handle clockwise
and then lifting. Then insert the
removable cooking bowl into the
stainless steel housing (see Fig. 9).
Fig. 9
3. Set the selection control dial to
the ‘Sauté’ setting (see Fig. 10).
Fig.10
4. Plug the removable power cord
into the stainless steel housing,
then plug the removable power
cord into the power outlet and
switch on. The power light will
activate, indicating that the
removable cooking bowl has
started to heat.
NOTE: Foods to avoid when
pressure cooking include;
apple sauce, cranberries, pearl
barley, oatmeal and other
cereals, potatoes, noodles and
pasta, and rhubarb; as these
foods can foam, froth and
splatter and clog the pressure
regulator/release valve and
pressure indicator valve.
NOTE: Do not exceed
maximum fill level. Some
foods expand during pressure
cooking such as rice and
legumes, do not fill removable
cooking bowl over ½ full.
Stainless Steel Trivet
The stainless steel trivet is for any food,
that needs to be raised above the
liquid level (see Fig. 8). Ensure that the
stainless steel trivet is placed in the
Pressure Express before plugging in the
removable cord to the power outlet.
Fig. 8

14
5. Allow the Pressure Express at least
3 minutes to preheat. Add oil/fat
into the Pressure Express.
NOTE: Do not place the lid on
the Pressure Express when using
the sauté function.
6. Place the food to be cooked
(as per recipe being used) into
the Pressure Express. Depending
on the quantity of food to be
cooked, you may have to sauté in
small batches.
NOTE: Use the heat resistant
serving spoon to stir and serve
the food.
7. Once all the ingredients have
cooked to the required level of
doneness, turn the dial back to
the ‘OFF’ position.
NOTE: If the selection control
dial moves to another setting
position during the sauté
process, simply turn it back
to the sauté position and
continue cooking.
8. When the sauté process is finished,
add the required ingredients for
pressure cooking and follow the
instructions on page 15.
NOTE: You will not be required
to remove the removable
power cord if switching from
the sauté function to pressure
cooking.
NOTE: The sauté function will
not function correctly if the
safety locking lid is placed on
top of the Pressure Express.
Using Your Pressure Express continued

15
Pressure Express Cooking Guide
WARNING: Caution should
be used when sautéing
in hot oil. Keep hands
and face away from the
removable cooking bowl
especially when adding
new ingredients as hot oil
may splatter.
The Settings
Pressure cooking is a perfect way to
cook a variety of foods in a faster and
more effective way. It works by locking
in the steam within the appliance,
maintaining a higher level of heat and
in the process, locking in the flavours
and juices.
The Pressure Express has 6 settings as
well as a sauté setting that enables the
meat and vegetables required for the
recipe to be cooked in one pot.
Setting Recipes Approx.
Cooking
Time*
(see Note)
1 Porridge 7 min
2 White Rice, Rice
Pudding
10 min
3 Brown Rice,
Casseroles and
Curries
15 min
4 Meat Cuts
(Various)^
20 min
5 Soup 24 min
6 Legumes (e.g.
chickpeas, dried
beans), Corned
Beef (Silverside),
Chicken Stock
28 min
Setting Recipes Approx.
Cooking
Time*
(see Note)
Sauté Vegetables,
simmer sauces
and seal meat
Reset dial to
Sauté if more
time required
*The time above is only an indication
and does not include the time it takes
for the pressure cooker to reach full
pressure.Timer will not start until the
cooker is pressurised.
^ For a Rare to Medium Rare finish for
1kg size cuts. Use settings 5 or 6 for a
more cooked finish. Use setting 6 for
Corned Beef or Chicken Stock.
The minimum amount of liquid (water
or stock) to be added to removable
cooking bowl for pressure cooking
recipes is 250ml (1cup). Anything less
might boil dry and pressure cook will
not function. Additional liquid may
need to be added during cooking if
this occurs. Do not cook with less than
1 litre of combined food and liquid in
the bowl.

16
NOTE: Never operate the
pressure cooker without food
and liquid in the removable
cooking bowl. Ensure that the
level of food and liquid inside
the removable cooking bowl is
not less than 1 litre combined
before cooking commences.
Always follow the maximum and
minimum quantities of liquid
stated in instructions and recipes.
NOTE:
Depending on the
quantity of food being cooked,
it could take the Pressure Express
up to 20 minutes to get to
pressure. To help speed this time
up, use boiling, not cold, liquid.
Pressure Express Cooking Guide continued
NOTE:
Some recipes call for
different forms of venting:
Slow Release – If the pressure
regulator/release valve is
not manually moved to the
venting position when cooking
is finished, the steam will
automatically vent out of the
Pressure Regulator slowly. This
method is recommended
for recipes containing larger
quantities of liquid such as
soups and casseroles to prevent
liquid being forced out with the
steam. The Slow Release method
is also used to finish off recipes
such as risottos and puddings.
Alternatively, pressing the
Steam Release Button on the
pressure release valve in short
bursts will depressurise in a
slower fashion.
Porridge
Porridge is a very popular breakfast
recipe. The Pressure Express can
quickly pressurize and cook porridge
speedier than an open pot, keeping
the moisture and flavour!
Porridge Setting 1

17
Pressure Express Cooking Guide continued
Rice Cooking Guide
Rice can be cooked in a faster and
more effective way due to the high
temperature of the Pressure Express.
With the safety locking lid maintaining
a high level of moisture within the unit,
perfect soft and fluffy rice is very easy
to make.
White Rice Setting 2
Brown Rice Setting 3
NOTE: When cooking rice,
cereals or pasta, depressurize
slowly after cooking by
pressing the Steam Release
button in short bursts.
NOTE: To speed up the building
up of pressure whilst pressure
cooking, use boiling water or
stock.
White Rice
MIN – 2 cups | MAX – 8 cups
Uncooked
Rice
Measures
Water
Measures
Cooked
Rice
Measures
2 2 4
4 4 8
6 6 12
8 8 16
Brown Rice
MIN – 4 CUPS | MAX - 8 CUPS
Uncooked
Rice
Measures
Water
Measures
Cooked
Rice
Measures
4 4 8
6 6 12
8 8 16
NOTE: Ensure that the cup
provided is being used for
each measure.
WARNING: Do not use the
Pressure Express to cook
instant rice.
Casseroles and Curries
A casserole or curry is a meal for all
occasions, whether a chicken, beef
or lamb dish. Firstly, seal the meat and
caramelize onions before adding
stock and vegetables using the
‘Sauté’ setting on the control dial. The
pressure cooking process, including
sautéing, will lock in the flavour and
deliver delicious and tender meat.
Casseroles and
Curry
Setting 3

18
Preparing Vegetables
It is not recommended to cook
vegetables alone, however for any
recipe that requires them, we suggest
the following tips:
Vegetables should be cut into
smalleven-sized pieces to ensure
more even cooking.
Frozen vegetables must be thawed
before adding to other foods when
cooking in the Pressure Express.
Peel vegetables when appropriate.
Keep in mind that hard vegetables like
potatoes and beetroots hold shape
better when the peel is left intact.
Cuts of Meat
Cooking cuts of meat in the Pressure
Express not only speeds up the
cooking process, it also provides a
tender and flavoursome finish as the
steam keeps the meat moist at a high
temperature and infuses the herbs,
spices and sauces.
Cuts of Meat Setting 4
Suitable Meat Cuts for
Pressure Cooking
Beef Beef Chuck, Skirt, Round Steak,
Boneless Shin (Gravy) Beef,
Bone-In Shin (Osso Bucco).
Lamb Lamb Shanks, Drumsticks
(Frenched shanks) Neck Chops,
Best Neck Chops, Boned Out
Forequarter or Shoulder.
Veal Diced Leg, Shoulder/Forequarter
Chops and Steaks, Neck Chops,
Knuckle
(Osso Bucco).
Pork Leg Steaks, Diced Belly, Diced
Shoulder, Boneless Loin Chops.
How to Pot Roast
Do not pressure cook cuts of meat
over 1kg in size as it will not cook
evenly. Larger cuts of meat should be
halved or quartered before placing in
pressure cooker.
The addition of liquid is required for all
pot roasting.
When pressure cooking, meat will not
brown during the cooking process, so
for browner results seal on the ‘Sauté’
setting first before pot roasting.
Suitable meat cuts for pot roasting
(not over 1kg) Beef Topside, Blade,
Corned Beef (Silverside) Roasts, Rump
Beef Rolled Brisket, Lamb Forequarter,
Shoulder, Veal Shoulder/ Forequarter,
Pork Loin, Neck.
Except for Corned Beef (Silverside)
and Chicken when making Chicken
Stock, setting 4 on your control dial
should be sufficient. This will give the
meat a Rare to Medium Rare finish
depending on the size of the meat.
For longer cooking time, use a higher
setting on the control dial (4 or 5).
It is recommended to raise the
meat to be cooked on the provided
stainless steel trivet. The stainless steel
trivet rack will keep the meat raised
above the boiling liquid and will assist
in keeping the surface of the meat
dry and free from any fat released
throughout the cooking process.
Add a minimum of 250ml (1 cup)
hot liquid (water or stock) to the
removable cooking bowl.
For Corned Beef (Silverside) and
Chicken when making Chicken Stock
where the meat is required to be
immersed in liquid to properly cook,
place meat in removable cooking
bowl, then add sufficient hot liquid to
cover up to a third of the meat. Do
not use the trivet. Set the control dial
to setting 6.
Pressure Express Cooking Guide continued

19
NOTE: A minimum of 250ml
(1 cup) of liquid is Is required
for using the pressure cooker.
Do not cook with less than 1
litre of combined food and
liquid in the bowl.
NOTE: Do not use oil or milk as
a liquid.
TIP: The pressure cook function
will stop operating if is there
insufficient liquid. Add more
liquid if required, make sure
at all times a minimum 250ml
(1 cup) of liquid is in cooking
bowl during cooking.
TIP: It is not recommended
to cook roasts of meat over 1
kilogram in size in the Pressure
Express. Large roasts should
be cut to smaller size to ensure
they cook through and should
be seared prior to pressure
cooking to hold in flavour.
TIP: Pressure cooking is great
for keeping meat tender and
moist. Roast meat cooked in
the Pressure Express will have
a Rare to Medium Rare finish.
Pressure Express Cooking Guide continued
Soup
Soup is always a welcome winter treat,
and is simple to do in the Pressure
Express. Using the Sauté function,
caramelise any foodstuffs as required
in the cooking pot to deepen the
flavour before adding the rest of the
ingredients. Thick and creamy soup is
just a short wait away!
CAUTION: Do not
use a stick blender to
blend soup inside the
removable cooking bowl
as it will damage the non
stick coating
Soup Setting 5
Legumes
A healthy and delicious option, which
can be easily prepared and cooked
in the Pressure Express. Place pulses in
the Pressure Express and cover with
water or stock at least 5cm above the
level of pulses.
Legumes Setting 6
/