Page is loading ...

Read carefully before Installation and Maintenance
CAUTION!
Observe the safety instructions of this installation and
maintenance manual before placing the boiler in
operation.
DANGER!
If installation, adjustment, modification, operation or
maintenance of the heating system is carried out by an
unqualified person, this may result in danger to life and
limb or property damage.
The directions of this installation and maintenance
manual must be followed precisely.
For assistance or additional information consult a
qualified installer, service agency or the gas supplier.
DANGER!
Caution!The operating manual is a component of the
technical documentation and must be handed over to
the operator of the heating system.
Discuss the content of this manual with the owner or
operator of the heating system to ensure that they are
familiar with all information required for operation of
the heating system.
If the storage tank will be installed in Massachusetts, it
must be installed by an installer or dealer who is
registered there.
Installation and Service Instructions
Gas condensing boiler
Logano plus GB312
6 720 806 275-00.1T
6 720 806 273 (2013/01) (US/CA)-en

Table of contents
Logano plus GB312 – 6 720 806 273 (2013/01)2
Table of contents
1 General safety instructions and explanation of symbols . . . . 4
1.1 Key to symbols . . . . . . . . . . . . . . . . . . . . . . . . . . . . . . . . . 4
1.2 Safety considerations . . . . . . . . . . . . . . . . . . . . . . . . . . . 4
2 Product information . . . . . . . . . . . . . . . . . . . . . . . . . . . . . . . . . . . 5
2.1 Designated use . . . . . . . . . . . . . . . . . . . . . . . . . . . . . . . . . 5
2.2 Standards, regulations and directives . . . . . . . . . . . . . . 5
2.2.1 National regulations . . . . . . . . . . . . . . . . . . . . . . . . . . . . . 5
2.3 Compliance with standards and regulations . . . . . . . . . . 6
2.3.1 Massachusetts installations only: . . . . . . . . . . . . . . . . . . 6
2.4 Notes on installation and operation . . . . . . . . . . . . . . . . . 6
2.4.1 Other important information . . . . . . . . . . . . . . . . . . . . . . 6
2.5 Heating system water quality . . . . . . . . . . . . . . . . . . . . . . 7
2.6 Tools, materials and equipment . . . . . . . . . . . . . . . . . . . 7
2.7 Environmental Protection / Disposal . . . . . . . . . . . . . . . . 7
2.8 Product information . . . . . . . . . . . . . . . . . . . . . . . . . . . . . 8
2.9 Scope of delivery . . . . . . . . . . . . . . . . . . . . . . . . . . . . . . . 9
2.10 Dimensions and Specifications . . . . . . . . . . . . . . . . . . . 10
2.10.1 Logano plus GB312 dimensions . . . . . . . . . . . . . . . . . . 10
2.10.2 Specifications . . . . . . . . . . . . . . . . . . . . . . . . . . . . . . . . . 11
3 Transporting the boiler . . . . . . . . . . . . . . . . . . . . . . . . . . . . . . . 13
3.1 Lifting and handling the boiler . . . . . . . . . . . . . . . . . . . . 13
3.2 Transporting the boiler on rollers . . . . . . . . . . . . . . . . . 14
4 Installing the boiler . . . . . . . . . . . . . . . . . . . . . . . . . . . . . . . . . . 14
4.1 Installation room requirements . . . . . . . . . . . . . . . . . . . 14
4.2 Recommended wall clearances . . . . . . . . . . . . . . . . . . . 14
4.3 Leveling the boiler . . . . . . . . . . . . . . . . . . . . . . . . . . . . . 15
5 Openings for combustion air supply and venting . . . . . . . . . 15
6 Installing the boiler . . . . . . . . . . . . . . . . . . . . . . . . . . . . . . . . . . 16
6.1 Attaching the flue connector to the boiler . . . . . . . . . . . 17
6.2 Installing the flue system . . . . . . . . . . . . . . . . . . . . . . . . 18
6.3 Installing the wall penetration for a horizontal flue . . . . 18
6.4 Installation of the roof penetration of a vertical flue
systems . . . . . . . . . . . . . . . . . . . . . . . . . . . . . . . . . . . . . 19
6.5 Connecting the air supply (for direct vent operations) 19
6.6 Installing the wall penetration for the air pipe . . . . . . . 20
6.7 Installing the roof penetration for the air pipe . . . . . . . 21
6.8 Design of flue and air pipe for direct vent operation . . 22
6.9 Connecting the heating system . . . . . . . . . . . . . . . . . . . 23
6.9.1 Safety instructions . . . . . . . . . . . . . . . . . . . . . . . . . . . . . 23
6.9.2 Connecting the boiler to the heating system . . . . . . . . 24
6.9.3 Installing B-Kit . . . . . . . . . . . . . . . . . . . . . . . . . . . . . . . . . 24
6.9.4 Connecting the central heating supply . . . . . . . . . . . . . 25
6.9.5 Installing the heating system return . . . . . . . . . . . . . . . 25
6.9.6 Installing the DHW Tank . . . . . . . . . . . . . . . . . . . . . . . . . 25
6.9.7 Installing the condensate drain . . . . . . . . . . . . . . . . . . . 25
6.10 Filling heating system and checking for leaks . . . . . . . . 26
6.11 Providing the fuel supply . . . . . . . . . . . . . . . . . . . . . . . . 27
6.11.1 Installing gas feed . . . . . . . . . . . . . . . . . . . . . . . . . . . . . . 27
6.11.2 Installation at high altitudes . . . . . . . . . . . . . . . . . . . . . . 28
6.12 Electrical connections . . . . . . . . . . . . . . . . . . . . . . . . . . 29
6.12.1 Connecting the power supply . . . . . . . . . . . . . . . . . . . . 29
6.12.2 Leveling the boiler . . . . . . . . . . . . . . . . . . . . . . . . . . . . . 30
7 Placing the heating system in operation . . . . . . . . . . . . . . . . 31
7.1 Checking heating system operating pressure . . . . . . . 31
7.2 Checking for leaks . . . . . . . . . . . . . . . . . . . . . . . . . . . . . 32
7.3 Checking appliance equipment . . . . . . . . . . . . . . . . . . . 32
7.4 Checking the air intake and outlet openings and flue
connector . . . . . . . . . . . . . . . . . . . . . . . . . . . . . . . . . . . . 32
7.5 Checking the air inlet diaphragm . . . . . . . . . . . . . . . . . . 33
7.6 Bleeding the gas supply pipe . . . . . . . . . . . . . . . . . . . . . 33
7.7 Making the heating system ready for operation . . . . . . 33
7.8 Commissioning the control unit and burner without
controller RC35 . . . . . . . . . . . . . . . . . . . . . . . . . . . . . . . 33
7.9 Starting up the controls and burner with the RC35 user
interface . . . . . . . . . . . . . . . . . . . . . . . . . . . . . . . . . . . . . 34
7.9.1 Boiler intended for operation with the
Logamatic 4000 . . . . . . . . . . . . . . . . . . . . . . . . . . . . . . 34
7.9.2 Boiler intended for operation with the RC35 . . . . . . . . 34
7.9.3 Continuing the commissioning procedure with the
RC35 . . . . . . . . . . . . . . . . . . . . . . . . . . . . . . . . . . . . . . . 34
7.10 Switch on the boiler on the BC10 . . . . . . . . . . . . . . . . . 34
7.10.1 Conducting a flue gas test . . . . . . . . . . . . . . . . . . . . . . . 34
7.10.2 Opening the Service menu on the RC35 and viewing
monitor data . . . . . . . . . . . . . . . . . . . . . . . . . . . . . . . . . 35
7.11 Adjusting and checking CO2 level at maximum output 35
7.11.1 CO2 content, natural gas type A . . . . . . . . . . . . . . . . . . 35
7.12 Adjusting and checking CO2 level at minimum output . 35
7.12.1 CO2 content, natural gas type A (minimum output) . . 36
7.12.2 Reading off and comparing CO2 levels . . . . . . . . . . . . . 36
7.13 Checking and monitoring CO2 level at maximum
output . . . . . . . . . . . . . . . . . . . . . . . . . . . . . . . . . . . . . . . 36
7.14 Recording measured values . . . . . . . . . . . . . . . . . . . . . . 36
7.14.1 Switching the status display on the BC10 to show the
boiler temperature . . . . . . . . . . . . . . . . . . . . . . . . . . . . 36
7.14.2 Returning to operating mode from the flue gas test . . . 36
7.14.3 Pressure differential . . . . . . . . . . . . . . . . . . . . . . . . . . . . 36
7.14.4 CO content . . . . . . . . . . . . . . . . . . . . . . . . . . . . . . . . . . . 36
7.15 Function testing . . . . . . . . . . . . . . . . . . . . . . . . . . . . . . . 37
7.15.1 Checking the (flame) ionization current . . . . . . . . . . . . 37
7.16 Testing the gas supply pressure . . . . . . . . . . . . . . . . . . 37
7.17 Checking for leaks during operation . . . . . . . . . . . . . . . 38
7.18 Installing jacket panels . . . . . . . . . . . . . . . . . . . . . . . . . . 38
7.19 Inform owner/operator, hand over technical
documentation . . . . . . . . . . . . . . . . . . . . . . . . . . . . . . . 38
7.20 Commissioning report . . . . . . . . . . . . . . . . . . . . . . . . . . 39

Table of contents
Logano plus GB312 – 6 720 806 273 (2013/01) 3
8 Shutting down the heating system . . . . . . . . . . . . . . . . . . . . . 40
8.1 Shutting down the heating system by means of the
controller . . . . . . . . . . . . . . . . . . . . . . . . . . . . . . . . . . . . 40
8.2 Shutting down the boiler in an emergency . . . . . . . . . . 40
8.2.1 Emergency shut-down . . . . . . . . . . . . . . . . . . . . . . . . . . 40
9 Heating system inspection . . . . . . . . . . . . . . . . . . . . . . . . . . . . 40
9.1 Preparing the boiler for inspection . . . . . . . . . . . . . . . . 40
9.2 General operations . . . . . . . . . . . . . . . . . . . . . . . . . . . . 41
9.3 Checking the flue system, including the combustion
air supply, air inlet/outlet openings . . . . . . . . . . . . . . . 41
9.4 Checking the heating system operating pressure . . . . 41
9.5 Measuring the carbon dioxide content . . . . . . . . . . . . . 41
9.6 Determining how dirty the burner and heat exchanger
are and cleaning them . . . . . . . . . . . . . . . . . . . . . . . . . . 42
9.6.1 Determining the extent of contamination . . . . . . . . . . . 42
9.6.2 Cleaning the burner and heat exchanger . . . . . . . . . . . 43
9.7 Checking gas valve for leaks . . . . . . . . . . . . . . . . . . . . . 47
9.8 Checking for leaks during normal operation . . . . . . . . . 48
9.9 Check ionization current . . . . . . . . . . . . . . . . . . . . . . . . 48
9.10 Completing inspection or maintenance . . . . . . . . . . . . 48
9.10.1 Removing instruments . . . . . . . . . . . . . . . . . . . . . . . . . . 48
9.10.2 Installing jacket panels . . . . . . . . . . . . . . . . . . . . . . . . . . 48
9.10.3 Confirming inspection or maintenance . . . . . . . . . . . . . 48
9.11 Servicing and maintenance logs . . . . . . . . . . . . . . . . . . 49
10 Troubleshooting . . . . . . . . . . . . . . . . . . . . . . . . . . . . . . . . . . . . . 51
10.1 Identifying operating status and resetting faults . . . . . 51
10.2 Operating and fault indications . . . . . . . . . . . . . . . . . . . 52
10.2.1 Status indicator . . . . . . . . . . . . . . . . . . . . . . . . . . . . . . . 52
10.2.2 Fault displays . . . . . . . . . . . . . . . . . . . . . . . . . . . . . . . . . 53
10.3 Troubleshooting the safety sequence/pressure switch 61
11 Sensor characteristics . . . . . . . . . . . . . . . . . . . . . . . . . . . . . . . 64
12 Spare parts . . . . . . . . . . . . . . . . . . . . . . . . . . . . . . . . . . . . . . . . . 65
13 Circuit diagram, internal boiler wiring . . . . . . . . . . . . . . . . . . 88
14 Examples of Installations . . . . . . . . . . . . . . . . . . . . . . . . . . . . . 89
14.1 Boiler, low-loss header, AM10 . . . . . . . . . . . . . . . . . . . 89
14.2 Boiler, low-loss header, Logamatic 4000 . . . . . . . . . . 90
14.3 2 Boilers , low-loss header, Logamatic 4000 with
FM456 Module . . . . . . . . . . . . . . . . . . . . . . . . . . . . . . . 91
List of keywords . . . . . . . . . . . . . . . . . . . . . . . . . . . . . . . . . . . . . 92

1
General safety instructions and explanation of symbols
Logano plus GB312 – 6 720 806 273 (2013/01)4
1 General safety instructions and explanation of symbols
1.1 Key to symbols
Warnings
The following keywords are defined and can be used in this document:
• DANGER indicates a hazardous situation which, if not avoided, will
result in death or serious injury.
• WARNING indicates a hazardous situation which, if not avoided,
could result in death or serious injury.
• CAUTION indicates a hazardous situation which, if not avoided,
could result in minor to moderate injury.
• NOTICE is used to address practices not related to personal injury.
Important information
Additional symbols
1.2 Safety considerations
If you smell gas
▶ Turn off the gas cock ( page 40).
▶ Open windows and doors
▶ Do not operate electrical switches , including telephones, plugs or
doorbells.
▶ Extinguish all open flames. Do not smoke. Do not use lighters.
▶ Warn all occupants of the building, but do not ring doorbells.
▶ If you can actually hear gas escaping, leave the building immediately.
Prevent others from entering and notify the police and fire
department from outside the building.
▶ From outside the building, call gas supply company and licensed
heating contractor.
If you smell flue gas
▶ Switch off the boiler ( page 40).
▶ Open windows and doors
▶ Inform an authorized heating contractor.
Danger of poisoning. Insufficient ventilation may cause dangerous
flue gas leaks.
▶ Never close off or reduce the size of air intake and outlet openings.
▶ Never operate the boiler unless faults are rectified immediately.
▶ Inform the system user in writing of the problem and associated risk.
Danger of explosion of flammable gases.
▶ Any work on components that carry gas or oil may be carried out only
by a certified heating contractor.
Dangers posed by explosive and easily combustible materials
▶ Never use or store easily flammable materials (paper, curtains,
clothing, thinners, paints etc.) near the boiler.
▶ Maintain a clearance of 16 inches from the boiler.
Combustion air
▶ Keep the combustion air free of corrosive substances (e. g.
halogenated hydrocarbons that contain chlorine or fluorine
compounds). In that way, corrosion will be prevented.
Danger of escaping flue gases
▶ Make sure that the vent pipes and gaskets are not damaged.
▶ Use high temperature silicon as sealing compound.
▶ The boiler must not be fitted with a barometric damper or a thermally
controlled vent damper downstream of the flue connector.
▶ Connect only one boiler to each venting system or chimney.
▶ Connection of another boiler may cause serious injury or death.
▶ The flue system pipes must not feed into another air extraction duct.
▶ Do not route the flue system piping through or inside another air
extraction duct, for example where there is a masonry or
prefabricated chimney flue.
Danger of electric shock when the boiler is open.
▶ Before opening the boiler: Disconnect the heating system from the
electrical power supply by means of the emergency shutoff switch or
the appropriate circuit breaker on the main electrical panel.
▶ It is not sufficient just to switch off the controller.
▶ Take measures to ensure that the heating system cannot be
accidentally reactivated.
Danger due to short-circuits
To prevent short-circuits, use:
▶ only genuine Buderus wiring replacement parts.
Warnings in this document are identified by a warning
triangle printed against a grey background.
Keywords at the start of a warning indicate the type and
seriousness of the ensuing risk if measures to prevent
the risk are not taken.
This symbol indicates important information where
there is no risk to people or property.
Symbol Explanation
▶ Step in an action sequence
Cross-reference to another part of the document
• List entry
– List entry (second level)
Table 1

2
Product information
Logano plus GB312 – 6 720 806 273 (2013/01) 5
Inspection/maintenance
Heating systems should be regularly maintained for the following
reasons:
• to achieve a high level of efficiency and to operate the system
economically (low fuel consumption),
• to achieve a high level of operational safety and reliability,
• to maintain the cleanest possible combustion,
▶ Recommendation for users: sign a maintenance and servicing
contract with an approved heating contractor covering annual
servicing and condition-based maintenance.
▶ Maintenance and repair may be performed only by authorized
contractors.
▶ Immediately correct all faults to prevent system damage.
▶ The operator is responsible for the general and environmental safety
of the heating system.
▶ Use only original spare parts! No liability is assumed for damage
caused by the use of spare parts not supplied by Buderus.
Installation and adjustment
▶ Correct and proper installation and adjustment of the burner and the
controller are the fundamental requirements for safe and economical
operation of the boiler.
▶ Have the boiler installed only by a qualified contractor.
▶ Never change any parts in contact with flue gas.
▶ Work on gas components may only be carried out by qualified and
authorized personnel.
▶ Only qualified electricians are permitted to carry out electrical work.
Installation regulations must be complied with.
▶ With sealed combustion appliances: do not cover or reduce the size
of ventilation openings in doors, windows and walls. If draft-proof
windows are installed, ensure an adequate supply of combustion air.
▶ Never shut off safety valves! Water may escape from the safety
valve for the hot water system and piping when the water is being
heated.
Instructing the customer
▶ Instruct the customer about how the boiler works and is operated.
▶ Inform the customer that they must not carry out any modifications
or repairs.
2 Product information
These installation and maintenance instructions contain important
information for the safe and appropriate installation, commissioning and
servicing of this gas condensing boilerLogano plus GB312.
The installation and maintenance manual is provided for contractors
who have been trained and have experience in working with heating
systems and oil-fired installations.
The boiler can be equipped with a user interface, e. g. RC35
(accessory).
Use the boiler only in the combinations and with the accessories and
spare parts that are specified in the installation and maintenance
instructions.
Any other combination, accessory or wearing part may be used only if
these are specifically designed for the intended application and impair
neither the performance characteristics nor the stipulated safety
requirements.
2.1 Designated use
The Logano plus GB312 is designed for heating central heating system
water and, with the use of an indirect tank, domestic hot water, for
instance in apartment buildings.
2.2 Standards, regulations and directives
2.2.1 National regulations
The heating system must comply with the requirements of the relevant
regulatory authorities or otherwise of the National Fuel Gas Code, ANSI
Z 223.1. In Canada, the requirements of CAN/CSA-B.149.1 or 2,
Installation Code for Gas Burning Appliances and Equipment, must be
observed.
If specified by the Local Authority having Jurisdiction, the heating
system must comply with the regulations of the Standard for Controls
and Safety Devices for Automatically Fired Boilers, ANSI/ASME CSD-1.
Carbon monoxide detectors must be installed as specified by the local
regulations. Boiler requires yearly maintenance.
Boiler operating conditions
The heat exchanger has been designed and certified in accordance with
the ASME Boiler and Vessel Code, Section IV.
Maximum boiler temperature: 200 °F
Maximum operating pressure: 50 psi
The hot water piping system must comply with the applicable legislation
and regulations. If an existing boiler is being replaced, the entire hot
water piping system must be inspected to ensure that it is in suitable
condition to assure safe operation.
Observe all standards and guidelines applicable to the
installation and operation of this heating system in your
country.

2
Product information
Logano plus GB312 – 6 720 806 273 (2013/01)6
2.3 Compliance with standards and regulations
The design and mode of operation of this boiler comply with the
American National Standard ANSI Z21.13/CSA4.9, latest edition for
Gas-Fired Low-Pressure Steam and Hot Water Boilers.
Other confirmed approvals and certifications are indicated by stickers
on the boiler.
Installation of the boiler must comply with all applicable codes and
regulations imposed by the national, Federal or local authorities and
bodies. If no specific requirements are defined, in the USA, the latest
edition of the National Fuel Gas Code ANSI Z223.1/NFPA 54 applies. In
Canada, installation of the heating systemmust comply in all respects
with the latest edition of the Installation Code for Gas Burning
Appliances and Equipment, CAN/CSA-B.149 and the applicable local
regulations and requirements for the appliance category. The relevant
authorities and regulatory bodies should be informed before installation
starts.
Where required by local regulations, the system must comply with the
American Society of Mechanical Engineers Safety Code for Controls and
Safety Devices for Automatically Fired Boilers (ASME CSD-1).
In the Commonwealth of Massachusetts, this appliance must be
installed by a licensed plumber and gas fitter. Valves external to the
boiler must be fitted with T-handles and condensate hose must be
installed in accordance with the State Plumbing Code.
2.3.1 Massachusetts installations only:
1. INSTALLATION OF CARBON MONOXIDE DETECTORS
(a) For all side wall horizontally vented gas-fueled equipment installed in
every dwelling, building or structure used in whole or in part for
residential purposes, including those owned or operated by the
Commonwealth and where the side wall exhaust vent termination is less
than seven (7) feet above finished grade in the area of the venting,
including but not limited to decks and porches, the following
requirements shall be satisfied:
When installing gas-fueled equipment with side wall flue gas routing, the
installing plumber or gas fitter shall ensure that a hard-wired carbon
monoxide detector with an alarm and battery back-up is installed on the
same level as the gas-fueled equipment. In addition, the installing
plumber or gas fitter shall ensure that a battery-operated or hard-wired
carbon monoxide detector with an alarm is installed on each additional
level of the dwelling, building or structure served by the gas-fueled
equipment. It shall be the responsibility of the property owner to secure
the services of qualified and licensed professionals for the installation of
hard-wired carbon monoxide detectors.
a. In the event that the side wall horizontally vented gas-fueled
equipment is installed in a crawl space or an attic, the hard-wired carbon
monoxide detector with alarm and battery back-up may be installed on
the next adjacent floor level.
b. In the event that the requirements of this section can not be met at the
time of installation, the owner shall have a period of thirty 30 days to
comply with the above requirements. The prerequisite for this is the
installation of a battery-powered carbon monoxide detector with alarm
for these 30 days.
2. PERMISSIBLE CARBON MONOXIDE DETECTORS
Each carbon monoxide detector as required in accordance with the
above provisions shall comply with NFPA 720 and be ANSI/UL 2034-
listed and IAS-certified.
3. SIGNAGE
A metal or plastic identification plate shall be permanently mounted to
the exterior of the building at a minimum height of eight (8) feet above
grade directly in line with the exhaust vent terminal for the horizontally
vented gas-fueled heating appliance or equipment. The sign shall read,
in print size no less than one-half (1/2) inch in size, "GAS VENT
DIRECTLY BELOW SIGN. KEEP CLEAR OF ALL OBSTRUCTIONS”.
4 INSPECTION
The state or local gas inspector of the side wall horizontally vented gas-
fueled equipment shall not approve the installation unless, upon
inspection, the inspector observes carbon monoxide detectors and
signage installed in accordance with the provisions of 248 CMR 5.08(2)
(a)1 through 4.
• A product-approved vent terminal must be used, and if applicable, a
product-approved air intake must be used. Installation shall be in
strict compliance with the manufacturer’s instructions. A copy of the
installation instructions shall remain with the boiler or equipment on
completion of the installation.
2.4 Notes on installation and operation
When installing and operating the heating system observe the following:
• The local building regulations regarding the installation conditions.
• The local building regulations regarding ventilation air and extract air
facilities, and the chimney connection.
• Electrical code requirements for connection to the power supply.
• The technical regulations of the gas company regarding the
connection of the gas burner to the local main gas supply.
• The regulations and standards relating to the safety of DHW heating
system.
2.4.1 Other important information
• The installation of a boiler must be notified to and approved by the
relevant gas supply company.
• Operate the boiler only with the combined air/flue system
specifically designed and approved for it.
• Remember that regional approvals are required for the flue system
and connecting the condensate outlet to the public sewer system.
If a high limit safety cut-out is installed according to
ASME-CSD1 on the heating supply of the (B-kit), heed
the following:
▶ At the factory, a pump post-purge time of 5 minutes
is set on the BC10 controls. This value can be
increased but not reduced.
▶ If an external controller controls the recirculation
pump, a pump post-purge time of 5 minutes must be
ensured.

2
Product information
Logano plus GB312 – 6 720 806 273 (2013/01) 7
2.5 Heating system water quality
As pure water cannot be used for heat transfer, water quality is
important. Poor water quality can damage heating systems due to
scale formation and corrosion. For further details, please see the
accompanying manual "7747010721_GB312_Water Quality
Requirements.pdf".
2.6 Tools, materials and equipment
For the installation and maintenance of the boiler, you will require the
standard tools used for central heating and gas and water systems plus
a set of a metric wrenches and hex keys.
The following items are also of use:
• The RC35 user interface is required as a monitoring device for
commissioning, servicing and maintaining the boiler.
2.7 Environmental Protection / Disposal
Environmental protection is one of the fundamental company policies of
the Bosch Group.
Quality of products and efficiency are equally important objectives for
us. Environmental protection laws and regulations are strictly adhered
to. To protect the environment, we use the best possible technology and
materials taking into account economic points of view.
Packaging
For the packaging, we participate in the country-specific recycling
systems, which guarantee optimal recycling. All packaging materials
used are environmentally-friendly and recyclable.
Old appliances
Old appliances contain resources that should be recycled.
The components are easy to separate and the plastics are marked. This
allows the various components to be sorted for appropriate recycling or
disposal.
CAUTION: Risk of system damage due to unsuitable
heating system water.
▶ When using oxygen-permeable water lines, e. g. for
radiant floor heating systems, you must separate the
system by means of heat exchangers. Unsuitable
heating system water promotes sludge and corrosion
formation. This can result in heat exchanger
malfunction and damage.
A PC with Buderus Logamatic ECO-Soft 4000/EMS and
a service key can also be used as a monitoring device.

2
Product information
Logano plus GB312 – 6 720 806 273 (2013/01)8
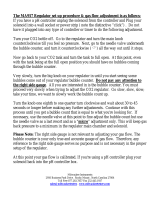
2.8 Product information
The Logano plus GB312 ( Fig. 1) is supplied with a fully factory-
installed and wired Logamatic BC10 basic control unit
( Fig. 2, page 9).
Fig. 1 Logano plus GB312 - main components
[1] Programmer (MC10 and BC10)
[2] Gas burner
[3] Boiler front panel
[4] Siphon (condensate trap)
[5] Boiler block with insulation
[6] Ignition Control
[7] Gas valve
[8] Boiler side panel
[9] B-kit with supply check valve (supplied as standard, not factory
installed)
[10] Gas gas shutoff valve (supplied as standard, not factory-installed)
[11] Mating flange, 2½ " (included in B-kit, not factory-installed)
[12] Bolts, washers, lock washers and nuts (to mount supply manifold
and mating flanges)
The main components of the Logano plus GB312 ( Fig. 1) are:
• Controller
• Frame and jacket
• Boiler block with insulation
• Gas burner
• B-kit (standard B-kit comprising temperature/pressure gauge,
pressure relief valve, supply manifold, supply check valve, mating
flange for supply/return piping, not factory installed)
• Gas shutoff valve
The controller monitors and controls all electrical boiler components.
The boiler block transfers the heat generated by the burner to the
heating water. The thermal insulation reduces the radiation and standby
losses.
7 747 010 720-01.3RS
10
11
12

2
Product information
Logano plus GB312 – 6 720 806 273 (2013/01) 9
Fig. 2 Controls on the Logamatic BC10 base controller
[1] ON/OFF switch
[2] Knob for hot water temperature setting
[3] "Water heating" LED
[4] Status display
[5] Knob for maximum boiler temperature
[6] "Central heat demand" LED
[7] Base plate with slot for a controller e.g. RC35 (behind the cover
panel)
[8] “Burner (On/Off)” LED
[9] Connection socket diagnostic plug
[10] "Status display" button
[11] “Flue gas test” button
[12] “Reset” button
Logamatic BC10 basic control unit ( Fig. 2). The Logamatic BC10
basic control unit enables basic operation of the heating system. It
provides functions such as the following for that purpose:
• Turning the heating system on/off
• Setting the DHW temperature and the maximum boiler temperature
in heating mode
• Status display
On overall picture of the controls on the Logamatic BC10 basic control
unit is shown in Fig. 2.
Many other functions for the convenient control of your heating system
are available with a user interface (e. g. RC35*).
* sold separately
2.9 Scope of delivery
The Logano plus GB312 is supplied as standard with a Logamatic BC10
basic control unit and the MC10 control unit.
▶ Upon receipt, check that all packaging is in perfect condition.
▶ Check that all package contents are present.
▶ Dispose of packaging in an environmentally responsible manner.
Accessories
A wide range of accessories for the boiler is available. Refer to the
catalog for precise details of suitable accessories.
The following accessories are available from the trade:
• Flue system
• Air supply system
• User interface, e.g. RC35
1
2 3 4 5 6
7 8 9 10 11 12
7 747 010 720-85.1RS
Component Packaging
Boiler (fully assembled with outer jacket,
Logamatic MC10 controller, BC10 and gas
shutoff valve)
1 box on a pallet
Technical documentation 1 x film packaging
Set of adjustable feet 1 x film packaging
B-kit (temperature/pressure gauge, pressure
relief valve, supply connector, supply/return
mating flange, supply check valve)
1 box
Table 2

2
Product information
Logano plus GB312 – 6 720 806 273 (2013/01)10
2.10 Dimensions and Specifications
2.10.1 Logano plus GB312 dimensions
Fig. 3 Connections and dimensions for Logano plus GB312 (sizes in inches)
AA = Flue connection
AL = Combustion air pipe connection (sealed combustion operation
only)
VK = Boiler supply
AKO = Condensate outlet
GAS = Gas connection + main shutoff valve
ST = Pressure relief valve connection
RK = Boiler return
TM = Pressure/temperature gauge

2
Product information
Logano plus GB312 – 6 720 806 273 (2013/01) 11
2.10.2 Specifications
Boiler size (output - no. of heat exchanger sections) Unit 90 - 4 120 - 4 160 - 5 200 - 6 240 - 7 280 - 8
Width B Inch 39.1 39.1 47.3 47.3 55.5 55.5
Dimension XAA Inch 13.1 13.1 15.1 17.2 19.2 21.3
Dimension X
RK
(= X
AL
= X
GAS
) Inch 10.6 10.6 14.7 10.6 14.7 10.6
Dimension F Inch 31.5 31.5 39.7 39.7 47.9 47.9
Dimension A Inch 51.4 51.4 51.4 51.4 51.4 51.4
AA = Vent pipe diameter Inch 6.3 6.3 6.3 7.9 7.9 7.9
Flue adaptor for desired manufacturer's venting system 6.3" x 5" 6.3" x 6" 6.3" x 6" 7.9" x 8" 7.9" x 8" 7.9" x 8"
Dimension Y
AA
Inch 18.5 18.5 18.5 19.5 19.5 19.5
Dimension Z
AA
Inch 5.7 5.7 5.7 12.2 12.2 12.2
AL = Combustion air pipe diameter (balanced flue only) Inch 3.94 3.94 3.94 3.94 3.94 3.94
Connections VK and RK NPT 2½ " NPT 2½ " NPT 2½ " NPT 2½ " NPT 2½ " NPT 2½ "
Connection ST (B-kit) ¾" NPT ¾" NPT ¾" NPT ¾" NPT ¾" NPT ¾" NPT
Diameter GAS 1" NPT 1" NPT 1" NPT 1 ¼ " NPT 1 ¼ " NPT 1 ¼ " NPT
Table 3 Dimensions and connection sizes
Observe all standards and guidelines applicable to the
installation and operation of the heating system in your
country. The information on the data plate is binding and
must be observed.
Boiler size (output - no. of heat exchanger sections) Unit 90 - 4 120 - 4 160 - 5 200 - 6 240 - 7 280 - 8
Natural gas (gas type A)
I-B-R Input max. load Btu/hr 328,300 440,500 588,300 732,600 880,700 1,028,800
min. load Btu/hr 132,200 132,200 176,500 219,800 264,200 308,600
I-B-R gross output 180/80 ° F max. load Btu/hr 305,000 409,000 544,000 676,000 810,000 944,000
I-B-R net rating 180/80 ° F max. load Btu/hr 265,000 356,000 473,000 588,000 704,000 821,000
Rated heat output 122/86 ° F max. load Btu/hr 307,100 409,500 545,900 682,400 819,000 955,400
(50/30 ° C) min. load Btu/hr 128,100 127,400 171,200 212,300 255,200 298,100
Flue gas mass flow rate 180/80 ° F max. load lb/min 4.85 6.53 9.14 11.40 13.88 16.15
Flue gas mass flow rate 122/86 ° F max. load lb/min 5.05 7.12 9.29 11.61 14.02 16.65
Flue gas temperature 180/80 ° F max. load ° F 83 90 127 138 140 134
Flue gas temperature 122/86 ° F max. load ° F 120 133 129 131 131 135
CO
2
content, natural gas max. load
%
9.1 9.1 9.1 9.1 9.1 9.1
(GAS A) min. load 9.1 9.1 9.1 9.1 9.1 9.1
Available draft
in. W.C.
0.4
(100 Pa)
0.4
(100 Pa)
0.4
(100 Pa)
0.4
(100 Pa)
0.4
(100 Pa)
0.4
(100 Pa)
(flue draft + air supply pressure)
Air supply volumetric flow rate cfm 95 95 130 160 190 220
Fan G1G 170 G1G 170 G1G 170 G1G 170 G1G 170 G1G 170
Honeywell gas valve V4730C1071 V4730C1097
V4730C10
63
Gas orifice diameter
Natural gas (GAS A) calorific value 1075 BTU/ft
3
17.0 17.0 17.0 17.0 17.0 17.0
Heating water circuit
Boiler water capacity
US
gallons
4.2 4.2 5.3 6.3 7.1 7.9
Primary pressure drop psi Fig. 4 (graph)
Maximum supply temperature, heating/hot water
mode
° F 180/180 180/180 180/180 180/180 180/180 180/180
High temperature cut-out safety limit (manual reset
high limit setting)
° F 200 200 200 200 200 200
Table 4 Specifications

2
Product information
Logano plus GB312 – 6 720 806 273 (2013/01)12
Fig. 4 Primary circuit flow resistance, GB312 with check valve
x Flow rate in gallon/min (GPM)
y Primary pressure drop in psi
The boiler is factory-set for:
• Natural gas (gas type A)
Permissible operating pressure psi 50 50 50 50 50 50
Electrical data
Protection class IP 40 IP 40 IP 40 IP 40 IP 40 IP 40
Main power connection V/HZ
120 V /
60 Hz
120 V /
60 Hz
120 V /
60 Hz
120 V /
60 Hz
120 V /
60 Hz
120 V /
60 Hz
Power consumption max. load W 84 150 190 230 270 370
min. load W 40 40 45 50 50 50
Maximum permissible fuse rating A101010101010
Boiler dimensions and weight
Transport clearance dimensions, width x depth x
height
Inch 34x25x60 34x25x60 42x25x60 42x25x60 50x25x60 50x25x60
Weight lbs 455 455 530 585 665 730
Boiler size (output - no. of heat exchanger sections) Unit 90 - 4 120 - 4 160 - 5 200 - 6 240 - 7 280 - 8
Table 4 Specifications
0,1
1
10
100
1 10 100 1000
x
y
90-4
120-4
160-5
200-6
240-7
280-8
7 747 010 720-30.1RS
Boiler size Gas flow rate
Natural gas (gas type A)
Calorific value 1075 BTU/ft
3
cu ft/hr
90 - 4 324.6
120 - 4 434.4
160 - 5 579.0
200 - 6 720.6
240 - 7 868.8
280 - 8 1013.4
Table 5 Gas flow rate (based on gas temperature of 60 °F and air
pressure of 30 ins Hg)

3
Transporting the boiler
Logano plus GB312 – 6 720 806 273 (2013/01) 13
3 Transporting the boiler
This section describes how to move the boiler safely and without
damaging it.
3.1 Lifting and handling the boiler
The boiler can be carried to its installation site using 2 pipes (1¼ ",
approx. 80 inches long).
▶ Unscrew the locking screw from the top center of the boiler's front
cover.
▶ Lift font panel slightly and draw forwards to remove.
▶ Unscrew the locking screws from the side panels at the front and
back of the boiler.
▶ Slightly lift the side panels and remove.
Fig. 5 Removing front cover and side panels
[1] Front panel
[2] Side panel
[3] Locking screw
▶ Unscrew the securing screws.
▶ Lift the boiler off the pallet.
Fig. 6 Lifting the boiler off the pallet
[1] Locking screw
[2] Pallet
▶ Push the pipes through the holes at the front and rear of the boiler
( Fig. 7, page 14).
▶ Secure the pipes at the positions shown in Fig. 7 to prevent slipping,
for example, by using adhesive tape.
▶ Carry the boiler to the installation site.
CAUTION: Risk of system damage from impacts.
The standard boiler includes parts that are sensitive to
impact.
▶ If the boiler has to be moved after delivery, protect all
components against shocks and impacts.
▶ Observe the transport instructions on the packaging.
If the boiler is not to be installed immediately, protect
the connections from entry of dirt.
Dispose of packaging in an environmentally-responsible
manner.
CAUTION: Risk of injury through carrying heavy loads.
▶ Always lift and move the appliance with the
assistance of another person and use the grip
positions shown.
▶ Secure the boiler against slipping.
7 747 010 720-06.1RS
1
1
2

4
Installing the boiler
Logano plus GB312 – 6 720 806 273 (2013/01)14
Fig. 7 Transporting the boiler using pipes
[1] Positions for securing the boiler against slipping
[2] Pipe (for carrying)
3.2 Transporting the boiler on rollers
If the route to the installation site is flat, the boiler can also be rolled. This
requires at least 5 lengths of pipe approx. 28 inches long (diameter
1¼ ") to be placed underneath to act as rollers.
▶ Lay the lengths of pipe on the floor spaced about 16 inches apart.
▶ Lift the boiler onto the lengths of pipe and carefully transport it to the
installation site.
Fig. 8 Transporting the boiler on rollers (dimensions in inches)
4 Installing the boiler
This chapter details how to install and site the boiler correctly in the
installation room.
4.1 Installation room requirements
4.2 Recommended wall clearances
When determining the installation location, take the clearances for the
flue gas routing and the connection pipes into consideration ( Fig. 9,
page 15 and Section 6, page 16, venting system connection and the
piping on the water and gas sides).
You can also use standard transport rollers.
▶ So that the bottom plate is not pressed in, it is
essential to ensure that the weight is evenly
distributed across the load-bearing parts.
7 747 010 720-07.1RS
7 747 010 720-08.1RS
WARNING: Risk of system damage due to freezing!
▶ Install the heating system in a frost-free room.
DANGER: Dangers posed by explosive and easily
combustible materials.
▶ Never use or store easily flammable materials (paper,
curtains, clothing, thinners, paints etc.) near the
boiler.
▶ Maintain a clearance of 16 inches from the boiler.
WARNING: Risk of boiler damage through contaminated
combustion air.
▶ Do not use cleaning agents that contain chlorine or
halogenated hydrocarbons (e.g. in spray cans,
solvents and cleaning agents, paints, glues).
▶ Never use or store chlorinated cleaning agents or
halogenated hydrocarbons in the installation room.
▶ Avoid excessive dust accumulation (building dust) on
or near the boiler.
Dimension Wall clearance (inch)
Minimum Recommended
A2028
B
1)
1) This clearance depends on the venting system installed
22 28
C2028
D 20 28
E
1)
614
Table 6 Recommended and minimum wall clearances (dimensions in
inches). Minimum clearance dimension E must absolutely be
adhered to.
Allow extra wall clearances for additional components,
for example, indirect water storage tanks, pipe
connections or other components on the flue gas side
etc.

5
Openings for combustion air supply and venting
Logano plus GB312 – 6 720 806 273 (2013/01) 15
Fig. 9 Wall clearances in the installation room
4.3 Leveling the boiler
To prevent air collecting in the boiler and to allow the condensate to
drain freely from the condensate pan, the boiler must be leveled.
▶ Place the boiler in its final position.
▶ Level the boiler horizontally by turning the adjustable feet and using
a level.
Fig. 10 Leveling the boiler
[1] Adjustable feet
[2] Level
5 Openings for combustion air supply and venting
To ensure an adequate combustion air supply and venting of the heating
system, suitable measures must be taken in accordance with the
National Fuel Gas CodeNFPA 54 (ANSI Z223.1), Section 5.3, Air for
Combustion and Ventilation, or the local codes. In Canada the
regulations in accordance with CAN/CSA B149.1 and 2 Installation
Codes apply.
CAUTION: Risk of boiler damage due to inadequate
load-bearing capacity of floor or unsuitable base.
▶ Make sure that the surface on which the solar storage
tank stands has sufficient load-bearing capacity.
▶ The boiler may stand on a base made of combustible
material but not on carpet.
7 747 010 720-09.1RS
A
D
B
E
C
7 747 010 720-10.1RS
CAUTION: Risk of boiler damage and malfunctions due
to missing or inadequate openings for combustion air
and venting of the installation room.
The openings for combustion air supply and venting are
always required regardless of whether the combustion
air is supplied from the room (operation from room air)
or directly to the boiler through ducts (operation
independent of room air). Inadequate venting of the
installation room may result in excessive ambient
temperatures. This can damage the boiler.
Inadequate combustion air supply may cause
malfunctions.
▶ Make sure that air inlet or outlet vents are not closed
off or their size reduced and that they are adequately
dimensioned.
▶ Never operate the boiler unless faults are rectified
immediately.
▶ Inform the operator of any faults and their associated
risks.
CAUTION: Risk of boiler damage through contaminated
combustion air.
▶ Never use chlorinated cleaning agents or
halogenated hydrocarbons (such as those contained
in spray cans, solvents, cleaning agents, paints and
adhesives, for example).
▶ Never use or store chlorinated cleaning agents or
halogenated hydrocarbons in the installation room.
▶ Avoid very dusty atmospheres.
If impurities in the combustion air are possible (e.g.
installation near swimming pools, dry cleaners or
hairdressing salons), sealed combustion operation is
recommended.
CAUTION: Dangers posed by explosive and easily
combustible materials.
▶ Never use or store easily flammable materials (paper,
curtains, clothing, thinners, paints etc.) near the
boiler.
▶ Maintain a clearance of 16 inches from the boiler.

6
Installing the boiler
Logano plus GB312 – 6 720 806 273 (2013/01)16
Overall air supply within the building
Make sure that the installation room has two permanent air vents that
are connected to one or more other rooms. When calculating the cross-
sectional areas of the vent apertures, the total burner output of all gas-
fired appliances in the connected rooms must be taken into account.
Each vent must have a minimum cross-section of one square inch per
1000 Btu/h of the total burner output of all gas-fired appliances inside
the connected rooms. Make sure that the cross-sectional area of each
vent is at least 100 square inches. One of the vents must be no more
than 12" from the ceiling and the other no more than 12" from the floor
of the installation room, measured from the outer edge of the vent
opening. The smallest dimension of all inlet and outlet vents must be not
less than 3".
All air from outdoors
Make sure that the installation room has two permanent air vents, one of
which must not be more than 12" from the ceiling and the other not more
than 12" from the floor of the installation room, measured from the outer
edge of the vent opening. The vents must be connected either directly or
via air ducts to the outside or to rooms that have an unobstructed
connection to the open air (crawl space or ventilated attic). The smallest
dimension of all inlet and outlet vents must be not less than 3".
• If there is a direct connection to the outside, each opening must have
a minimum cross-section of one square inch per 4000 Btu/h of the
total combustion output of all gas-fired appliances inside the closed
room.
• If there is a connection to the outside through a ventilated attic with
vertical ventilation ducts, each vent aperture must have a minimum
cross-section of one square inch per 4000 Btu/hr of the total burner
output of all gas-fired appliances inside the closed room. The attic
must be ventilated at both ends of the house.
• If there is a connection to the outside through horizontal ventilation
ducts, each vent aperture must have a minimum cross-section of one
square inch per 2000 Btu/hr of the total burner output of all gas-fired
appliances inside the closed room. The duct cross sectional area
must not be smaller than the free area of the inlet.
• If there is a connection to the outside through a ventilated attic and
ventilated crawl space, each opening must have a minimum cross-
section of one square inch per 4000 Btu/h of the total burner output
of all gas-fired appliances inside the closed room.If there is a
connection to the outside through a ventilated attic and ventilated
crawl space, each opening must have a minimum cross-section of
one square inch per 4000 Btu/h of the total burner output of all gas-
fired appliances inside the closed room. The attic must be ventilated
at both ends of the house.
6 Installing the boiler
This section details how to install the boiler. The individual steps
involved are:
• Flue and air supply system
• Heating circuit connection
• Providing the fuel supply
• Electrical connections
General notes on installing the flue and air supply system
The boiler requires a venting system approved for Category IV
(condensing, positive pressure; to ANSI Z21.13/CSA4.9). The material
must consist of AL 29-4C stainless steel and conform to UL 1738 or UL
103.
In Canada, the flue system material must conform to ULC-636.
We recommend stainless steel flue systems made by the following
manufacturers:
In the US, Category IV plastic flue systems can also be used. We
recommend the following manufacturers:
The use of cellular core PVC, CPVC and Radel as venting material is
prohibited.
If a plastic system (CPVC) is used in Canada, it must be approved as a
type "BH gas venting system" (ULC-S636). Components made by
different manufacturers must not be used in the same flue system nor
may any uncertified components or materials be used in the flue system.
The components, adhesives and adhesive primers specified by the flue
system manufacturer must be used. Only components, adhesives,
adhesive primers, etc. made by the same manufacturer may be used.
The following systems are approved for use in Canada and may be used
with this boiler:
Flue gas/air supply system installation must comply with Part 10,
Venting of Equipment, of the National Fuel Gas Code NFPA 54 (ANSI
Z223.1), or CAS B.149 or other applicable local building code
regulations.
The flue and air supply system (for design of flue connection
Section 6.5, page 19) must be designed for a max. pressure of 0.40
inches W.C. for the overall system (flue and air supply system).
Manufacturer Flue system
heat fab Saf-T Vent EZ Seal
Z-Flex Z-Vent IV special gas vent
Metal Fab CorrGuard
Pro-Tech FasNSeal
Table 7 Recommended flue systems
Manufacturer system
Centrotherm Inno Flue SW
Spears,
Charlotte
CPVC pipe Schedule 80 ASTM D1784,
PVC pipe Schedule 40 ASTM D1784
Table 8 Recommended systems for the USA
Manufacturer Flue system
Centrotherm Inno Flue SW
IPEX System 636 CPVC,
System 636 PVC
Table 9 Recommended flue systems for Canada

6
Installing the boiler
Logano plus GB312 – 6 720 806 273 (2013/01) 17
Observe the following points when installing the flue ducting:
• The cross-sectional area of the vent pipe must be calculated
according to the applicable regulations. Guidance on the
dimensioning of the flue/air supply system can also be obtained in
the Application Manual GB312 US/CA.
• Select the shortest possible route for the flue pipe.
• Install vent pipes with an upward slope from the boiler (¼ " per foot).
• The application of external insulation on plastic pipes is prohibited.
We recommend installing a safety mesh (bird screen) at the discharge
opening from the vent pipe.
For details of correct dimensioning, contact the venting manufacturer
concerned.
Flue system for multi-boiler systems (cascading systems)
These instructions relate only to single-boiler systems. Flue/air supply
systems for multi-boiler systems must be designed by qualified heating
professionals and approved and guaranteed by the flue system
manufacturer. The venting system must prevent back-flow of flue gas
through boilers that are not in operation.
6.1 Attaching the flue connector to the boiler
Install the selected flue system manufacturer's appropriate flue pipe
adaptor for the boiler according to the manufacturer's instructions.
Fig. 11 Connecting the flue connector
[1] Flue pipe adaptor (available separately)
[2] Flue pipe adaptor (available separately)
[3] Fitted gasket
All instructions relating to all parts of the flue gas routing
system, and especially the instructions of the venting
system manufacturer, must be followed. Use only piping
with the appropriate diameter for the output rating of the
boiler and made by the recommended manufacturers
listed in Table 7, 8 or 9.
DANGER: Risk of fatal injury from escaping flue gases in
the installation room.
▶ The gasket in the flue connector of the condensate
pan must be present, in good order and correctly
inserted.
▶ Installing an air inlet flap in the flue system is not
permitted.
CAUTION: Risk of system damage due to inadequate
condensate drainage.
▶ Use a suitable siphon to drain condensate that
accumulates in the flue before it reaches the boiler
(maximum distance from boiler: 6 ft).
CAUTION: Disruption of operation due to high wind.
If no T-piece or 90° elbow is fitted on the end of flue pipe,
high winds may cause the boiler to shut down.
▶ Always make sure that there is a T-piece or a 90°
elbow fitted depending on the design of the flue
system.
▶ Use only a T-piece or 90° elbow (Category IV) made
by the selected flue system manufacturer.
With regard to possible restrictions and inspections for
flue systems, consult the local building and fire safety
authorities. Observe the national regulations.
In the Commonwealth of Massachusetts the
requirements about carbon monoxide detectors must be
followed.
In the case of venting systems sealed with high-
temperature silicone from a cartridge, the silicone must
be allowed to dry for 24 hours before commissioning the
boiler.
DANGER: Risk of fatal injury due to poisoning by
escaping flue gas.
▶ After carrying out any of the installations referred to,
check that all connections throughout the entire
venting system are properly joined and sealed.
▶ Check seams and joints for leaks.
▶ Have the entire flue system checked once a year by a
qualified heating contractor.
Use a suitable siphon to drain condensate that
accumulates in the flue before it reaches the boiler
(maximum distance to boiler: 6 ft). Condensate must not
be allowed to flow into the appliance.
▶ Ensure that the condensate drain is adequately
dimensioned (at least ¾ ").
▶ Install the vent pipe with an upward slope (¼ " per
foot).
7 747 010 720-11.3T
2
3
1

6
Installing the boiler
Logano plus GB312 – 6 720 806 273 (2013/01)18
6.2 Installing the flue system
To ensure perfect operation and prevent foreign bodies entering the flue
system, it must be fitted with an end piece (a T-piece or a 90°-elbow is
required).
In areas subject to heavy snowfalls, the end piece on flue system must be
at least 12" higher than the maximum depth of snow.
The flue system must not terminate less than 14 feet above any public
surfaced footway or path.
Make sure that the end piece is at least 10 feet away from the
combustion air intake of any other boiler.
The flue system must terminate more than 6 feet away from any other
opening in a building, from gasometers, equiment controls, combustible
components or similar.
The flue system must terminate at least 4 feet below, 4 feet (6 feet in
Canada) horizontally away from or 1 foot above any door, window or air
vent in any a building.
Ensure a minimum distance of 6" from combustible components.
6.3 Installing the wall penetration for a horizontal flue
Please carefully read the following instructions and information on the
installation of the wall exit and make sure you observe the safety
instructions.
The wall exit must be installed in accordance with the specified
regulations and/or local building code regulations.
Fig. 12 Specified clearances to ANSI Z223.1 for horizontal flues
A Minimum horizontal distance from air intake of another appliance
= 10 ft, minimum distance from own air intake for directly vented
appliances = 4 ft.
B Minimum vertical distance from air intake of another
appliance = 3 ft, with directly vented appliances the flue outlet
can be positioned level with the appliance's own air intake
(observe minimum horizontal separation of 4 ft).
[1] Flue wall penetration
[2] Air intake wall penetration
Fig. 13 Wall penetration
[1] Wall penetration
[2] Flue pipes
[3] End piece on flue pipe (T-piece or 90°-elbow)
[4] External cover plate
WARNING: Risk of slipping hazard due to ice formation.
▶ Do not position air intake and flue piping directly
above footways. Dripping condensate can result in
ice formation on the footway.
All instructions provided by the flue system
manufacturer regarding the installation of the wall
penetration must be followed. Use only those that are
required for the flue pipe diameter. The use of a T-piece
or a 90°-elbow as the external end piece for the flue pipe
is required.
12 in.
min.
12 in.
min.
4 ft.
min.
B
A
4 ft.
min.
2
1
3
1
2
3
4
7 747 010 720-13.1RS

6
Installing the boiler
Logano plus GB312 – 6 720 806 273 (2013/01) 19
6.4 Installation of the roof penetration of a vertical flue
systems
Observe the clearances for the roof exit above the roof ( Fig. 14).
If the flue passes through ceilings at any points, fire plates
( Fig. 14, [2]) must be installed.
Fig. 14 Vertical flue system with room air for combustion
[1] Roof penetration
[2] Fire protection collar
[3] Fastening the flue pipe
[4] Flue pipe adaptor (available separately)
[5] T-piece with siphon to drain condensate
6.5 Connecting the air supply (for direct vent
operations)
The combustion air is supplied to the boiler either through an external
wall connection, through a chimney flue or through a separate pipe in the
chimney flue. For direct vent operation, a suitable air supply system
must be used (made of PVC or CPVC, galvanized steel or other suitable
material).
The flue and air supply system (for design of flue connection,
see Section 6, page 16) must be designed for a max. pressure of
0.40 inches W.C. for the overall system (flue and air supply system).
Use Tab. 10 or refer to the GB312 Application Manual for detailed
descriptions of maximum permissible vent lengths and dimensioning of
exhaust venting systems.
▶ Remove the side panel if not already removed.
▶ Unscrew the cover plate from the rear panel.
▶ Attach the 90° elbow on the air supply system to the air inlet
connection through the rear panel and seal.
▶ Construct the air supply pipe using a standard air pipe system
according to the national requirements.
We recommend installing a safety mesh (bird screen) on the air intake
opening. For details of correct dimensioning, contact the manufacturer
concerned.
Fig. 15 Connecting the air supply for balanced flue operation
[1] Bolt
[2] Air supply restriction plate
All instructions provided by the flue system
manufacturer concerned regarding the installation of the
wall penetration must be followed. Use only those that
are required for the necessary flue pipe diameter. The
use of a T-piece or a 90°-elbow as the external end piece
for the flue pipe is required.
Always make sure that the flue connector is installed
with a downward slope towards the boiler ( ¼ " per foot).
6 720 806 275-01.1T
10 Min
2 Min
3 Min
48"Max
1
2
3
3
4
5
We recommend that the air supply pipe diameter match
the flue pipe diameter.
Boiler size Required air supply
volumetric flow rate
Recommended air supply
pipe diameter
[ft
N
3
/m] [inches]
90 - 4 95 5
120 - 4 95 6
160 - 5 130 6
200 - 6 160 8
240 - 7 190 8
280 - 8 220 8
Table 10 Air supply volumetric flow rate/Air supply pipe diameter
To avoid problems when making the gas connection, it is
best to install a 90° elbow for the air intake connection.

6
Installing the boiler
Logano plus GB312 – 6 720 806 273 (2013/01)20
6.6 Installing the wall penetration for the air pipe
To prevent possible recirculation of flue gas, the flue system installer
must take account of effects such as the prevailing wind conditions, e. g.
any eddy zones, the specifics of the site, etc. in the design of the flue and
air supply systems. Buderus can not be held responsible for such
potentially deleterious effects on boiler operation. Multi-boiler systems
must be installed according to the specifications of ANSI Z223.1.
The clearances detailed or illustrated in Fig. 12 and Fig. 16 should be
seen as the absolute minimum and may in some circumstances not be
adequate for specific installations.
Fig. 16 Design of air pipe wall penetration
A Minimum vertical distance from air intake of another
appliance = 3 ft.; with directly vented appliances, the flue outlet
can be positioned level with the appliance's own air intake
(observe minimum horizontal separation of 4 ft).
[1] Flue outlet boiler 1
[2] Inner wall centering and retaining plate
[3] Boiler sealer
[4] Outer wall retaining plate
[5] T-piece or
[6] 90° elbow
[7] Air intake boiler 1
[8] Flue outlet boiler 2
[9] Air intake boiler 2
2
1
4
3
5
7
6
8
9
4 ft min.
10 ft min. (ANSI Z223.1)
4 ft min.
12 in min.
12 in min.
6 720 647 031-01.1T
3 ft min.
A
/