
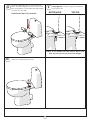
WL6007##H
WL6008##H
WL6009##H
WL6018##H
WL6019##H
WL6021##H
WL6022##H
WL6024##H
WL6104##H
WL6105##H
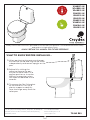
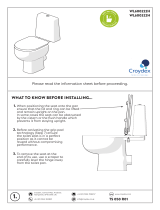
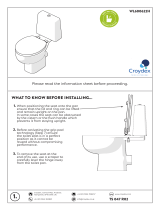
WHAT TO KNOW BEFORE INSTALLING...
When positioning the seat onto the pan
ensure that the lid and ring can be lifted
independently and remain upright on the
pan.
Before fully sticking the
adhesive tape to the pan,
ensure the toilet seat is in a
perfect position as it can be
dicult to reposition when
the tape has adhered to the
ceramic.
1.
2.
To remove the flexi fit bracket
at the end of its use, use a
plastic scraper to carefully
lever the hinge away from the
toilet pan.
3.
Always follow the instructions provided to ensure that your product is assembled and fitted safely,
and retains its high quality finish.
ALWAYS RETAIN THIS MANUAL FOR FUTURE REFERENCE
TS 045 R05
UK: Croydex, Central Way, Andover, Hampshire, SP10 5AW, UK
EU: MIL, Unit 8 Purcellsinch Ind Est, Dublin Road, Kilkenny,
R95 HP71, Ireland
Tel: +44 (0)1264 365881
Email: info@croydex.co.uk
www.croydex.com
1

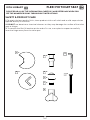
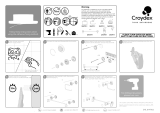
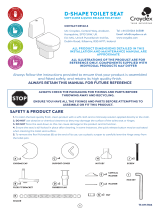
ICON LIBRARY
PLEASE READ ALL OF THE INFORMATION CAREFULLY AND REFER BACK WHEN YOU
SEE THE NUMBERED ICONS THROUGHOUT INSTRUCTIONS.
FLEXI FIX TOILET SEAT
A
B
C
D
E
x2
x2
x2
x2
x2
Fx2
G
Ix2
H
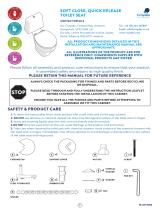
SAFETY & PRODUCT CARE
1. To retain the best quality finish, clean product with a soft cloth and a mild soap solution
applied directly to the cloth.
2. DO NOT use abrasive or chemical cleaners as they may damage the surface of the toilet
seat or hinges.
3. To remove the flexi fit bracket at the end of its use, use a plastic scraper to carefully
lever the hinge away from the toilet pan.
2

1. 2.
3.
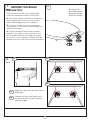
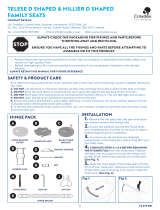
BEFORE YOU BEGIN
Remove the
decorative and
protective caps
from the hinges.
Align the seat with the front of the
toilet pan.
Choose the slot which best suits
the position of the toilet seat on
your toilet pan.
*Hinge positions should be symmetrical.
3a.
3b.
3a. 3b.
3b.
PREPARATION
1. Remove the old seat from the pan and
clean the surface around the fixing holes.
2. Ensure the surfaces around the fixing holes
are completely dry and free of any dust or
debris before beginning the installation.
3. To ensure you do not lose any dropped
components in the toilet pan, place cling film
over the toilet bowl.
4. Ensure the red protective film has been
peeled o the tape on the underside of the
flexi fit bracket before mounting the hinges.
Do not fully stick the hinges in place until the
desired position of the seat has been achieved.
3

5.4.
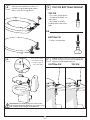
TOP FIX
- Fits most toilet pans.
- Suitable for back to
wall pans.
- No need to reach
underneath the toilet
pan.
TOP OR BOTTOM FIXINGS?
BOTTOM FIX
- Faster installation.
Remove the protective film to
reveal the grip pad and place
bolts into the hinge base.
OR
6. 7. Lightly screw the bolt into place using your
chosen fixing method. Do not collapse the
supports on the hinge base yet.
TOP FIXBOTTOM FIX
For top fix, insert
the rubber plugs
into the holes in
the toilet pan.
IMPORTANT! Carefully place the seat on the
pan ensuring the Grip Pad does not stick to the
pan surface at this stage of installation.
4

9.8. When the desired position of the seat has
been achieved, apply firm pressure on both
flexi fix brackets so the adhesive pad makes
contact with the pan.
Hold for at least 20 seconds.
10.
Fully tighten the bolt using your preferred
fixing method.
TOP FIXBOTTOM FIX
Place on the decorative covers.
NOTE: If you need to lift the seat to access the
bolt, ensure you do not move the hinges.
5
-
 1
1
-
 2
2
-
 3
3
-
 4
4
-
 5
5


Ask a question and I''ll find the answer in the document
Finding information in a document is now easier with AI
Related papers
-
 Croydex AJ401341 User manual
-
 Croydex WL601322H Operating instructions
-
 Croydex WL600322H Operating instructions
-
 Croydex QM291841 User manual
-
 Croydex WL600622H Operating instructions
-
 Croydex WL601922H Operating instructions
-
 Croydex WL611022H User manual
-
 Croydex WL610321H User manual
-
 Croydex AP701022H User manual
-
 Croydex WL610722H User manual


Other documents
-
 Boyel Living JMJBL-128-OPT Installation guide
-
Kado 9501530 Technical Guide
-
Fresca FTL2336 Installation guide
-
 NRS Healthcare M11090 Operating instructions
-
 Elddis affinity Owner's Handbook Manual
-
 Lunar Caravans User manual
-
 Auto-Sleepers warwick duo 2008 User manual
-
Invacare Aquatec Ocean VIP User manual
-
Jade Bath TS-051 Installation guide
-
SWIFT Caravan Owner's Handbook Manual


