Page is loading ...

9-Tiered Wood Literature Display
BDI1224RM, BDI1224BLK, BDI45BLK, BDI45RM
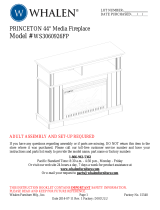
1. Screw connectors (I) into small holes in Right (A)
and Left (B) sides
2. Place cams (H) into large holes in Upper Back (C) and
both Front/Back (E). Place the Upper Back so small
hole is at bottom.
3. Join Right Side (A) to Front/
Back as shown. Join Upper
Back, with small hole facing
the back of the unit. Use
screwdriver to turn the arrow
on the cam toward nearest
edge. Insert connector and
rotate ½ turn clockwise with
screwdriver to lock cams.
PARTS LIST:
A. Right Side
B. Left Side
C. Upper Back
D. Top
E. Front, Back
F. Acrylic Insert
G. Wire Frame
H. Cam, 15mm
I. Connector
J. Screwdriver
K. Pan Head Screw
QTY:
1
1
1
1
1, 1
1
1
12
12
1
1

4. Connect Left Side (B) to unit. Lock cams with
screwdriver.
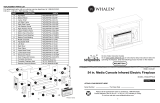
6. Lower Wire Frame (G) into the unit, so pegs slide
into slots on Top (D). Place Acrylic Insert (F) into slot
on Top (D).
5. Lift unit to standing position. Place Top (D) with slot and
two holes facing front as shown.
7. Set retainer hook of Wire Frame (G) over small hole
of Upper Back (C). Insert screw (K) into hole using
screwdriver to secure.
8. Flip wire hooks on Wire Frame (G) to set pocket
spacing as desired.
Assembly is
complete.
/