Page is loading ...

Revised 14 Nov 07
Installation Guide for the XJ &
ZJ Front Sway Bar Quick Discon-
nects Kit Part #001713000(QDFXZ)
Part One
Prior to starting the installation,
please remove stock sway bar links.
Step 1
After removing the sway bar links,
identify the left and right quick dis-
connect. One way to tell is that the
bolt head will point away from the
vehicle in its nal position.
Place the round spacer ring on the
threaded bracket bolt.
Once the assembly has been inserted
into place, make sure that the grease
zerk points downward away from the
vehicle. Add the at washer and nut
and secure.
Step 2
Attach the sway bar connecting stud
to the lower mount bracket by insert-
ing the stainless steel stud in the
hole vacated by the sway bar arm and
securing with lock washer and nut. Be
sure that the threaded portion of the
stud points away from the vehicle.
NOTE: It is highly recommended to use
loctite on the stud.
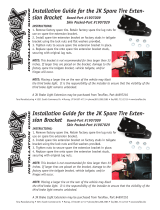
The new generation TeraFlex Sway
Bar Quick Disconnects for XJs and ZJs
include the components picture to the
right. DO NOT use these quick discon-
nects with only one side connected.
Doing so will void any warranty claims.
Grand Cherokee Owners: Please note that these instructions were photographed during an
installation on a Cherokee. Although the function will be the same, the installation will
vary slightly on the Grand Cherokee. Please use the instructions as guidance, but realize
that actual drilling locations may appear different. When drilling, be sure to check clear-
ance to avoid drilling into anything you shouldn’t.
Tera Manufacturing, Inc.
5251 South Commerce Dr.
Murray, Utah 84107
Phone/801.288.2585
Fax/801.713.2313
www.teraex.biz
INSTALLATION GUIDE

Revised 14 Nov 07
Revised 14 Nov 07
Step 4
Attach the sway bar arm by sliding the polyurethane
bushing onto the lower stainless steel stud. The use of
lubricant such as WD-40 will make this much easier.
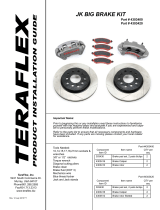
Step 5
Secure the quick disconnect by placing the washer on
the side opposite the bolt and insert pin into the stud.
Note: This photo illustrates how the front axle will
shift to the driver’s side when the suspension is fully
extended by a hoist. You may wish to connect the com-
ponents with the vehicle on the ground.
Step 3
Use the pin for leverage when tightening the nut with
a 3/4” wrench.

Revised 14 Nov 07
Revised 14 Nov 07
Part Two
Step 1
The next step involves installation of the retention
strap used to secure the sway bar when disconnected.
Drill the hole where the retention strap will be
attached. The photograph shows one possible location.
Step 2
Place one washer on each side of the grommet located
on the upper end of the retention strap and insert the
bolt. Please refer to the diagram.
Step 3
Tighten the bolt to secure the retention strap.
Step 4
Now, locate and mark the proper position for the
retention strap hook. Be sure to allow enough freedom
in the strap to remove the strap from the hook.

Revised 14 Nov 07
Step 5
Drill the hole marked in Step 4.
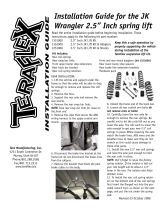
Notes on securing your disconnected sway bars
There are two methods of securing the disconnected
sway bars. One method should be stronger but the
other is quicker.
Stronger method Quicker method
Step 6
Attach the retention strap hook to the vehicle using
the included metal screws.
Instructions for Brake Line Relocators
1. Remove the Torx bolt holding the brake line to the
frame.
2. Line the bracket up with the holes in the frame so
that the bracket extends down.
3. With the bracket in place, use the Torx bolt to
secure the bracket to the frame.
4. Pull the brake line assembly down until it lines up
with the lower holes in the new bracket.
5. Using the 1/4” bolt and nut supplied, secure the
brake line to the bracket.
Note:
We recommend greasing your quick disconnects at
least every 3,000 miles. It is also a good idea to grease
after going through water and when the quick discon-
nects become difcult to move. Lubricants like WD-40
on the stainless studs will make moving the quick
disconnect arms much easier.
/