Page is loading ...

User Manual
18Gbps True 4K60 4:4:4, 8x8 Matrix with eight
HDMI inputs as well as eight mirrored HDBaseT
outputs blocks.
AC-MX-88HDBT
1

INTRODUCTION .................................................................................. 4
FEATURES ......................................................................................... 4
WHAT’S IN THE BOX ............................................................................ 4
SPECIFICATIONS ................................................................................ 5
COMPATIBLE HDBASET RECEIVERS ........................................................ 6
FRONT AND REAR PANEL OVERVIEW ...................................................... 7
INITIAL SETUP: WEBUI ....................................................................... 8
ADVANCED SETUP: WEBUI INPUT SETTINGS ......................................... 12
ADVANCED SETUP: WEBUI OUTPUT SETTINGS ....................................... 13
ADVANCED SETUP: WEBUI EXTRACTED AUDIO OUTPUT SETTINGS ............ 14
WEBUI: VIDEO MATRIX ..................................................................... 16
WEBUI: AUDIO MATRIX ..................................................................... 17
WEBUI: I/O CONFIG - INPUT SETTINGS ............................................... 18
WEBUI: I/O CONFIG - INPUT SETTINGS CONT. ..................................... 19
WEBUI: I/O CONFIG - OUTPUT SETTINGS............................................. 19
WEBUI: I/O CONFIG - OUTPUT SETTINGS CONT. ................................... 20
WEBUI: I/O CONFIG - OUTPUT SETTINGS CONT. ................................... 21
WEBUI: I/O CONFIG - OUTPUT SETTINGS CONT. ................................... 22
WEBUI: SYSTEM - IP SETTINGS .......................................................... 23
WEBUI: SYSTEM - TELNET SETTINGS ................................................... 23
WEBUI: SYSTEM - ADMIN WEB INTERFACE ........................................... 24
WEBUI: SYSTEM - USER WEB INTERFACE ............................................. 25
WEBUI: SYSTEM - CLOUD SERVICES .................................................... 26
WEBUI: SYSTEM - FIRMWARE UPDATE CONT. ........................................ 27
WEBUI: SYSTEM - HARDWARE ............................................................ 27
WEBUI: DIAGNOSTICS - HDMI IN ....................................................... 28
WEBUI: DIAGNOSTICS - HDMI IN CONT. .............................................. 29
WEBUI: DIAGNOSTICS - HDMI OUT ..................................................... 30
WEBUI: DIAGNOSTICS - HDBT OUT ..................................................... 31
2

WEBUI: DIAGNOSTICS - HDBT OUT CONT. ............................................ 32
WEBUI: CONSOLE ............................................................................. 33
FRONT PANEL CONTROL - SWITCHING ................................................. 34
FRONT PANEL CONTROL - SCALING ..................................................... 34
FRONT PANEL CONTROL - SCALING CONT. ............................................ 35
FRONT PANEL CONTROL - AUDIO BINDING ........................................... 36
AUDIO MATRIX CONTROL:.................................................................. 37
FRONT PANEL CONTROL - AUDIO DELAY .............................................. 37
EDID MANAGEMENT: ......................................................................... 38
DISPLAY IP INFORMATION: ............................................................... 39
QUICK NETWORK CONNECT TO WEB INTERFACE: .................................. 39
HDBASET LIGHTS: LINK .................................................................... 40
HDBASET LIGHTS: STATUS ................................................................ 41
IR CONTROL: IR REMOTE ................................................................... 42
IR CONTINUED: ................................................................................ 43
RS-232 AND TCP/IP CONTROL: ........................................................... 44
COMMAND LIST: ............................................................................... 45
COMMAND LIST CONTINUED: .............................................................. 46
COMMAND LIST CONTINUED: .............................................................. 47
EXTRACTED AUDIO: .......................................................................... 48
BALANCED 5 PIN 2CH AND TOSLINK AUDIO PORT /SPDIF: ..................... 48
AUDIO OUTPUT LOGIC AND CABLE PREP: ............................................. 49
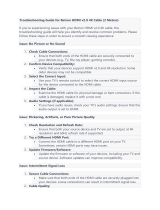
TROUBLESHOOTING .......................................................................... 50
BANDWIDTH CHART .......................................................................... 50
MAINTENANCE ................................................................................. 51
DAMAGE REQUIRING SERVICE ............................................................ 51
SUPPORT ......................................................................................... 52
WARRANTY ...................................................................................... 52
3

The AC-MX-88HDBT is an 8x8 HDMI/HDBaseT matrix switch. This unit includes 8 HDMI inputs and 8 HDMI/
HDBaseT output blocks, and these output blocks have an HDBaseT and HDMI port. The matrix mirrors these
ports, and both are active. This matrix supports HDMI 2.0(a/b), HDCP 2.3, up to 4K video resolution, and 18
Gbps bandwidth. We can pass 18Gbps through category cable using the HDBaseT technology we have de-
veloped called “ICT.” This switch allows any source (Blu-ray, UHD Blu-ray, satellite receiver, game consoles,
PCs, etc.) to be shown on any of the connected displays. This matrix equalizes and amplies the output to
ensure the HDMI signal can be transmitted through long HDMI cables without losing quality.
Audio delay is “on-board,” so you can manage to lip-sync issue before it is a problem. Also, with built-in
Scalers, you don’t have to forfeit that 4K signal because you have a couple of older displays. All that with
Full EDID management allows maximum exibility with today’s broad mixture of sources and displays.
Features
·HDMI 2.0(a/b)
·18Gbps Uncompressed Bandwidth Support on HDMI
·18 Gbps with ICT on HDBaseT outputs
·4K60 4:4:4 Support
·Full HDR Support (HDR 10 & 12 Bit)
·Dolby Vision, HDR10+ and HLG Support
·HDCP 2.2 (and all earlier versions supported)
·1080p > 4K Up Scaling on HDMI outputs
·4K > 1080p Down Scaling on HDBaseT outputs
·Advanced EDID Management
·IR, RS-232 and LAN Control Options
·Digital Toslink Out (7CH PCM, DD, DD+, DTS, DTS-MA)
·Balanced Analog Out (2CH PCM)
·Audio Delay for Digital & Analog Out
·HDBaseT Compatibility mode for mixed systems! (More
below)
·Driver Support for Crestron, C4, RTI, ELAN and more!!!
·Extracted Audio Supports DD+, DTS Master Audio on
Toslink
·Extracted Audio has 3 Operating Modes. Bound to
Input, Bound to Output, or Independent Matrix
·Built in Test Pattern on Each Output to Verify Infrastruc-
ture
4
Introduction
*3V CR2025 Battery Required For IR Remote Control
Not Included
What’s In the Box
·AC-MX-88HDBT (Matrix Switch)
·2 x 48v Power Supplies
·1 x IR Remote Control
·Mounting Brackets
·8 x 5-Pin to 2ch Audio Extraction Cable
·9 x 3-Pin Terminal Blocks

Specications
5

Compatible HDBaseT Receivers
AC-EX70-444-RNE (Receiver /No Ethernet)
·70M 4k 60 4:4:4 & HDR
·100M 1080P
AC-EX70-SC2-R (Scaling Receiver)
·70M 4k 60 4:4:4 & HDR
·100M 1080P
AC-CX100-RAMP
·70M 4k 60 4:2:0 & HDR
·70M 1080P
AC-EX70-UHD-R
·40M 4k 30 4:4:4/4k 60 4:2:0
·70M 1080P
6
Non AVPro HDBaseT Receivers may work but ICT (our Invisible Compression Technology) will not. This
means higher bandwidth signals (greater than 10.2Gbps) will not pass as this requires ICT.

7
Front and Rear Panel Overview

8
Initial Setup: WebUI
1. With the AC-MX-88HDBT placed into its new home (AV Rack, cabinet, table top) take a Phil-
lips head screwdriver and attach the included yellow ground strap to the back of the chassis
using the pre-installed screw, then attach the other end to a suitable grounded object.
2. Connect the HDMI Input sources to the HDMI Inputs on the back of the matrix.
3. Connect the HDMI/HDBaseT devices to the HDMI/HDBaseT Outputs.
4. Connect the network LAN cable to the RJ45 port labeled LAN (between the Micro USB and 3pin RS232
port).
5. Power on the sources (Inputs).
6. Power on the Output devices/displays.
7. Connect both 48V power supplies to the matrix and then to a suitable power source.
8. In order to see the current IP settings, press and hold (for 3 seconds) INPUT 3 and INPUT 4 buttons
simultaneously. This screen will change every 3 seconds showing
additional settings (host, net mask, router IP).
NOTE: This screen starts with the current IP address of the matrix.
9. To Enable/Disable DHCP, press and hold INPUT 1 and INPUT 4 at the same time for 3 seconds. With
the matrix connected to the local network, using a computer on the same network open up a web
browser and type the HIP (Host IP Address) into the address bar to navigate to the WebUI.
10. With the WebUI open, navigate to System. Click on the Privacy Policy and Terms of Use, this will open
these documents in a new tab for review. Once read click on the boxes next to each to agree. When
both are checked the switch for Enable Cloud Services will be selectable (will be red or disabled by
default). Click to enable (the switch will turn green).
The AC-MX-88HDBT can be controlled using the Micro USB port, 3pin RS232, or over TCP/IP using the LAN
connection. For initial setup it is recommended to connect the matrix to a local area network (LAN) and use
a computer on the same network in conjunction with the built in WebUI. After making all the physical con-
nections, the rst step will be to check for any Firmware Updates. The below steps are an example of this
setup, other control options are covered in separate sections of this user manual.

9
11. With the AVProEdge WebUI open, navigate to System. Click on the Privacy Policy and Terms of Use,
this will open these documents in a new tab for review. Once read click on the boxes next to each to
agree. When both are checked the switch for Enable Cloud Services will be selectable (will be red or dis-
abled by default). Click to enable (the switch will turn green).
12. With the Cloud Services enabled under the Hardware section click the Update Firmware button to
check for new Firmware OTA (over the air). This will compare the rmware versions currently loaded on
the AC-MX-88HDBT and compare to the latest available. If it is up to date, you will see a prompt stating
“No update available!”
13. If an update is available, the following prompt will show. Simply click UPDATE.
14. If a new update is available a le will automatically be selected, simply click the UPLOAD button to
load the rmware les to the Matrix. Uploading does not install the Firmware, that is the next step.

10
15. Once the rmware le has been uploaded, it will display all containing rmware les. Here you can
select individual rmware les to load or simply leave all les/options selected. If the version currently in-
stalled is not newer (does not need to be updated), then that update will be skipped automatically. Click
the UPGRADE button to start.
16. Once the progress bar hits 100% click the CLOSE button, the rmware upgrade process is complete.
17. With the Firmware up to date it’s time to start setting up the matrix. With the AVPro Edge WebUI open,
navigate to the I/O Conifg section. Label the applicable Inputs (Apple TV, Cable Box, Roku, etc) under
the Input Settings - Label.
18. Label the Outputs (Living Room, Bedroom, Den, etc) under the Video Output Settings - Label.

11
19. Set the HDMI/HDBaseT Video Scaling if needed. HDMI outputs can be upscaled (1080P signal up to 4k)
and the HDBaseT outputs can be downscaled (4k signals down to 1080P).
20. With the system and all it’s components powered up it’s time to verify signal path from source to the
sync. For now leave EDID settings to their default 1080P 2 CH, the next section Advanced Setup will
cover the more advance settings.
21. Use the Signal Indicator on the HDMI INPUTS. Green means HDMI source is detected, red means that
the source is not detected. If red verify that the input is powered on and that the HDMI cable is prop-
erly connected to the source and to the back of the matrix.
22. Now verify the connections to the HDMI/HDBaseT outputs using the Signal indicator. Green means
HDMI/HDBaseT sync is detected, red means that the HDMI/HDBaseT sync is not detected. If red verify
that the sync devices are powered on and that the HDMI/HDBaseT cables are properly connected to
the back of the matrix.
23. With everything connected and powered on, green indicators across the applicable inputs and outputs,
verify you are getting all of your sources on all of your displays.
24. Problems with a source or sync, see the Troubleshooting section for help on page 45.

Advanced Setup: WebUI Input Settings
After verifying good signal path from source to sync now it is time to go through the rest of the settings to
maximize the setup. Starting with the input side with the EDID and Audio Mode settings.
12
1. With the WebUI open, navigate to the I/O Conifg tab and focus on the Input Settings section at the
top.
2. Set the EDID on each input by selecting the resolution drop-down rst (default is set to 1080P). The
options are 1080P, 4K30Hz, 4K60Hz Y420, and 4K60Hz. If you select USER1 EDID, then the drop-
downs change to allow you to select from and output to copy from. You can select any of the 4 HDMI
outputs, or any of the 4 HDBaseT outputs, then click the COPY button. This will save that outputs EDID
to the USER1 slot.
3. Next use the drop-down to select NO 3D, or 3D depending on the displays capability.
NOTE: Currently the only resolution you can choose NO 3D for is 1080P.
4. Next drop-down select either SDR (standard dynamic range) or HDR (High Dynamic Range).
5. The fourth drop-down in the EDID section is for the audio, you can select 2 CH, 6CH, or 8CH.
6. Click the APPLY button to set the EDID.
7. Verify you are still getting that source to all your displays and that the image looks correct.
NOTE: Some older displays may take an HDR signal and display correctly (ignoring the HDR Metadata)
others will not ignore the HDR part of the signal and may display incorrectly.

Advanced Setup: WebUI Output Settings
13
8. Now navigate to the Video Output Settings under I/O Cong
9. In addition to the output Label (name/alias), there are 3 settings for each HDMI output and 4 settings
for each HDBaseT output.
10. Under State, you can enable/disable that port (turn that
port on or o) and also enable a 1080P test pattern, the
Video Scaling mode (HDMI you can choose to No Scaling or
1080P to 4k, HDBaseT you can choose ICT or 4K to 1080P),
and you can Enable or Disable the Bitstream Audio (slider
icon Green=ON, Red=OFF).
11. Long Range - This switch allows you to Enable/Disable
HDBaseT Long Range Mode. This mode when enabled and
paired with an AC-EX70-444-RNE HDBaseT receiver will allow the Matrix to send a 1080P 8-BIT signal up
to 150 Meters (500 Feet). NOTE: This mode does NOT support 4K.
O
Disabled
On
Enabled

1.
Advanced Setup:
WebUI Extracted Audio Output Settings
1. Now navigate to the Extracted Audio Output Settings under I/O Cong.
2. The extracted audio ports have 3 distinct operating modes, use the drop-down at the top to select.
The three options are.
Bind to Input (Default) - where the audio port number corresponds to the input signal. This is ideal
for systems where audio is matrixed separately in a zoned amplier.
Bind to Output - this conguration the audio will automatically follow the HDMI/HDBaseT output.
This is ideal for systems that use local AVR’s for some of the Zones.
Matrix - This mode allows you to matrix the extracted audio ports independently from the HDMI/
HDBaseT outputs. In this mode you there will be a Tab for the extracted audio under the Matrix page,
allowing you to route the audio just like routing the video. If the matrix is set to Bind to Input or Bind
to Output this tab will not be visible.
3. Other available settings for the extracted audio ports include Enable/Disable, Volume control (1-100),
EQ presets (7 generic preset options to choose from), Left/Right balance, and audio delay. Each of
these 5 settings can be changed per extracted audio port.
4. You can use the slider or text box to change the volume (settings are 0-100).
14

15
5. To change the EQ settings of that port click on the emblem to the right of the volume slider. This will
bring up the Audio Conguration Page. Here you can choose from 8 dierent EQ settings, change the
Left / Right balance, and set the audio delay.
6. Delay (eight settings in 90 millisecond increments)
None (default), 90, 180, 270, 360, 450, 540, and 630.

16
WebUI: Video Matrix
Use this page to route the video INPUTS and OUTPUTS.
·Click on the INPUT number to select (example below shows IN 1)
·With the INPUT selected simply click on the OUTPUT you want to send that source to.
·Note: If you rename the INPUTS/OUTPUTS using the I/O Cong page they will display here.

17
WebUI: Audio Matrix
Use this page to route the extracted audio.
NOTE: The extracted audio ports can only be manually changed (matrixed) when in Matrix Mode. If the
extracted audio is set to Bind to Input (default) or Bind to Output then this tab will not be visible, example
below. See Page 14 “Advanced Setup: WebUI Extracted Audio Output Settings” for more info.
·Click on the INPUT number to select (example below shows IN 1 - Apple TV)
·With the INPUT selected simply click on the OUTPUT you want to send that audio to.
·Note: If you rename the INPUTS/OUTPUTS using the I/O Cong page they will display here.

18
WebUI: I/O Cong - Input Settings
Input Settings Label - Use this to give an name/alias to your inputs (Apple TV, Cable Box, Roku, etc).
Note: There is a 15 character limit to this eld, the name will replace the default “IN #” throughout the rest
of the WebUI (for instance the Video Matrix tab).
Input Settings Enable switch - Use this enable/disable switch to turn the
corresponding Input port on or o. The default setting is enabled (green) by
default.
Input Settings EDID - Use these four drop-downs to select your preferred EDID.
The available combinations are as follows.
1. 1080P_2CH
2. 1080P_6CH
3. 1080P_8CH
4. 1080P_3D_2CH
5. 1080P_3D_6CH
6. 1080P_3D_8CH
7. 4K30HZ_3D_2CH
8. 4K30HZ_3D_6CH
9. 4K30HZ_3D_8CH
10. 4K60HzY420_3D_2CH
11. 4K60HzY420_3D_6CH
12. 4K60HzY420_3D_8CH
13. 4K60HZ_3D_2CH
14. 4K60HZ_3D_6CH
15. 4K60HZ_3D_8CH
16. 1080P_2CH_HDR
17. 1080P_6CH_HDR
18. 1080P_8CH_HDR
19. 1080P_3D_2CH_HDR
20. 1080P_3D_6CH_HDR
21. 1080P_3D_8CH_HDR
22. 4K30HZ_3D_2CH_HDR
23. 4K30HZ_3D_6CH_HDR
24. 4K30HZ_3D_8CH_HDR
25. 4K60HzY420_3D_2CH_HDR
26. 4K60HzY420_3D_6CH_HDR
27. 4K60HzY420_3D_8CH_HDR
28. 4K60HZ_3D_2CH_HDR
29. 4K60HZ_3D_6CH_HDR
30. 4K60HZ_3D_8CH_HDR
NOTE: If you select USER1 EDID, then drop-downs change to allow you to select from and output to copy
from. You can select any of the 4 HDMI outputs, or any of the 4 HDBaseT outputs, then click the COPY
button (this replaces the Apply button). This will save that outputs EDID to the USER1 slot.
O
Disabled
On
Enabled

19
WebUI: I/O Cong - Input Settings Cont.
Input Settings Signal - The Signal Indicator on the HDMI INPUTS shows the current state of the con-
nection HDMI source. Green means the HDMI source is detected, red means that the source is not detect-
ed. If red verify that source is powered on and that the HDMI cable is properly connected to the source and
to the back of the matrix.
Global Input Settings - There are two settings available
·Supports Dolby MAT - Check this box to enable Dolby MAT audio
·Requires Dolby Vision Low Latency - Check this box to require Dolby Vi-
sion Low Latency over Regular Dolby Vision.
Output Settings Label - Use this to give an name/alias to your outputs (Living Room, Den, Kitchen, etc).
Note: There is a 15 character limit to this eld, the name will replace the default “OUT #” throughout the
rest of the WebUI (for instance the Video Matrix tab).
Output Settings State - This drop-down has 3 settings, just like the input settings you can Enable or
disable this port. In addition you can also choose Test Pattern to enable a 1080P color bar test pattern on
that output. This is helpful in verifying the signal chain from Matrix to sync (display). To disable the test
pattern, change the state back to Enabled (default).
WebUI: I/O Cong - Output Settings

Output Settings State - This drop-down has 3
settings, just like the input settings and HDMI outputs
you can Enable or Disable this port. In addition you
can also choose Test Pattern to enable a 1080P col-
or bar test pattern on that output. This is helpful in
verifying the signal chain from Matrix to sync (display).
To disable the test pattern, change the state back to
Enabled (default).
Output Settings Video Scaling - The HDBaseT out-
puts can down-scale a 4K signal to 1080P. This scaling
only changes the pixel density, it does not alter frame
rate or colorspace. The other setting is ICT Mode (de-
fault), AVProEdge’s Invisible Compression Technology
designed to work with a compatible AVProEdge HDBa-
seT Receiver (RX).
Output Settings Bitstream Audio - This is an enable/disable switch. By default
this will be Enabled/Green. To change the setting simply click to switch. Disabled/
Red there will be no Audio passed on that HDBaseT output.
Long Range - This switch allows you to Enable/Disable HDBaseT Long Range Mode. This mode when
enabled and paired with an AC-EX70-444-RNE HDBaseT receiver will allow the Matrix to send a 1080P 8-BIT
signal up to 150 Meters (500 Feet). NOTE: This mode does NOT support 4K.
WebUI: I/O Cong - Output Settings Cont.
Output Settings Video Scaling - The HDMI outputs can up-scale a 1080P signal to 4k. This scaling only
changes the pixel density, it does not alter frame rate or colorspace.
Output Settings Bitstream Audio - This is an enable/disable switch. By default this will be Enabled/
Green. To change the setting simply click to switch. Disabled/Red there will be no Audio passed on that
HDMI output.
NOTE: This setting has no aect on the HDBaseT or Extracted Audio output.
Output Settings Signal - The Signal Indicator on the HDMI OUTPUTS shows the current state of the
connection HDMI Output. Green means HDMI sync is detected, red means that the sync is not detected. If
red verify that the output is powered on and that the HDMI cable is properly connected to the sync and to
the back of the matrix.
20
O
Disabled
On
Enabled
/