Celestron 22005 Operating instructions
- Category
- Telescopes
- Type
- Operating instructions

TRAVELSCOPE 60 INSTRUCTION MANUAL
TRAVELSCOPE 60AZ
Model #22005

ASSEMBLY
Set up your Travelscope indoors the fi rst time and familiarize yourself with the correct assembly procedure before attempting it outdoors.
SETTING UP THE TRIPOD
1. The tripod comes preassembled. Stand the tripod upright and pull the tripod legs outward until each leg is fully
extended.
2. You can raise the tripod legs to the height you desire. At the lowest level, the height is about 16” (41 cm) and
extends to about 49” (125 cm).
3. To raise the height of the tripod, unlock the tripod leg lock clamps at the bottom of each tripod leg by opening the
clamp for each section and pulling outward. Once a clamp is unlocked, pull the tripod leg out as far as it will go, and
then close the leg lock to secure it. Continue doing this for each tripod leg and each section to raise the height to
the level you desire.
4. If you want to raise the tripod height up further, use the central column locking knob. Turn the locking knob
counterclockwise until loose. Then, pull up on the head of the tripod. Continue pulling to the height you desire and
then tighten the locking knob.
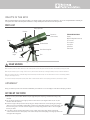
Objective Lens
(under lens shade)
Telescope Optical Tube
Focus Knob
Finderscope
Eyepiece
Erect Image
Diagonal
Tripod
Central Column Locking Knob
Tripod Head Platform
Pan Handle
OTHER INCLUDED ACCESSORIES:
Compass
White LED fl ashlight with carabiner clip
1.25” moon fi lter,
20 mm eyepiece
8 mm eyepiece
3x Barlow lens
Travel backpack.
PARTS LIST
We recommend saving your telescope box so it can be used to store the telescope when it is not in use. Unpack the box carefully as
some parts are small. Use the parts list below to verify that all parts and accessories are present.
WHAT’S IN THE BOX
SOLAR WARNING
Never look directly at the Sun with the naked eye or with a telescope unless you have the proper solar fi lter. Permanent and irreversible eye damage may result.
Never use your telescope to project an image of the Sun onto any surface. Internal heat build-up can damage the telescope and any accessories attached to it.
Never use an eyepiece solar fi lter or a Herschel wedge. Internal heat build-up inside the telescope can cause these devices to crack or break, allowing unfi ltered
sunlight to pass through to the eye.
Do not leave the telescope unsupervised, especially when children or adults unfamiliar with the correct operating procedures of your telescope are present.

ATTACHING THE TELESCOPE OPTICAL TUBE TO THE TRIPOD
The telescope optical tube attaches to the tripod using the mounting bracket on
the bottom of the optical tube and the mounting platform of the tripod. Before
starting, make sure all of the knobs on the tripod are locked.
1. Remove the protective paper covering the optical tube.
2. Loosen the top right knob by turning it counterclockwise. This allows you to
tilt the tripod platform up 90°. After tilting the platform up, tighten the knob to
secure it in place.
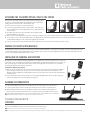
3. The images show the bottom of the optical tube, the tripod platform, and
where they will attach to each other.
4. Under the center of the tripod platform, you will see a knob that contains a ¼ x 20 screw to attach the platform to the telescope optical tube.
5. You can put the ¼ x 20 screw into the threaded hole of the TravelScope 60 in the mounting bracket of the telescope optical tube. Hold the optical tube with
one hand while threading the screw clockwise until tight with the other hand.
6. Lastly, loosen the knob for the tripod platform and lower the platform down to the level position. Then, tighten the knob securely.
MOVING THE TRAVELSCOPE MANUALLY
The TravelScope is easy to move wherever you want to point it. The up and down (altitude) is controlled by the pan handle. The side-to-side (azimuth) motion is
controlled by the azimuth locking knob. Both knobs are loosened when turned counterclockwise and tightened when turned clockwise. When both knobs are
loose, you can fi nd objects easily and then lock the controls.
INSTALLING THE DIAGONAL AND EYEPIECE
The diagonal is a prism that diverts the light at a right angle to the light path of the telescope. This allows you to observe in a
position that is more comfortable than if you had to look straight through. The TravelScope diagonal is an erect image model
that corrects the image to be right side up and oriented correctly left-to-right which is much easier to use for terrestrial
observing. The diagonal can be rotated to any position.
To install the diagonal and eyepiece:
1. Make sure the two thumbscrews on the rear of the telescope tube do not protrude into the opening before installation.
Remove the plug up cap from the opening at the rear of the telescope tube, and the caps from the barrels on the
diagonal. Insert the small barrel of the diagonal all the way into the rear opening of the telescope tube. Then tighten the
two thumbscrews.
2. Put the chrome barrel end of one of the eyepieces into the diagonal and tighten the thumb screw. When doing this,
make sure the thumbscrew is not protruding into the diagonal.
ALIGNING THE FINDERSCOPE
1. Locate a distant daytime object and center it in the low power (20 mm) eyepiece in the main telescope.
2. Look through the eyepiece end of the fi nderscope and take notice of the position of the same object.
3. Without moving the main telescope, turn the adjustment thumbscrews located around the fi nderscope
bracket until the crosshairs of the fi nderscope are centered on the object chosen with the main telescope.
4. If the image through the fi nderscope is out of focus, rotate the eyepiece of the fi nderscope for a clear view.
NOTE: Objects viewed through a fi nderscope are upside down and backwards, which is normal.
TELESCOPE BASICS
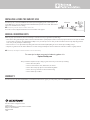
FOCUSING
To focus your TravelScope turn the focus knob located near the rear of the telescope.
NOTE: Remove the front lens cap of the TravelScope optical tube prior to attempting your observation.
NOTE: If you wear glasses, you may want to remove them when observing with an eyepiece attached to the telescope. However, if you have astigmatism, corrective lenses should be worn at all times.
Objective Lens EyepieceAdjustment Screws

INSTALLING & USING THE BARLOW LENS
Your telescope also comes with a 3x Barlow lens which triples the magnifying power of each eyepiece. To
use the Barlow lens, remove the diagonal and insert the Barlow directly into the focuser tube. Then insert an
eyepiece into the Barlow lens for viewing.
NOTE: Start by using a low power eyepiece as it will be easier to focus.
To use the moon fi lter, simply thread the fi lter to the chrome barrel of the eyepiece.
GENERAL OBSERVING HINTS
When using any optical instrument, there are a few things to remember to ensure you get the best possible image.
• Never observe through window glass. Glass found in household windows is optically imperfect, and as a result, may vary in thickness from one part of a window
to the next. This inconsistency can and will affect the ability to focus your telescope. In most cases you will not be able to achieve a truly sharp image, while in
some cases you may actually see a double image.
• Never look across or over objects that are producing heat waves. This includes asphalt parking lots on hot summer days or building rooftops.
• Hazy skies, fog and mist can also make it diffi cult to focus when viewing terrestrially. The amount of detail seen under these conditions is greatly reduced.
NOTE: Your telescope was designed for terrestrial observation as well as celestial viewing.
For more tips for about astronomical observing please visit
ExploreTheSky.com
There you will fi nd comprehensive tips to help you get the most from your new telescope including:
• How to observe the planets
• How to locate and observe stars, double stars, star clusters
• How to observe deep-sky objects such as nebulae and galaxies
• How to choose a good location for astronomical observing
• How to evaluate sky conditions
WARRANTY
Your telescope has a Two Year Limited Warranty. For detailed information and to register your new product, please visit celestron.com.
© 2014 Celestron • All rights reserved
celestron.com
2835 Columbia Street • Torrance, CA 90503 U.S.A.
Telephone: 800.421.9649
Printed in China
08-14
3x Barlow Lens
-
 1
1
-
 2
2
-
 3
3
-
 4
4


Celestron 22005 Operating instructions
- Category
- Telescopes
- Type
- Operating instructions
Ask a question and I''ll find the answer in the document
Finding information in a document is now easier with AI
Related papers
-
Celestron 21035 Travel Scope 70 User manual
-
Celestron 22002-DS User manual
-
-
Celestron Scope 90 User manual
-
Celestron 22006 User manual
-
Celestron XLT Series User manual
-
-
Celestron Astro Master 90az User manual
-
Celestron PowerSeeker 50AZ User manual
-
Celestron Astro Master 130eq Owner's manual
Other documents
-
Barska 300 Power Starwatcher Telescope 40070 User manual
-
-
Elenco EDU41010 Owner's manual
-
iOptron #6002 Owner's manual
-
-
Sharper Image Backpack Telescope Owner's manual
-
Tasco Novice 402x60mm User manual
-
Bushnell 181561 User manual
-
Herschel Inspire Wall and Ceiling Mounted Infrared Heaters User manual
-
Edelkrone SliderPlus User manual