Celestron 22006 User manual

Category
Telescopes
Type
User manual

Celestron 22006 is a versatile telescope designed for both terrestrial and celestial observation. It features a 60mm objective lens, a 20mm and a 10mm eyepiece, and a 3x Barlow lens for magnified views. The erect image diagonal provides a comfortable viewing position for land-based subjects. The altazimuth mount allows for smooth and easy manual movement of the telescope. With its compact size and included travel backpack, the Celestron 22006 is an ideal choice for outdoor enthusiasts and casual stargazers.

Celestron 22006 is a versatile telescope designed for both terrestrial and celestial observation. It features a 60mm objective lens, a 20mm and a 10mm eyepiece, and a 3x Barlow lens for magnified views. The erect image diagonal provides a comfortable viewing position for land-based subjects. The altazimuth mount allows for smooth and easy manual movement of the telescope. With its compact size and included travel backpack, the Celestron 22006 is an ideal choice for outdoor enthusiasts and casual stargazers.

INSTRUCTION MANUAL
Model #22006
Pg. 2
ASSEMBLY
Set up your Travel Scope 60 indoors the first time and familiarize yourself with the correct assembly procedure before attempting it outdoors.
SETTING UP THE TRIPOD
1. The tripod comes preassembled. Stand the tripod upright and pull the tripod legs outward until each leg is
fully extended.
2. You can raise the tripod legs to the height you desire. At the lowest level, the height is about 16” (41 cm) and
extends to about 49” (125 cm).
3. To raise the height of the tripod, unlock the tripod leg lock clamps at the bottom of each tripod leg by opening
the clamp for each section and pulling outward. Once a clamp is unlocked, pull the tripod leg out as far as it will
go, and then close the leg lock to secure it. Continue doing this for each tripod leg and each section to raise the
height to the level you desire.
4. If you want to raise the tripod height up further, use the central column locking knob. Turn the locking knob
counterclockwise until loose. Then, pull up on the head of the tripod. Continue pulling to the height you desire
and then tighten the locking knob.
Objective Lens
(under lens shade)
Optical Tube
Focus Knob
Finderscope
Smartphone Adapter
Bluetooth Remote
Erect Image
Diagonal
Tripod
Central Column Locking Knob
Tripod Head Platform
Pan Handle
OTHER INCLUDED ACCESSORIES:
PARTS LIST
We recommend saving your telescope box so it can be used to store the telescope when it is not in use. Unpack the box carefully as
some parts are small. Use the parts list below to verify that all parts and accessories are present.
WHAT’S IN THE BOX
SOLAR WARNING
Never look directly at the Sun with the naked eye or with a telescope unless you have the proper solar filter. Permanent and irreversible eye damage may result.
Never use your telescope to project an image of the Sun onto any surface. Internal heat build-up can damage the telescope and any accessories attached to it.
Never use an eyepiece solar filter or a Herschel wedge. Internal heat build-up inside the telescope can cause these devices to crack or break, allowing unfiltered
sunlight to pass through to the eye.
Do not leave the telescope unsupervised, especially when children or adults unfamiliar with the correct operating procedures of your telescope are present.
1.25” Moon Filter
20 mm Eyepiece
10 mm Eyepiece
3x Barlow Lens
Travel Backpack
Pg. 3
ATTACHING THE TELESCOPE OPTICAL TUBE TO THE TRIPOD
The telescope optical tube attaches to the tripod using the mounting bracket on
the bottom of the optical tube and the tripod head platform. Before starting, make
sure all of the knobs on the tripod are locked.
1. Remove the protective paper covering the optical tube.
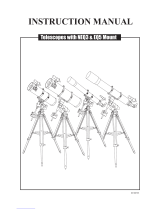
2. Loosen the top right knob by turning it counterclockwise. This allows you to
tilt the tripod platform up 90°. After tilting the platform up, tighten the knob to
secure it in place.
3. The images show the bottom of the optical tube, the tripod platform, and
where they will attach to each other.
4. Under the center of the tripod platform, you will see a knob that contains a ¼ x 20 screw to attach the platform to the telescope optical tube.
5. You can put the ¼ x 20 screw into the threaded hole of the Travel Scope 60 in the mounting bracket of the telescope optical tube. Hold the optical tube with
one hand while threading the screw clockwise until tight with the other hand.
6. Lastly, loosen the knob for the tripod platform and lower the platform down to the level position. Then, tighten the knob securely.
MOVING THE TRAVEL SCOPE MANUALLY
The Travel Scope is easy to move wherever you want to point it. The up and down (altitude) is controlled
by the pan handle. The side-to-side (azimuth) motion is controlled by the azimuth locking knob. Both
knobs are loosened when turned counterclockwise and tightened when turned clockwise. When both
knobs are loose, you can find objects easily and then lock the controls.
INSTALLING THE DIAGONAL AND EYEPIECE
The diagonal is a prism that diverts the light at a right angle to the light path of the telescope. This allows you
to observe in a position that is more comfortable than if you had to look straight through. The Travel Scope
diagonal is an erect image model that corrects the image to be right side up and oriented correctly left-to-
right which is much easier to use for terrestrial observing. The diagonal can be rotated to any position.
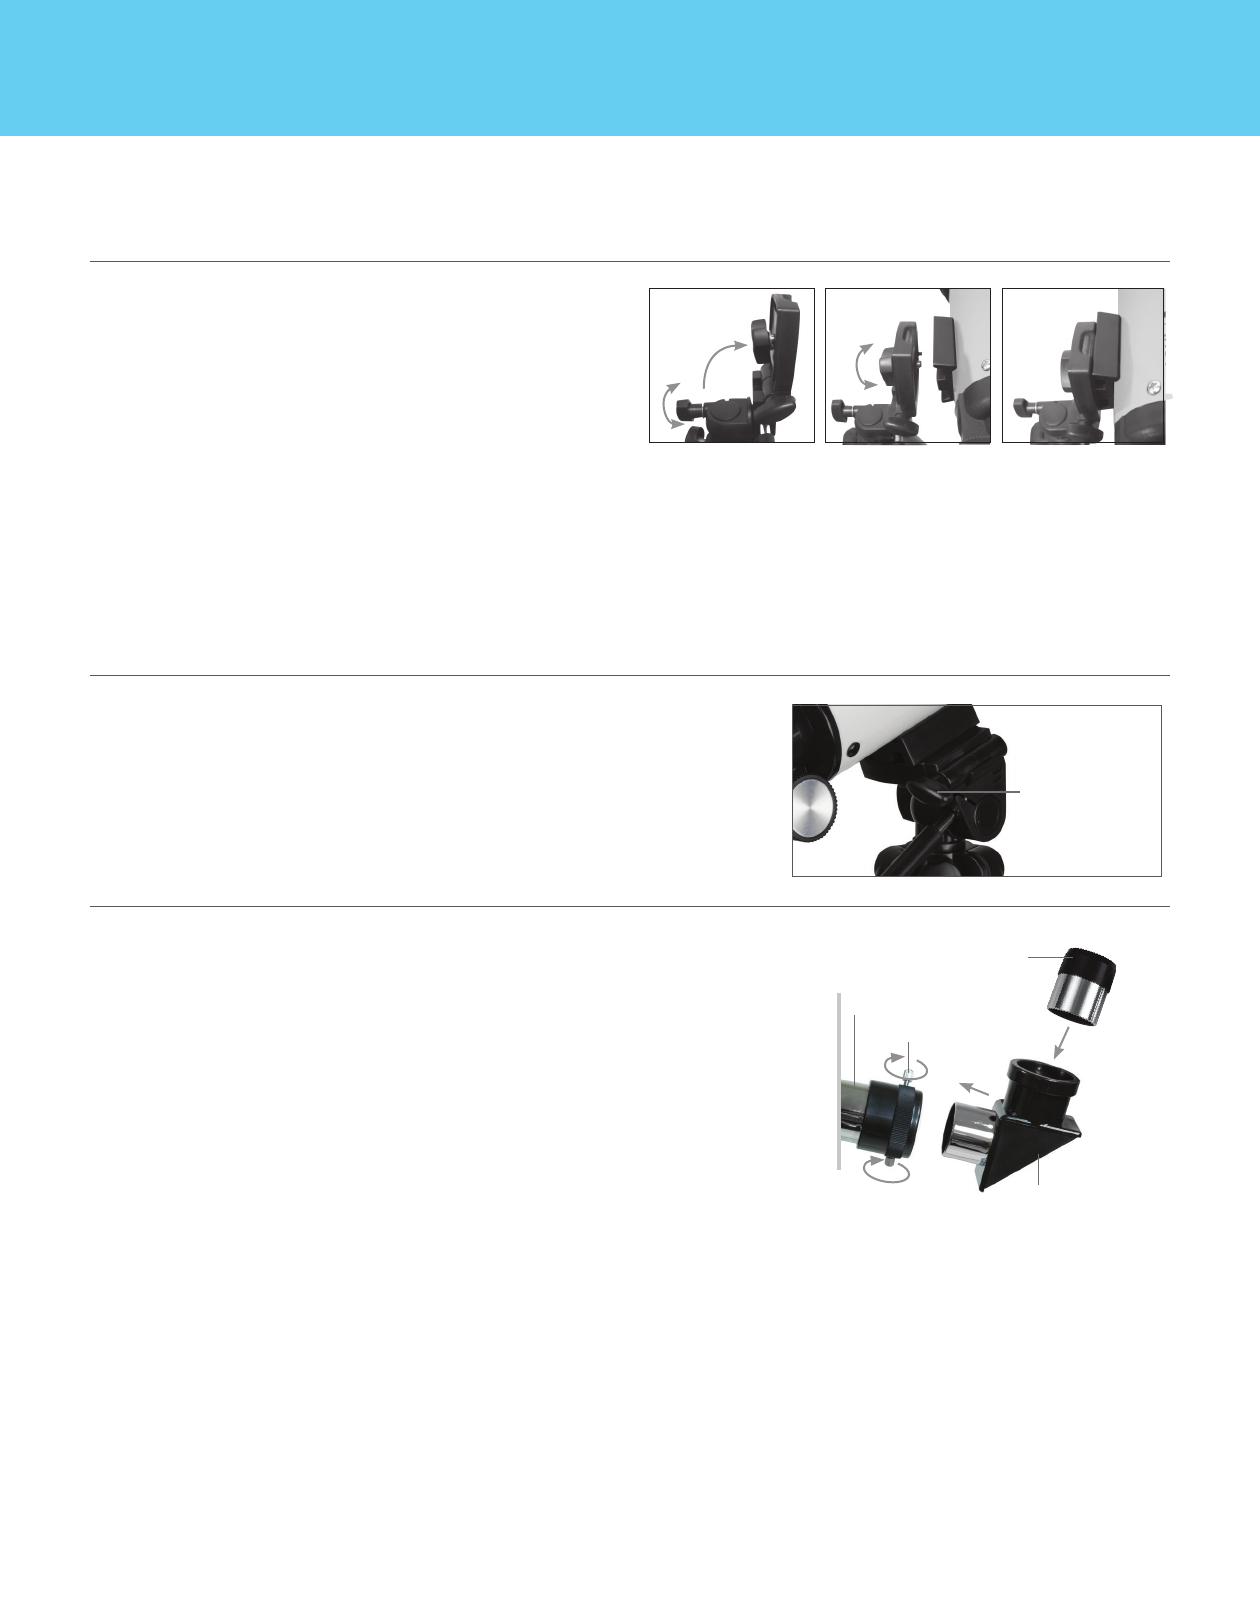
To install the diagonal and eyepiece:
1. Make sure the two thumb screws on the rear of the telescope tube do not protrude into the opening
before installation. Remove the cap from the opening at the rear of the telescope tube, and the caps from
the barrels on the diagonal. Insert the small barrel of the diagonal all the way into the rear opening of the
telescope tube. Then tighten the two thumb screws.
2. Put the chrome barrel end of one of the eyepieces into the diagonal and tighten the thumb screw.
When doing this, make sure the thumb screw is not protruding into the diagonal.
Locking Knob
Diagonal
Eyepiece
Thumb Screws
Optical Tube
Pg. 4
CENTER THE TARGET
IN THE EYEPIECE
Look through the telescope using your lower powered
eyepiece. Move the telescope until the object you chose lies
in the center of the view. If the image is blurry, gently turn the
focus knobs until it comes into sharp focus.
LOOK THROUGH FINDERSCOPE
Once the object is centered in your 20mm eyepiece, look
through the finderscope and locate the crosshair reticle.
3
ADJUST THE FINDERSCOPE
Without moving the telescope, use the three finger knobs
on the finderscope bracket to move the finder around in the
bracket until the crosshair appears over the same object you
are observing in the telescope’s 20mm eyepiece.
TIP: Try adjusting one screw at a time. Loosen one screw by
half a turn and tighten another by the same amount to
ensure the finderscope is securely held in place.
YOUR FINDERSCOPE IS
NOW ALIGNED!
It should not require realignment unless it is bumped
or dropped.
4
The finder is one of the most important parts of your telescope. It helps you
locate objects and center them in the eyepiece. The first time you assemble
your telescope, you need to align the finder to the telescope’s main optics.
It’s best to do this during the day*.
* SOLAR WARNING! Never attempt to view the sun through any
telescope without a proper solar filter!
ALIGNING THE
FINDERSCOPE
CHOOSE A TARGET
Take the telescope outside during the day and find an easily
recognizable object, like a streetlight, license plate or sign.
The object should be as far away as possible, but at least a
quarter mile away.
2Low Power Eyepiece
Focus Knobs
1
5
Objective Lens EyepieceAdjustment Screws
TELESCOPE BASICS
FOCUSING
To focus your Travel Scope turn the focus knob located near the rear of the telescope.
NOTE: Remove the front lens cap of the TravelScope optical tube prior to attempting your observation.
NOTE: If you wear glasses, you may want to remove them when observing with an eyepiece attached to the telescope. However, if you have astigmatism, corrective lenses should be worn at all times.
Pg. 5
INSTALLING & USING THE BARLOW LENS
Your telescope also comes with a 3x Barlow lens which triples the magnifying power of each eyepiece.
To use the Barlow lens, insert the Barlow between the diagonal and the eyepiece.
NOTE: Start by using a low power eyepiece as it will be easier to focus.
To use the moon filter, simply thread the filter to the chrome barrel of the eyepiece.
Use the phone clamp knob to open the phone holder so that
your phone fits inside. Tighten it to secure your phone in place.
Turn on the phone and open your camera app. Make sure the
flash is turned off.
Loosen the knob on the bottom of the adapter that secures the
phone clamp to the eyepiece clamp. Slide the phone clamp up
and down and rotate it left and right until your camera is looking
down through the eyepiece of the telescope. Tighten the knob
on the bottom of the adapter to secure it in place.
Use the telescope’s focuser to adjust focus of your camera.
Snap the image using your app.
Open the eyepiece clamp and place it around the body of the
eyepiece. Tighten the clamp until it’s secure.
12
4 5
USING THE
SMARTPHONE
ADAPTER
3x Barlow Lens
3
Moon Filter
on Eyepiece
Pg. 6
Press and hold the button on the remote for 5 seconds. A blue
light will turn on and, after a few seconds, start to blink. The
remote is now in pairing mode.
Using the Bluetooth settings on your phone, pair the device
called “GBshutter”.
Open your camera app. Press the button on the remote to trigger
the shutter on your phone.
If your camera is in video mode, you can press the button once
to start recording and again to stop the recording.
4
To insert or replace the battery, place your thumb in the center
of the back cover, pressing inward and sliding downward remove
the battery door. The CR2032 battery should be inserted with
the positive (+) side facing upward. Replace the cover.
123
USING THE
BLUETOOTH
REMOTE
5
Pg. 7
© 2021 Celestron • All rights reserved
celestron.com
2835 Columbia Street • Torrance, CA 90503 U.S.A.
Telephone: 800.421.9649
Printed in China
01-21
GENERAL OBSERVING HINTS
When using any optical instrument, there are a few things to remember to ensure you get the best possible image.
Never observe through window glass. Glass found in household windows is optically imperfect and may vary in thickness from one part of a window to the next.
This inconsistency can and will affect the ability to focus your telescope. In most cases you will not be able to achieve a truly sharp image, while in some cases
you may actually see a double image.
Never look across or over objects that are producing heat waves. This includes asphalt parking lots on hot summer days or building rooftops.
Hazy skies, fog and mist can also make it difficult to focus when viewing terrestrially. The amount of detail seen under these conditions is greatly reduced.
NOTE: Your telescope was designed for terrestrial observation as well as celestial viewing.
WARRANTY
Your telescope has a Two Year Limited Warranty. For detailed information and to register your new product, please visit celestron.com/pages/warranty.
Popular Science is a trademark of Camden Media, Inc.,
and used under license.
  • Page 1 1
  • Page 2 2
  • Page 3 3
  • Page 4 4
  • Page 5 5
  • Page 6 6
  • Page 7 7

Celestron 22006 User manual

Category
Telescopes
Type
User manual

Celestron 22006 is a versatile telescope designed for both terrestrial and celestial observation. It features a 60mm objective lens, a 20mm and a 10mm eyepiece, and a 3x Barlow lens for magnified views. The erect image diagonal provides a comfortable viewing position for land-based subjects. The altazimuth mount allows for smooth and easy manual movement of the telescope. With its compact size and included travel backpack, the Celestron 22006 is an ideal choice for outdoor enthusiasts and casual stargazers.

Ask a question and I''ll find the answer in the document

Finding information in a document is now easier with AI