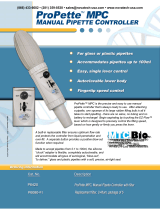
PIPETMAN 8X200

Gilson PIPETMAN 8X200, DISTRIMAN, Microman, Pipetman F, PIPETMAN P, Pipetman Ultra, Pipetman Ultra Multichannel Standard Operating Procedure

  • Hello! I am an AI chatbot trained to assist you with the Gilson PIPETMAN 8X200 Standard Operating Procedure. I’ve already reviewed the document and can help you find the information you need or explain it in simple terms. Just ask your questions, and providing more details will help me assist you more effectively!
Decontamination Procedures
for
Gilson Pipettes
(defined for Users to Incorporate in SOPs)
in Accordance with ISO8655 Standard
Procedure LT802288/C - © 2003 Gilson SAS All rights reserved October 2003
Standard Operating Procedure for Pipettes
Page 2
Contents
II
II
I
nn
nn
n
trtr
trtr
tr
oducoduc
oducoduc
oduc
tiontion
tiontion
tion 3
Decontamination Room 3
Equipment and Clothing 3
Solutions for Decontaminating and Cleaning 4
Precautions 4
PP
PP
P
rr
rr
r
ococ
ococ
oc
eduredur
eduredur
edur
e fe f
e fe f
e f
or End-useror End-user
or End-user
’’
’’
ss
ss
s5
CC
CC
C
ompletomplet
ompletomplet
omplet
e Pe P
e Pe P
e P
rr
rr
r
ococ
ococ
oc
eduredur
eduredur
edur
e fe f
e fe f
e f
or Gilson Distror Gilson Distr
or Gilson Distr
ibutibut
ibutibut
ibut
orsors
orsors
ors 6
Checking the Outside of the Package for Radioactivity 6
Unpacking the Pipettes and Checking for Radioactivity 6
Disassembly PDisassembly P
Disassembly P
rr
rr
r
ococ
ococ
oc
eduredur
eduredur
edur
eses
eses
es 8
DD
DD
D
ecec
ecec
ec
onon
onon
on
taminatamina
taminatamina
tamina
tion Mtion M
tion Mtion M
tion M
ethodsethods
ethodsethods
ethods 10
Manual Method 10
Immersion Method 11
AA
AA
A
ssociassocia
ssociassocia
ssocia
tt
tt
t
ed Ded D
ed Ded D
ed D
ocumenocumen
ocumenocumen
ocumen
tsts
tsts
ts 12
NotNot
NotNot
Not
eses
eses
es 13
Page 3
Introduction
This document contains Decontamination Procedures suitable for
Pipetman® P, Pipetman® F, Pipetman® Ultra (Single and Multichannel),
Pipetman® 8X200, Microman® and Distriman®; it describes how to
decontaminate specific component parts of these pipettes.
Only after preliminary checks for radioactivity may the pipette be
unpacked and disassembled for subsequent cleaning and decontami-
nation, using disposable gloves.
DD
DD
D
ecec
ecec
ec
onon
onon
on
taminatamina
taminatamina
tamina
tion startion star
tion startion star
tion star
ts with rts with r
ts with rts with r
ts with r
adioacadioac
adioacadioac
adioac
tivittivit
tivittivit
tivit
y checksy checks
y checksy checks
y checks using a
validated Geiger-Müller counter equipped with probes capable of
detecting gamma, beta and X-rays. Cleaning is integrated in the
combined chemical and biological Decontamination Procedure.
Complete servicing consists of three mandatory procedures, to be
performed in the following order: decontamination, maintenance [see
respective Maintenance Procedure*] and calibration [see respective
Adjustment Procedure*].
Parts that are found to have been damaged or to have been attacked
chemically must be replaced with new ones before reassembling the
pipette. Any parts that you remove from the pipette because they
suffered chemical or mechanical damage should be decontaminated
before being discarded.
DD
DD
D
ecec
ecec
ec
onon
onon
on
taminatamina
taminatamina
tamina
tion Rtion R
tion Rtion R
tion R
oomoom
oomoom
oom
The decontamination room must be separate from all other rooms in
the laboratory. For safety reasons, only authorized personnel should
be allowed to enter the decontamination room.
EE
EE
E
quipmenquipmen
quipmenquipmen
quipmen
t and Clothingt and Clothing
t and Clothing
1) Protective clothing, safety glasses, and disposable gloves.
2) Geiger-Müller counter for detecting beta, gamma and X-rays.
3) Benches, one equipped with a safety hood (without filter).
4) Disposable bench covers and safety bags.
5) A safety box (e.g. a lead box).
6) A separate identifiable plastic box for each pipette.
7) For the manual method, small round brushes for cleaning the in-
sides of the tip-holders.
8) For the alternative immersion method: an ultrasonic bath, lattice
boxes and lattice container, plus a thermostatically controlled oven
(50 °C to 60 °C).
End-users mEnd-users m
End-users m
ust decust dec
ust decust dec
ust dec
on-on-
on-on-
on-
taminattaminat
taminattaminat
taminat
e their pipe their pip
e their pip
ettett
ettett
ett
eses
eses
es
beforbefor
beforbefor
befor
e sending them te sending them t
e sending them t
oo
oo
o
their loctheir loc
their loctheir loc
their loc
al Gilson Sal Gilson S
al Gilson S
erer
erer
er
vicvic
vicvic
vic
ee
ee
e
CC
CC
C
entent
entent
ent
erer
erer
er
..
..
.
* To be carried out by suitably quali-
fied people only. End-users should
refer to their local distributor for fur-
ther information.
Damaged parts: contact your local
Gilson distributor, who will either
supply you with genuine Gilson user-
level replacements parts or who will
service the pipette for you.
Page 4
Introduction
SS
SS
S
olutions folutions f
olutions f
or Dor D
or Dor D
or D
ecec
ecec
ec
onon
onon
on
taminatamina
taminatamina
tamina
ting and Cleaningting and Cleaning
ting and Cleaning
Gilson recommends the use of a solution containing a mixture of
chemicals: a detergent for chemical cleaning and a disinfectant for
biological decontamination. For example: Aniospray 41 and Aniosyme
P.L.A. from Anios; if you have difficulty in obtaining either of these solutions,
you may contact Gilson for a list of distributors.
The solutions mentioned above are compatible with pipette materials
and have a wide spectrum of action. Other solutions may be used,
however you must check with your supplier that the solution you use
does not attack any of the following materials: aluminium, stainless
steel, nitrile, ABS (acrylonitrile butadiene styrene), PBT (polybutene
terephtalate), PC (polycarbonate), PE (polyethylene), PEI (polyether
imide), POM (polyoxymethylene), PPS (polyphenylene sulfide), PTFE
(polytetrafluoroethylene), PVDF (polyvinylidene fluoride) and PMP
(polymethylpentene).
PP
PP
P
rr
rr
r
ecautionsecautions
ecautionsecautions
ecautions
Decontamination implies that for any person in contact with returned
pipettes there is a risk of contamination. Therefore, systematic
vaccination against hepatitis B of all persons in contact with pipettes is
highly recommended. Because other pathogens could be present,
great care should be taken when handling pipettes.
Use disposable gloves and any other protective clothing that may be
necessary throughout the Decontamination Procedure. Disposable
gloves must be worn at all times during the cleaning and
decontamination procedures.
Follow the regulations in force in your country for handling and
disposing of material that has been exposed to radioactivity. Dispose
of any damaged parts and used water or chemical solutions safely, in
accordance with the regulations in force in your country.
Record the serial number, which is engraved on the body of the
pipette, and identify the boxes used to contain the component parts
of the pipette with this serial number.
Page 5
Procedure for End-users
If your pipettes are used for dispensing radioactive liquids, you must
check each pipette separately for radioactivity.
If a pipette is found to be radioactive, put it in a safety box and pro-
ceed according to the regulations that apply in your country.
If your pipettes are not used for dispensing radioactive liquids or are
found not to be radioactive:
- disassemble the pipettes in accordance with the instructions given
on Page 8.
- decontaminate and dry the pipettes in accordance with the instruc-
tions given on Page 10.
Page 6
Complete Procedure for Gilson Distributors
The complete procedure comprises the following steps:
- checking the outside of the packaging for radioactivity,
- unpacking the pipettes and checking each pipette separately for
radioactivity,
- disassembling the pipettes in accordance with the instructions given
in the Maintenance Procedure,
- decontaminating and drying; cleaning-up the work area,
- transfering the pipettes in their boxes to the repair room for reas-
sembly.
CheckCheck
CheckCheck
Check
ing the Outside of the Ping the Outside of the P
ing the Outside of the P
ackack
ackack
ack
age fage f
age fage f
age f
or Ror R
or Ror R
or R
adioacadioac
adioacadioac
adioac
tivittivit
tivittivit
tivit
yy
yy
y
1) Place a disposable absorbent cover on the bench, below the safety
hood.
2) Upon receipt, put the package containing the pipette(s) on the
disposable cover, below the safety hood.
3) Before undoing the package, check it for radioactivity (beta,
gamma, and X-rays) using a Geiger-Müller counter
4) If the level of radioactivity exceeds 10 Bq for beta and gamma rays
or 25 Bq for X-rays, store the package in a safety box or dispose of
it.
5) We recommend that if the level of radioactivity is less than or equal
to 10 Bq for beta and gamma rays or 25 Bq for X-rays, you may unpack
the pipette(s). However, if the laws and directives (national and in-
ternational) that apply in your country prescribe different limits, you
should use the lowest limit.
UnpackUnpack
UnpackUnpack
Unpack
ing the Ping the P
ing the Ping the P
ing the P
ipettipett
ipettipett
ipett
es and Checkes and Check
es and Check
ing fing f
ing fing f
ing f
or Ror R
or Ror R
or R
adioacadioac
adioacadioac
adioac
tivittivit
tivittivit
tivit
yy
yy
y
1) Place a disposable absorbent cover on the bench, below the safety
hood.
2) Unpack the pipette(s) and place them on the disposable cover,
below the safety hood. Take out the customers shipping docu-
ments before disposing of the packaging.
3) Check the pipettes individually for radioactivity (beta, gamma, and
X-rays) using a Geiger-Müller counter.
4) If the level of radioactivity exceeds 10 Bq for beta and gamma rays
or 25 Bq for X-rays store the pipette in a safety box or dispose of it.
Procedures for storage and disposal must be in accordance with
the laws and directives (national and international) that apply in
your country.
Procedures for storage and disposal
must be in accordance with the laws
and directives (national and interna-
tional) that apply in your country.
Page 7
Complete Procedure for Gilson Distributors
5) We recommend that if the level of radioactivity is less than or equal
to 10 Bq for beta and gamma rays or 25 Bq for X-rays, you may
disassemble the pipette(s). However, if the laws and directives (na-
tional and international) that apply in your country prescribe dif-
ferent limits, you should use whichever of the limits are the lower.
Page 8
Disassembly Procedures
The following are brief summaries of disassembly procedures. We
strongly recommend you to refer to the appropriate Users guide for more
information. Please refer also to the opposite schematics.
PP
PP
P
ipetman P and Pipetman P and P
ipetman P and P
ipetman Fipetman F
ipetman Fipetman F
ipetman F
1) Push the tip-ejector button and remove the tip-ejector.
2) Unscrew the connecting nut.
3) Remove the piston assembly from the tip-holder.
4) Remove the seal and the O-ring from the piston.
PP
PP
P
ipetman 8x200ipetman 8x200
ipetman 8x200
1) Unscrew the connecting nut.
2) Undo the 6 screws of the liquid end box.
3) Lift out the nozzle assemblies.
4) Remove the pistons from the nozzles.
5) Wipe the silicon grease off the 8 pistons.
MM
MM
M
icricr
icricr
icr
omanoman
omanoman
oman
1) Unscrew the capillary-holder.
2) Remove the clamp assembly and return spring from the capillary-holder.
DistrDistr
DistrDistr
Distr
imaniman
imaniman
iman
Disassemble the piston retaining assembly.
1) Hold your Distriman in the horizontal position with the red flag in front
of you.
2) Hold the filling knob at its lower position using the thumb of on hand.
3) Press lightly on the white locking tab with a screwdriver.
4) Move the filling knob toward the upper position to separate it from
the assembly.
5) Pull the assembly out of the Distrimans neck, taking care not to lose
the small red flag.
PP
PP
P
ipetman Ultripetman Ultr
ipetman Ultr
a single channela single channel
a single channel
1) Push the ejection button and remove the tip-ejector by rotating it
gently counterclockwise.
2) Unscrew both parts of tip-holder (remove also O-ring and seal).
3) Set the counter to zero.
4) Unscrew the connecting nut.
5) Pull on the spring guide to remove the piston from the body.
PP
PP
P
ipetman Ultripetman Ultr
ipetman Ultr
a Multichannela Multichannel
a Multichannel
1) Push the tip-ejector button and remove the ejector clip by rotating it
gently counterclockwise.
2) Set the counter to zero.
It is recommended that you
replace the seal and O-ring with
new ones. Your local distributor
is able to supply you, genuine
Gilson spare parts and to advise
you about the way to service
your pipette.
Page 9
Disassembly Procedures
Pipetman Ultra - You may wipe or immerse the
following parts:
- tip ejector,
- tip-holder (upper and lower parts),
- piston spring and spring guide,
- connecting nut.
Pipetman Ultra Multichannel - You may wipe or immerse the
entire head or individually the following parts:
- piston tray,
- cover-ejector,
- tip-holder,
- piston and spring,
- connecting nut,
- clips.
Wipe only, Do not immerse.
3) Unscrew the connecting nut to separate the head from the body.
4) Take the head and remove the two screws and pull the cover-ejector
away.
5) Remove the wire clip(s), and push awards (the piston cover) to flip
upwards it.
6) Remove the tip holders and pistons.
7) Pull each piston out of each tip holder.
Upper Part (Body)
Lower Part
Pipetman P/F
Pipetman Ultra
Pipetman Ultra
Multichannel
Page 10
Decontamination Methods
Two methods are described below: the manual method, which can
be used with any part of the pipette, and the immersion method,
which is only for the parts that can be removed from the upper part
(body) of the pipette.
TT
TT
T
he body of the pipetthe body of the pipett
he body of the pipett
e must not bee must not be
e must not be
immersed in animmersed in an
immersed in an
y liquidy liquid
y liquidy liquid
y liquid
..
..
.
The manual method is quicker to perform than the immersion
method. If an ultrasonic bath is not available you can still immerse
the specified parts after cleaning them manually.
When the decontamination process is finished, you should disinfect
the empty boxes, the brushes (manual method), the ultrasonic bath
(immersion method) and the bench with a 10 % v/v sodium hypochlo-
rite solution; then rinse with water.
MM
MM
M
anual Manual M
anual Manual M
anual M
ethodethod
ethodethod
ethod
1) Wipe the body of the pipette with a tissue soaked in Aniospray 41.
2) Place the body of the pipette in a clean box.
3) Spray the other disassembled pipette parts with Aniospray 41.
4) Clean inside the tip-holder with small (soft plastic) brushes (both
parts).
5) Dispose of the O-rings and/or piston seals and any damaged parts
(after cleaning them).
6) Place the remaining clean parts from one pipette in a separate box
(identified by serial number for cross-referencing with upper part
(body).
7) Wipe with a tissue soaked in distilled water, then leave the pipettes
to dry (about 15 minutes).
II
II
I
mmersion Mmmersion M
mmersion M
ethodethod
ethodethod
ethod
1) Fill the ultrasonic bath with hot water, then add the Aniosyme P.L.A
to a concentration of 0.5 % (refer to the instructions given by Anios).
2) Place the component parts from an individual pipette in a separate
lattice-box (identified with that pipettes serial number). Put any
damaged parts from the batch of pipettes in another box and wash
them before disposing of them.
3) Place all of the lattice boxes in a lattice container.
4) Immerse the lattice container in the ultrasonic bath for 15 minutes.
5) Remove the lattice container (containing the lattice boxes and
pipette parts) from the ultrasonic bath.
Note: You may find it difficult to clean
inside the lower part of the smaller
pipettes (e.g. P2 or U2), in which case
you should either replace the part with
a new one or use an ultrasonic bath
(immersion method).
Liquid must not enter the upper
part (body) of the pipette.
Page 11
Decontamination Methods
6) Rinse the lattice container (containing the lattice boxes and pipette
parts) thoroughly with warm water (60 °C maximum).
7) Place the component parts (still in their individual lattice-boxes)
in an oven for about 30 minutes at 50 °C to 60 °C.
8) Wipe the upper part (body) of each pipette with a tissue soaked
with Aniospray 41, then wipe it with a tissue soaked with distilled
water.
9) Reunite the upper part (body) of the pipette with its component
parts by placing it in the lattice-box having the same serial number.
DD
DD
D
amaged Pamaged P
amaged Pamaged P
amaged P
arar
arar
ar
ts:ts:
ts:ts:
ts:
CC
CC
C
ontacontac
ontacontac
ontac
t yt y
t yt y
t y
our Gilson Dour Gilson D
our Gilson D
istributistribut
istributistribut
istribut
or tor t
or tor t
or t
o obtain geno obtain gen
o obtain gen
uine Gilson sparuine Gilson spar
uine Gilson spar
ee
ee
e
parpar
parpar
par
ts for ants for an
ts for ants for an
ts for an
y damaged pary damaged par
y damaged par
tsts
tsts
ts
. Y. Y
. Y. Y
. Y
our distributour distribut
our distribut
or will also be able tor will also be able t
or will also be able t
oo
oo
o
manage the sermanage the ser
manage the ser
vicing of yvicing of y
vicing of y
our pipour pip
our pipour pip
our pip
ettett
ettett
ett
eses
eses
es
..
..
.
Page 12
Associated Documents
DD
DD
D
ocumenocumen
ocumenocumen
ocumen
tsts
tsts
ts
Gilson RGilson R
Gilson RGilson R
Gilson R
efef
efef
ef
erer
erer
er
encenc
encenc
enc
ee
ee
e
Pipetman Ultra Users Guide LT801441
Pipetman P Users Guide LT801117
Pipetman F Users Guide LT801118
Pipetman 8X200 Users Guide LT801236
Pipetman Ultra Multichannel LT801462
Microman Users Guide LT801367
Distriman Users Guide LT801285
Verification Procedure for Accuracy and Precision LT802292
Page 13
Notes
World Wide Web
: www.gilson.com
E-mail
World Headquarters
Gilson, Inc.
3000 W. Beltline Hwy., P.O. Box 620027, Middleton, WI 53562-0027, USA
Telephone: (1) 800-445-7661 or (1) 608-836-1551 • Fax: (1) 608-831-4451
Gilson SAS
19 avenue des Entrepreneurs, B.P. 145
95400 Villiers-le-Bel, France
Telephone: (33) 1-34-29-50-00 • Fax: (33) 1-34-29-50-20
/