Page is loading ...

OCDWB01
OPERATORCONTROLLED
DISCHARGEFOR
W ALK-BEHINDUNITS
PartNo.4500-569Rev.A

Exmarkreservestherighttomakechangesor
addimprovementstoitsproductsatanytime
withoutincurringanyobligationtomakesuch
changestoproductsmanufacturedpreviously.
Exmark,oritsdistributorsanddealers,accept
noresponsibilityforvariationswhichmaybe
evidentintheactualspecicationsofitsproducts
andthestatementsanddescriptionscontained
inthispublication.
©2010—ExmarkMfg.Co.,Inc.
IndustrialParkBox808
Beatrice,NE68310
2
Contactusatwww.Exmark.com.
PrintedintheUSA
AllRightsReserved

Introduction
CONGRATULATIONSonthepurchaseofyour
Exmarkequipment.Thisproducthasbeencarefully
designedandmanufacturedtogiveyouamaximum
amountofdependabilityandyearsoftrouble-free
operation.
Thismanualcontainsoperating,maintenance,
adjustment,andsafetyinstructionsforyourExmark
equipment.
BEFOREOPERATINGYOURMOWER,
CAREFULLYREADTHISMANUALINITS
ENTIRETY.
Byfollowingtheoperating,maintenance,and
safetyinstructions,youwillprolongthelifeofyour
equipment,maintainitsmaximumefciency,and
promotesafeoperation.
Ifadditionalinformationisneeded,orshouldyou
requiretrainedmechanicservice,contactyour
authorizedExmarkequipmentdealerordistributor.
Exmarkpartsmanualsareavailableonlineat
http://www.exmark.com/manuals.htm.
AllExmarkequipmentdealersanddistributorsare
keptinformedofthelatestmethodsofservicing
andareequippedtoprovidepromptandefcient
serviceintheeldorattheirservicestations.They
carryamplestockofservicepartsorcansecurethem
promptlyforyoufromthefactory.
AllExmarkpartsarethoroughlytestedandinspected
beforeleavingthefactory,however,attentionis
requiredonyourpartifyouaretoobtainthefullest
measureofsatisfactionandperformance.
Wheneveryouneedservice,genuineExmarkparts,
oradditionalinformation,contactanAuthorized
ServiceDealerorExmarkCustomerService.
3

Contents
Introduction...........................................................3
Safety.....................................................................5
SafetyAlertSymbol.........................................5
SafeOperatingPractices..................................5
SafetyandInstructionalDecals.......................7
Setup......................................................................8
AssemblingDischargeDeectorto
OCDWB01.................................................8
InstallingOCDWB01onMower
Deck...........................................................8
ProductOverview................................................12
Operation.............................................................13
OpeningtheDischargeGate..........................13
ClosingtheDischargeGate............................14
RemovingtheOCDWB01.............................14
Maintenance.........................................................16
RecommendedMaintenanceSchedule(s)...........16
PeriodicMaintenance.......................................16
CheckforLooseHardware............................16
CheckDischargeGateClosure.......................16
Adjustments.....................................................16
HandleAdjustment.......................................16
DischargeGateAdjustment...........................17
Troubleshooting...................................................18
4

Safety
Safety
SafetyAlertSymbol
ThisSafetyAlertSymbol(Figure1)isusedbothin
thismanualandonthemachinetoidentifyimportant
safetymessageswhichmustbefollowedtoavoid
accidents
Thissymbolmeans:ATTENTION!BECOME
ALERT!YOURSAFETYISINVOLVED!
Figure1
1.Safetyalertsymbol
Thesafetyalertsymbolappearsaboveinformation
whichalertsyoutounsafeactionsorsituations
andwillbefollowedbythewordDANGER,
WARNING,orCAUTION.
DANGER:Whitelettering/Redbackground.
Indicatesanimminentlyhazardoussituationwhich,if
notavoided,Willresultindeathorseriousinjury.
WARNING:Blacklettering/Orangebackground.
Indicatesapotentiallyhazardoussituationwhich,if
notavoided,Couldresultindeathorseriousinjury.
CAUTION:Blacklettering/Yellowbackground.
Indicatesapotentiallyhazardoussituationwhich,if
notavoided,Mayresultinminorormoderateinjury.
Thismanualusestwootherwordstohighlight
information.Importantcallsattentiontospecial
mechanicalinformationandNoteemphasizes
generalinformationworthyofspecialattention.
SafeOperatingPractices
Training
•ReadtheOCDWB01andtractorOperator’s
Manualsandothertrainingmaterial.Ifthe
operator(s)ormechanic(s)cannotreadEnglish
itistheowner’sresponsibilitytoexplainthis
materialtothem.
•Becomefamiliarwiththesafeoperationofthe
equipment,operatorcontrols,andsafetysigns.
•Alloperatorsandmechanicsshouldbetrained.
Theownerisresponsiblefortrainingtheusers.
•Neverletchildrenoruntrainedpeopleoperate
orservicetheequipment.Localregulationsmay
restricttheageoftheoperator.
•Onlyadultsandmatureteenagersshouldoperate
amower,andevenmatureteenagersshouldhave
adultsupervision.Besureateenager:
1.hasreadandunderstandstheOperator’s
Manualandrecognizestherisksinvolved;
2.issufcientlymaturetousecaution;and
3.isofsufcientsizeandweighttooperate
thecontrolscomfortablyandtomanagethe
mowerwithouttakingrisks.
•Theowner/usercanpreventandisresponsible
foraccidentsorinjuriesoccurringtohimselfor
herself,otherpeopleorproperty.
Preparation
•Evaluatetheterraintodeterminewhataccessories
andattachmentsareneededtoproperlyand
safelyperformthejob.Onlyuseaccessoriesand
attachmentsapprovedbyExmark.
•Wearappropriateclothingincludingsafetyglasses,
substantialfootwear,longtrousers,andhearing
protection.DoNotoperatewhenbarefootor
whenwearingopensandals.
CAUTION
ThemachinethattheOCDWB01attachesto
producessoundlevelsinexcessof85dBAat
theoperator’searandcancausehearingloss
throughextendedperiodsofexposure.
Wearhearingprotectionwhenoperatingthis
machine.
•Inspecttheareawheretheequipmentistobe
usedandremoveallrocks,toys,sticks,wires,
bones,andotherforeignobjectswhichcanbe
thrownbythemachineandmaycausepersonal
injurytotheoperatororbystanders.
Operation
•Operateonlyindaylightorgoodarticiallight,
keepingawayfromholesandhiddenhazards.
•Nevermowwiththedischargedeectorraised,
removedoralteredunlessthereisagrass
5

Safety
collectionsystemormulchkitinplaceand
workingproperly.
•Stopengine,waitforallmovingpartstostop,
removekeyandengageparkingbrake:
–Beforechecking,cleaningorworkingonthe
mower.
–Afterstrikingaforeignobjectorabnormal
vibrationoccurs(inspectthemowerfor
damageandmakerepairsbeforerestarting
andoperatingthemower).
–Beforeclearingblockages.
–Wheneveryouleavethemower.
WARNING
Hands,feet,hair,clothing,oraccessoriescan
becomeentangledinrotatingparts.Contact
withtherotatingpartscancausetraumatic
amputationorseverelacerations.
•DoNotoperatethemachinewithout
guards,shields,andsafetydevicesin
placeandworkingproperly.
•Keephands,feet,hair,jewelry,orclothing
awayfromrotatingparts.
•NEVERcarrypassengers.DONOToperate
themowerwhenpeople,especiallychildren,or
petsareinthearea.
MaintenanceandStorage
•DisengagePTO,setparkingbrake,stopengine
andremovekeyordisconnectsparkplugwire.
Waitforallmovementtostopbeforeadjusting,
cleaningorrepairing.
•Usecarewhencheckingblades.Wraptheblade(s)
orweargloves,andusecautionwhenservicing
them.Onlyreplacedamagedblades.Never
straightenorweldthem.
•Keepallguards,shieldsandallsafetydevicesin
placeandinsafeworkingcondition.
•Checkallboltsfrequentlytomaintainproper
tightness.
•Frequentlycheckforwornordeteriorating
componentsthatcouldcreateahazard.
WARNING
Removingstandardoriginalequipment
parts,orusingnon-Exmarkreplacement
partsandaccessoriesmayalterthewarranty,
traction,andsafetyofthemachine.Failure
touseoriginalExmarkpartscouldcause
seriousinjuryordeath.
ReplaceallpartswithoriginalExmarkparts.
6

Safety
SafetyandInstructionalDecals
•Keepallsafetysignslegible.Removeallgrease,
dirtanddebrisfromsafetysignsandinstructional
labels.
•Replaceallworn,damaged,ormissingsafety
signs.
•Whenreplacementcomponentsareinstalled,be
surethatcurrentsafetysignsareafxedtothe
replacedcomponents.
•Ifanattachmentoraccessoryhasbeeninstalled,
makesurecurrentsafetysignsarevisible.
•Newsafetysignsmaybeobtainedfrom
yourauthorizedExmarkequipmentdealeror
distributororfromExmarkMfg.Co.Inc.
•Safetysignsmaybeafxedbypeelingoffthe
backingtoexposetheadhesivesurface.Apply
onlytoaclean,drysurface.Smoothtoremove
anyairbubbles.
•Familiarizeyourselfwiththefollowingsafetysigns
andinstructionlabels.Theyarecriticaltothesafe
operationofyourExmarkcommercialmower.
98-5954
116-1537
7

Setup
Setup
AssemblingDischarge
DeectortoOCDWB01
Inserttherodthroughthersttabonthegatelink
frame,dischargedeector,andsecondtabonthegate
linkframe(Figure2).Orientandinstallthespringso
thattheloopwillrestinthenotchonthedischarge
deector.Continuetopushtherodintothelinkage
cover.Orientandinstallthehairpinsintotheendsof
therodasshowninFigure2.
Figure2
1.Hairpin
6.Secondtab
2.Rod7.Linkagecover
3.Dischargedeector8.Spring
4.Gatelinkframe
9.Notch
5.Firsttab
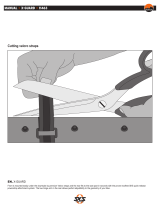
InstallingOCDWB01on
MowerDeck
For32inch,36inch,orVantagedecks:Usea
hammerandchiseltoknockoutthetab,asshownin
Figure3,beforestartingtheinstallationinstructions.
KnockingoutthetaballowstheOCDWB01frame
totproperlytothesedecks.
Figure3
1.Knockouttab
1.Flipuptheexistingdischargedeector.
Important:TheOCDWB01comeswithits
owndischargedeector.Whenusingthe
OCDWB01,Exmarkrecommendstheoriginal
dischargedeectortoremaininstalledonthe
unitandintheippedupposition.Thereare
someinstanceswheretheexistingdischarge
deectormustberemovedwheninstalling
theOCDWB01.Iftheoriginaldischarge
deectorisremovedduringtheOCDWB01
installation,retainthedischargedeector
anditshardwareforreinstallationoncethe
OCDWB01isremoved.
2.InstalltheOCDWB01assemblybyinsertingthe
mountingpinintothetubeweldedtotherear
cornerofthedeck(seeFigure4).
Figure4
1.Flipupdischargechute
3.OCDWB01assembly
2.Mountingpininserted
intodecktube
4.Rotate
3.Pivottheassemblytowardsthedeck.Thefront
pinshouldengageintotheslotinthedeckas
showninFigure5.
8

Setup
Figure5
1.Latch3.Frontpin
2.OCDWB01assembly4.Slot
•Ifthefrontpindoesnotengageintheslot
inthedeck,loosenorcompletelyremovethe
hardwareinthegatelinkframeasshownin
Figure6.Positionthegatelinkframesothat
thefrontpinalignswiththeslot.Reinstall
hardware,ifremoved,andtighten.Pivotthe
assemblytowardsthedeckandengagethe
frontpinintotheslot.
Figure6
1.Gatelinkframe4.Shim(storageposition)
2.Adjustmentslots5.Pivotmountassembly
3.Hardware
6.Shim(installedposition)
•Duetomanufacturingvariance,thegate
linkframemaynotcloseandhavecomplete
contactallaroundthedischargeopening.
Anygapsaretobeminimized.Iftherearof
thegatelinkframecontactsthemowerdeck
whilerotatingittowardsthedeckcreatinga
gapatthefront,usethestepsbelowtoinstall
ashim.Ifthegatelinkframehascomplete
contactallaroundthedischargeopening,the
shimisnotnecessary.Itcanremaininthe
storagepositionforpotentiallateruseon
othermowerdecks.
A.Removetheshimlocatedonthefrontof
thegatelinkframeandlooselyreinstall
thenut.
B.Loosenthenutontheleftadjustmentslot
ofthegatelinkframe.
C.Installtheshimbetweenthegatelink
frameandthepivotmountassembly.
Positionthecentertaboftheshim
betweenthetwomountingboltsasshown
inFigure6.
D.Tightenhardware.
4.Rotatethelatchdownwardtolocktheassembly
inthisposition(referenceFigure5).Adjustthe
tensiononthelatchtoholdtheassemblyupto
thedeck,yetallowforreleasebyhand.Tension
canbeadjustedbytighteningorlooseningthe
hardwarethatretainsthelatch.
5.Installthemountingbrackettotheunit.
•ForallWalk-BehindUnitsexceptVantage:
A.Positionthemountingbracketvertically,
withthewideopeningofthebracket
pointedupward,andinstallonthefrontof
theunitasshowninFigure7.
Figure7
1.Drill3.Mountingbracket
2.5/16-18x5/8inch
carriagebolt
4.5/16inchnylocnut
B.Usingthemountingbracketasatemplate,
markthetwoholelocationsonthefront
paneloftheunit(seeFigure7).Makesure
9

Setup
therewillberoomtotightenthenuton
theupperhole,ontheundersideofthe
frontpanel.
C.Drilltwo11/32inchdiameterholeson
thefrontpanelasshowninFigure7.
D.Alignthetwoholesinthemounting
bracketwiththefrontpaneloftheunit.
Install5/16-18x5/8inchcarriagebolt
throughtheupperholeandsecurewith
5/16inchnylocnut.
E.Insertthehandleassemblyintothe
mountingbracketasshowninFigure8.
Figure8
1.Handleassembly
3.Clevispin
2.Mountingbracket4.Hairpin
F.Inserttheclevispinthroughthehandle
assemblyhole,intothebottomholeofthe
mountbracketandthroughthefrontpanel
oftheunit.Installthehairpinthroughthe
holeontheclevispin(Figure8).
G.Ifthemowerdeckisnotequippedwith
beltshieldknobs,skiptostepH.Ifthe
deckdoeshavebeltshieldknobs,secure
theloomclipbyremovingtherearknob
onthebeltshield.Placetheloomclip
ontothebeltshieldstudandreinstallthe
knobontothebeltshield(Figure9).
Figure9
1.Knob3.Handleassemblycable
2.Loomclip
H.Usevelcrostrapstosecurethecableas
showninFigure10.
Important:Keepthecableawayfrom
heatsourcessuchasthemuferand
manifold.
Important:Beltshieldsmustbein
placebeforeoperatingtheOCDWB01.
Figure10
1.Velcrostrap
•ForVantageUnits:
A.Thebracketisinstalledontheleftside
panelwiththewideopeningpointed
towardtherearofthemachineasshown
inFigure11.
10

Setup
B.Aligntheexistingholeattherearofthe
unitwiththerightholeonthebracket.
C.Positionthebrackethorizontallyorwith
thenarrowendpointedslightlydownward.
D.Usingthemountingbracketasatemplate,
marktheleftholelocationontotheside
paneloftheunitanddrill11/32inch
diameterhole(seeFigure11).
Figure11
1.Drill3.Mountingbracket
2.5/16-18x5/8inch
carriagebolt
4.5/16inchnylocnut
E.Alignthetwoholesinthemounting
bracketwiththepaneloftheunit.Install
5/16-18x5/8inchcarriageboltand5/16
inchnylocnutintheholeontherightside.
F.Insertthehandleassemblyintothe
mountingbracketasshowninFigure12.
Figure12
1.Handleassembly
3.Clevispin
2.Mountingbracket4.Hairpin
G.Inserttheclevispinthroughthehandle
assemblyhole,intotheleftholeofthe
mountingbracket,andthroughthepanel
oftheunit.Securethehandleassembly
withhairpinasshowninFigure12.
H.Removethenutfromthefrontpanel
guard,installtheloomclip,andreplace
nutasshowninFigure13.
Figure13
1.Frontpanelguard3.Nut
2.Loomclip
I.Usevelcrostrapstosecurethecableas
showninFigure14.
Important:Keepthecableawayfrom
heatsourcessuchasthemuferand
manifold.
Important:Beltshieldsmustbein
placebeforeoperatingtheOCDWB01.
11

ProductOverview
Figure14
1.Velcrostrap2.Loomclip
ProductOverview
Figure15
1.Handle
2.Dischargegate(underdischargedeector)
3.Dischargedeector
12

Operation
Operation
Usethedischargegatetotemporarilystopordeect
grassclippingsawayfromsidewalks,parkinglots,
patios,oranywheregrassclippingsarenotdesiredto
bedischarged.Thehandleallowsthedischargegate
tobeheldinanypositionfromfullyclosedtofully
open.
Important:Makesurethemowerisinneutral
beforeoperatingthehandleofthedischarge
gate.
Important:Alwaysmowwiththedischarge
deectorinstalledandinthedownposition.
DANGER
Anuncovereddischargeopeningwillallow
objectstobethrowninanoperator’sor
bystanders’sdirection.Alsocontactwiththe
bladecouldoccur.Thrownobjectsorblade
contactcancauseseriousinjuryordeath.
Neveroperatethemowerwiththedischarge
deectorraised,removed,oralteredunless
thereisagrasscollectionsystemormulch
kitinplaceandworkingproperly.
DANGER
Therotatingbladesunderthemowerdeck
aredangerous.Bladecontactcancause
seriousinjuryorkillyou.
DoNotputhandsorfeetunderthemower
ormowerdeckwhenthebladesareengaged.
OpeningtheDischargeGate
ForallWalk-BehindUnitsexceptVantage:Rotate
thehandleupwardtoopenthegate.
Figure16
1.Rotateupward2.Handleingateopen
position
ForVantageUnits:Rotatethehandlerearwardto
openthegate.
Figure17
1.Rotaterearward2.Handleingateopen
position
13

Operation
ClosingtheDischargeGate
ForallWalk-BehindUnitsexceptVantage:Push
downonthehandletoclosethegate.
Figure18
1.Pushdown2.Handleingateclosed
position
ForVantageUnits:Pushforwardonthehandleto
closethegate.
Figure19
1.Pushforward
2.Handleingateclosed
position
RemovingtheOCDWB01
1.Removeandretainthevelcrostrapsthatsecure
thehandleassemblycabletothemower.If
installed,removeandretaintheloomclipfrom
thedeckandreplacetherearknob.
2.Removethehairpinandclevispinfromthe
handleassembly.
3.Removethehandleassembly:
•ForallWalk-BehindUnitsexceptVantage:
Slidethehandleassemblyupwardandoutof
themountingbracketasshowninFigure20.
Note:Themountingbracketdoesnothave
toberemovedfromthefrontpanel.
Figure20
1.Clevispin
3.Handleassembly
2.Hairpin4.Mountingbracket
•ForVantageUnits:Slidethehandle
assemblyrearwardandoutofthemounting
bracketasshowninFigure20.
Note:Themountingbracketdoesnothave
toberemovedfromthesidepanel.
14

Operation
Figure21
1.Handleassembly
3.Clevispin
2.Mountingbracket4.Hairpin
4.Unlocktheassemblyandpivotitawayfromthe
mowerdeck.LifttheOCDWB01outofthedeck
mountingtube.
5.Lowertheexistingdischargedeector.
Important:Reinstalltheoriginaldischarge
deectorifitwasremovedduringthe
OCDWB01installation.
6.Themachinecannowbeusedforsidedischarge
mowing.
15

Maintenance
Maintenance
Note:Determinetheleftandrightsidesofthemachinefromthenormaloperatingposition.
WARNING
Whilemaintenanceoradjustmentsarebeing
made,someonecouldstarttheengine.
Accidentalstartingoftheenginecould
seriouslyinjureyouorotherbystanders.
Removethekeyfromtheignitionswitch,
engageparkingbrake,andpullthewire(s)
offthesparkplug(s)beforeyoudoany
maintenance.Alsopushthewire(s)aside
soitdoesnotaccidentallycontactthespark
plug(s).
RecommendedMaintenanceSchedule(s)
MaintenanceService
Interval
MaintenanceProcedure
Beforeeachuseordaily
•Checkforloosehardware.
•Checkdischargegateclosure.
PeriodicMaintenance
CheckforLooseHardware
ServiceInterval:Beforeeachuseordaily
1.Stopengine,waitforallmovingpartstostop,and
removekey.Engageparkingbrake.
2.Visuallyinspectmachineforanyloosehardware
oranyotherpossibleproblem.Tightenhardware
orcorrecttheproblembeforeoperating.
CheckDischargeGate
Closure
ServiceInterval:Beforeeachuseordaily
1.Stopengine,waitforallmovingpartstostop,and
removekey.Engageparkingbrake.
2.Visuallyinspectthatthedischargegateclosesat
againstthedischargeopening.Ifnot,reshape
thedischargegatesoitclosesproperlyand
completely.
Adjustments
Note:DisengagePTO,shutoffengine,waitfor
allmovingpartstostop,engageparkingbrake,and
removekeybeforeservicing,cleaning,ormakingany
adjustmentstotheunit.
HandleAdjustment
Thehandleallowsthegatetobeheldinanyposition.
Adjustthetensionofthepivotboltandnutasshown
inFigure22formoreorlessresistance.
16

Maintenance
Figure22
1.Pivotboltandnut
DischargeGateAdjustment
Thedischargegateisproperlyadjustedintheclosed
positionwhenthedischargegateisatagainstthe
dischargeopening.
Ifthedischargegatedoesnotcloseatfollowthe
stepsbelow:
1.Stopengine,waitforallmovingpartstostop,and
removekey.Engageparkingbrake.
2.Placethehandleintheclosedposition,referto
ClosingtheDischargeGateintheOperation
section.
3.UnlocktheOCDWB01assemblyandpivotit
awayfromthemowerdeck.
4.Adjustthecablenutslocatedbehindandunder
thelinkagecover(seeFigure23).Turnnutsuntil
desiredgatepositionisachieved.
1
2
4
3
5
7
6
G012592
Figure23
1.Cablenuts
2.Linkagecover(shownhiddenforclarity)
3.Locknut
4.Pivotadjuster
5.Dischargedeector
6.Gatepivot
7.Cotterpin
5.Ifmoreadjustmentisnecessary,removethecotter
pinshowninFigure23.
6.Removethepivotadjusterfromthegatepivot.
7.Loosenthelocknut.
8.Threadthepivotadjusterforwardorbackward
untildesiredresultisachieved.
9.Tightenthelocknutandreinstallthepivot
adjusterintothegatepivotandsecurewiththe
cotterpin.
10.Repeatsteps4through9untilthedischargegate
isproperlyadjusted.
Thedischargegateisproperlyadjustedintheopen
positionwhenthegatehandlehitsthefullyopen
stopandthedischargegatemakescontact,oralmost
makescontact,withthedischargedeector.
Ifthedischargegatedoesnotopenfully,repeatsteps
4through9toreadjust.Thedischargegatewillnot
closeastightagainstthedischargeopeningafterthis
adjustmentismade.
17

Troubleshooting
Troubleshooting
Important:Itisessentialthatalloperatorsafetymechanismsbeconnectedandinproperoperating
conditionpriortomoweruse.
Thefollowingtablelistssomeofthecommoncausesoftrouble.Ifassistanceisneeded,contactyour
ExmarkServiceDealer.
ProblemPossibleCauseCorrectiveAction
1.Dischargegateisdeformed.1.Reshapethedischargegate.
2.Dischargegateisnotadjustedproperly.
2.Adjustthecablenutsand/orpivotgate.
Dischargegatedoesnotopenand/orclose.
3.Cableisdisconnectedatoneorbothends.3.Reconnectcable.
Handleistoolooseortight.
1.Pivotboltandnutnotadjustedproperly.1.Adjusttheboltandnutforproper
resistance.
18

Conditions and Products Covered
Exmark Mfg. Co. Inc. and its affiliate, Exmark Warranty
Company, pursuant to an agreement between them, jointly
warrant on the terms and conditions herein, that we will repair,
replace or adjust any part on these products and found by us
(in the exercise of our reasonable discretion) to be defective in
factory materials or workmanship for a period of 90 days.
This warranty applies to Exmark commercial attachments and
accessories sold in the U.S. or Canada. This warranty may
only be assigned or transferred to a second (or third) owner by
an authorized Exmark dealer. The warranty period commences
upon the date of the original retail purchase.
This warranty only includes the cost of parts and labor.
Items and Conditions Not Covered
This warranty does not cover the following:
• Pickup and delivery charges to and from any authorized
Exmark Service Dealer.
• Any damage or deterioration due to normal use, wear and
tear, or exposure.
• Cost of regular maintenance service or parts, such as filters,
fuel, lubricants, tune-up parts, and adjustments.
• Any product or part which has been altered or misused or
required replacement or repair due to normal wear,
accidents, or lack of proper maintenance.
• Any repairs necessary due to use of parts, accessories or
supplies, including gasoline, oil or lubricants, incompatible
with the attachment or accessory or other than as
recommended in the operator's manual or other operational
instructions provided by Exmark.
All warranty work must be performed by an authorized
Exmark Service Dealer using Exmark approved replacement
parts.
Instructions for Obtaining Warranty Service
The product must be registered with original proof of purchase
by an Exmark Service Dealer before obtaining any warranty
service.
Contact any Exmark Service Dealer to arrange service at their
dealership. To locate a dealer convenient to you, access our
website at www.exmark.com. U.S. or Canada customers may
also call 402-223-6375.
If for any reason you are dissatisfied with the Service Dealer’s
analysis or with the assistance provided, contact us at:
Exmark Customer Service Department
The Exmark Warranty Company
2101 Ashland Avenue
Beatrice, NE 68310
402-223-6375 or
Owner’s Responsibilities
If your product requires warranty service it must be returned
to an authorized Exmark service dealer within the warranty
period. This warranty extends only to commercial attachments
and accessories operated under normal conditions. You must
read the operator’s manual. You must also properly service
and maintain your Exmark product as described in the
operator’s manual or other operational instructions provided
by Exmark. Such routine maintenance, whether performed by
a dealer or by you, is at your expense.
General Conditions
The sole liability of Exmark and Exmark Warranty Company
with respect to this warranty shall be repair or replacement of
defective components as set forth herein. Neither Exmark
nor Exmark Warranty Company shall be liable for any
incidental or consequential loss or damage.
Such damages include but are not limited to:
• Expenses related to gasoline, oil or lubricants.
• Travel time, overtime, after hours time or other
extraordinary repair charges or charges relating to repairs or
replacements outside of normal business hours at the place
of business of the authorized Exmark Service Dealer.
• Rental of like or similar replacement equipment during the
period of any warranty, repair or replacement work.
• Any telephone or telegram charges or travel charges.
• Loss or damage to person or property other than that
covered by the terms of this warranty.
• Any claims for lost revenue, lost profit or additional cost as
a result of a claim of breach of warranty.
• Attorney's fees.
No Claim of breach of warranty shall be cause for cancellation
or rescission of the contract of sale of any Exmark attachment
or accessory.
All implied warranties of merchantability (that the
product is fit for ordinary use) and fitness for use (that the
product is fit for a particular purpose) are limited to the
duration of the express warranty.
Some states do not allow exclusions of incidental or
consequential damages, or limitations on how long an
implied warranty lasts, so the above exclusions and
limitations may not apply to you.
This warranty gives you specific legal rights, and you may
also have other rights which vary from state to state.
Exmark Commercial Attachments and Accessories
90 Day Limited Warranty
G4500-427_B
19

MID-MOUNT RIDING ACCESSORIES AND OPTIONS
SEE EXMARK’S COMPLETE LINE OF ACCESSORIES AND OPTIONS
WALK-BEHIND ACCESSORIES AND OPTIONS
GRASS CATCHER
MICRO-MULCH SYSTEM
TURF STRIPER
STANDON
CUSTOM RIDE SEAT SUSPENSION SYSTEM
FULL SUSPENSION SEAT
DECK LIFT ASSIST KIT
HITCH KIT
LIGHT KIT
12
V POWER PORT
MICRO-MULCH SYSTEM
OPERATOR CONTROLLED DISCHARGE
ROLL OVER PROTECTION SYSTEM (ROPS)
SUN SHADE
TRASH CONTAINER
TURF STRIPER
ULTRA VAC COLLECTION SYSTEM
ULTRA VAC QUICK DISPOSAL SYSTEM
OUT-FRONT RIDING ACCESSORIES AND OPTIONS
CUSTOM RIDE SEAT SUSPENSION SYSTEM
DUAL-TAIL WHEEL
FLOOR PAN EXTENDER
HITCH KIT
LIGHT KIT
MICRO-MULCH SYSTEM
ROLL OVER PROTECTION SYSTEM (ROPS)
SNOW BLADE
SNOWBLOWER
SUN SHADE
TRASH CONTAINER
ULTRA VAC COLLECTION SYSTEM
ULTRA VAC QUICK DISPOSAL SYSTEM
WEATHER CAB
PlaceModelNo.andSerialNo.
LabelHere(IncludedintheLiterature
Pack)orFillinBelow
DatePurchased
ModelNo.
SerialNo.
©2010ExmarkMfg.Co.,Inc.
IndustrialParkBox808
Beatrice,NE68310
AllRightsReserved
PartNo.4500-569Rev.A
(402)223-6300
Fax(402)223-5489
PrintedintheUSA
www.exmark.com
/