Page is loading ...

Uniden
App Cam Solo
Battery Powered Camera
OWNER’S MANUAL
For more exciting new products please visit our website:
Australia: www.uniden.com.au

2
IMPORTANT SAFETY INSTRUCTIONS
Damages caused by non-compliance with this Owner’s Manual will void the
warranty! We will not assume any liability for damages to items or persons
caused by improper handling or non-compliance with the safety notices! Any
warranty claim will be null and void in such cases.
• Do not drop, puncture or disassemble the camera. DO NOT expose the
camera to excessive water or moisture.
• Never tug on the power cords. Use the plug to unplug it from the outlet.
• Do not expose the camera to high temperature or leave it in direct
sunlight. Doing so, may damage the camera or cause temporary camera
malfunction.
• Use the devices with care. Avoid pressing hard on the camera body.
• For your own safety, avoid using the camera or power off the camera when
there is a storm or lightning.
• Disconnect the power adaptor during long periods between usage.
• Use only the accessories and power adaptors supplied by Uniden.
Ensure the signal reception is acceptable between the camera(s) and the WiFi
router. If necessary, reduce the distance between them to improve overall
system performance. As local internet environments may vary, your device
may indicate that the camera is disconnected or may display a black screen. If
this occurs, refresh the app.
Item Requirement/Recommendation
Internet Bandwidth 1 Mbps upload/download speed
Network Requirement WiFi or 4G (optimize download speed)
Memory Card microSD, CLASS10, up to 32GB
Device Processor 1.5GHz dual core processor or equivalent
WIRELESS DEVICES OPERATING RANGE

3
CONTENTS
IMPORTANT SAFETY INSTRUCTIONS ........................................................ 2
OVERVIEW ..................................................................................................... 4
WHAT’S IN THE BOX? ................................................................................... 5
GETTING TO KNOW YOUR CAMERA ........................................................... 6
INSTALLING THE BATTERY ......................................................................... 7
INSTALL UNIDEN SOLO APP...................................................................... 7
DEVICE MANAGEMENT............................................................................ 10
PLACING THE CAMERA ............................................................................. 17
QUICK ACCESS ICONS ............................................................................... 19
LIVEVIEW/PLAYBACK ................................................................................ 22
LIVEVIEW ................................................................................................... 22
PLAYBACK ................................................................................................. 24
ADVANCED SETTING .................................................................................. 25
PIR SENSOR SETTING ............................................................................. 25
E-MAIL SETTINGS ..................................................................................... 28
VIDEO QUALITY & ON SCREEN DISPLAY SETTING ............................. 30
DATE AND TIME SETTING ....................................................................... 33
IMPORTANT INFORMATION ..................................................................... 34
SD CARD ................................................................................................... 34
BATTERY ................................................................................................... 35
SPECIFICATION ........................................................................................... 37
WARRANTY .................................................................................................. 38

4
The App Cam Solo is a full HD, weatherproof smart camera. Completely
wirefree, the app cam is battery powered with advanced power-saving
technology featuring up to 180 days standby time. With quick and easy
installation, the camera can be placed anywhere inside or outside of the
home.
Offering a 130-degree viewing angle, which provides a greater field of vision,
the Guardian App Cam Solo can be fitted to any flat surface with an easy-to
install magnetic base. Also included is an optional screw base for those more
easy-to-reach areas, such as the front door. Cameras can be twisted to an
angle to suit any situation and easily moved around the home without the
need to re-wire or place near a power source, providing complete flexibility
when setting up viewing angles.
The App Cam Solo connects directly to the local Wi-Fi network and features
motion detection recording directly to an SD card. Users can access the App
Cam Solo with a Smart phone or tablet via the free to download Uniden Solo
app, which also provides users remote access to the cameras to check-in from
anywhere in the world. With optional app push notifications when motion or
sound is detected, users can be reassured the home is safe while at work or
on holiday.
Users can connect as many cameras as they wish in areas such as, the
driveway, garage, front and back entrances and upstairs. The camera can
even be used to check on pets or babies while in other areas of the house.
The camera features PIR motion sensor, which detects movement and will
send notifications to the user via the app. Users have the ability to two-way
talk in real time through the camera, for easy communication with visitors
including couriers, while also acting as a deterrent to unwanted guests.
The flexible, innovative Uniden App Cam Solo camera provides peace of mind
at home or while away.
OVERVIEW

5
WHAT’S IN THE BOX?
Twin Pack includes 2 single packs of AppCam Solo.
Quad Pack includes 4 single packs of AppCam Solo.
CR123A
AppCam Solo Camera
x1
Reset Needle
x1
Flat Mount
x1
Screw Mount
x1
CR 123A Batteries
x1
Screws (in pack)
x1
Stick
x1
If any item is missing or damaged, contact your place of purchase
immediately.
Never use damaged products!
Need Help? Get answers at our website:
www.uniden.com.au for Australian model

6
GETTING TO KNOW YOUR CAMERA
Micro SD Card Slot
Reset Button
Daylight Sensor
Lens
Status LED
Built-in Mic
Speaker
Flat Mount
Working Mode
App Cam Solo has two working modes:
Standby Status: The camera is in the power-saving mode; there is no live
view or motion recording.
Working Status : The camera is running at full capacity. It enters the working
status when someone is accessing the camera via Uniden Solo App or the
PIR motion sensor detects a movement.
LED Status
Color Mea
Colour Connection Status
Red WiFi Connection failed Blinking: Standby
On: Working
Blue WiFi Connection is successful Blinking: Standby
On: Working
Note: LED will flash every 20 seconds when the camera is in Standby status.
Appearance
Built-in PIR Motion Sensor

7
INSTALLING THE BATTERY
CR 12 3
A
-
+
Step 1
Step 2 Step 2
Please use the stick to
press the white button,
and then rotate to sepa-
rate the backing casing
from the camera.
Insert four batteries
into the battery slot.
Close the back cas-
ing. Please press
both end of the cas-
ing to make it close
rmly for good weath-
erproof performance.
Insert the Batteries into the Camera

8
Install Uniden Solo App
System Requirement
Uniden Solo App will run on both the Android and iOS devices.
System Requirement:
iOS devices: iOS 8.0 or higher.
Android devices: Android 3.0 or higher.
Install the App
1. Search “Uniden Solo” in App Store or Google Play, download and install the
app.
2. After successfully installed it, tap the icon to launch the Uniden Solo App.
INSTALLING THE UNIDEN SOLO APP

9
User Interface
: More Option , tap this icon to show more configuration icons.
: Help , tap to read the tips regarding camera usage and installation.
: Share the QR code, tap this icon to get the QR code/UID of the camera.
: Edit Device , tap this icon to edit the login parameters of the camera.
: Delete , tap this icon to delete the camera from the device list.
: Battery Status , tap this icon to enter the battery usage page.
/ : Push Notification, tap this icon to enable or disable Push Notification.
/ : PIR Motion Sensor, tap the button to enable or disable the PIR.
: Wi-Fi Settings, tap this icon to enter the WiFi settings page.
: Device Settings , tap this icon to enter the setup menu of the camera.
: Play , tap this icon to enter the live view page to view the video stream.
: Settings , tap this icon to enter the settings page of the App.

10
Device Management
This part will introduce how to add new device, modify the device information
and modify device login password etc.
Add New Device
You can add the camera by scanning QR code (on camera’s back) or
manually entering camera UID (below QR code).
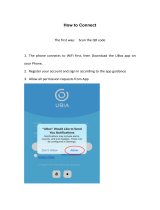
1. Tap to start.
2. Option 1: Scan the QR Code
Scan the QR code on the back of camera to continue.
Note: In the dark environment, please turn on the flashlight on your phone by
tapping .

11
Option 2: Manually Enter the UID
Tap down on the bottom to type in information.
Enter the UID of the camera in the UID field, tap “ Done ” on top right to save
the settings.
3. To configure the camera for the first time, tap to “ Set Up Camera ” and
follow the instruction to continue.
If the camera has already been configured, tap “ Access Camera ”.

12
4. Enter the login password of the camera, if there is no password yet, leave it
blank, then tap the “ Login ” button on the bottom to login the camera.
5. The camera has no password by default, but the camera will require you
to create a new password for security reason. Please name the camera and
create a password. Tap “ Create Password ” to finish.

13
6. To read the tips, slide the page to go through, or tap the “ Skip ” button on
top right to skip these tips.

14
Edit the Device Information
To modify the login information of your camera, follow the steps below:
1. Tap and choose on the screen.
2. You can change the device name in the field, then enter the login username
and password.
Tap “Save” on top right to save settings. Tap back on top left to return to the
previous page.

15
Modify Camera Login Password
To change the login password, follow the steps below:
Steps :
1. Go to “Device Settings” > “Password” > “Account Security” >
“ Password ”.
2. Enter the old password, then type in the new password and confirm, tap “
Modify Password ” to save changes.
Note: The password is between 6 and 31 characters in length, and may
consist of numbers, letters or symbols.
For your account’s security, please create a strong password (that contains
letters and numbers.

16
Delete Device
On the Devices Page, tap and choose to delete camera from the list.
Reset Camera
To rest the camera, use the provided reset needle to hold the reset button for
5 seconds. A voice prompt “ factory resets succeeds ” indicates the camera
has been reset successfully.

17
Uniden Solo Placement
Know Camera’s Field of View
The field of view of Uniden Solo is 130° diagonally. Please make sure the
monitoring area is well within its field of view.
The ideal viewing distance is 2 to 10 meters, which enables you to recognize
a human. To achieve better viewing experience, it's advised not to place the
camera too far away or too high from designated monitoring areas.
PLACING THE CAMERA

18
Understand the Detecting Field of the PIR Motion Sensor
The PIR motion sensor is more sensitive to side-to-side movement than
movement heading straight toward the camera or away from the detection
area of the PIR motion sensor.
For example, when a person moves straight toward the camera, the PIR
motion sensor will be less sensitive to the movement.
Note: To get the best performance of the camera, please make sure the
camera is mounted well within the coverage of your wireless network.
Camera Placement Dos & Don’ts
For reducing False alarms, please note that :
● Do not install the camera facing any objects with bright lights, including
sunlight and bright lamp lights.
● Do not place the camera too close to a place where many vehicles move
frequently; 15 meters away from the vehicle is the recommended distance
based on our numerous tests.
● Stay away from the outlets, including the air conditioner vents, humidifier
outlets, the heat transfer vent of projectors, etc.
● Do not install the camera facing the mirror/glass.
● Keep the camera at least 1 meter away from any wireless devices, including
Wi-Fi routers and phones in order to avoid wireless interference.

19
QUICK ACCESS ICONS
Quick Access Shortcut
On the Devices page, there are several icons which allow you to tweak
camera settings quickly.
Disable/Enable Push Notification
Tap the Push icon to enable or disable Push Notification, means Push
Notification is enabled while means not enabled.
Note: You need to allow Uniden Solo App to send you notifications on your
device.
Go to “Settings” > “ Notifications ” on your smartphone, and then click Uniden
Solo App to allow notifications.
Disable/Enable PIR/Audio Alarm/E-mail
Tap on the main screen, the following menu will come up.
● To disable the PIR motion sensor, please tap the PIR icon to turn it off.
● To disable the audio alarm, tap the Siren icon to disable it.
● To disable Email alert, tap the Email icon.
● Tap the Schedule icon to enter the PIR Schedule Settings
● Tap the More icon to enter the Alarm Settings menu.

20
Wi-Fi Settings
To set up the camera for the first time, follow the voice prompt to configure.
If you want to modify the WiFi settings of the camera, please follow the steps
below:
1. Tap to enter the “ Wi-Fi Settings ” page.
2. Tap on the Wi-Fi network you want to join, enter the password of the Wi-Fi
network.
3. Tap the Save icon on the top right to save settings.
Note : The WiFi password should be within 31 characters.
/